


 When they don't work my pass-key/alarm does not work & does not lock my doors

Door Ajar Switch

Thread Starter
Intermediate

Joined: May 2009
Posts: 44
Likes: 0
Whenever it gets hot out, the LH door ajar switch stops working properly. I have to wiggle it around to get the radio to turn off. How can I clean it or otherwise make it function properly?
Drifting

Joined: Aug 2009
Posts: 1,615
Likes: 3
From: Tampa Fl
I bought one from the dealer 30 bucks and it stuck,took it back and used a hacksaw on mine on both sides ,split it apart and cleaned it with brake cleaner than JB welded it back together.this was about 10 months ago and still working good.I only did this because i need one and didn't want to wait.
Team Owner


Joined: Oct 2000
Posts: 96,443
Likes: 9
From: Fort Knox, KY
Cruise-In IV Veteran
Cruise-In VI Veteran
Cruise-In VII Veteran
Cruise-In VIII Veteran
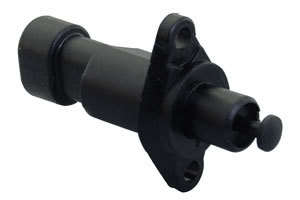
Typically, the nipple/plunger device on the end of the switch is what goes bad. I replaced mine with a new switch from the dealer and it cured my problem. The switch on the passenger side was faulty, causing my alarm to go off after the ignition was off and the car was parked.
Safety Car


Joined: Jul 1999
Posts: 3,559
Likes: 207
From: Olathe KS
Sprayed my '85's with WD40 and seems to have relieved the stickiness (for now).
Use the spray "snorkel tube", let soak for several minutes, then work the switch in and out several times by hand.
-CKB
Use the spray "snorkel tube", let soak for several minutes, then work the switch in and out several times by hand.
-CKB
Slingshot

Joined: Dec 2001
Posts: 3,817
Likes: 24
From: Charlotte NC
Replaced mine with these a couple of years back & they have worked fine ever since. 
http://www.ecklers.com/corvette-door...1985-1987.html
http://www.ecklers.com/corvette-door...1985-1987.html
Pro


Joined: Jul 2005
Posts: 741
Likes: 37
From: Athens, GA

Typically, the nipple/plunger device on the end of the switch is what goes bad. I replaced mine with a new switch from the dealer and it cured my problem. The switch on the passenger side was faulty, causing my alarm to go off after the ignition was off and the car was parked.
Anyone else run into this?
Steven
Corvette Stories
The Best of Corvette for Corvette Enthusiasts

Top 10 Most Expensive Corvettes Ever Sold on Bring A Trailer
Brett Foote
10 Things Every Corvette Owner Needs (2026 Edition)
Michael S. Palmer
8 Most "Only Corvette Owners Understand" Quirks and Problems
Pouria Savadkouei
10 Reasons the C6 Z06 is Still A Performance Benchmark After 20 Years
Joe Kucinski
How Much Horsepower Every Corvette Engine "LOST" in 1972
Joe Kucinski
Top 10 DOs and DON'Ts for Protecting Your Convertible Top!
Michael S. Palmer
Top 10 Most Explosive Corvettes Ever Made: Power-to-Weight Ratio Ranked!
Joe Kucinski
150 hp to 1,250 hp: Every Corvette Generation Compared by the Specs That Matter
Joe Kucinski
8 Coolest Corvette Pace Cars (and Replicas) of All Time
Verdad GallardoSafety Car
Joined: Sep 2006
Posts: 4,129
Likes: 1
From: Pasadena CA
My driver's side started to go. I spray some silicon lubricant in there and whack it in and out a few times- sorts it out. If it gets worse I will swap it with the passenger side one as obviously it gets much less use
Pro
Joined: May 2006
Posts: 637
Likes: 0
Look real close to the tip, you should be able to get in a small putty knife (back side) or the smallest screwdriver you can find and pry the tip out.
Pro
Joined: Jul 2005
Posts: 741
Likes: 37
From: Athens, GA
Pro
Joined: May 2006
Posts: 637
Likes: 0
Better of buying a new one or try to pry out the tip as mentioned in the prev. reply to "oldcorvettefan".
Pro
Joined: May 2006
Posts: 637
Likes: 0
If the internals of the switch are still OK.
Pry/pull out the tip for lets say 4 mm or 1/6th of an inch, and spray just a little WD 40 on the larger "****" where the pin sits in, because that is the actual switch.
It�s plastic in plastic and wears over time and will not slide in and out that easy.
Now you have pre/adjusted the switch, when you close the door now, the small pin is the first thing that hits the door post, thereby pushing in the switch enough so the electronic circuit in the switch closes.
When you open the door again, you will notice that the pin is pushed in in the larger **** again.
Now it is adjusted as it should be, the reason for this is that weatherstrips wear out and get thinner over time.
If you had a solid switch with no "adjustable" pin, you will end up with a switch that doesn�t close after a while.
In short you could call this small pin an adjuster pin.
If you did this and the radio still doesn�t switch off after you release the ignition key followed by opening the door, then the switch�s internals are most likely shot, wich isn�t repairable.
Only thing to do is to buy a new one, they aren�t that expensive and are not that hard to replace either.
Last edited by vette079; Jul 28, 2010 at 02:58 PM.
Pro
Joined: Jul 2005
Posts: 741
Likes: 37
From: Athens, GA
If the internals of the switch are still OK.
Pry/pull out the tip for lets say 4 mm or 1/6th of an inch, and spray just a little WD 40 on the larger "****" where the pin sits in, because that is the actual switch.
It�s plastic in plastic and wears over time and will not slide in and out that easy.
Now you have pre/adjusted the switch, when you close the door now, the small pin is the first thing that hits the door post, thereby pushing in the switch enough so the electronic circuit in the switch closes.
When you open the door again, you will notice that the pin is pushed in in the larger **** again.
Now it is adjusted as it should be, the reason for this is that weatherstrips wear out and get thinner over time.
If you had a solid switch with no "adjustable" pin, you will end up with a switch that doesn�t close after a while.
In short you could call this small pin an adjuster pin.
If you did this and the radio still doesn�t switch off after you release the ignition key followed by opening the door, then the switch�s internals are most likely shot, wich isn�t repairable.
Only thing to do is to buy a new one, they aren�t that expensive and are not that hard to replace either.
Pry/pull out the tip for lets say 4 mm or 1/6th of an inch, and spray just a little WD 40 on the larger "****" where the pin sits in, because that is the actual switch.
It�s plastic in plastic and wears over time and will not slide in and out that easy.
Now you have pre/adjusted the switch, when you close the door now, the small pin is the first thing that hits the door post, thereby pushing in the switch enough so the electronic circuit in the switch closes.
When you open the door again, you will notice that the pin is pushed in in the larger **** again.
Now it is adjusted as it should be, the reason for this is that weatherstrips wear out and get thinner over time.
If you had a solid switch with no "adjustable" pin, you will end up with a switch that doesn�t close after a while.
In short you could call this small pin an adjuster pin.
If you did this and the radio still doesn�t switch off after you release the ignition key followed by opening the door, then the switch�s internals are most likely shot, wich isn�t repairable.
Only thing to do is to buy a new one, they aren�t that expensive and are not that hard to replace either.
I just kept looking at the new part, the old part, and visualizing my new part breaking the first time I closed the door.
Thanks!
Steven
Pro
Joined: May 2006
Posts: 637
Likes: 0
Pretty much, yes.
Before you close the door with the new part, be sure the wider **** moves freely in the switch, and see to it that the small pin only sticks out about 4 millimeters or so.
Be sure you have one for a 1994 model, the one back in post 4 (onedef92).
How are your weatherstrips?
Did you replace them recently?
In that case the plunger/small pin doesn�t push in that far compared to old strips, because they (new strips) are a little thicker.
Safety Car
Joined: Jul 1999
Posts: 3,559
Likes: 207
From: Olathe KS
Yes...at least you do on an '85...in order to re-position the metal plate behind the fiberglass that the visible screws go into as well as undo the single pair wire connector.
Pro
Joined: May 2006
Posts: 637
Likes: 0
There is a retainer on the inside of the door, that one you don�t want to loose track of, this is from the FSM:
Remove or disconnect,
1. Negative batt. cable
2. Lower screw. Replace with longer screw (Gm p/n 11503397 or equivalent started into retainer.
3. Upper screw.
4. Pull switch outward and rotate switch to expose upper screw hole.
5. Reinstall upper screw to hold retainer.
6. Remove lower screw.
7. Pull switch outward and depress harness lock tab to allow passage of switch and harness through opening.
8. Switch from harness.
Install or Connect,
1. Switch to harness.
2. Switch and harness into door.
3. Long screw through switch and lower door screw hole into retainer.
4. Remove upper screw.
5. Rotate switch and install upper screw through switch into retainer.
6. Remove longer screw.
7. Install original lower screw.
Done.