


Opti-Spark Installation Question

Thread Starter
Intermediate

Joined: Feb 2011
Posts: 36
Likes: 0
From: Chagrin Falls Ohio
96 Vette LT1, 5.7L VIN P. I'm thinking about replacing the Opti-Spark distributor my self. This will be the first time I've ever done this. My Chilton repair manual instructions don't really bother me too much, except the part that says: "remove the engine front mounting nuts and raise the engine enough so that I can access the crankshaft balancer (damper) with a puller tool", this one sounds major and makes me a bit nervious. Must the engine be raised to remove the balancer? Is there any other method I could use without having to raise the engine? Any other tips would be appreciated. I will also replace my water pump while I'm at it. Tku, Bob
Racer

Joined: Aug 2008
Posts: 301
Likes: 17
From: Toronto Ontario
96 Vette LT1, 5.7L VIN P. I'm thinking about replacing the Opti-Spark distributor my self. This will be the first time I've ever done this. My Chilton repair manual instructions don't really bother me too much, except the part that says: "remove the engine front mounting nuts and raise the engine enough so that I can access the crankshaft balancer (damper) with a puller tool", this one sounds major and makes me a bit nervious. Must the engine be raised to remove the balancer? Is there any other method I could use without having to raise the engine? Any other tips would be appreciated. I will also replace my water pump while I'm at it. Tku, Bob
Just remember that if you choose to do it this way, don't just hit the damper in one spot or it will never come loose. You have to rotate. Hit the damper a few times on the left side (for example) then hit it a few times on the right side and then back to the left etc. etc.
The trick is to try and keep the damper "straight". If all you do is hit it on one spot, it will never slide off the hub. Be sure to use a block of wood though, as you don't want to hit the damper directely with the hammer or you'll risk damaging the damper. The wood is there to absorb the sharp impact of metal-to-metal contact and keep the damper from breaking with the impact.
Of coarse, you can always just use a puller, but as you already know, you'd have to jack up the motor for clearance...
I wrote up a little "how-to" last year in regards to replacing an optispark. Mine's a '92 so it's not identical to the 96. There are a couple minor differences between the two (different optispark design, water-pump housing etc.) but it should be close enough to give you a rough idea of what to expect. Anything else you're not clear on, I'm sure the Chilton book will guide you through it...
As long as you have some basic tools and above all, PATIENCE, you should be just fine. I've done enough of these swaps over the years on both mine and friends' cars, that I can do the job with my eyes closed by now

Check my signature for a link to the write-up.
Hopefully it might help you out a bit.

Last edited by LT1*C4; Feb 25, 2011 at 01:55 PM.
Burning Brakes

Joined: Feb 2009
Posts: 785
Likes: 3
From: Richmond Virginia
You don't have to use a puller tool to remove the damper if you don't want to. It's not essential to complete the job. Most guys just use a ball-peen hammer and a block of wood and hit the back of the damper until it's finally free. At least, that's how I've always done it and have never had an issue.
Just remember that if you choose to do it this way, don't just hit the damper in one spot or it will never come loose. You have to rotate. Hit the damper a few times on the left side (for example) then hit it a few times on the right side and then back to the left etc. etc.
The trick is to try and keep the damper "straight". If all you do is hit it on one spot, it will start never slide off the hub. Be sure to use block of wood though, as you don't want to hit the damper directely with the hammer or you'll risk damaging the damper. The wood is there to absorb the sharp impact of metal-to-metal contact and keep the damper from breaking with the impact.
Of coarse, you can always just use a puller, but as you already know, you'd have to jack up the motor for clearance...
I wrote up a little "how-to" last year in regards to replacing an optispark. Mine's a '92 so it's not identical to the 96 (different optispark design) but it should give you a rough idea of what to expect.
As long as you have some basic tools and above all, PATIENCE, you should be just fine. I can do these swaps with my eyes closed by now
Check my signature for a link to the write-up.
Hopefully it might help you out a bit.
 --sometimes a little PB blaster or some type of penetrating oil where the balancer slides over the hub can be helpful.
Thread Starter
Intermediate
Joined: Feb 2011
Posts: 36
Likes: 0
From: Chagrin Falls Ohio
You don't have to use a puller tool to remove the damper if you don't want to. It's not essential to complete the job. Most guys just use a ball-peen hammer and a block of wood and hit the back of the damper until it's finally free. At least, that's how I've always done it and have never had an issue.
Just remember that if you choose to do it this way, don't just hit the damper in one spot or it will never come loose. You have to rotate. Hit the damper a few times on the left side (for example) then hit it a few times on the right side and then back to the left etc. etc.
The trick is to try and keep the damper "straight". If all you do is hit it on one spot, it will never slide off the hub. Be sure to use a block of wood though, as you don't want to hit the damper directely with the hammer or you'll risk damaging the damper. The wood is there to absorb the sharp impact of metal-to-metal contact and keep the damper from breaking with the impact.
Of coarse, you can always just use a puller, but as you already know, you'd have to jack up the motor for clearance...
I wrote up a little "how-to" last year in regards to replacing an optispark. Mine's a '92 so it's not identical to the 96. There are a couple minor differences between the two (different optispark design, water-pump housing etc.) but it should be close enough to give you a rough idea of what to expect. Anything else you're not clear on, I'm sure the Chilton book will guide you through it...
As long as you have some basic tools and above all, PATIENCE, you should be just fine. I've done enough of these swaps over the years on both mine and friends' cars, that I can do the job with my eyes closed by now
Check my signature for a link to the write-up.
Hopefully it might help you out a bit.
Bob
Le Mans Master


Joined: Mar 2001
Posts: 7,999
Likes: 14
From: Life is just one big track event. Everything before and after is prep and warm-up and cool-down laps
Cruise-In III Veteran
Cruise-In IV Veteran
St. Jude Donor '12
When I removed my balancer I had a helper, plugs out of engine.
He would wach a few times, I'd rotate the engine using the hub bolt 90*
Then he would wack a few times, I'd rotate the engine.
IIRC it took 2 1/2 revolutions to get it off.
When you put it back on use some anti-seize on the hub so it will be easier when you have to do it again.
Longest part of the job is draining coolant and removing the water pump.
Drifting

Joined: Aug 2009
Posts: 1,615
Likes: 3
From: Tampa Fl
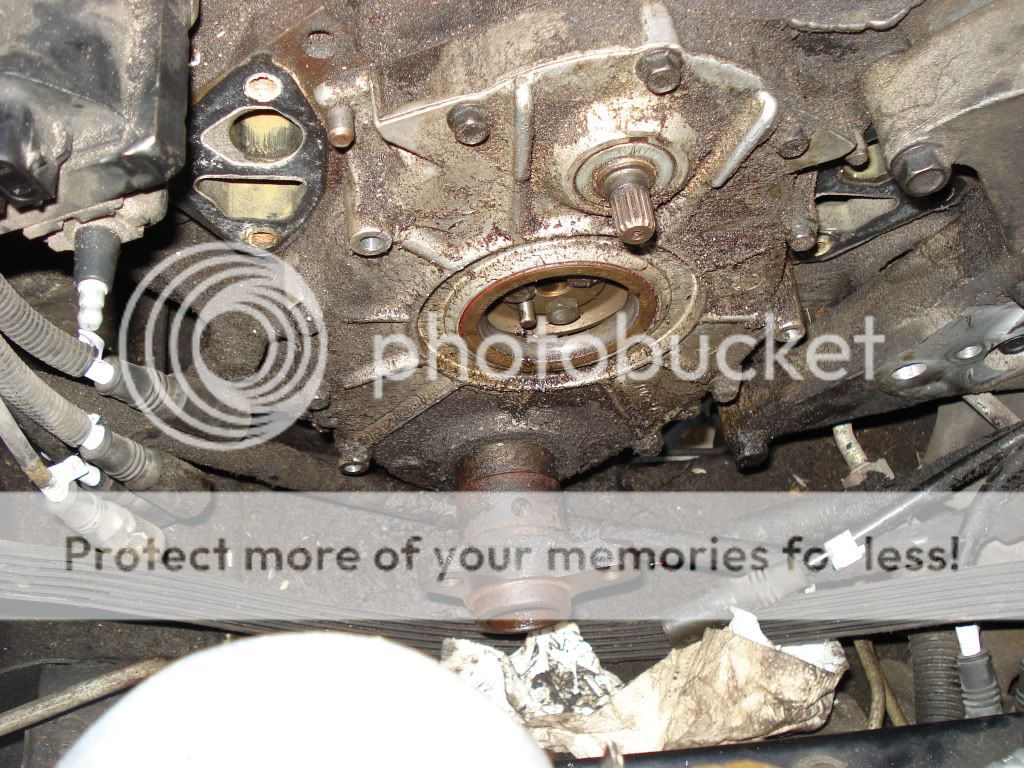
I modified a puller and did mine.I tried the whacking methode with no luck.
No you do not have to raise the engine, there is a loop in the line for the rack and pinon to get a puller to the balancer.
job is easy after the balancer is pulled,
Just remember use antiseize on the hub so next time it will come right off.
yes I know it's dirty
get new seals for the opti and w/p and replace them.Read up on the w/p seal install so you don't get a leak
Thread Starter
Intermediate
Joined: Feb 2011
Posts: 36
Likes: 0
From: Chagrin Falls Ohio
I modified a puller and did mine.I tried the whacking methode with no luck.
No you do not have to raise the engine, there is a loop in the line for the rack and pinon to get a puller to the balancer.
job is easy after the balancer is pulled,
Just remember use antiseize on the hub so next time it will come right off.
yes I know it's dirty
get new seals for the opti and w/p and replace them.Read up on the w/p seal install so you don't get a leak
captbob
Drifting

Joined: Aug 2004
Posts: 1,327
Likes: 5
From: 2010 C6 Grand Sport Convertible
Wow....now someone at the General was actually thinking about us poor shadetree guys when they engineered that rack line. Kudos! Now if I could only get my camshaft out without pulling the radiator?
Mike
Mike
Corvette Stories
The Best of Corvette for Corvette Enthusiasts

Top 10 Most Expensive Corvettes Ever Sold on Bring A Trailer
Brett Foote
10 Things Every Corvette Owner Needs (2026 Edition)
Michael S. Palmer
8 Most "Only Corvette Owners Understand" Quirks and Problems
Pouria Savadkouei
10 Reasons the C6 Z06 is Still A Performance Benchmark After 20 Years
Joe Kucinski
How Much Horsepower Every Corvette Engine "LOST" in 1972
Joe Kucinski
Top 10 DOs and DON'Ts for Protecting Your Convertible Top!
Michael S. Palmer
Top 10 Most Explosive Corvettes Ever Made: Power-to-Weight Ratio Ranked!
Joe Kucinski
150 hp to 1,250 hp: Every Corvette Generation Compared by the Specs That Matter
Joe Kucinski
8 Coolest Corvette Pace Cars (and Replicas) of All Time
Verdad GallardoDrifting
Joined: Aug 2009
Posts: 1,615
Likes: 3
From: Tampa Fl
It was not easy I took a 4 inch puller from autozne,cut the legs in half and drilled new holes for the bolts.
It was't easy getting it on the pulley,I had to put one claw on the put the bolt in where I couln't see because now the legs don't swing open.The make a puller for this and I think it's about 60 bucks which would be much easier.
When I got the balancer off I sanded the inside so it would slide back on.
The opti would now be a gravy job and only take about 2 hours to complete.
why your there do your plug wires.You will have to loosen and pull the power steering pump out about an inch to get the wires thru the drivers side.
Good luck and remember use thread sealer on the W/P bolts.
Some people try cranking the engine a few times to loosen the pulley,make sure the bolts are back in at least 3 turns if you try this.
Last edited by tblt44; Mar 1, 2011 at 08:13 PM.

Thread Starter
Intermediate
Joined: Feb 2011
Posts: 36
Likes: 0
From: Chagrin Falls Ohio
Really appreciate your input tblt44, every bit of knowledge helps when your doing this job for the first time. I think I'll start with the wacking method then move on to the modified puller if need be, hope not. In the pic of your modified puller, it looks as though there are only two jaws, or is that just an illusion? I was wondering just where you hooked the claws, thought maybe there are slots in the pulley or something else to hook on to. Have you ever tried that cranking the engine- loose pulley bolt method? Does that really work? My vette is a 96 with about 52,000 miles on her and no winter driving, super clean engine, so hopefully the pulley is not too rusted on. The pulley might be a bit different from yours, don't know yet. I'll definitely change my spark plugs and wires while I'm at it, I didn't know to pull the power stearing pump out a bit, for access, thanks for that tip. Gotta wait for the weather to warm up here in Cleveland before I begin this project, so I have some time to get all my ducks in a row. Thanks much, take care, captbob33
Thread Starter
Intermediate
Joined: Feb 2011
Posts: 36
Likes: 0
From: Chagrin Falls Ohio
Hey LT1*C4, just read your write-up on the Opti/ Water Pump Installation and wanted to commend you on a super article, big big help there guy. I have a few Q's, if you don't mind:
1) What is the name of that green anti-freeze you used when you swapped out the Dex-Cool, and what's the best method to flush all the Dex-Cool out of the system, including the engine, which you know, doesn't really drain by gravity.
2) In your pics of the water pump mounting bolts, coated with pipe-joint compound, I see that you have them pretty well gooped up. I was just wondering; when you screw these bolts in, much of the pipe-joint compound will ooze in-between the gasket and engine mounting surface. Is that detrimental to the sealing of the gasket? I was thinking of first mounting the warer pump with two uncoated bolts, one on each side just to snug it into position, then insert the remaining four coated bolts and tighten, then remove the two uncoated bolts, coat them and re-tighten them. My thinking is that this will prevent the joint compound from getting trapped between the gasket and engine mounting surface. What do you think?
3) How do you know that Water-Wetter really helps? Did you use two bottles? I'm not to keen on using additives.
OK, that's about all. Thanks for your help guy. Take care, captbob33
Racer
Joined: Aug 2008
Posts: 301
Likes: 17
From: Toronto Ontario
Hey LT1*C4, just read your write-up on the Opti/ Water Pump Installation and wanted to commend you on a super article, big big help there guy. I have a few Q's, if you don't mind:
1) What is the name of that green anti-freeze you used when you swapped out the Dex-Cool, and what's the best method to flush all the Dex-Cool out of the system, including the engine, which you know, doesn't really drain by gravity.
1) What is the name of that green anti-freeze you used when you swapped out the Dex-Cool, and what's the best method to flush all the Dex-Cool out of the system, including the engine, which you know, doesn't really drain by gravity.
The coolant that was emptied out prior to the optiswap, was actually just straight water with a bottle of water wetter added. You can see in one of the picture's I posted that the coolant coming out of the radiator had a slight reddish colour to it. That's the colour the water changes to when you mix in a bottle of water wetter to it.
During the colder month's, I run a 50/50 water + antifreeze mix to keep the water from freezing inside the block during the winter. I've always used the old style green coolant in the past, but that time I noticed my dad had some of that Dex-Cool stuff laying around so I decided to try it.
Later when I found out about the issues people have had with the orange Dex-Cool, I quickly drained it from the car and filled it with the usual green antifreeze (Prestone).
I actually used my shop-vac to aid in the process of flushing out the Dexcool. The vac has a "blower" setting and I just stuffed the end of the hose into the coolant expansion tank and held it there and blew air into the system until no more coolant exited the radiator drain opening. (Be sure to have a bucket/pail by under the rad opening when you do this to catch all the coolant).
Then I re-installed the drain plug, filled the entire system with water, removed the drain plug once again and let the system drain itself a second time. Again, with the help of the shop-vac blowing air into the system.
Basically, I repeated this process 3-4 times until all the water coming from the radiator was clean/clear. That's when I knew all the Dexcool had been flushed out. It took a while to get there, but I had to be sure.
All those horror-stories of Dexcool had me paranoid.
2) In your pics of the water pump mounting bolts, coated with pipe-joint compound, I see that you have them pretty well gooped up. I was just wondering; when you screw these bolts in, much of the pipe-joint compound will ooze in-between the gasket and engine mounting surface. Is that detrimental to the sealing of the gasket? I was thinking of first mounting the warer pump with two uncoated bolts, one on each side just to snug it into position, then insert the remaining four coated bolts and tighten, then remove the two uncoated bolts, coat them and re-tighten them. My thinking is that this will prevent the joint compound from getting trapped between the gasket and engine mounting surface. What do you think?
For the record, the only reasons I apply the compound to begin with, is so that it prevents the bolts from getting seized over time. This makes makes removing them in the future, a much easier job. Also, when you're removing the bolts, the compound helps prevent the remaining antifreeze that's still inside the block, from leaking out past the threads and making a mess all over the floor.
With the compound on the threads, you can loosen all the bolts to the point where they're only attached by 2-3 threads, and the compound will prevent the antifreeze from leaking past the threads and onto your hands/floor.
The compound was only put on for those reasons. It's just a little something I like to do, but by no means is it "required" to do the job. It's up to you. I see nothing wrong with the method you've described and if it works for you, all the better.


Having said that, a good long while ago (going back at least 10 years now
 ) - A friend of mine had actually picked up 2 bottles of that water-wetter stuff and later found out he only needed to add one.
 He gave me the extra one and told me to try it. Like I said, I've never been a fan of any kind of "snake-oils" or "mechanic-in-a-bottle" additives, but he swore his engine ran cooler with the stuff.

I was planning on changing my coolant in the spring anyway, so it probably wouldn't hurt anything.
Wouldn't you know it, the darndest thing happened after pouring a bottle of that stuff into my radiator. The car consistently ran 10-15 degrees cooler in all driving conditions.

Ever since then, I add a bottle of the stuff every time I change my coolant. It's never hurt anything before and I've been using in for the past decade.

Last edited by LT1*C4; Mar 4, 2011 at 09:01 AM.
Thread Starter
Intermediate
Joined: Feb 2011
Posts: 36
Likes: 0
From: Chagrin Falls Ohio
So, I finished the job just yesterday. With all your help, all went well. I ended up replacing the water pump, T-stat (180*), coolant temp sensor, opti-spark, spark plugs, plug wires, serp belt, upper & lower radiator hoses, pressure cap, and ignition coil. All parts were OEM Delco except the opti which was Delphi. Don't trust aftermarket parts made in China too much. I removed the two knock sensors to drain the block, no problem. The job went well, except the harmonic ballancer was a bear to get off. First tried wacking with a piece of wood, the wood kept splitting apart and couldn't really get solid hit on the ballancer so I went with a brass rod, 1" dia, 18" long and that did the trick, that baby popped right off. Also had difficulty removing the water pump bolts. When I bought the car, the previous owner told me he had the water pump replaced. Well it seems the mechanic use some type of loctite on the bolts. They were so tight I thought they were going to break off when I tried to remove them, so I decided to heat the bolt heads with a torch, that did the trick and I finally got them out. Get this, the mechanic who replaced the water pump got one of the opti vacumn hoses clamped between the water pump mounting flange and the block. So, after time that hose finally blew out and that's where my problems first started. That's where my coolant was leaking from. The coolant must have leaked right into that vacumn hose and right down into the opti because when I removed the opti it was flodded with anti-freeze, poured out all over the place, couldn't believe it! Well after all part were replaced, just touched the key starter and wala, she fired right up. All was good, no leaks, runs like a bear. Couldn't have done this job without all your help, so thanks to those who gave me their advice.
My only concern now is that my coolant temperature is running about 15* hotter than it use to both at highway and stop & go traffic, don't know just why. I'm thinking that air is still trapped in the cooling system
and I don't know how to bleed it out. I opened the bleed valve on top of the T-stat housing until I got a solid stream of coolant, but that was all I did to bleed the system. Do I need to do more? Another concerned is that the coolant does not transfer to the recovery tank when engine gets hot, like it's suppose to. The pressure cap is new and the line is not plugged. I'm guessing that there is air trapped in the system and when the coolant heats up and expands, it is compressing the trapped air and not building to the 15 psi required to open the pressure cap and allow transfer to the recovery tank, not sure. Any suggestions?
Thinking about adding that Water Wetter stuff. Any thoughts?
Well, thanks again to all,
captbob33
Last edited by captbob33; Apr 17, 2011 at 02:05 PM. Reason: Adding comments