


Home built ram air?
Racer

Joined: Oct 2011
Posts: 312
Likes: 0
From: state of insanity
At what speed is a ram air effective. At what point is it worth the time and effort. Seems to me all c-4 already have factory ram air of somesort. As an old drag racer i to experimented with fresh air.i had two hoods,did not notice an et change until 140 mph or faster or 9.70s. Ended up running the flat hood no scoop. Car looked cleaner and the sleeper look shocked everybody

Racer


Joined: Jul 2006
Posts: 420
Likes: 1
From: Zolton NJ
I did a write up some time ago but it seems to have been lost on the forum. I will try to explain the process in steps
The reason I did this modification was to get more cool air to my air to air intercooler for my supercharger. The air to air intercooler sits in front of my radiator and pre heats the air going to the radiator. The supercharger kit came with a diverter to split the air coming from the factory air dam so that half is diverted to the air to air intercooler and the other half to the radiator. I needed cool air into the air to air intercooler.
I looked at the forced air intake and for what they wanted for the kit, at the time it was $450.00, I thought I could do something similar for next to no cost.
Tools needed:
1. Dremmel (or similar tool) I recommend Sears brand (some of the kits come with attachments).
2. Flex shaft attachment (looks like a dental tool attachment)
3. Drill bit that fit�s the flex shaft attachment
4. Cutting wheels (thin that fit the above attachment about the size of a silver dollar, they are sold in packs)
5. Lead pencil or white correction pen
6. Shop light or flash light
7. Painters tape
The tools pay for themselves after just this one job considering the $450.00 cost previously mentioned.
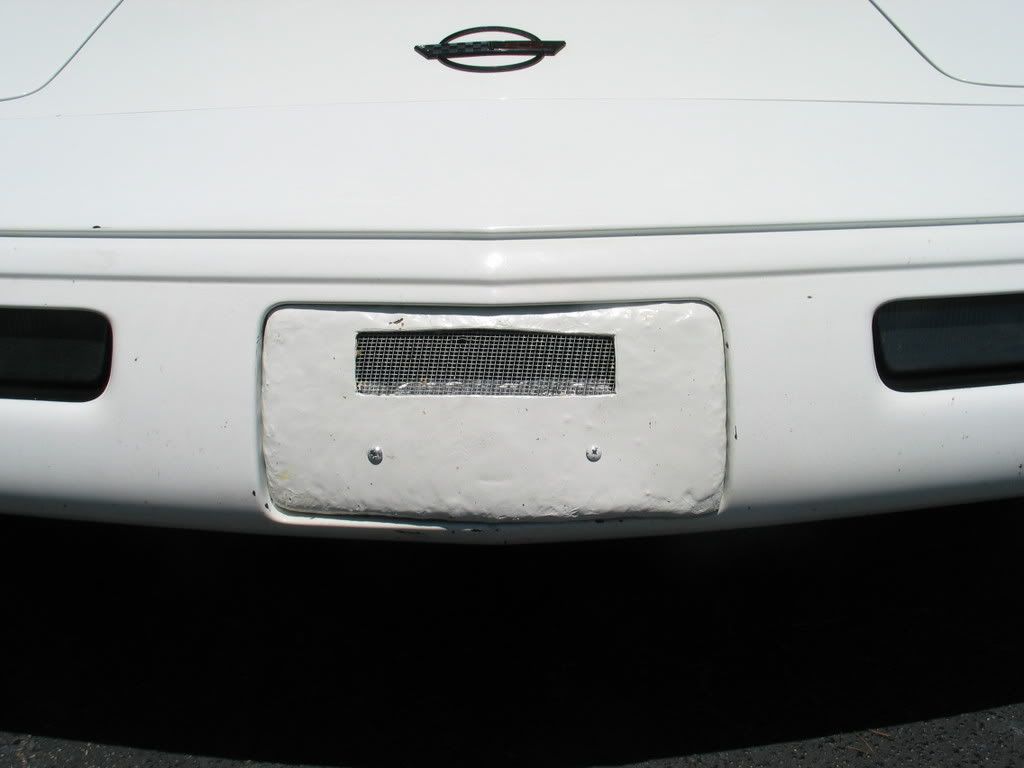
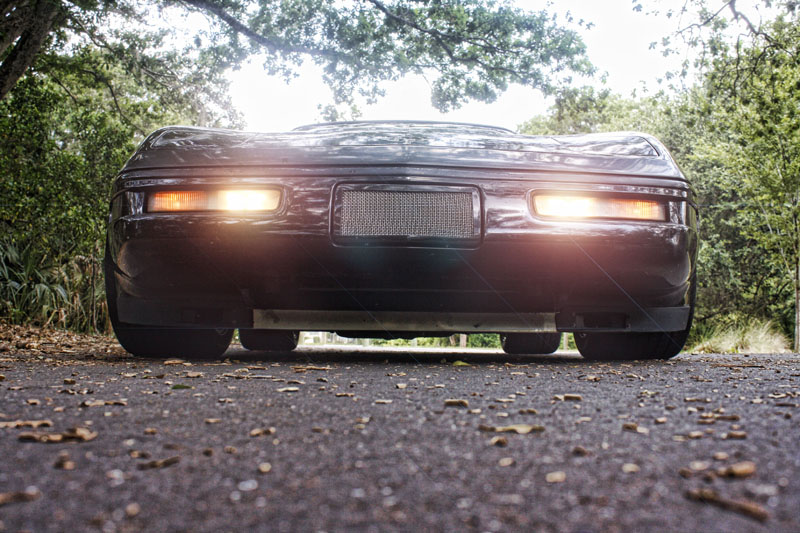
I took the filler plate with the Corvette name and taped it off with masking tape. I wanted to keep the name and make a cross hair. This helps the plate from flexing. I used a dremmel (Sears brand) with the flex shaft and cutting wheel. Take your time cut a little less at first you can trim more after the initial cuts. You will be essentially cutting out four squares. As a side note I drew up several patterns and this simple one allowed the most air to pass through. You can also dress it up with ss or aluminum screening behind the plate when you are finished. I was looking for maximum air flow.
Next trace your license plate attached to your factory attachment points. Remove plate. IMPORTANT - I left the tabs for the license plate bolts in place if ever I should have to mount the plate. I then used the cutting wheel to cut out the plastic behind the plate leaving the mounting points in place. Try to take our in one piece in case you should want to put back in place in the future.
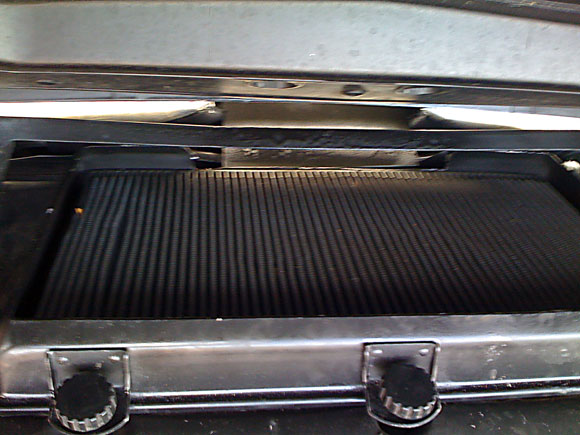
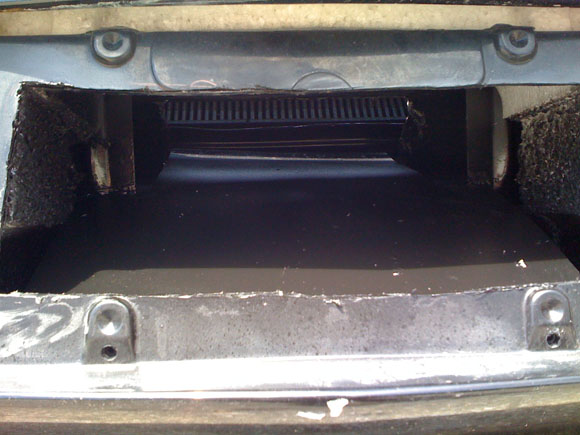
Now you will be facing a grid or egg crate plastic bumper enforcement. Using the dental attachment with the cutting drill bit and cutting wheel remove the section of material behind the license plate. The grid material is gray in color. I painted everything remaining black.
The next step use the light to look inside the opening. You should see a black steel bar(DO NOT CUT). You will be cutting the area underneath it. I placed a small thin board in front of the air to air intercooler as a safety, it was not needed. I then proceeded to use the flex shaft with the drill bit and made an outline of roughly a upside down triangle. Take your time and take a few brakes. I then just connected the holes with the bit until that piece was removed. If you wanted you could use some flex hose to the air filter cover from the opening giving you the forced air you were looking for.
Taking your time it should not take more than a few hours. You will also have the pride of telling someone you did the job your self. It is not a difficult process, I thought it was a fun Saturday project. It did help to cool things down for my supercharger.
I hope this helps. If you look at my pictures you will see a close up of the front plate filler and the parts removed from the bumper. Good luck! Let me know if I can be of further assistance.
I believe once you have selected the tubing you will use you could affix it to the air filter cover with some adhesive. Check out your local plumbing department and I am sure something will come to mind.


The reason I did this modification was to get more cool air to my air to air intercooler for my supercharger. The air to air intercooler sits in front of my radiator and pre heats the air going to the radiator. The supercharger kit came with a diverter to split the air coming from the factory air dam so that half is diverted to the air to air intercooler and the other half to the radiator. I needed cool air into the air to air intercooler.
I looked at the forced air intake and for what they wanted for the kit, at the time it was $450.00, I thought I could do something similar for next to no cost.
Tools needed:
1. Dremmel (or similar tool) I recommend Sears brand (some of the kits come with attachments).
2. Flex shaft attachment (looks like a dental tool attachment)
3. Drill bit that fit�s the flex shaft attachment
4. Cutting wheels (thin that fit the above attachment about the size of a silver dollar, they are sold in packs)
5. Lead pencil or white correction pen
6. Shop light or flash light
7. Painters tape
The tools pay for themselves after just this one job considering the $450.00 cost previously mentioned.
I took the filler plate with the Corvette name and taped it off with masking tape. I wanted to keep the name and make a cross hair. This helps the plate from flexing. I used a dremmel (Sears brand) with the flex shaft and cutting wheel. Take your time cut a little less at first you can trim more after the initial cuts. You will be essentially cutting out four squares. As a side note I drew up several patterns and this simple one allowed the most air to pass through. You can also dress it up with ss or aluminum screening behind the plate when you are finished. I was looking for maximum air flow.
Next trace your license plate attached to your factory attachment points. Remove plate. IMPORTANT - I left the tabs for the license plate bolts in place if ever I should have to mount the plate. I then used the cutting wheel to cut out the plastic behind the plate leaving the mounting points in place. Try to take our in one piece in case you should want to put back in place in the future.
Now you will be facing a grid or egg crate plastic bumper enforcement. Using the dental attachment with the cutting drill bit and cutting wheel remove the section of material behind the license plate. The grid material is gray in color. I painted everything remaining black.
The next step use the light to look inside the opening. You should see a black steel bar(DO NOT CUT). You will be cutting the area underneath it. I placed a small thin board in front of the air to air intercooler as a safety, it was not needed. I then proceeded to use the flex shaft with the drill bit and made an outline of roughly a upside down triangle. Take your time and take a few brakes. I then just connected the holes with the bit until that piece was removed. If you wanted you could use some flex hose to the air filter cover from the opening giving you the forced air you were looking for.
Taking your time it should not take more than a few hours. You will also have the pride of telling someone you did the job your self. It is not a difficult process, I thought it was a fun Saturday project. It did help to cool things down for my supercharger.
I hope this helps. If you look at my pictures you will see a close up of the front plate filler and the parts removed from the bumper. Good luck! Let me know if I can be of further assistance.
I believe once you have selected the tubing you will use you could affix it to the air filter cover with some adhesive. Check out your local plumbing department and I am sure something will come to mind.
Race Director


Joined: Jun 2004
Posts: 13,963
Likes: 709
From: WI
It's fairly straight forward to build. Mod the front plate, use Great Stuff or whatever, to seal off inside the bumper area. This simplifies the project, you aren't making a tube. Then inclose the filter, from the bumper. The ram air effect will be very minor unless speeds are very high. It is more of a looks mod since these cars already have cold air. It may be useful in reducing frontal area. I think it's a waste of time with the stock air bridge also, it turns so many times and is small in cross section.
Team Owner

Joined: Aug 2005
Posts: 34,988
Likes: 515
From: Riverside County Southern California
Co-winner 2020 C4 of the Year - Modified
2018 Corvette of Year Finalist
2017 C4 of Year
2016 C7 of Year Finalist
St. Jude Donor '09 thru '20
Le Mans Master

Joined: Sep 2006
Posts: 6,050
Likes: 147
From: Phoenix AZ
2021 C4 of the Year - Modified Finalist
It would seem to me that using smaller parking lights and turning the inboard areas into the scoops would give you more than just the single center scoop. I have begun looking for smaller parking/driving lights that I can use there. I do not like the little round driving lights that they used on the C5. They look totally out of place.
Corvette Stories
The Best of Corvette for Corvette Enthusiasts

Top 10 Most Expensive Corvettes Ever Sold on Bring A Trailer
Brett Foote
10 Things Every Corvette Owner Needs (2026 Edition)
Michael S. Palmer
8 Most "Only Corvette Owners Understand" Quirks and Problems
Pouria Savadkouei
10 Reasons the C6 Z06 is Still A Performance Benchmark After 20 Years
Joe Kucinski
How Much Horsepower Every Corvette Engine "LOST" in 1972
Joe Kucinski
Top 10 DOs and DON'Ts for Protecting Your Convertible Top!
Michael S. Palmer
Top 10 Most Explosive Corvettes Ever Made: Power-to-Weight Ratio Ranked!
Joe Kucinski
150 hp to 1,250 hp: Every Corvette Generation Compared by the Specs That Matter
Joe Kucinski
8 Coolest Corvette Pace Cars (and Replicas) of All Time
Verdad Gallardo
Safety Car


Joined: Apr 2011
Posts: 3,660
Likes: 22
There IS an alternative that does NOT require the butchering of the energy pad or bumper cover...
Visualize the stock air cleaner box upside down so the air filter is on the underside....
Then all that is required is an opening in the top radiator shroud for the filter box to sit in, with a seal around the edges.
The air-box that contains the condensor and radiator is designed as a "high pressure" area to draw air in for the cooling AND to duct some up to the air intake in an indirect way. By placing the air filter box face down,. you put the intake in that high pressure area. As long as the air-dam is intact and the car is in motion the high pressure area stays charged with positive pressure thats absorbed by the intake thru the filter and the radiator pulling the rest back into the engine bay where its exhausted below and supposedly thru the side louvers...
It takes a little fabrication and some effort. I did this yrs ago on another C4 I had. The only other mod was a baffle that was mounted in the airstream to duct more air against the filter box. This acted like a "spliter" and had to be adjusted so the radiator did not starve for air at lower speeds. All you wanted was enough of a lip to catch some of the flow and aim it at the filter box.
I also used 3" tubes in a different design that ran from the MAF to a big cone filter that was mounted inside the air-box that that worked well, but it crowded the air-box area a LOT and was a PITA to access the filter....and it needed regular service with the big increase in air flow also comes a BIG increase in DIRT in the filter,.That was a super clean, nice set-up. Just a single tube that ran from the MAF to a hole in the top shroud and then disappeared. Clean. But too crowded down below.
Laying the stock square filter into an opening flat on the shroud solved all the problems and yeilded the results I was looking for. A ram effect with minimal butchery. Only downside was the cutting of the air filter box to flip the filter upside down was not very pretty. If someone wanted to take the time it would not be impossible to make it nice with fiber glass or even a sheet metal housing to hold a K&N face down. All you;re looking to do is get the intake/filter in a high pressure area. That air-box handles that if you can access the air-stream and not starve the radiator....not too difficult.
Last edited by leesvet; Dec 3, 2011 at 08:43 PM.
Racer

Joined: Sep 2010
Posts: 379
Likes: 0
From: Kingsland GA
I once put a ram air setup on an 84 and it did make a noticeable 1-2 car length differerence(or maybe the other guy forgot how to drive).
Anyways, sheet metal, rivets and aluminum dryer duct was my route. My skills were more beginner level at the time. Under the front bumper is a nice area for dual rectangular scoops. If you like your design you can always refine it with fiberglass. Try to take into consideration the way air flows over your car at speed. A lot of scoops are on the hood, and when you think about the way air flows, not much air will enter those scoops. The design that uses the license plate area is reasonable if you don't need a license plate. I would actually widen it up and go with a mesh vice louvered cover if it were mine. I may actually work on a design of my own in a few years, if my car needed to be any faster.
Anyways, sheet metal, rivets and aluminum dryer duct was my route. My skills were more beginner level at the time. Under the front bumper is a nice area for dual rectangular scoops. If you like your design you can always refine it with fiberglass. Try to take into consideration the way air flows over your car at speed. A lot of scoops are on the hood, and when you think about the way air flows, not much air will enter those scoops. The design that uses the license plate area is reasonable if you don't need a license plate. I would actually widen it up and go with a mesh vice louvered cover if it were mine. I may actually work on a design of my own in a few years, if my car needed to be any faster.
Le Mans Master


Joined: Mar 2000
Posts: 8,950
Likes: 4
From: Lafayette LA
Here is what I had on my track car. I cut everything out behind the front plate area, so incoming air had a strait shot at the open element filter (cut lid).

Smaller side ducts were for front brake cooling, oil cooler, and power steering cooler.


Smaller side ducts were for front brake cooling, oil cooler, and power steering cooler.
Racer
Joined: Sep 2011
Posts: 445
Likes: 11
From: Indiana

No lie. I hit a cement wall doing 80 in a c4 with no seatbelt on and got out and walked away. Then cried about my car.
Safety Car
Joined: Aug 2006
Posts: 4,147
Likes: 452
From: Port St. Lucie West Florida


Safety Car

Joined: Dec 2009
Posts: 4,363
Likes: 430
From: Birmingham Al
Being an old school Hot Rodder It's nice to see people trying to make these C-4 a better ride. Most parts people have just given up on the C-4 ..Just me... but the C-4 I think could be the 57-Chevy or the SS for today..Just need some parts we can aford to buy ..These are not Z-6s don't need $1,400+ headers ...Thanks Dyno Don L for steeping up ..good C-4 Hot Rod parts at a good price...
Team Owner

Joined: Aug 2004
Posts: 21,543
Likes: 3,216
From: Park City Utah
Not to say that *I* wouldn't chop a small, insignificant hole in the bumper for fresh air...but I REALLY don't think that w/s frame will support the car. No way.
Team Owner
Joined: Aug 2004
Posts: 21,543
Likes: 3,216
From: Park City Utah
^That is not right. The C4 (and 5 & 6) all have under-hood, "hot air" intake, with absolutely zero deliberate ducting to create either a ram air effect, OR a cold air.
This is right^. The benefits of the thru-the-bumper "Ram" air, is that you are getting the best air source available; higher off the asphalt than the other options and no radiant radiator/condenser heat in the vicinity. 


 Definitely lowers the wind drag coefficient.
Drifting

Joined: Aug 2010
Posts: 1,704
Likes: 8
sometime ago i did some 3d previsual using 3dmax,that is a CAD aplication,it requires a fiberglassing work on the hood,some guys did it.It consists in creating a some sort of naca in front connected inside directly with the maf by inserting in between an air filter,just an idea:
[IMG]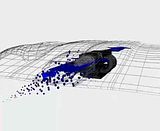 [/IMG]
[IMG]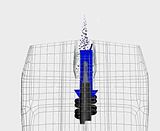 [/IMG]
[IMG]
[/IMG][IMG]
[/IMG]