


'96 Heater Core Replacement
Thread Starter
Racer

Joined: Jan 2006
Posts: 323
Likes: 4
From: McKinney Texas
Since there are lots of threads out there talking about the Fastguy method of changing out early C4 heater cores, I thought I would put one together for us late C4 guys.
After reading through all the threads, I was dreading replacing my leaking heater core. The service manual is vague at best.
The total job took about seven hours, and was not that difficult. Very doable for your average shade-tree mechanic.
Since I was trying to document this during the process, I may have missed a step or got things in the wrong order. If you have some insights, please add them to the thread.
Quick tips:
1) When doing any work around airbags, disconnect the battery and let the car sit for awhile. I do not know how long, but I would wait at least 30 minutes.
2) Normally if I was working under the dash I would remove the seat, but I found it more helpful to sit/lay on, so I would not remove it.
3) I find it helpful to take lots of digital pictures so I can remember how it all looked. I also make little post-it-notes saying which screws went where, and put them in containers with the hardware.
Good luck.
Tools Needed:
1/4 inch ratchet
Short and long socket extensions
T15 star wrench
7mm sockets (deep and regular - most bolts are these)
10mm socket
7/32 socket (for the gold colored bolts around the heater box)
10mm end wrench
Channel Locks
Phillips screw driver
Flathead screw driver (for popping off the covers)
Steps:
1) Remove the fuse cover
2) Remove the three T15 star bolts holding the plate around the fuse panel

3) Remove the three 7mm bolts holding the dash and lower dash panel

4) Remove the center cover on the passenger side vents by gently using a screw driver to pry it off

5) Remove the two T15 star bolts holding the passenger side vents to the dash, and remove the vent assembly

6) Remove the three 10mm nuts holding the lower panel to the dash: Note for reassembly - the lower plate tabs are immediately below the nuts


7) Gently pull out the lower dash panel and set it aside. Note the little tabs that you have to gently pry around the studs


8) Remove the two T15 star bolts holding the center vents to the dash, and remove the vent assembly
9) Remove the two T15 star bolts holding the left side vent to the dash, and remove the vent assembly
10) Remove the defrost grill by gently prying the side closest to the seats, lift it up and back, disconnect the wire and set it aside
Not sure how the console removal differs from an automatic car, but here are the instructions for a manual:
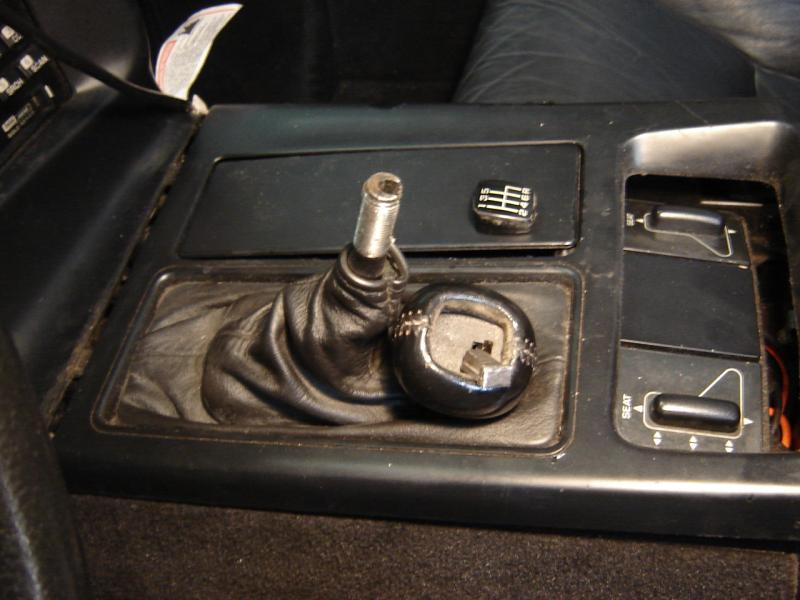
11) Remove the gear indicator on the top of the shifter by gently prying it up with a screwdriver

12) Remove the metal pin locking in the shift **** by gripping the crap out of it and pulling like a madman
13) Remove the shift **** by unscrewing it
14) Remove the three or four 7mm bolts holding the compartment lid on, and set it back (did not disconnect the wiring)
15) Pull back the carpet in the compartment, and unscrew the two 7mm bolts holding the front console piece in place
16) Remove the 7mm bolts in the cupholder area and you should be able to slide the front piece over the shift lever high enough to unplug the cigarette lighter and set the piece aside
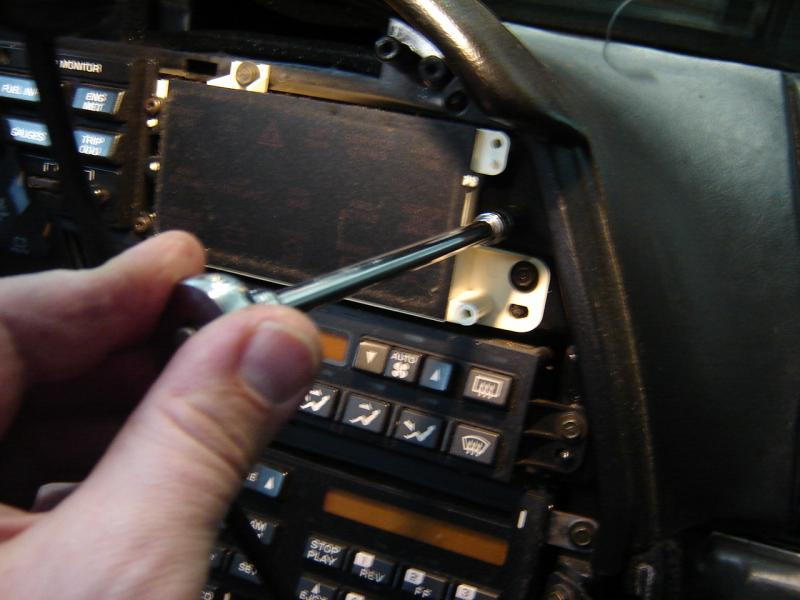
17) Remove the three bolts holding the radio (etc.) cover and set it aside

18) Remove the two 7mm bolts holding the dash by the defrost hole

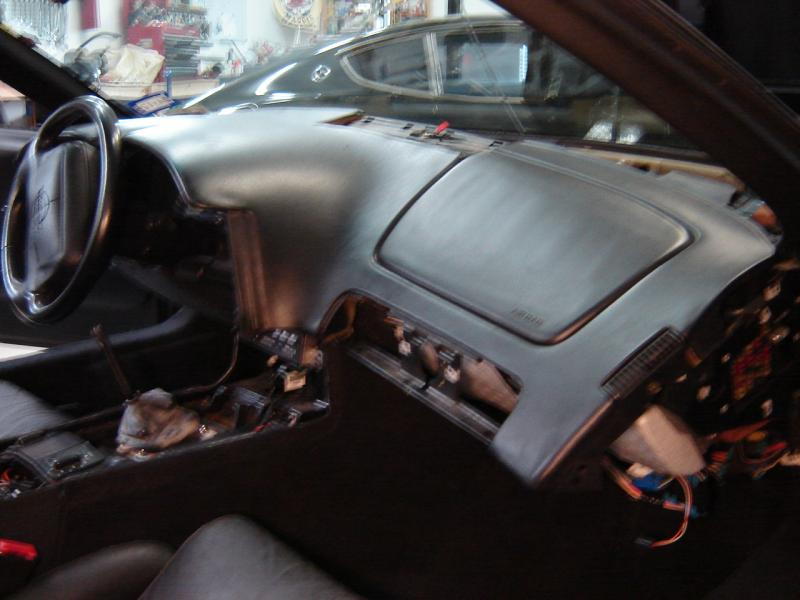
19) Remove the three 7mm bolts (these are shorter, about 5/8 thread deep) holding the dash, one at about 10pm behind the wheel, one at 2pm, and one in the center stack (pictured)
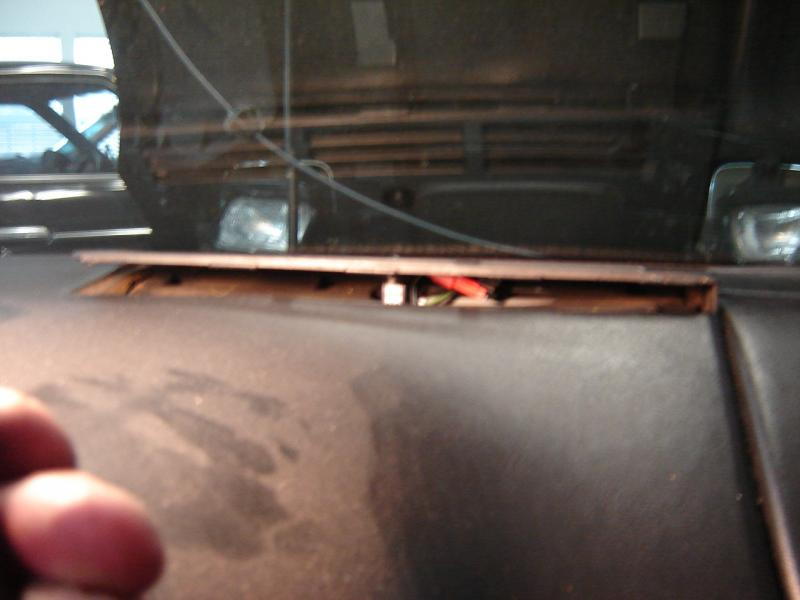
20) Gently pry the dash away from all the studs (near where you removed the bolts) and you should be able to lift up on it. It took me a little time, but I started on the passenger side, and was able to pick the dash up (from the seat side) and away from the windshield. Little scary, but it eventually popped out. The picture of the dash underside shows the location of the four clips holding the dash under the windshield. Once loose, set it aside.
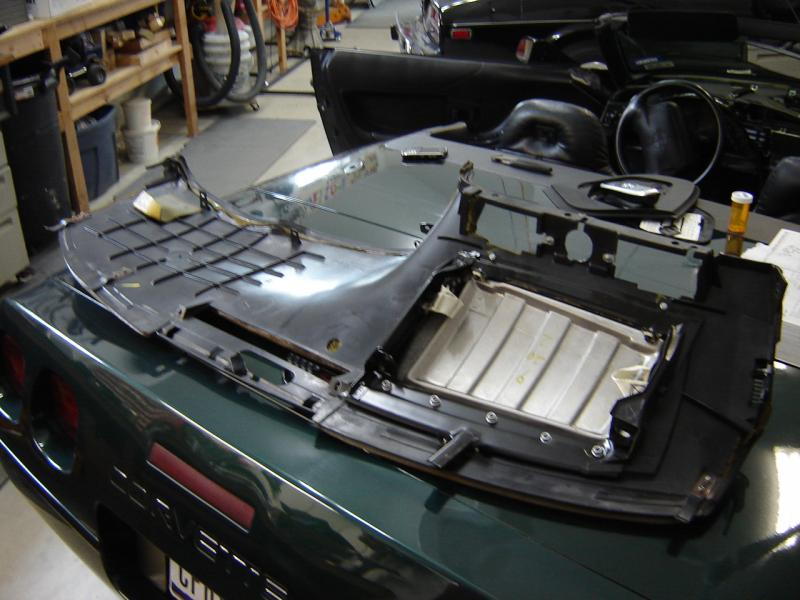
21) Remove the four 10mm bolts holding the airbag assembly into place, pull the blue electrical connector retainer, disconnect the electrical connection, and set the whole assembly aside.

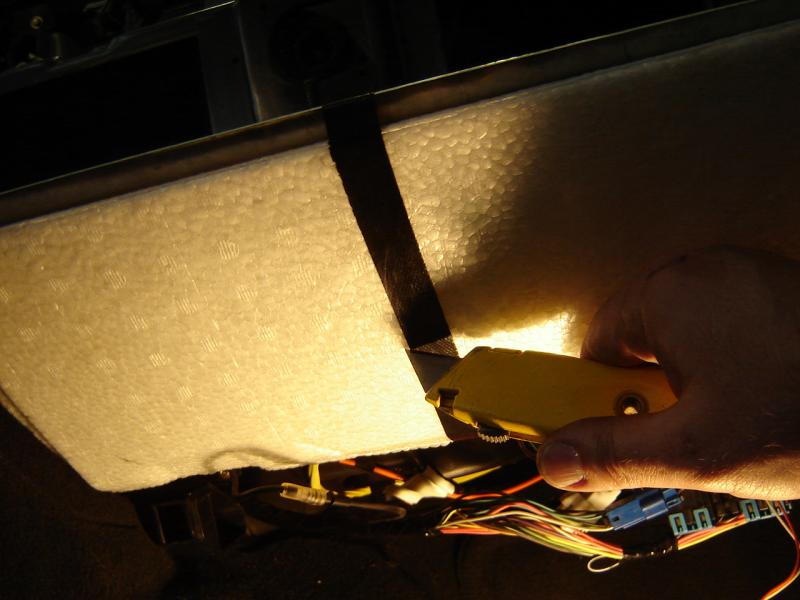
22) Cut the black tape holding the Styrofoam pad on the underside of the dash and set the pad aside
23) Remove the four 10mm bolts holding the metal plate behind the pad, and set the plate aside (10mm ratcheting end-wrench handy for the left side of this)

24) Start taking lots of pictures of the electrical connections. Most of them can only connect with one other end, but the two big blue ones are the same. Plus you will want pictures of the zip-ties so they can be redone

25) Disconnect all the connectors so you can get the wiring out of the way
26) Remove the two 10mm nuts on the left, and the two 10mm bolts on the right holding the electrical carrier. You will also have to cut the zip-ties to get it all out of your way. There is a lot to this step, but work carefully and you will be able to clear a path to the heater box

These next few steps take some looking and monkeying around, but not too bad.
27) Remove the two gold colored 7/32 bolts holding the heater box, on its left side, to the defrost area
28) Remove the five gold colored 7/32 bolts holding the heater box halves together. The picture is of the backside as the frontside one did not come out.

29) Remove the two 7mm bolds holding the side defrost duct to the heater box
30) Enjoy working the heater box half out and set it aside
31) Open the hood, and remove the two 7mm bolts and two 10mm bolts holding the radiator expansion tank in place, and set it out of the way
32) Slide the hose clamps down the heater hose, and work the hoses free. You may spill some coolant, so elevate the hoses once you get them off
33) Remove one of both of the 7mm (might be 7/32) bolts on the bottom heater core hold-down strap

34) Remove the 7mm (might be 7/32) bolt on the upper heater core hold-down strap
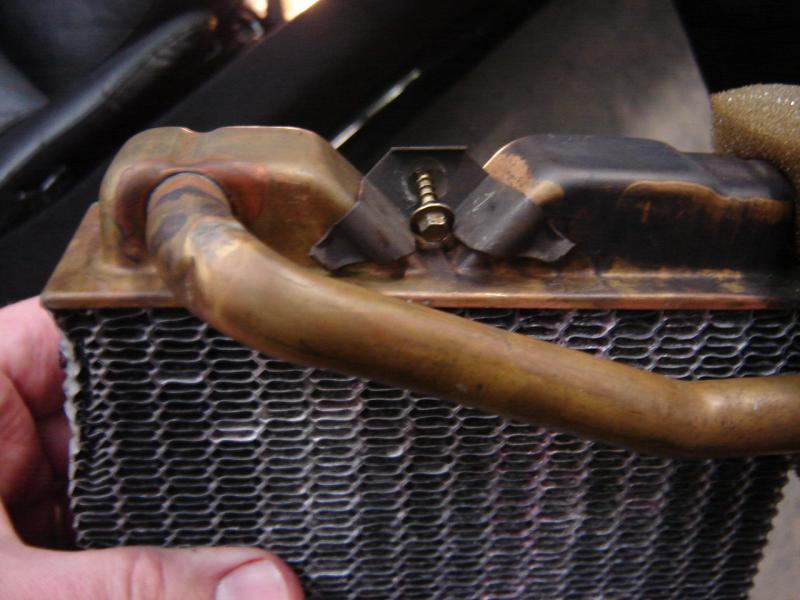
35) Remove the heater core
Reassembly is just the reverse, and went fairly well. Make sure you pressure test the new heater core before putting everything back together (I went to AutoZone and used their pressure tester from the lend a tool program).
After reading through all the threads, I was dreading replacing my leaking heater core. The service manual is vague at best.
The total job took about seven hours, and was not that difficult. Very doable for your average shade-tree mechanic.
Since I was trying to document this during the process, I may have missed a step or got things in the wrong order. If you have some insights, please add them to the thread.
Quick tips:
1) When doing any work around airbags, disconnect the battery and let the car sit for awhile. I do not know how long, but I would wait at least 30 minutes.
2) Normally if I was working under the dash I would remove the seat, but I found it more helpful to sit/lay on, so I would not remove it.
3) I find it helpful to take lots of digital pictures so I can remember how it all looked. I also make little post-it-notes saying which screws went where, and put them in containers with the hardware.
Good luck.
Tools Needed:
1/4 inch ratchet
Short and long socket extensions
T15 star wrench
7mm sockets (deep and regular - most bolts are these)
10mm socket
7/32 socket (for the gold colored bolts around the heater box)
10mm end wrench
Channel Locks
Phillips screw driver
Flathead screw driver (for popping off the covers)
Steps:
1) Remove the fuse cover
2) Remove the three T15 star bolts holding the plate around the fuse panel
3) Remove the three 7mm bolts holding the dash and lower dash panel
4) Remove the center cover on the passenger side vents by gently using a screw driver to pry it off
5) Remove the two T15 star bolts holding the passenger side vents to the dash, and remove the vent assembly
6) Remove the three 10mm nuts holding the lower panel to the dash: Note for reassembly - the lower plate tabs are immediately below the nuts
7) Gently pull out the lower dash panel and set it aside. Note the little tabs that you have to gently pry around the studs
8) Remove the two T15 star bolts holding the center vents to the dash, and remove the vent assembly
9) Remove the two T15 star bolts holding the left side vent to the dash, and remove the vent assembly
10) Remove the defrost grill by gently prying the side closest to the seats, lift it up and back, disconnect the wire and set it aside
Not sure how the console removal differs from an automatic car, but here are the instructions for a manual:
11) Remove the gear indicator on the top of the shifter by gently prying it up with a screwdriver
12) Remove the metal pin locking in the shift **** by gripping the crap out of it and pulling like a madman
13) Remove the shift **** by unscrewing it
14) Remove the three or four 7mm bolts holding the compartment lid on, and set it back (did not disconnect the wiring)
15) Pull back the carpet in the compartment, and unscrew the two 7mm bolts holding the front console piece in place
16) Remove the 7mm bolts in the cupholder area and you should be able to slide the front piece over the shift lever high enough to unplug the cigarette lighter and set the piece aside
17) Remove the three bolts holding the radio (etc.) cover and set it aside
18) Remove the two 7mm bolts holding the dash by the defrost hole
19) Remove the three 7mm bolts (these are shorter, about 5/8 thread deep) holding the dash, one at about 10pm behind the wheel, one at 2pm, and one in the center stack (pictured)
20) Gently pry the dash away from all the studs (near where you removed the bolts) and you should be able to lift up on it. It took me a little time, but I started on the passenger side, and was able to pick the dash up (from the seat side) and away from the windshield. Little scary, but it eventually popped out. The picture of the dash underside shows the location of the four clips holding the dash under the windshield. Once loose, set it aside.
21) Remove the four 10mm bolts holding the airbag assembly into place, pull the blue electrical connector retainer, disconnect the electrical connection, and set the whole assembly aside.
22) Cut the black tape holding the Styrofoam pad on the underside of the dash and set the pad aside
23) Remove the four 10mm bolts holding the metal plate behind the pad, and set the plate aside (10mm ratcheting end-wrench handy for the left side of this)
24) Start taking lots of pictures of the electrical connections. Most of them can only connect with one other end, but the two big blue ones are the same. Plus you will want pictures of the zip-ties so they can be redone
25) Disconnect all the connectors so you can get the wiring out of the way
26) Remove the two 10mm nuts on the left, and the two 10mm bolts on the right holding the electrical carrier. You will also have to cut the zip-ties to get it all out of your way. There is a lot to this step, but work carefully and you will be able to clear a path to the heater box
These next few steps take some looking and monkeying around, but not too bad.
27) Remove the two gold colored 7/32 bolts holding the heater box, on its left side, to the defrost area
28) Remove the five gold colored 7/32 bolts holding the heater box halves together. The picture is of the backside as the frontside one did not come out.
29) Remove the two 7mm bolds holding the side defrost duct to the heater box
30) Enjoy working the heater box half out and set it aside
31) Open the hood, and remove the two 7mm bolts and two 10mm bolts holding the radiator expansion tank in place, and set it out of the way
32) Slide the hose clamps down the heater hose, and work the hoses free. You may spill some coolant, so elevate the hoses once you get them off
33) Remove one of both of the 7mm (might be 7/32) bolts on the bottom heater core hold-down strap
34) Remove the 7mm (might be 7/32) bolt on the upper heater core hold-down strap
35) Remove the heater core
Reassembly is just the reverse, and went fairly well. Make sure you pressure test the new heater core before putting everything back together (I went to AutoZone and used their pressure tester from the lend a tool program).
Burning Brakes


Joined: Nov 2009
Posts: 828
Likes: 103
From: Olney MD
Thanks! I'm looking forward to doing something similar to get my Air conditioning working again (non-functioning Blend door).
Just one question- Can you see the blend door motor as you're doing this?
That's what I have to replace, and I'm planning to follow these steps until I get to that part - and no farther (if I can get away with it!).
I didnt recognize that motor in any of the pictures, so any guidance you or others can provide will be appreciated.
Thread Starter
Racer
Joined: Jan 2006
Posts: 323
Likes: 4
From: McKinney Texas
Glad you all are enjoying the post. Hopefully it will demystify the procedure.
Is the Blend Door the one on the left in the picture showing the bottom heater core hold down strap? I believe the actuator/motor for that door is on the bottom of the heater box, held on by a few screws. You would not have to take the dash off, or really remove/disconnect all the wiring to get that out, just take the lower dash panel out.
Is the Blend Door the one on the left in the picture showing the bottom heater core hold down strap? I believe the actuator/motor for that door is on the bottom of the heater box, held on by a few screws. You would not have to take the dash off, or really remove/disconnect all the wiring to get that out, just take the lower dash panel out.
Burning Brakes
Joined: Nov 2009
Posts: 828
Likes: 103
From: Olney MD
Glad you all are enjoying the post. Hopefully it will demystify the procedure.
Is the Blend Door the one on the left in the picture showing the bottom heater core hold down strap? I believe the actuator/motor for that door is on the bottom of the heater box, held on by a few screws. You would not have to take the dash off, or really remove/disconnect all the wiring to get that out, just take the lower dash panel out.
Is the Blend Door the one on the left in the picture showing the bottom heater core hold down strap? I believe the actuator/motor for that door is on the bottom of the heater box, held on by a few screws. You would not have to take the dash off, or really remove/disconnect all the wiring to get that out, just take the lower dash panel out.
Once, I took out the glove box to get a better view, (my 93 doesnt have an air bag on that side) but it(blend door motor) seems to be a lot farther forward. There's a device inside the engine compartment that sits on top of the heater box, that if you remove it you can see the blend door itself (like your picture) but the only thing it did for me is to prove that the blend door was stuck on 100% heat. A little voice in my head says I can possibly go in through that hole to pry the door permanently to AC, which will solve the AC problem, but is rather 'inelegant.'
There's a great Corvette shop near my house, so I might take it there when I come into some money.
Thanks for taking the time to try to help me with my issue. I might take one more run at it, since I'm sure that once the heater core is out, the part that holds the blend door motor will be 'revealed.'
Corvette Stories
The Best of Corvette for Corvette Enthusiasts

Top 10 Most Expensive Corvettes Ever Sold on Bring A Trailer
Brett Foote
10 Things Every Corvette Owner Needs (2026 Edition)
Michael S. Palmer
8 Most "Only Corvette Owners Understand" Quirks and Problems
Pouria Savadkouei
10 Reasons the C6 Z06 is Still A Performance Benchmark After 20 Years
Joe Kucinski
How Much Horsepower Every Corvette Engine "LOST" in 1972
Joe Kucinski
Top 10 DOs and DON'Ts for Protecting Your Convertible Top!
Michael S. Palmer
Top 10 Most Explosive Corvettes Ever Made: Power-to-Weight Ratio Ranked!
Joe Kucinski
150 hp to 1,250 hp: Every Corvette Generation Compared by the Specs That Matter
Joe Kucinski
8 Coolest Corvette Pace Cars (and Replicas) of All Time
Verdad Gallardo
Thread Starter
Racer
Joined: Jan 2006
Posts: 323
Likes: 4
From: McKinney Texas
I should have taken more pictures while I had everything off.
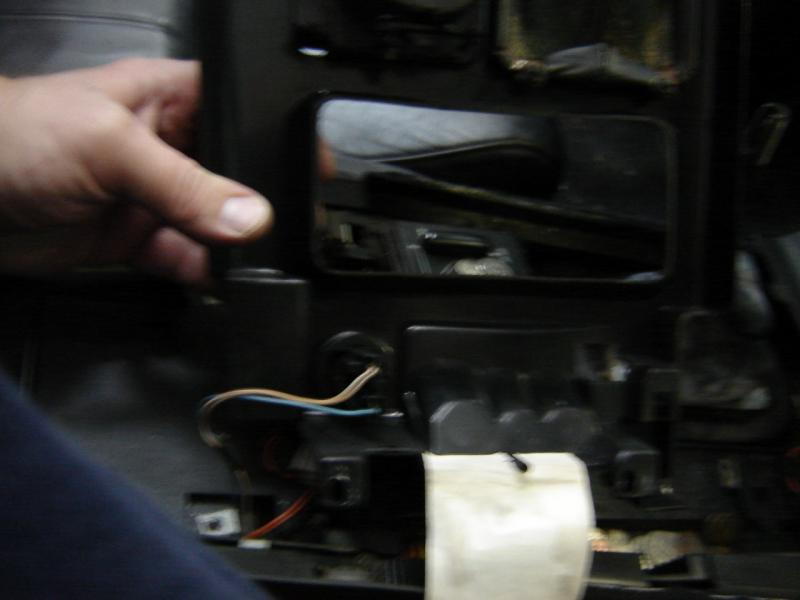
In the picture below, at the bottom you can see an orange tube (looks like a wire, but it is a vacuum line to the vent) and yellow wire. Between those is a gold colored hex bolt that I think is one of the retainers for the motor cover. Not sure how many bolts hold that plate on, or if the plate is integrated into the motor part. The picture is taken with the camera on the floor, looking up towards the firewall (the yellow coupler is on the firewall.
To get that plate off, I would drop the lower dash cover, then pull the passenger seat for comfortable viewing/working.
Hope it helps, good luck.
Drifting


Joined: Oct 2003
Posts: 1,356
Likes: 78
From: Kamakura, Japan
I should have taken more pictures while I had everything off.
In the picture below, at the bottom you can see an orange tube (looks like a wire, but it is a vacuum line to the vent) and yellow wire. Between those is a gold colored hex bolt that I think is one of the retainers for the motor cover. Not sure how many bolts hold that plate on, or if the plate is integrated into the motor part. The picture is taken with the camera on the floor, looking up towards the firewall (the yellow coupler is on the firewall.
To get that plate off, I would drop the lower dash cover, then pull the passenger seat for comfortable viewing/working.
Hope it helps, good luck.
Burning Brakes
Joined: Nov 2009
Posts: 828
Likes: 103
From: Olney MD
since we're resurrecting an old thread, let me share my experience with my blend door. I finally took it to the Corvette Shop, and they said that when a PO replaced the heater core, they forgot to hook up the blend door electrical connector. Soooo, heed Mandingo214's advice to take pictures and note how many connectors and zip ties you encounter! That disconnected blend door motor led to many hot days with no A/C, despite everything in the A/C circuit being in perfect shape!
Good Luck!
(Since my original post, I traded my C4 for a C5. Nice Vette, but lacking the character of the C4!)
Good Luck!
(Since my original post, I traded my C4 for a C5. Nice Vette, but lacking the character of the C4!)
Drifting
Joined: Oct 2003
Posts: 1,356
Likes: 78
From: Kamakura, Japan
since we're resurrecting an old thread, let me share my experience with my blend door. I finally took it to the Corvette Shop, and they said that when a PO replaced the heater core, they forgot to hook up the blend door electrical connector. Soooo, heed Mandingo214's advice to take pictures and note how many connectors and zip ties you encounter! That disconnected blend door motor led to many hot days with no A/C, despite everything in the A/C circuit being in perfect shape!
Good Luck!
(Since my original post, I traded my C4 for a C5. Nice Vette, but lacking the character of the C4!)
Good Luck!
(Since my original post, I traded my C4 for a C5. Nice Vette, but lacking the character of the C4!)