


Coolant Leak

Thread Starter
Racer


Joined: Oct 2010
Posts: 257
Likes: 7
From: Haslet texas
One thing i noticed on removing heads. Did not feel like all were at 70 foot pounds as i torqued them to. Could be as simple as that as being the issue. Nevertheless, I am going to get the heads checked out, re-install if ok, and cross my fingers and hope it is not the block.
Looking at the block while i assembled and talking to my machinist, he stated that there was very little grinding that needed to be done for the rods and crank to be cleared.
Ryan.
P.S. Thanks for all the help guys.
Looking at the block while i assembled and talking to my machinist, he stated that there was very little grinding that needed to be done for the rods and crank to be cleared.
Ryan.
P.S. Thanks for all the help guys.

Melting Slicks

Joined: Aug 2008
Posts: 2,082
Likes: 50
From: Palmdale CA
Ryan,
It would be a good idea to place a straight edge across the engine deck and check for flattness. Your machinest should have a rule, or something Similar to accomplish this. before you pulled the heads did you drain the block? some of that coolant may have spilled into the cylinders when you pulled the heads.
It would be a good idea to place a straight edge across the engine deck and check for flattness. Your machinest should have a rule, or something Similar to accomplish this. before you pulled the heads did you drain the block? some of that coolant may have spilled into the cylinders when you pulled the heads.
Thread Starter
Racer
Joined: Oct 2010
Posts: 257
Likes: 7
From: Haslet texas
No, i did not drain the block. Was going to but, i have 2 other guys helping pull them for free, and i didnt want to lose the help while i had them. Thanks for pointing that out to me tho. I know they decked the block, but ill put the straight edge to check to.

Race Director

Joined: Jan 2012
Posts: 17,062
Likes: 166
From: United States
Who did your motor? Just curious how they fit a 6 inch rod with a 396? and what pistons? most 396 use a 5.85. Not to say it cant be done, but just asking how it was done and by whom.
Start from the begininning.
396 Engine with 3.875in crank, 6 in rods, and over bored to 4.060, making it a 401 LT1, block work done by shop. No block fill used.
Assembled engine myself: Terrible coolant leak, over heated quite a few times, upwards around 6-8. I made the mistake of using silicone on gaskets .
.
Replaced gaskets: Used Fel Pro Q9966PT ( http://www.summitracing.com/parts/FEL-9966PT/ )Coolant leak went to a trickle, put some steal seal in it and bar's leak head gasket repair. Still was at a trickle. Did not pay too much attention to it because i was blowing a lot of blue smoke out tail pip and had low compression numbers. Didnt know bout stroker ring on pistons .
.
Rebuilt Engine: So did rebuild, re-used copper head gaskets. Still had slow leak, put bar's leak seal in it no help. Drove car for 1 week, coolant leak got worse. No overheating
Replaced Gaskets: Pulled head gaskets and installed Fel Pro Q9966PT again, just finished on Sunday. Ran car, drove to work on monday, no change. Still slow coolant leak, no overheating. Put Bar's Leak in again, did not work. Left car in drive way and idle for a bit. Oil became contaminated and white smoke increased. Will not see smoke while driving, only at idle or in park, when car is not in motion.
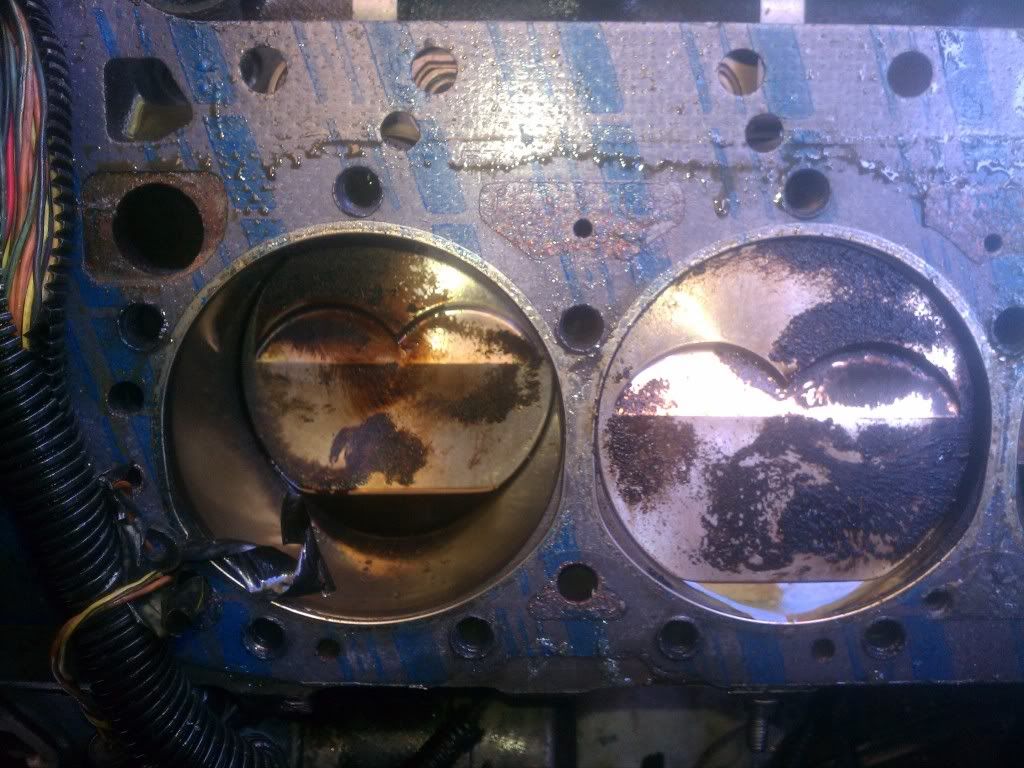
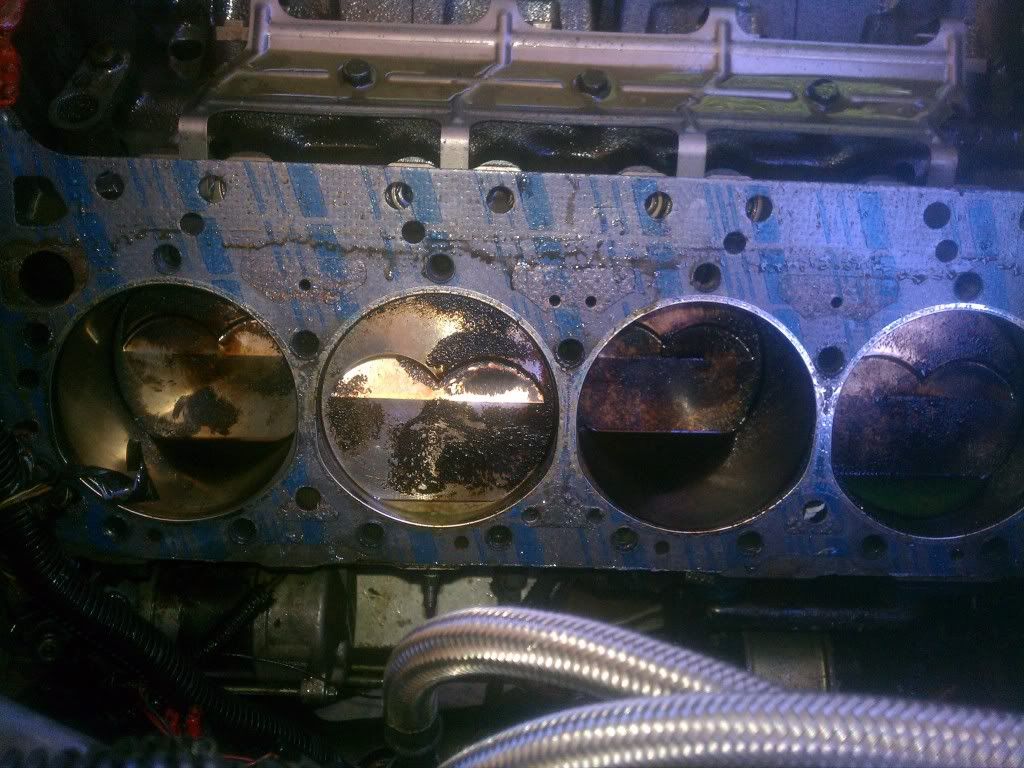
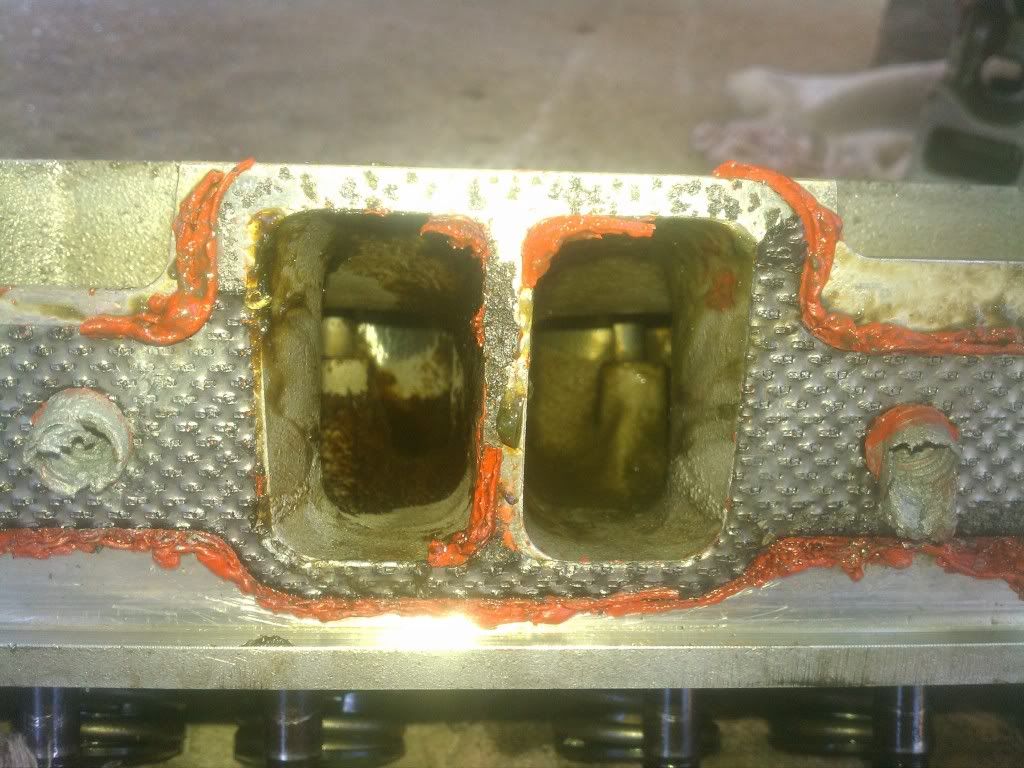
Pulled Heads Just now: Here are pictures.
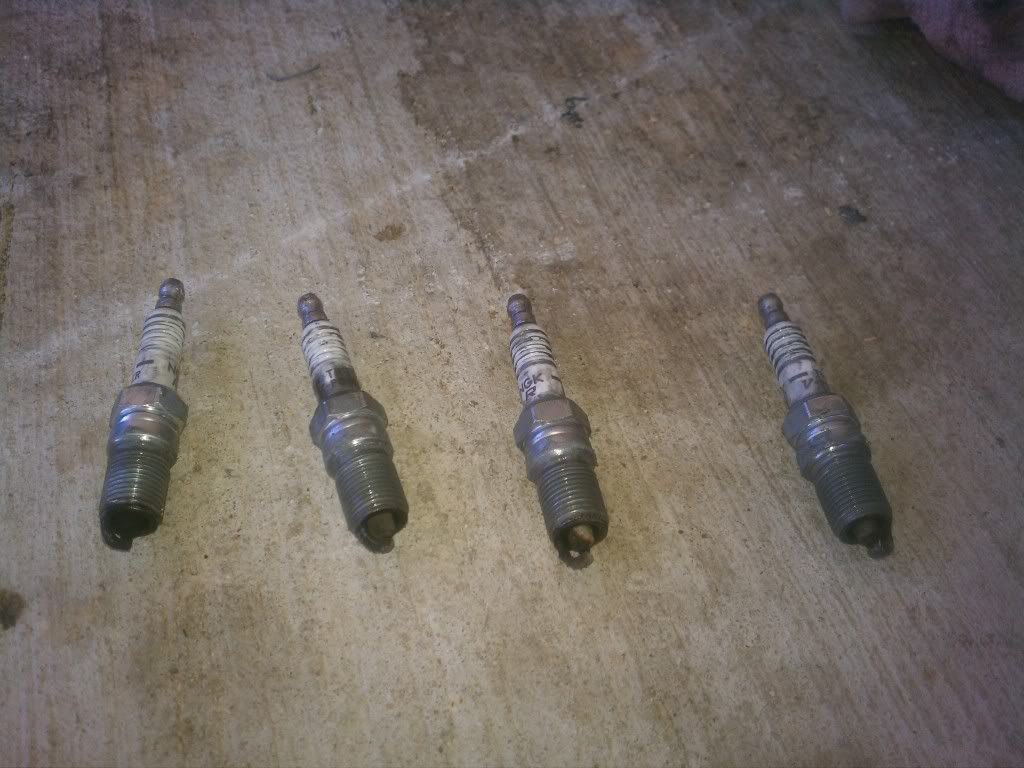
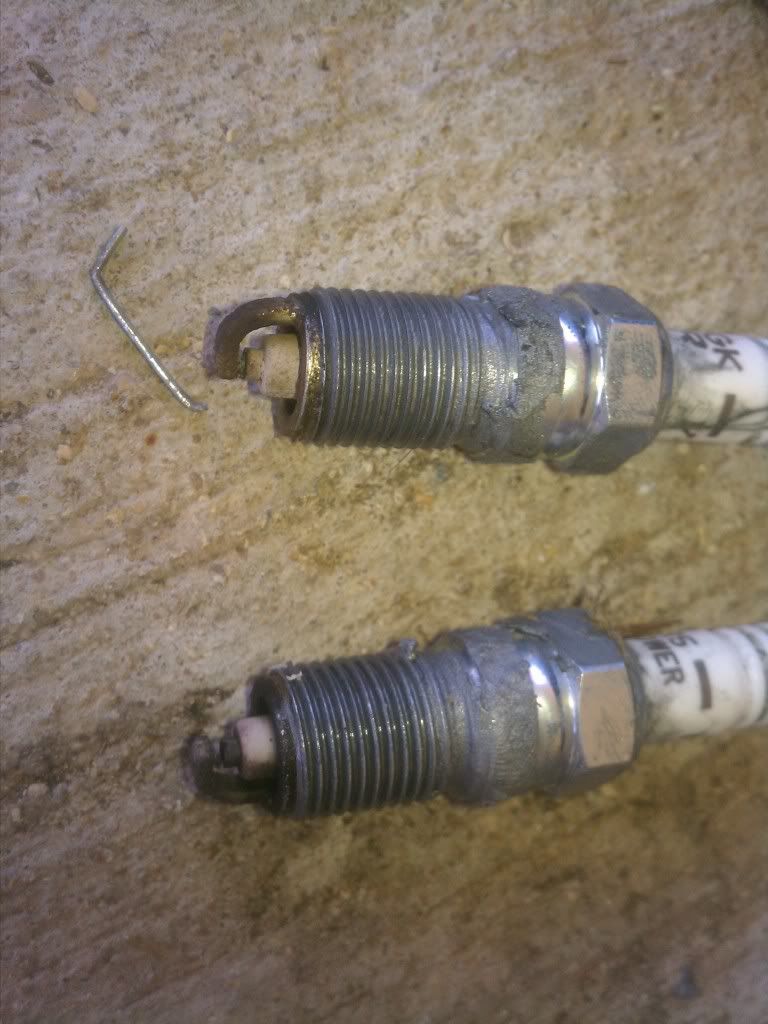
Spark Plugs: Installed on Sunday, less than 1x week ago. In order from left->right, 8,6,4,2
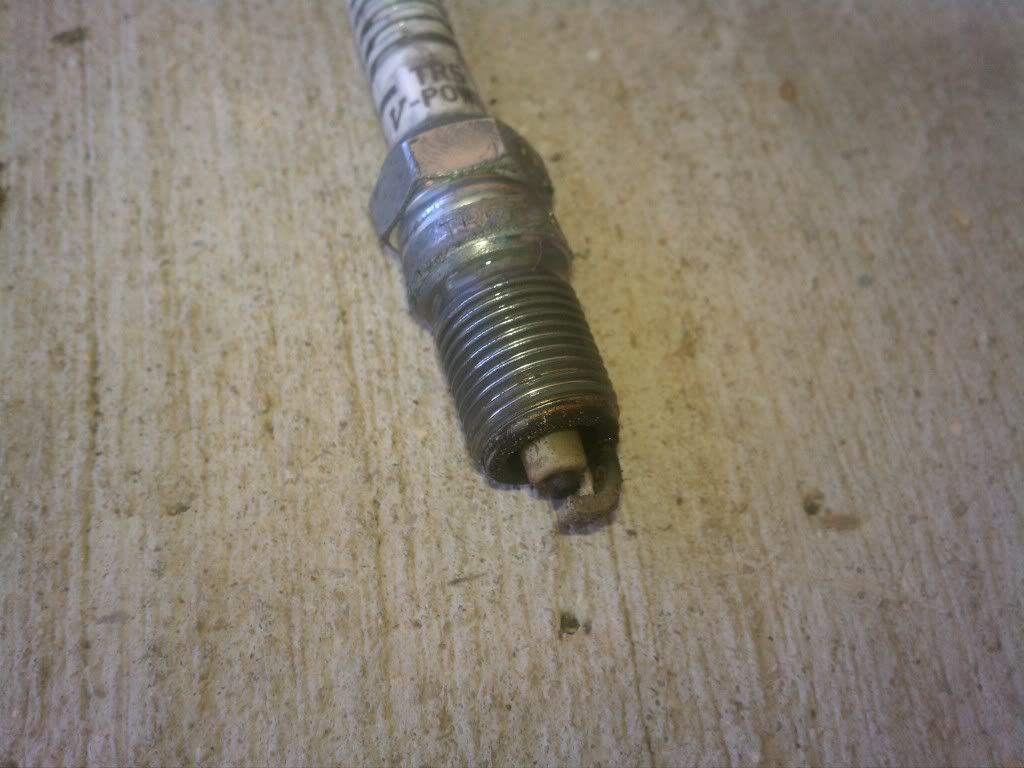
Number: 4, steamed white
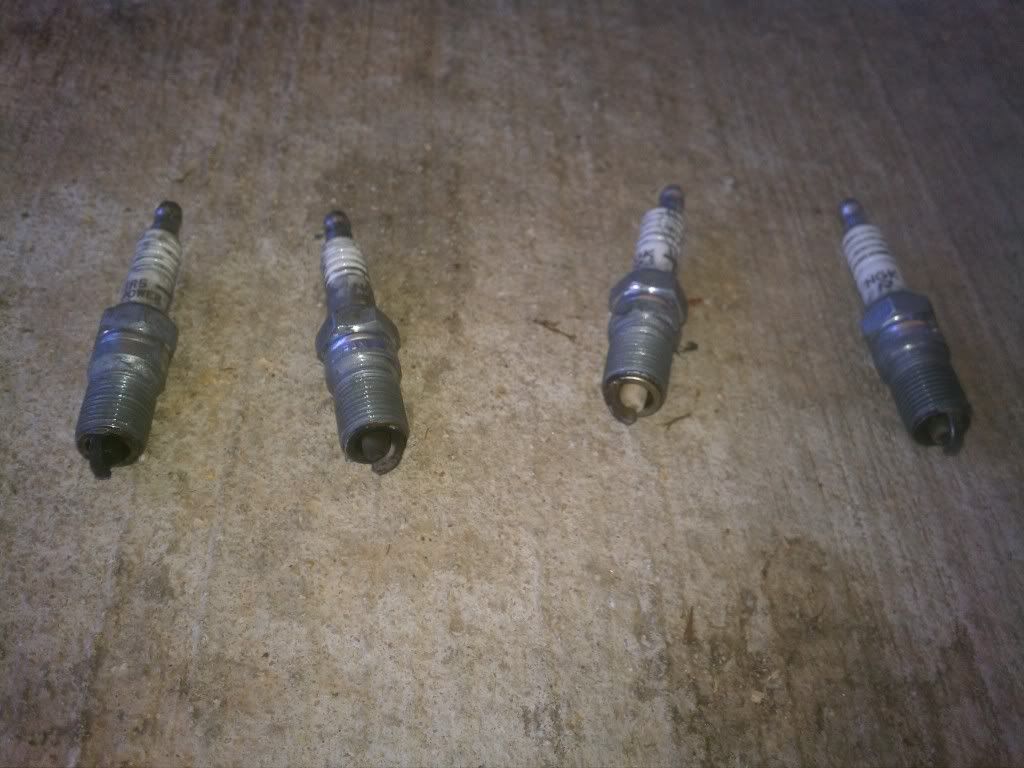
Spark Plugs: Installed on Sunday. In order from left->right, 7,5,3,1
Plugs 3,5
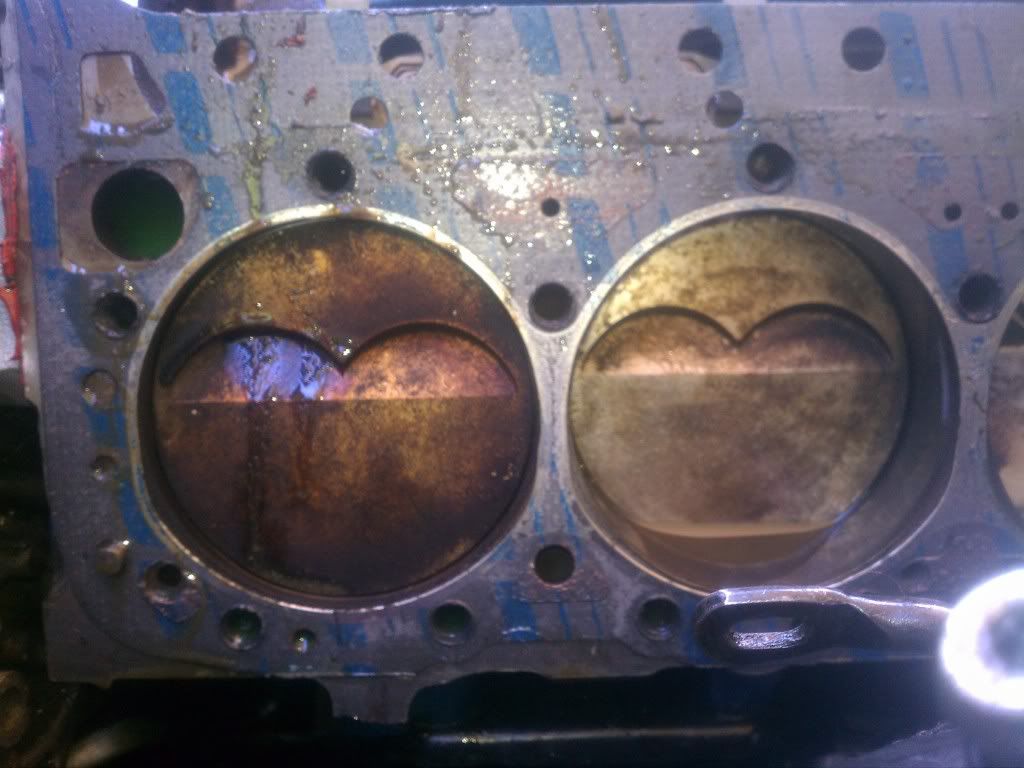
Pistons 1,3
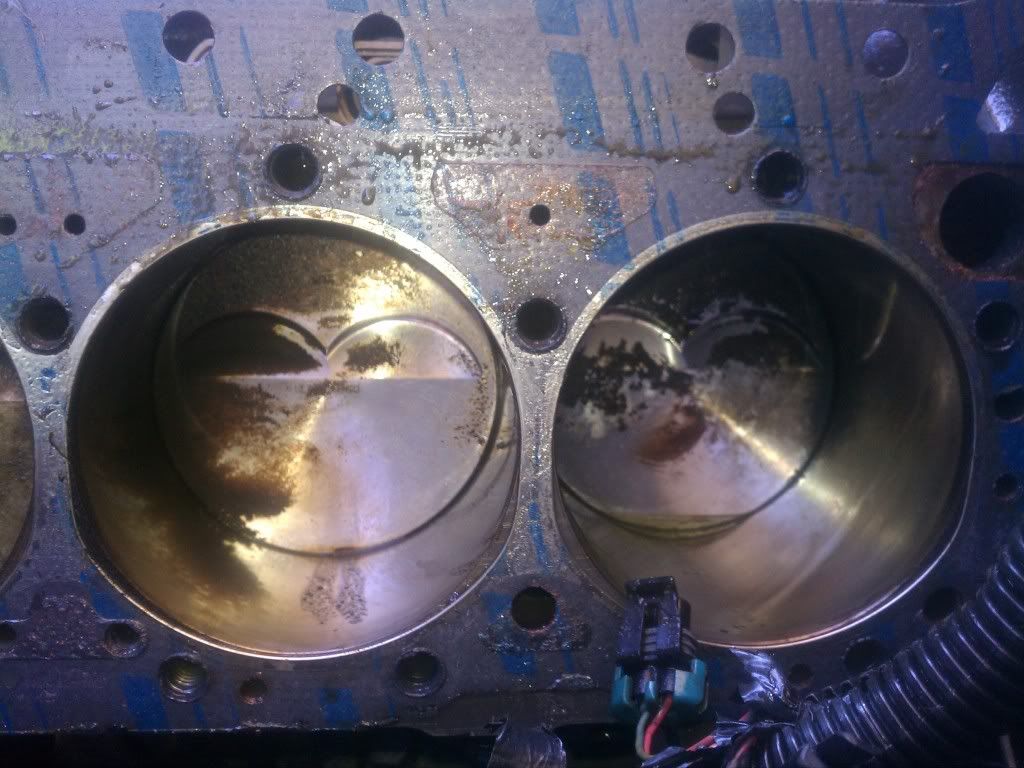
5,7
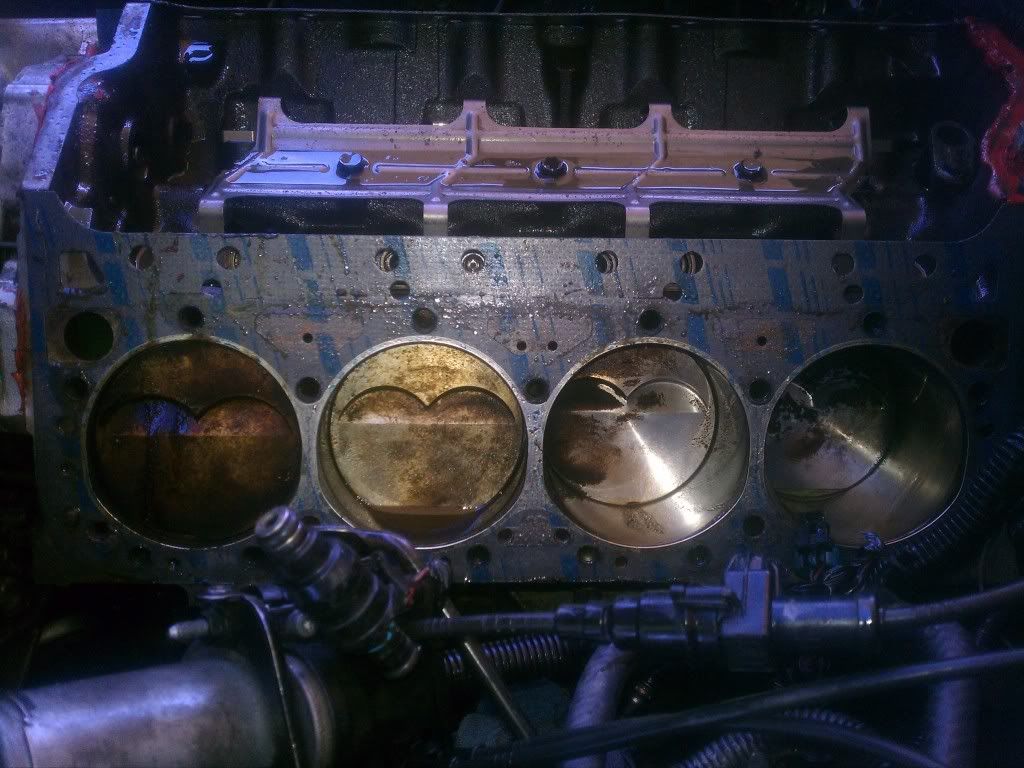
[Driver Side
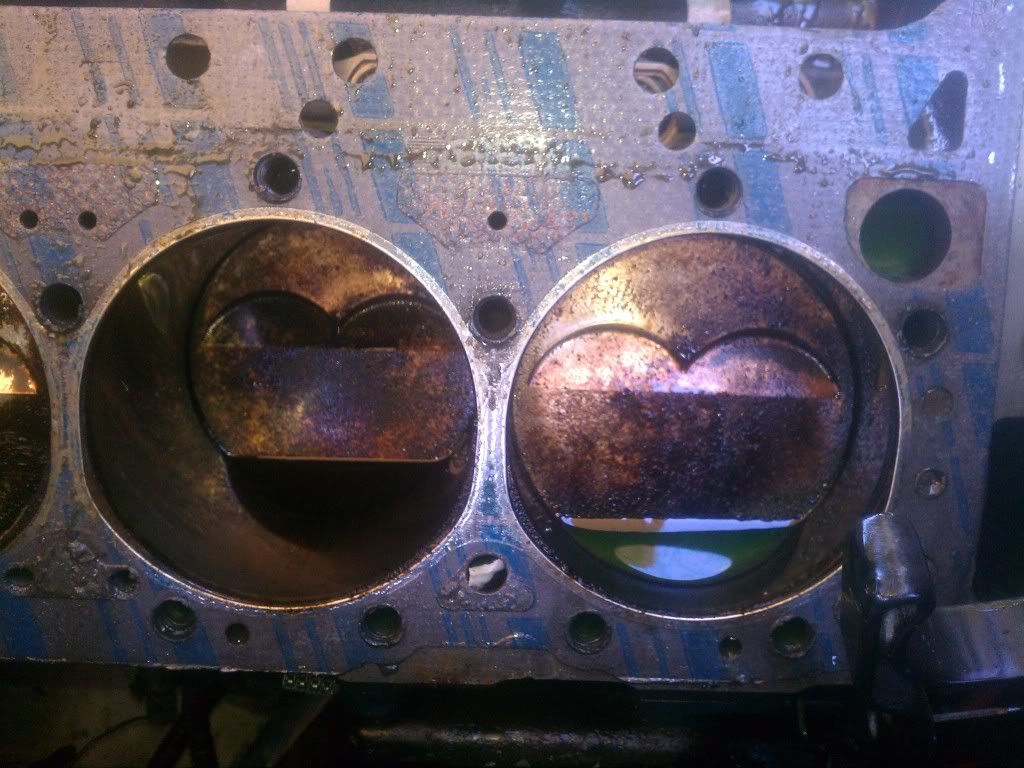
2,4
6,8
Passenger Side
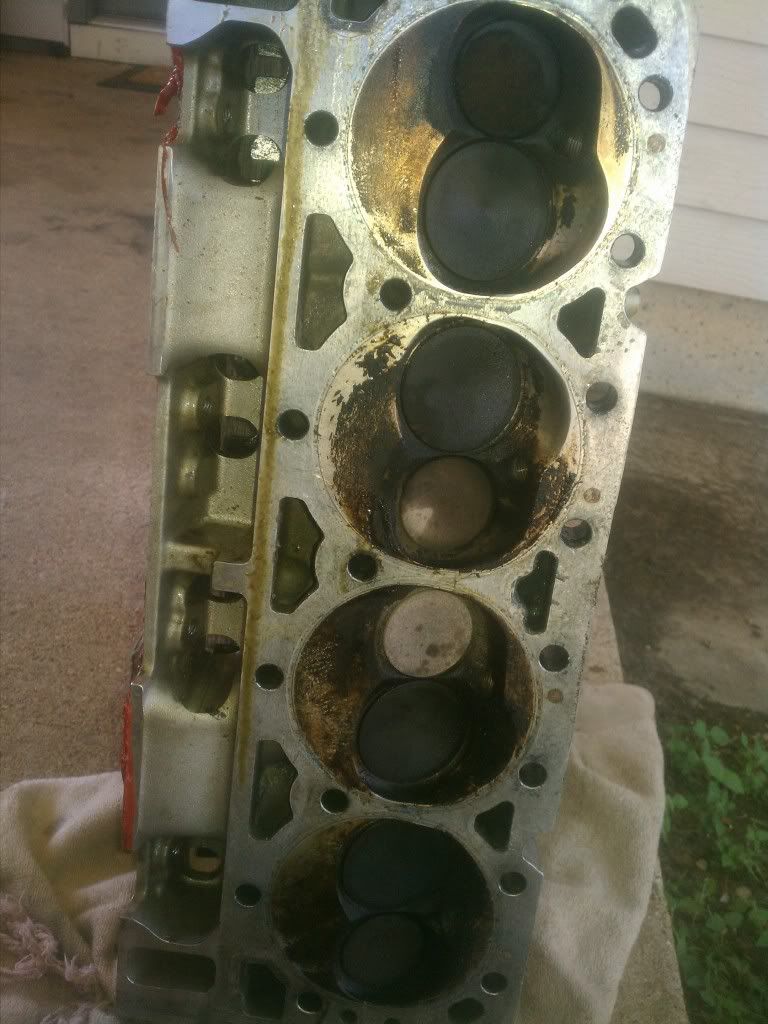
Driver Head
Passenger Head
[IMG][/IMG]
Passenger Head
396 Engine with 3.875in crank, 6 in rods, and over bored to 4.060, making it a 401 LT1, block work done by shop. No block fill used.
Assembled engine myself: Terrible coolant leak, over heated quite a few times, upwards around 6-8. I made the mistake of using silicone on gaskets
.Replaced gaskets: Used Fel Pro Q9966PT ( http://www.summitracing.com/parts/FEL-9966PT/ )Coolant leak went to a trickle, put some steal seal in it and bar's leak head gasket repair. Still was at a trickle. Did not pay too much attention to it because i was blowing a lot of blue smoke out tail pip and had low compression numbers. Didnt know bout stroker ring on pistons
. Rebuilt Engine: So did rebuild, re-used copper head gaskets. Still had slow leak, put bar's leak seal in it no help. Drove car for 1 week, coolant leak got worse. No overheating
Replaced Gaskets: Pulled head gaskets and installed Fel Pro Q9966PT again, just finished on Sunday. Ran car, drove to work on monday, no change. Still slow coolant leak, no overheating. Put Bar's Leak in again, did not work. Left car in drive way and idle for a bit. Oil became contaminated and white smoke increased. Will not see smoke while driving, only at idle or in park, when car is not in motion.
Pulled Heads Just now: Here are pictures.
Spark Plugs: Installed on Sunday, less than 1x week ago. In order from left->right, 8,6,4,2
Number: 4, steamed white
Spark Plugs: Installed on Sunday. In order from left->right, 7,5,3,1
Plugs 3,5
Pistons 1,3
5,7
[Driver Side
2,4
6,8
Passenger Side
Driver Head
Passenger Head
[IMG]
[/IMG]Passenger Head
Pro


Joined: Aug 2009
Posts: 725
Likes: 4
From: Plano, TX
When you put it all back together, try the Felpro 1074 head gasket. Pricy but good.
Make sure both surfaces are clean and dry. Use some methanol or brake cleaner to remove any oil films. Don't use any kind of sealer on the head gasket. Just make sure its clean and dry.
I used the Felpro 1074's on an LT1 with 15psi from an F1 blower and never had any leakage issues. They are pretty forgiving if you have surface imperfections.
Last edited by 93VettePilot; Apr 14, 2012 at 08:59 AM.
Safety Car


Joined: Apr 2005
Posts: 3,624
Likes: 431
From: Dale City VA
It's done all the time.
1.060 compression height pistons are FAR more common (shelf stocking) than 1.213 compression height pistons.
Probe, ICON and SRP all mfgr mid priced 1.060 pistons.
The only stocking number for a 1.213 is an SRP that has a 14cc dish in it and is only availiable in 4.030 bore...
The reason the 1.060 CH is so popular with piston mfgrs is because it's dual use for the very popular 347 SBF.
Will
Race Director
Joined: Jan 2012
Posts: 17,062
Likes: 166
From: United States
I don't know where your info is comming from....
It's done all the time.
1.060 compression height pistons are FAR more common (shelf stocking) than 1.213 compression height pistons.
Probe, ICON and SRP all mfgr mid priced 1.060 pistons.
The only stocking number for a 1.213 is an SRP that has a 14cc dish in it and is only availiable in 4.030 bore...
The reason the 1.060 CH is so popular with piston mfgrs is because it's dual use for the very popular 347 SBF.
Will
Learn something new everyday

Team Owner

Joined: Oct 2004
Posts: 81,241
Likes: 3,063
From: altered state
St. Jude Donor '05
Nothing wrong with the pin in the ring pack
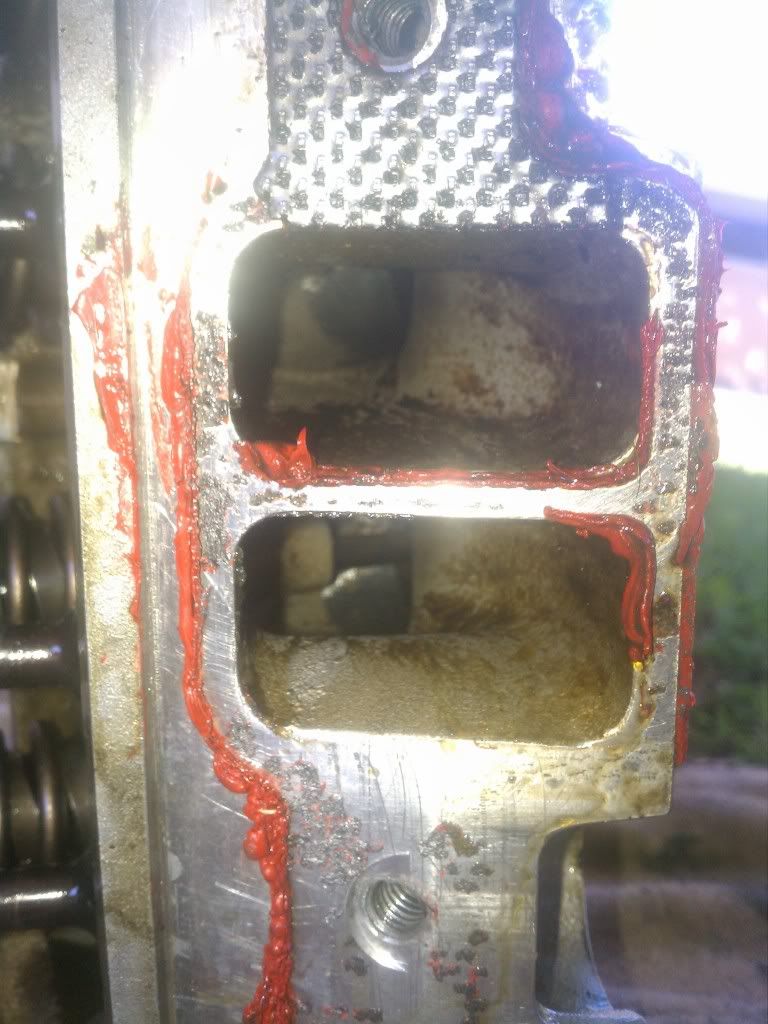
Did you have your block honed with a torqueplate?
Maybe its just the pic -that stuff on the wall wipe off?
Lay off all the silicones and greases you dont need to glop all that stuff on. Bolt holes dont have any coolant going through them either. Gaskacinch, some silicone on teh china walls and corners and youre good.
Clean your intake bolt threads just a touch of antiseize is all thats needed. If that.
Not picking on you just some observations
Last edited by cv67; Apr 14, 2012 at 01:00 PM.
Corvette Stories
The Best of Corvette for Corvette Enthusiasts

5 Best & 5 Worst Corvette Daily Drivers
Joe Kucinski
The Headlights of Every Corvette Generation Explained
Joe Kucinski
5 Best & 5 Most Overrated Corvette Track Packages of All Time!
Joe Kucinski
Every 2027 Corvette Engine Explained
Joe Kucinski
Designer Imagines A Corvette That Looks More Like a Corvette Than the Corvette
Verdad Gallardo
10 Ugly Corvettes That We Still Kinda Love
Joe Kucinski
Top 10 Most Expensive Corvettes Ever Sold on Bring A Trailer
Brett Foote
10 Things Every Corvette Owner Needs (2026 Edition)
Michael S. Palmer
8 Most "Only Corvette Owners Understand" Quirks and Problems
Pouria Savadkouei
Thread Starter
Racer
Joined: Oct 2010
Posts: 257
Likes: 7
From: Haslet texas
Got the heads checked out. All was good with them. Went ahead and re-installed them. But before i could do that I had to heli-coil two bottom row bolts on the passenger side. One was the closest to the firewall, Sure did take a while. Put it all together and have had no white smoke since. Took it on a test drive, wouldnt make it around the block without overheating..Removed Coolant sensors from both sides of the block and this is what comes out after picking that solid layer preventing it from flowing....
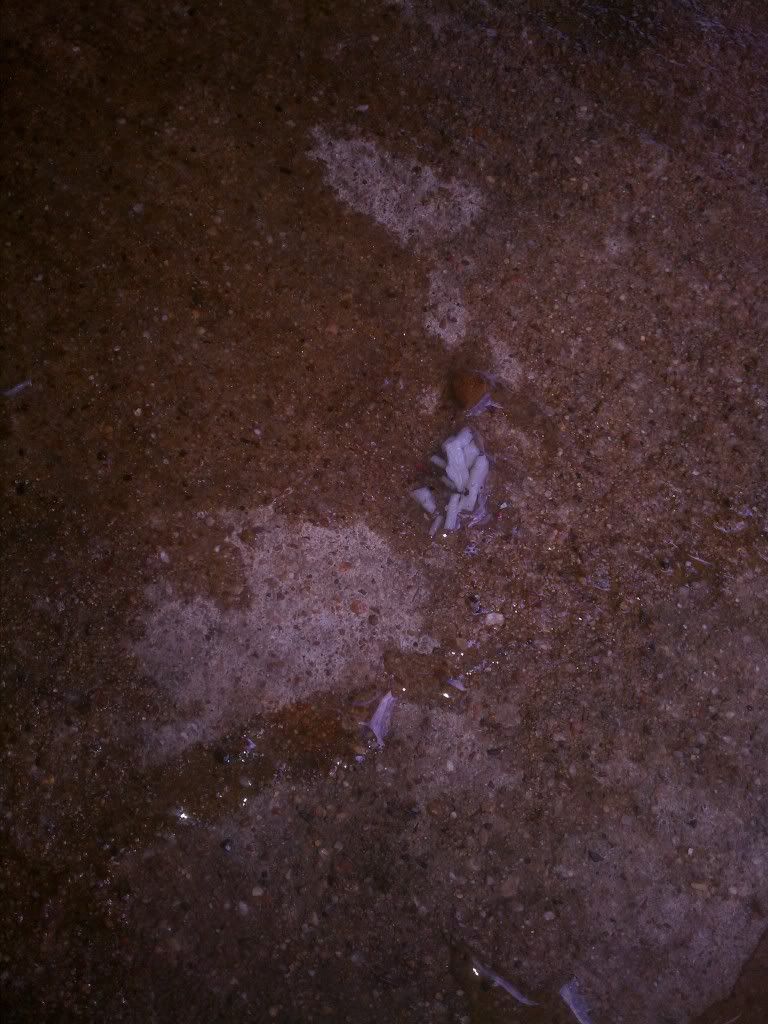
After this was removed, car make it around the block several times before getting too hot, went ahead and pulled sensors again...

Took test drive, car last longer. But noticed it reach 234 while i was adjusting rockers. Water has been only in the car since heads were installed. Went at sensors again, barely got any out. So after consulting GM and auto parts stores, looking for anything stronger enough to aid in breaking this stuff down, I was left with the concensus that the radiator is possibly clogged. So pulled radiator and more chunks come out from just flipping it over, then spayed hose through it once and...
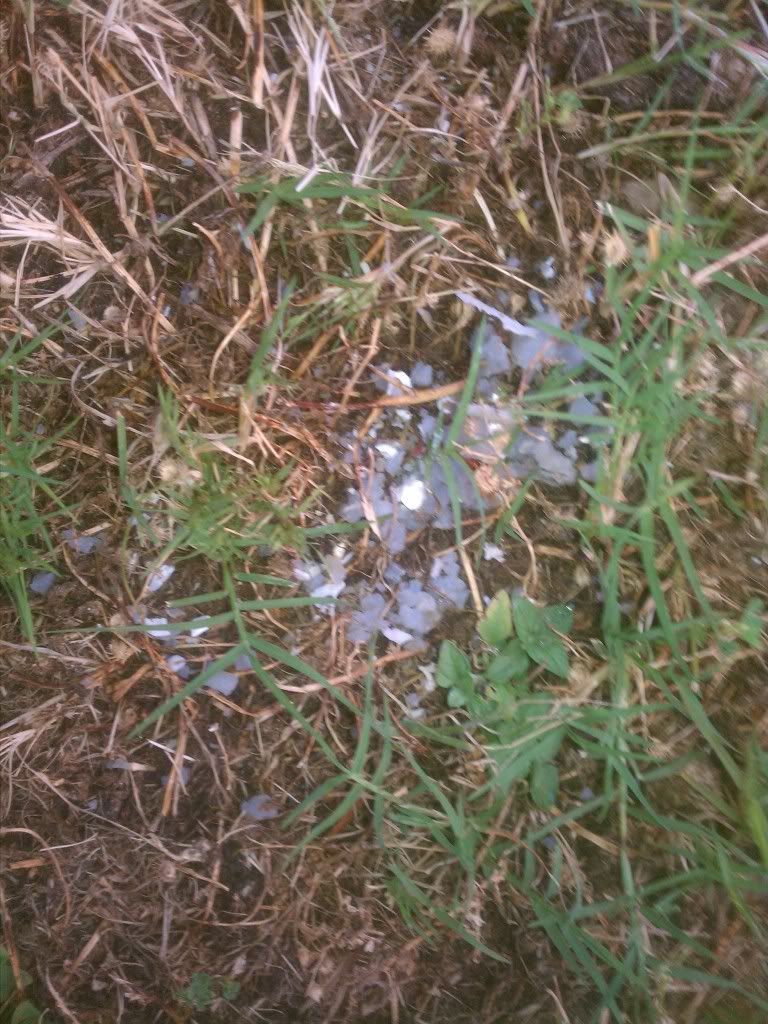
The white is the stuff as seen in block, grey is like sludge.
This stuff that is clogging it is....
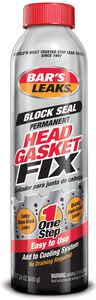
Bar's Leaks HG-1 Head Gasket and Cooling Sealant
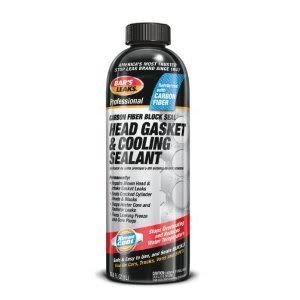
As soon as i put this stuff in I immediately started having problems, and it cost 60 dolllars a can at auto part stuff. In the whit chunks, i can see the silver particles attached to it. The Bar's Leak Head Gasket Fix, i have never had a problem with and it has Orange particles.
Right now I am in the process of attempting to clean the radiator out even more with pressure wash and shaking. Wish me luck that I dont have to spend extra $$ on new radiator.
Sure did take a while. Put it all together and have had no white smoke since. Took it on a test drive, wouldnt make it around the block without overheating..Removed Coolant sensors from both sides of the block and this is what comes out after picking that solid layer preventing it from flowing....After this was removed, car make it around the block several times before getting too hot, went ahead and pulled sensors again...
Took test drive, car last longer. But noticed it reach 234 while i was adjusting rockers. Water has been only in the car since heads were installed. Went at sensors again, barely got any out. So after consulting GM and auto parts stores, looking for anything stronger enough to aid in breaking this stuff down, I was left with the concensus that the radiator is possibly clogged. So pulled radiator and more chunks come out from just flipping it over, then spayed hose through it once and...
The white is the stuff as seen in block, grey is like sludge.
This stuff that is clogging it is....
Bar's Leaks HG-1 Head Gasket and Cooling Sealant
As soon as i put this stuff in I immediately started having problems, and it cost 60 dolllars a can at auto part stuff. In the whit chunks, i can see the silver particles attached to it. The Bar's Leak Head Gasket Fix, i have never had a problem with and it has Orange particles.
Right now I am in the process of attempting to clean the radiator out even more with pressure wash and shaking. Wish me luck that I dont have to spend extra $$ on new radiator.
Thread Starter
Racer
Joined: Oct 2010
Posts: 257
Likes: 7
From: Haslet texas
Well i put the radiator back in with coolant. No change to car rising in temp. Continued to get hotter and hotter to over 230+. I currently have the water pump off, check it and it is rotating fine, still a new water pump, only been on car a couple months. Goint to remove coolant sensors from block plugs and shot more water it, but i fear it will not help. Is there anything else i can do, aside from pulling the engine back out. Does anyone think I need a new radiator?
Ryan M.
Ryan M.
Race Director
Joined: Apr 2000
Posts: 15,344
Likes: 4,009
From: Texas

You've put so much of the various Stop Leak products in there that the radiator is likely clogged and the heater core for that matter.
I'd flush the block and install a new radiator. I'd also pull the hoses to the heater core, overflow tank, etc and flush all of those.
Be sure to take a look at the water pump drive shaft and ensure that the teeth aren't stripped at either end. Although unusual, it can happen such that there's enough left of the teeth to drive the water pump but not very well.
Race Director
Joined: Jan 2012
Posts: 17,062
Likes: 166
From: United States
You've put so much of the various Stop Leak products in there that the radiator is likely clogged and the heater core for that matter.
I'd flush the block and install a new radiator. I'd also pull the hoses to the heater core, overflow tank, etc and flush all of those.
Be sure to take a look at the water pump drive shaft and ensure that the teeth aren't stripped at either end. Although unusual, it can happen such that there's enough left of the teeth to drive the water pump but not very well.
What he said...
Thread Starter
Racer
Joined: Oct 2010
Posts: 257
Likes: 7
From: Haslet texas
Going to get the radiator flow tested. Will that suffice as measurement to see if it faulty. Cause when i shot water hose through it, it seems like it comes out just fine. Or should i just go ahead and get new radiator? What would you do in my position, do not want to just throw parts at it.Tommorrow , I will start shooting water all through block, heater core, coolant crossover tube and all other places i can come up with.BTW Checked water pump drive shaft, in great condition. Side note, while care was running both top and bottom radiator hoses were hot, same temps it seems.
Race Director
Joined: Jan 2012
Posts: 17,062
Likes: 166
From: United States
Going to get the radiator flow tested. Will that suffice as measurement to see if it faulty. Cause when i shot water hose through it, it seems like it comes out just fine. Or should i just go ahead and get new radiator? What would you do in my position, do not want to just throw parts at it.Tommorrow , I will start shooting water all through block, heater core, coolant crossover tube and all other places i can come up with.BTW Checked water pump drive shaft, in great condition. Side note, while care was running both top and bottom radiator hoses were hot, same temps it seems.
Flushing does no good unless it has something in the water to eat up all the crap you put in there. Use prestone flush and get it hot and run it for a couple days. Its basically soap, but you need to extract all the crap within the system with hot soapy water of some sort. running water through isnt going to get rid of much.
Race Director
Joined: Apr 2000
Posts: 15,344
Likes: 4,009
From: Texas
Flow test. Never heard of that. A radiator shop can take the thing apart and look in it to see if it is full of crap.
Flushing does no good unless it has something in the water to eat up all the crap you put in there. Use prestone flush and get it hot and run it for a couple days. Its basically soap, but you need to extract all the crap within the system with hot soapy water of some sort. running water through isnt going to get rid of much.
Flushing does no good unless it has something in the water to eat up all the crap you put in there. Use prestone flush and get it hot and run it for a couple days. Its basically soap, but you need to extract all the crap within the system with hot soapy water of some sort. running water through isnt going to get rid of much.
The water may come out of both big openings just fine, but that doesn't mean that 3/4 of the tubes are clogged.
Over in the parts section, someone had a stock '94 radiator for sale. It'll work fine in your '96.
Did they pressure test the heads or just make sure they were flat?
Thread Starter
Racer
Joined: Oct 2010
Posts: 257
Likes: 7
From: Haslet texas
S OThey pressure tested the head,.took them apart. And cleaned them.up, also.checked for.flatness. I have a buddy in cOrvette club.who has a lt1.radiator.from.camaro.he.can give me for.free. If.dimensions.are same

Burning Brakes

Joined: Oct 2009
Posts: 773
Likes: 2
From: Minneapolis MN
Did you check for any small cracks in the block?Especially the wall between the cylinders that had obvious coolant being burned?Those old head gaskets didn't look like they were circlular-did the new set look similar?If the heads tested fine I would have throughly inspected the block or even pulled it to get magnafluxed.Are special head gaskets required when the engine is bored much over stock?My guess is a cracked block from boring or a warped block from overheating the engine with the small cylinder walls between the pistons due to the boring.I never use stop-leak of any kind unless on a beater as it can cause clogging in multiple places.The only thing that should be in a corvette coolant is coolant.Any pics of the block surface with the heads off & the head gaskets removed?If you pull heads again,throughly inspect the block paying close attention to the head bolt threads in block & cracks between the cylinders that was burning coolant.Also get part/casting number off of heads & call that manufacturer & see if you got correct heads for your vehicle
Drifting

Joined: Dec 2011
Posts: 1,439
Likes: 23
From: mesa az
I seem to have a coolant leak as well but where ? I dont have any coolant underneath the car ever. I dont have any in the oil NONE. I just cant seem to find this yet its about a quart after driving 100 or so miles on average. I am going to do a compression test when it is still hot and not cooled down to the touch. My mechanic thinks it is going into the motor and out the exhaust but I never see any signs of this happening. Any test other than the compression test ? Or something I am overlooking ? The coolant reservoir is fine no leaks the hoses are all brand new. I read about the bypass to the throttle body could it be this area that is leaking ? I have not changed to the bypass. Maybe I should ? It is hot enough to evaporate it off if it is right ? Just reaching at this point ?
Thread Starter
Racer
Joined: Oct 2010
Posts: 257
Likes: 7
From: Haslet texas
Final update: took the engine out completely and cleaned all of those deposits out with water hose. Also disassembled engine down to the short block. I believe i got abput 90% of that stuff out. Put it back in the car and havent had that problem again. Went ahead and filed a claim with Bar s Products with my lawyer to back me up. After sending them samples and a calculation on how much it would have cost for me to send to a shop and repair. They eventually agreed to pay me $1300, which was 50% of my claim. They just wanted me to relay that they stand behind their products and take customer satisfaction very seriously. Car has over 1000 miles on new build, some small issues, but at least i can drive it to work and around town.
Ryan M
Ryan M