
Full custom sound system installation, my experience.

Thread Starter
Intermediate


Joined: Jan 2024
Posts: 43
Likes: 6
From: San Diego CA
Sidenote, does anyone know how to re-size photos? They all maxed out on size and it wrecked the readability of the post.
Wanted to do a write-up because when I was planning all this, I felt sound systems was an area lacking a lot of corvette-specific documentation across the forums, at least any current posts about it. I would however like to preface that I am in no means an Audiophile and I know absolutely nothing about sound systems outside of the knowledge I accumulated to do this project.
I got tired of keeping a bluetooth speaker in my trunk, and I wanted the convenience and quality of a modern sound system, without sacrificing any of the trunk space or sleek lines of the car. This meant no big subwoofer boxes or false floors, concealed amp, and factory (ish, you'll see what I mean) speaker grilles. And as we all know, the squeaks, rattles, and wind noise is nothing to scoff at in these cars and the best way to drown it out is VOLUME. So, it had to be loud.
First order of business, the build list. All in, this project was probably about $1300. When I type it out it makes me physically cringe, wow that's a painful number to look at. Oh well. Here's what I used:
Now the fun bit. Phase one was blowing up the interior of the car, taking out the interior trim, carpets, door panels, seats, center console, etc. This is tedious, make sure you put everything in haphazard piles around the garage, I promise, it makes it easier when you're putting it back together (Don't actually do that, but you probably will anyway).
While I was there, I found out that one of the many previous owners had, for some reason, lined the interior of the car with neoprene. And spray adhesive. A Lot of Spray Adhesive. No really, a LOT of spray adhesive. So that sucked, but obviously it had to go. Kilmat (and other sound deadening products) rely on increasing the apparent mass of the panel they're adhered to, thus increasing their inertia and preventing them from vibrating as easily. This vibration is what allows sound to get from outside, to inside. No Bueno. Anyway, it won't work if it's laid over the top of foam because the foam would mechanically isolate the Kilmat from the panel, allowing it to vibrate freely. So, after a lot of scraping with a drywall spatula and 90% isopropyl alcohol, I got most of it off.
Then, laid down all the Kilmat, which is a significantly cheaper version of dynamat and as far as I can tell, exactly the same thing. This honestly was pretty easy, this stuff cuts like warm butter and is pretty easy to readjust until you really press it in there for the final layup. Often, I would just lay the sheet overtop of an irregular feature and cut it to fit. And there's essentially zero waste because all of the cutoffs can just be stuck wherever you have space. Remember, the whole point is to increase the apparent mass of the car's panels. 100% coverage isn't needed, and if you have the clearance for it double up. I did so on the transmission tunnel, the rear storage compartments, wheel wells, and I did probably 5-6 layers in the rear speaker compartments. More on that Next. The only places to be particularly mindful of clearance are the doors and under the seats.
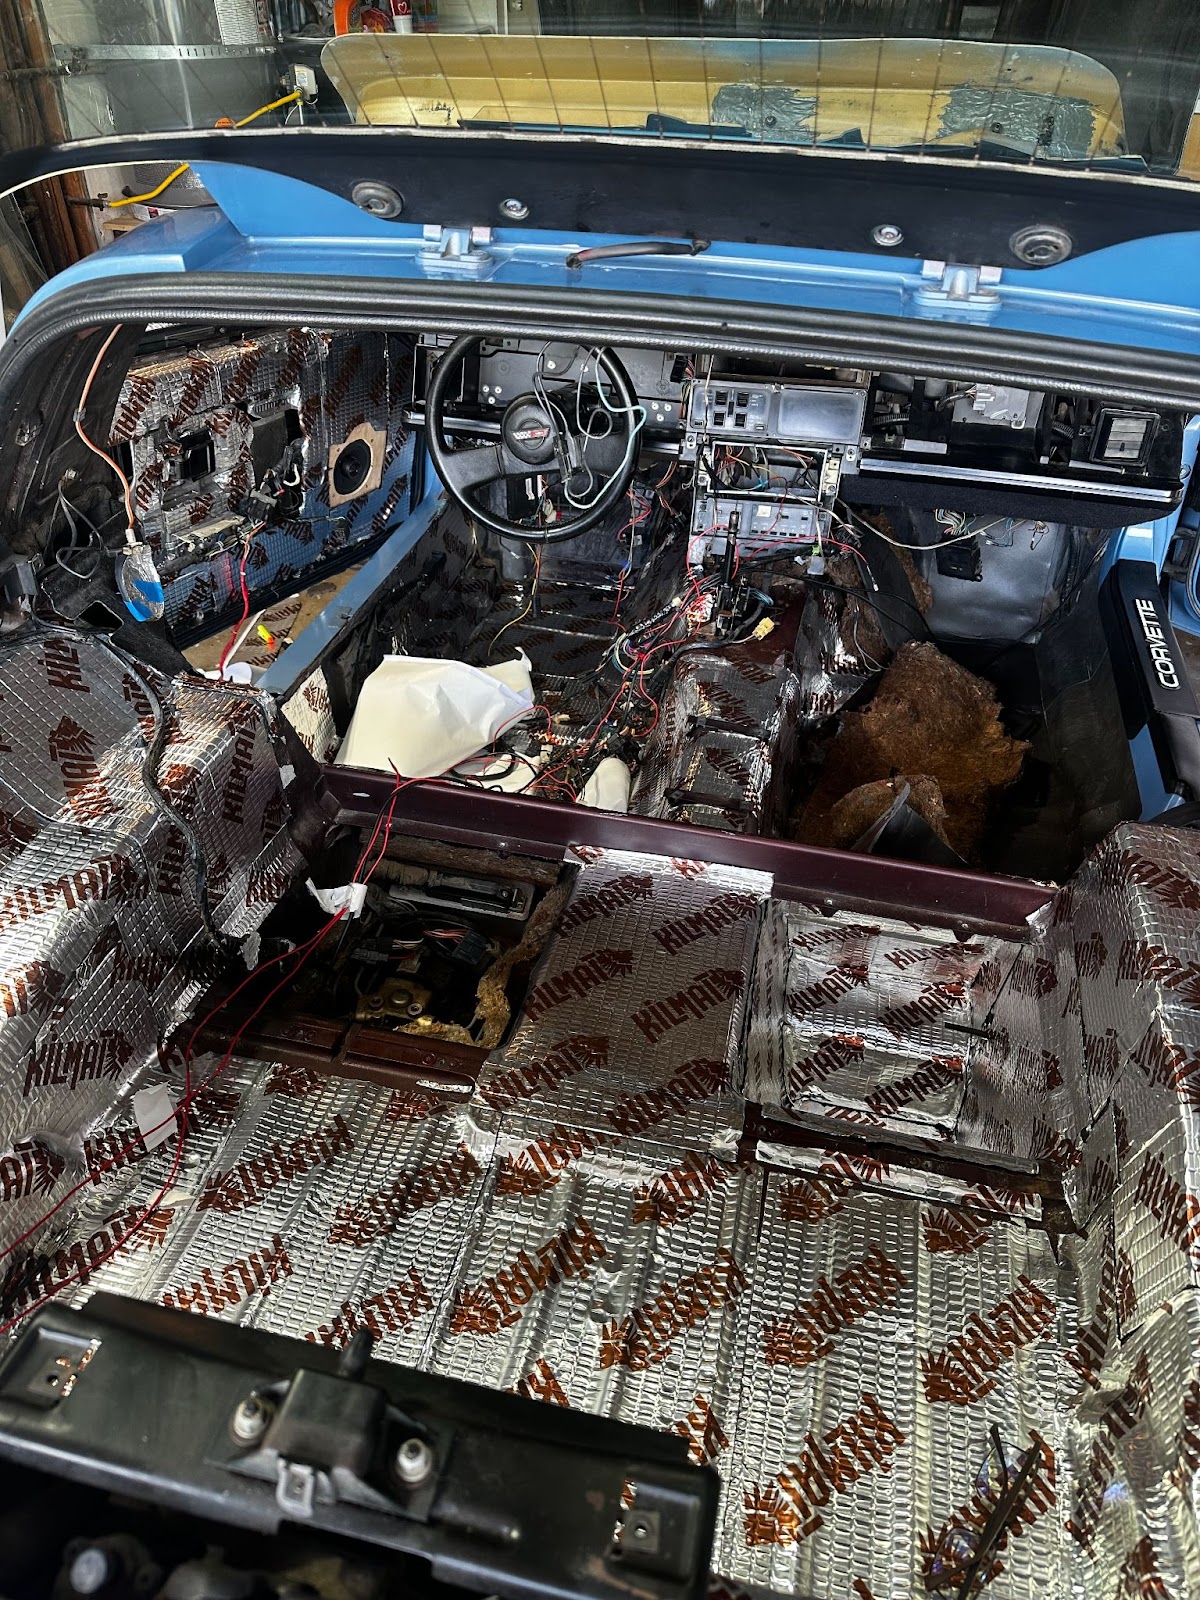

Onto the subwoofer installation. There's not a lot of information about getting subwoofers to play nice in this car, other than a few allusions to 10" storage compartment subs, gigantic false floor constructions, or huge boxes in the trunk. I hated the way the rear storage subs looked, and I definitely didn't want to lose any trunk storage on my daily driver. Enter: rear speaker compartments. Some PO had gutted them out anyway, and they seemed to be the perfect size, and position for subwoofers. They had this insulation-type (pictured below) stuff inside of them, which was promptly torn out. Word of caution, it itches like MAD. I suspect it's some form of fiberglass or other nasty stuff. Wear gloves and long sleeves.


Now, Originally, I wanted to create a removable fiberglass enclosure following instructions shown here. So I measured the interior size of the compartment, using packing peanuts and nerf darts (I did not have enough packing peanuts) and got aboutttt 1/2 sq ft. Conveniently enough, the cardboard boxes my subwoofers were shipped in were .25 sq feet which made this quite easy. While attempting to tape off the compartment I quickly realized this would not be possible, and the geometry would result in a box that is impossible to remove without destroying it.

Then came a radical idea. What if I didn�t need an enclosure? What if building up � inch thick of fiberglass wasn�t necessary? After all, that compartment is already fairly thick, sealed, and partially fiberglass. So I took a risk, and laid down just 2-3 layers of fiberglass cloth (about half what is usually recommended for enclosures) to brace any flex in the box, seal it 100%, and build up the thickness of the stamped steel portions of the compartment. But I was still missing one critical feature of a subwoofer enclosure, the mass that � inch thick MDF of � inch thick fiberglass usually provides. Allow me to remind you now of Kilmat. Which does what? Increase the mass of the panels it is bonded to, thus decreasing their resonance and making (in conjunction with the fiberglass bracing) the perfect subwoofer enclosure. So I laid down as much of the stuff as I could cram in there, and then some.


Next, I created a cardboard template for the cover plate, traced it out onto the MDF, cut two out, and cut out the ring for the subwoofer. After painting with the bedliner, it looked as good as I could hope for. So I lined the outside of it in gasket tape, then laid a generous bead of construction adhesive around the inner of it and screwed it down. I also ran my speaker wire through the tape, to avoid having to drill a hole into it later. I similarly lined the sub ring with the speaker tape, wired the subwoofers as shown, and screwed them down.


Next up was the dash speakers. Dropped in easy as pie, cut a couple of mounting plates out of MDF, painted them, and screwed em straight into the dash pad. Careful though, it is very easy to crack your pad doing this.

At this point it was time to run wires. Buy extra, cut them long, and trim after you�re 100% done with the install. Each wire is going to end up being about 2 feet longer than it looks like to get it routed nicely and to give you flexibility with your amplifier. Taking out the old head unit revealed numerous randomly cut wires in the dash, 4 (extremely old) Hersheys kisses, and a random toggle switch that wasn�t attached to anything. Take this opportunity to clean back there, apparently, you may never get the chance again. Also label ALL of your wires.
New head unit looks awesome. The Grand Prix isn�t listed as compatible for the C4, but in my opinion it looks massively better than the retrosound faces which are. I decided to use the flat mounting plate in the DIN kit, as I thought it looked the best and I didn�t want it to stick out any further than it had to.

With the head unit back in, the wires ran, and the speakers installed it was time to button everything back up. I put the old jute and neoprene insulation back in wherever I could, and then laid the carpet back down, cutting a hole to fit around the subwoofers. I also poked holes for the Amp wires underneath the passenger's seat. It�s also worth noting that I ran the amp power wire through a hole drilled in the fire wall by a P.O. for a security system that I had gotten rid of. After the carpet came trim, seats, and everything nice.


I secured the amp under the passenger's seat with a semi-unholy zip tie contraption, but it�s definitely not going anywhere anytime soon. I also screwed the subwoofer rings down, after cutting up the cheapo Amazon grills I bought to fit inside of them and gluing them down.

Overall, I�m super happy with how the installation went. All in all it probably took me about 4-5 days to do in between my homework and classes. The audio place I checked out quoted me $250/hr with a minimum of 6 hours to �take the door panels off� and inspect the Bose system (which my car has none of) with the installation time likely being 10-15 hours. Subwoofer sound quality is pretty damn good, and as far as I can tell the enclosures are performing exactly how I wanted them to. Still have to set the gains on the amplifier, and decide on a few good EQ presets, but I have Bluetooth, USB input/charging, big bass, and loud tunes. If I was re-doing this, I would probably plan for maybe 1 6x9 speaker in the back to counteract the front-heavy speaker distribution I have now. Maybe in the future. When I get home I�ll take some more pictures of the final installation and comment them down below. I�ll do my best to answer any questions.
Wanted to do a write-up because when I was planning all this, I felt sound systems was an area lacking a lot of corvette-specific documentation across the forums, at least any current posts about it. I would however like to preface that I am in no means an Audiophile and I know absolutely nothing about sound systems outside of the knowledge I accumulated to do this project.
I got tired of keeping a bluetooth speaker in my trunk, and I wanted the convenience and quality of a modern sound system, without sacrificing any of the trunk space or sleek lines of the car. This meant no big subwoofer boxes or false floors, concealed amp, and factory (ish, you'll see what I mean) speaker grilles. And as we all know, the squeaks, rattles, and wind noise is nothing to scoff at in these cars and the best way to drown it out is VOLUME. So, it had to be loud.
First order of business, the build list. All in, this project was probably about $1300. When I type it out it makes me physically cringe, wow that's a painful number to look at. Oh well. Here's what I used:
- Head Unit: RetroSound Grand Prix M2B
- Amplifier: RetroSound Technophonic
- Subwoofer: Rockford Fosgate Punch Stage 3 Shallow (2 Ohm) P3SD2-8 x2
- Dash Speakers: Kicker 46CSC464 x2
- Kick Panel Speakers: Alpine SPS-510 x2 (Previous Owner had installed these, they worked well and free is free)
- Din Kit: Metra 99-4644 Dash Kit (Black)
- Wiring Harness: Metra 70-1677-1 Receiver Wiring Harness
- Sub Grilles: Tongze 8" Speaker Grill Cover
- Sound Deadening: Kilmat (72 Sq Ft)
- Fiberglass Cloth
- Fiberglass resin
- Amp Wiring Kit: Scosche Install Centric ICAK84 (and an extra RCA cable, this kit was only 4 channels)
- Gorilla Glue Construction Adhesive
- � Inch MDF
- Rustoleum Truck Bed Liner
- Frost King Expanding Foam Gasket Tape
- Respirator, gloves, paint brushes, etc. for fiberglassing
Now the fun bit. Phase one was blowing up the interior of the car, taking out the interior trim, carpets, door panels, seats, center console, etc. This is tedious, make sure you put everything in haphazard piles around the garage, I promise, it makes it easier when you're putting it back together (Don't actually do that, but you probably will anyway).
While I was there, I found out that one of the many previous owners had, for some reason, lined the interior of the car with neoprene. And spray adhesive. A Lot of Spray Adhesive. No really, a LOT of spray adhesive. So that sucked, but obviously it had to go. Kilmat (and other sound deadening products) rely on increasing the apparent mass of the panel they're adhered to, thus increasing their inertia and preventing them from vibrating as easily. This vibration is what allows sound to get from outside, to inside. No Bueno. Anyway, it won't work if it's laid over the top of foam because the foam would mechanically isolate the Kilmat from the panel, allowing it to vibrate freely. So, after a lot of scraping with a drywall spatula and 90% isopropyl alcohol, I got most of it off.
Then, laid down all the Kilmat, which is a significantly cheaper version of dynamat and as far as I can tell, exactly the same thing. This honestly was pretty easy, this stuff cuts like warm butter and is pretty easy to readjust until you really press it in there for the final layup. Often, I would just lay the sheet overtop of an irregular feature and cut it to fit. And there's essentially zero waste because all of the cutoffs can just be stuck wherever you have space. Remember, the whole point is to increase the apparent mass of the car's panels. 100% coverage isn't needed, and if you have the clearance for it double up. I did so on the transmission tunnel, the rear storage compartments, wheel wells, and I did probably 5-6 layers in the rear speaker compartments. More on that Next. The only places to be particularly mindful of clearance are the doors and under the seats.
Onto the subwoofer installation. There's not a lot of information about getting subwoofers to play nice in this car, other than a few allusions to 10" storage compartment subs, gigantic false floor constructions, or huge boxes in the trunk. I hated the way the rear storage subs looked, and I definitely didn't want to lose any trunk storage on my daily driver. Enter: rear speaker compartments. Some PO had gutted them out anyway, and they seemed to be the perfect size, and position for subwoofers. They had this insulation-type (pictured below) stuff inside of them, which was promptly torn out. Word of caution, it itches like MAD. I suspect it's some form of fiberglass or other nasty stuff. Wear gloves and long sleeves.
Now, Originally, I wanted to create a removable fiberglass enclosure following instructions shown here. So I measured the interior size of the compartment, using packing peanuts and nerf darts (I did not have enough packing peanuts) and got aboutttt 1/2 sq ft. Conveniently enough, the cardboard boxes my subwoofers were shipped in were .25 sq feet which made this quite easy. While attempting to tape off the compartment I quickly realized this would not be possible, and the geometry would result in a box that is impossible to remove without destroying it.
Then came a radical idea. What if I didn�t need an enclosure? What if building up � inch thick of fiberglass wasn�t necessary? After all, that compartment is already fairly thick, sealed, and partially fiberglass. So I took a risk, and laid down just 2-3 layers of fiberglass cloth (about half what is usually recommended for enclosures) to brace any flex in the box, seal it 100%, and build up the thickness of the stamped steel portions of the compartment. But I was still missing one critical feature of a subwoofer enclosure, the mass that � inch thick MDF of � inch thick fiberglass usually provides. Allow me to remind you now of Kilmat. Which does what? Increase the mass of the panels it is bonded to, thus decreasing their resonance and making (in conjunction with the fiberglass bracing) the perfect subwoofer enclosure. So I laid down as much of the stuff as I could cram in there, and then some.
Next, I created a cardboard template for the cover plate, traced it out onto the MDF, cut two out, and cut out the ring for the subwoofer. After painting with the bedliner, it looked as good as I could hope for. So I lined the outside of it in gasket tape, then laid a generous bead of construction adhesive around the inner of it and screwed it down. I also ran my speaker wire through the tape, to avoid having to drill a hole into it later. I similarly lined the sub ring with the speaker tape, wired the subwoofers as shown, and screwed them down.
Next up was the dash speakers. Dropped in easy as pie, cut a couple of mounting plates out of MDF, painted them, and screwed em straight into the dash pad. Careful though, it is very easy to crack your pad doing this.
At this point it was time to run wires. Buy extra, cut them long, and trim after you�re 100% done with the install. Each wire is going to end up being about 2 feet longer than it looks like to get it routed nicely and to give you flexibility with your amplifier. Taking out the old head unit revealed numerous randomly cut wires in the dash, 4 (extremely old) Hersheys kisses, and a random toggle switch that wasn�t attached to anything. Take this opportunity to clean back there, apparently, you may never get the chance again. Also label ALL of your wires.
New head unit looks awesome. The Grand Prix isn�t listed as compatible for the C4, but in my opinion it looks massively better than the retrosound faces which are. I decided to use the flat mounting plate in the DIN kit, as I thought it looked the best and I didn�t want it to stick out any further than it had to.
With the head unit back in, the wires ran, and the speakers installed it was time to button everything back up. I put the old jute and neoprene insulation back in wherever I could, and then laid the carpet back down, cutting a hole to fit around the subwoofers. I also poked holes for the Amp wires underneath the passenger's seat. It�s also worth noting that I ran the amp power wire through a hole drilled in the fire wall by a P.O. for a security system that I had gotten rid of. After the carpet came trim, seats, and everything nice.
I secured the amp under the passenger's seat with a semi-unholy zip tie contraption, but it�s definitely not going anywhere anytime soon. I also screwed the subwoofer rings down, after cutting up the cheapo Amazon grills I bought to fit inside of them and gluing them down.
Overall, I�m super happy with how the installation went. All in all it probably took me about 4-5 days to do in between my homework and classes. The audio place I checked out quoted me $250/hr with a minimum of 6 hours to �take the door panels off� and inspect the Bose system (which my car has none of) with the installation time likely being 10-15 hours. Subwoofer sound quality is pretty damn good, and as far as I can tell the enclosures are performing exactly how I wanted them to. Still have to set the gains on the amplifier, and decide on a few good EQ presets, but I have Bluetooth, USB input/charging, big bass, and loud tunes. If I was re-doing this, I would probably plan for maybe 1 6x9 speaker in the back to counteract the front-heavy speaker distribution I have now. Maybe in the future. When I get home I�ll take some more pictures of the final installation and comment them down below. I�ll do my best to answer any questions.
Drifting


Joined: Apr 2011
Posts: 1,925
Likes: 441
From: Albuquerque NM
Heck yeah awesome documentation and work, very similar to my install and relevant thread for my 89. I did a very similar thing for the rear subs, using the factory enclosure as the sub box, but I wish I had gone with a pair of 8" subs like you did, I instead tried some boutique 6x9" subs but if I do an install like this again I will go with 8" subs.
Thread Starter
Intermediate
Joined: Jan 2024
Posts: 43
Likes: 6
From: San Diego CA
6x9 subs sound pretty cool, I tried to find your thread but couldn't, you mind sharing some pics? I'm super happy with the 8", I had almost gone with 6.5" but the 8 inch ones fit perfectly, and the output is exactly what I wanted.
Drifting
Joined: Apr 2011
Posts: 1,925
Likes: 441
From: Albuquerque NM
How would you characterize and describe the output from the pair of 8" subs?
I feel like that is the way to go.
Here is my install thread:
https://www.corvetteforum.com/forums...n-coupe-6.html
I feel like that is the way to go.
Here is my install thread:
https://www.corvetteforum.com/forums...n-coupe-6.html


