
How to replace running lights in the vette...

Thread Starter
Burning Brakes

Joined: Feb 2009
Posts: 811
Likes: 0
From: greenville north carolina
Hey brothers...my left rear running light is out...how do i go about replacing it? I am at the point where the air vent? and the cord to pull and unlock the gas...am not certain how to get in there to replace the bulb??


Administrator


Joined: Mar 2001
Posts: 368,541
Likes: 24,833
From: In a parallel universe. Currently own 2014 Stingray Coupe.
C7 of the Year - Modified Finalist 2021
MO Events Coordinator
St. Jude Co-Organizer
St. Jude Donor '03 thru '26
NCM Sinkhole Donor
CI 5, 8 & 11 Veteran
If you are talking about the side light on the rear fender, just take the outboard rear taillight out and you can reach in to access the light.
Pro


Joined: Jun 2007
Posts: 681
Likes: 0
From: Flushed and swirling down the bowl
If you mean the red rear side marker, then the easiest way I know is to remove the outside brake light. There is two Torx-head screws that take a T-15 (I think) bit. Then just pull out the taillight assembly and push the locking tab on the bulb socket and twist it out, so you can reach in easier. Then just reach in, twist out the marker light socket, and replace the bulb. As the service manuals say, installation is the reverse process.
If you mean the amber side marker behind the DRL in the front corner lense, If you have really long, skinny arms (or know someone who does) then you have two options. Turn the headlights on, (and turn back one to parking lights if you want), and see if you can reach the small socket by sticking your hand through the space under the headlight. BE ADVISED: if you leave the headlights up too long, the lights will turn off automatically to save the battery and close down.
If your arms won't fit, then raise the front end and remove the access panel and side spoiler with a 7 mm socket. I think there are 7 or 8 black screws. I find it easier to remove the spoiler first the leave 1 or 2 screws almost all the out to hold up the panel while removing the rest. Once you've done that, you probably won't be able to see the corner light because of the brake cooling duct. So, you'll have to feel for the socket. The small marker will be closest to the outside.
Tech Contributor


Joined: Dec 2003
Posts: 19,384
Likes: 87
From: Horncastle Lincolnshire, England
2023 C5 of the Year Finalist - Unmodified
I guess you mean the rear side markers? Its easy on the drivers side but the antenna on the Vert gets in the way on the pasenger side.
Here's the procedure from the book:
Marker Lamp Replacement - Side
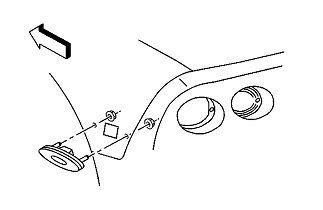
• Remove the nearest outer tail lamp.
• Remove the two nuts attaching the radio antenna bracket and position the antenna for access to the side marker lamp if equipped with a power antenna.
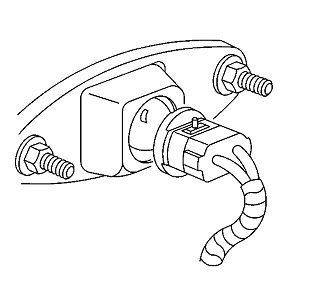
• Remove the sidemarker lamp socket from the sidemarker lamp. Access the sidemarker lamp through the tail lamp opening.
• Remove the sidemarker lamp retaining nuts.
• Remove the sidemarker lamp.
• Position the sidemarker lamp to the fender.
Notice
Use the correct fastener in the correct location. Replacement fasteners must be the correct part number for that application. Fasteners requiring replacement or fasteners requiring the use of thread locking compound or sealant are identified in the service procedure. Do not use paints, lubricants, or corrosion inhibitors on fasteners or fastener joint surfaces unless specified. These coatings affect fastener torque and joint clamping force and may damage the fastener. Use the correct tightening sequence and specifications when installing fasteners in order to avoid damage to parts and systems.
• Install the sidemarker lamp retaining nuts. Tighten
Tighten the rear sidemarker lamp retaining nuts to 2 N•m (18 lb in).
• Install the socket to the sidemarker lamp assembly.
• Install the nuts attaching the radio antenna, if removed. Tighten
Tighten the antenna bracket retaining nuts to 12 N•m (106 lb in).
• Install the tail lamp.
Marker Lamp Bulb Replacement – Side
Removal:
• Remove the nearest outer tail lamp. Access the sidemarker lamp through the tail lamp opening.
• Remove the sidemarker lamp socket from the sidemarker lamp assembly by rotating the socket counterclockwise.
• Remove the bulb from the socket.
Installation:
• Install the bulb to the sidemarker lamp socket.
• Install the socket to the sidemarker lamp assembly. Rotate the socket clockwise to engage the locking tabs.
• Install the tail lamp
Here's the procedure from the book:
Marker Lamp Replacement - Side
• Remove the nearest outer tail lamp.
• Remove the two nuts attaching the radio antenna bracket and position the antenna for access to the side marker lamp if equipped with a power antenna.
• Remove the sidemarker lamp socket from the sidemarker lamp. Access the sidemarker lamp through the tail lamp opening.
• Remove the sidemarker lamp retaining nuts.
• Remove the sidemarker lamp.
• Position the sidemarker lamp to the fender.
Notice
Use the correct fastener in the correct location. Replacement fasteners must be the correct part number for that application. Fasteners requiring replacement or fasteners requiring the use of thread locking compound or sealant are identified in the service procedure. Do not use paints, lubricants, or corrosion inhibitors on fasteners or fastener joint surfaces unless specified. These coatings affect fastener torque and joint clamping force and may damage the fastener. Use the correct tightening sequence and specifications when installing fasteners in order to avoid damage to parts and systems.
• Install the sidemarker lamp retaining nuts. Tighten
Tighten the rear sidemarker lamp retaining nuts to 2 N•m (18 lb in).
• Install the socket to the sidemarker lamp assembly.
• Install the nuts attaching the radio antenna, if removed. Tighten
Tighten the antenna bracket retaining nuts to 12 N•m (106 lb in).
• Install the tail lamp.
Marker Lamp Bulb Replacement – Side
Removal:
• Remove the nearest outer tail lamp. Access the sidemarker lamp through the tail lamp opening.
• Remove the sidemarker lamp socket from the sidemarker lamp assembly by rotating the socket counterclockwise.
• Remove the bulb from the socket.
Installation:
• Install the bulb to the sidemarker lamp socket.
• Install the socket to the sidemarker lamp assembly. Rotate the socket clockwise to engage the locking tabs.
• Install the tail lamp
Last edited by DeeGee; Mar 9, 2009 at 04:02 AM.


