



fog lamp help!!

Thread Starter
Pro

Joined: Sep 2008
Posts: 510
Likes: 0
From: oceanside CA
 fog lamp help!!
been having problems with my fog lamps not turning on. I have checked all the fuses that go with the fog lamps (#1,#6,#39,#37,and #32 in the footwell) but none of them are blown and all the relays are good and have just recently been replaced. not sure what the problem is but would really like to have my lamps back. any help is welcome. 

Melting Slicks


Joined: Aug 2003
Posts: 2,786
Likes: 7
From: Iowa
the fog lights are controlled by the BCM. when you press the fog lights button you are asking the BCM to turn them on. if it feels like you should be allowed to it will provide a ground output to the fog light control relay.
the BCM decides you are not worthy of fog lights if you don't have at least your parking lights on already, or if your high beams are on. so make sure that's not the case.
check the connections behind the switch, and at the fog lights themselves. if its working sometimes but not others something must be loose.
the BCM decides you are not worthy of fog lights if you don't have at least your parking lights on already, or if your high beams are on. so make sure that's not the case.
check the connections behind the switch, and at the fog lights themselves. if its working sometimes but not others something must be loose.

Le Mans Master


Joined: Feb 2003
Posts: 6,683
Likes: 144
From: Memphis Tennessee
the fog lights are controlled by the BCM. when you press the fog lights button you are asking the BCM to turn them on. if it feels like you should be allowed to it will provide a ground output to the fog light control relay.
the BCM decides you are not worthy of fog lights if you don't have at least your parking lights on already, or if your high beams are on. so make sure that's not the case.
check the connections behind the switch, and at the fog lights themselves. if its working sometimes but not others something must be loose.
the BCM decides you are not worthy of fog lights if you don't have at least your parking lights on already, or if your high beams are on. so make sure that's not the case.
check the connections behind the switch, and at the fog lights themselves. if its working sometimes but not others something must be loose.
Thread Starter
Pro
Joined: Sep 2008
Posts: 510
Likes: 0
From: oceanside CA
ok ill check the switch but i know the low beams are on in order for the fogs to work so i have checked that but idk what the deal is beccause when i lock the car i have it so the horn and the lights will flash and sometimes the lights will flash and other times they wont. not sure if its the BCM acting up but from what i have herd it can be quite an expensive fix...
Melting Slicks
Joined: Nov 2004
Posts: 2,275
Likes: 6
From: Lake Oswego, Near Portland Oregon
Have you checked for burned out bulbs? I have had mine burn out, sometimes in near time with one another, resulting in darkness. Stock bulbs are 35 watt, but there are 50 watt in the exact same base, actually stock for the Camaro fogs, that will fit and work just fine. I am about to remove control of the fogs from the computer..I'll be installing a REAL SWITCH and a high current relay to run the fogs, just like my main headlights. You can also use a feed from the original fog lamp hot wire at the bulb to also drive the same new relay, but through a back-blocking diode. In this way, if the computer wants to flash the fogs to let you know it got a command from the radio key fob, or for approach lights, it can light 'em up, but in the REAL world, you can over-ride the computer via the manual switch and really to turn them ON, WHENEVER you want them on.
The same diode trick can be used between HI and LOW relay coils, so that when LOW is selected, you get lows, but when you have HIGH selected, you can get HI and LOW on at the same time! THATS a lot of LIGHT with Eurospec T-84 glass headlamps and 130/100 watt Halogen bulbs.
Good luck!
The same diode trick can be used between HI and LOW relay coils, so that when LOW is selected, you get lows, but when you have HIGH selected, you can get HI and LOW on at the same time! THATS a lot of LIGHT with Eurospec T-84 glass headlamps and 130/100 watt Halogen bulbs.
Good luck!
Last edited by FiberglassFan; Jul 5, 2009 at 05:15 AM.
Thread Starter
Pro
Joined: Sep 2008
Posts: 510
Likes: 0
From: oceanside CA
Ok I like the headlight idea with keeping them both on with the highs. But as far as the fog lamps I'm eventually going to get HID's for them but before I do that I need to get them to work first off. Not sure how to go about checking the BCM fuse or relay to check to see if that's the problem. But I really want my fogs back because the lack of light my headlights put out the fog lights really make up for their downfall.
Corvette Stories
The Best of Corvette for Corvette Enthusiasts

Top 10 Most Explosive Corvettes Ever Made: Power-to-Weight Ratio Ranked!
Joe Kucinski
150 hp to 1,250 hp: Every Corvette Generation Compared by the Specs That Matter
Joe Kucinski
8 Coolest Corvette Pace Cars (and Replicas) of All Time
Verdad Gallardo
Top 10 Corvette Engines RANKED by Peak Torque (70+ Years of Muscle!)
Joe Kucinski
Corvette ZR1X Will Be Pacing the Indy 500, And Could Probably Race, Too!
Verdad Gallardo
Top 10 Corvettes Coming to Mecum Indy 2026!
Brett Foote
Top 10 C9 Corvette MUST-HAVES to Fix These C8 Generation Flaws!
Michael S. Palmer
10 Revolutionary 'Corvette Firsts' Most People Don't Know
Joe Kucinski
5 Reasons to Upgrade to an LS6-Powered Corvette; 5 Reasons to Stay LT2
Michael S. Palmer
Melting Slicks
Joined: Aug 2003
Posts: 2,786
Likes: 7
From: Iowa
Have you checked for burned out bulbs? I have had mine burn out, sometimes in near time with one another, resulting in darkness. Stock bulbs are 35 watt, but there are 50 watt in the exact same base, actually stock for the Camaro fogs, that will fit and work just fine. I am about to remove control of the fogs from the computer..I'll be installing a REAL SWITCH and a high current relay to run the fogs, just like my main headlights. You can also use a feed from the original fog lamp hot wire at the bulb to also drive the same new relay, but through a back-blocking diode. In this way, if the computer wants to flash the fogs to let you know it got a command from the radio key fob, or for approach lights, it can light 'em up, but in the REAL world, you can over-ride the computer via the manual switch and really to turn them ON, WHENEVER you want them on.
The same diode trick can be used between HI and LOW relay coils, so that when LOW is selected, you get lows, but when you have HIGH selected, you can get HI and LOW on at the same time! THATS a lot of LIGHT with Eurospec T-84 glass headlamps and 130/100 watt Halogen bulbs.
Good luck!
The same diode trick can be used between HI and LOW relay coils, so that when LOW is selected, you get lows, but when you have HIGH selected, you can get HI and LOW on at the same time! THATS a lot of LIGHT with Eurospec T-84 glass headlamps and 130/100 watt Halogen bulbs.
Good luck!
also there are no relays for the stock headlights, so you can't just insert a diode and make a high and low beam mod work. you'll have to add a relay to do the trick. there are a couple of threads about how to do this, not very difficult to do at all.
Tech Contributor

Joined: Dec 2003
Posts: 19,384
Likes: 87
From: Horncastle Lincolnshire, England
2023 C5 of the Year Finalist - Unmodified
If you checked the fuses the next thing is to replace the bulbs. Intermittent operation could be bulbs just about to quit.
Here's how:
Document ID# 780025
2002 Chevrolet Corvette
________________________________________
Fog Lamp Bulb Replacement - Front
Removal Procedure
1. Raise and support the vehicle. Refer to Lifting and Jacking the Vehicle in General Information.
2. Remove the front fascia lower close out panel. Refer to Close Out Panel - Front Bumper Fascia Lower in Bumpers.
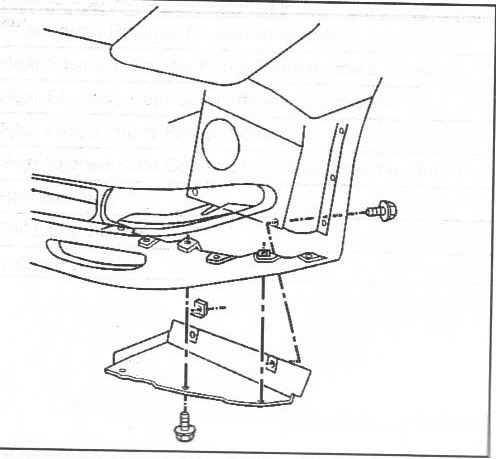
3. Release the brake caliper cooling duct from the front fascia and position the duct aside.

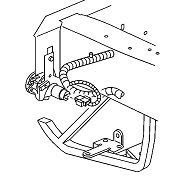
4. Disconnect the front fog lamp electrical connector from the fog lamp bulb/socket.
Caution
Halogen bulbs contain gas under pressure. Handling a bulb improperly could cause it to shatter into flying glass fragments. To help avoid personal injury:
o Turn off the lamp switch and allow the bulb to cool before changing the bulb.
o Leave the lamp switch OFF until the bulb change is complete.
o Always wear eye protection when changing a halogen bulb.
o Handle the bulb only by its base. Avoid touching the glass.
o Keep dirt and moisture off the bulb.
o Properly dispose of the used bulb.
o Keep halogen bulbs out of the reach of children.
5. Remove the fog lamp bulb/socket from the fog lamp.
6. Rotate the fog lamp bulb/socket counter-clockwise to release it from fog lamp.
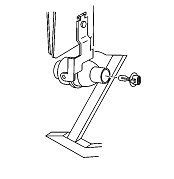
Installation Procedure
1. Install the fog lamp bulb/socket to the fog lamp.
2. Rotate the fog lamp bulb/socket clockwise to secure it to the fog lamp.
3. Connect the front fog lamp electrical connector to the fog lamp bulb/socket.
4. Position the brake caliper cooling duct to the front fascia, and press to secure.
5. Install the front fascia lower close out panel. Refer to Close Out Panel - Front Bumper Fascia Lower in Bumpers.
6. Lower the vehicle.
7. Check and adjust fog lamp aim as necessary. Refer to Fog Lamp Aiming Procedure
Here's how:
Document ID# 780025
2002 Chevrolet Corvette
________________________________________
Fog Lamp Bulb Replacement - Front
Removal Procedure
1. Raise and support the vehicle. Refer to Lifting and Jacking the Vehicle in General Information.
2. Remove the front fascia lower close out panel. Refer to Close Out Panel - Front Bumper Fascia Lower in Bumpers.
3. Release the brake caliper cooling duct from the front fascia and position the duct aside.
4. Disconnect the front fog lamp electrical connector from the fog lamp bulb/socket.
Caution
Halogen bulbs contain gas under pressure. Handling a bulb improperly could cause it to shatter into flying glass fragments. To help avoid personal injury:
o Turn off the lamp switch and allow the bulb to cool before changing the bulb.
o Leave the lamp switch OFF until the bulb change is complete.
o Always wear eye protection when changing a halogen bulb.
o Handle the bulb only by its base. Avoid touching the glass.
o Keep dirt and moisture off the bulb.
o Properly dispose of the used bulb.
o Keep halogen bulbs out of the reach of children.
5. Remove the fog lamp bulb/socket from the fog lamp.
6. Rotate the fog lamp bulb/socket counter-clockwise to release it from fog lamp.
Installation Procedure
1. Install the fog lamp bulb/socket to the fog lamp.
2. Rotate the fog lamp bulb/socket clockwise to secure it to the fog lamp.
3. Connect the front fog lamp electrical connector to the fog lamp bulb/socket.
4. Position the brake caliper cooling duct to the front fascia, and press to secure.
5. Install the front fascia lower close out panel. Refer to Close Out Panel - Front Bumper Fascia Lower in Bumpers.
6. Lower the vehicle.
7. Check and adjust fog lamp aim as necessary. Refer to Fog Lamp Aiming Procedure
Tech Contributor
Joined: Dec 2003
Posts: 19,384
Likes: 87
From: Horncastle Lincolnshire, England
2023 C5 of the Year Finalist - Unmodified
Failing that here's how to troubleshoot
Fog Lamps Inoperative
Step
Action
Yes
No
Schematic Reference: Fog Lights Schematics
Connector End View Reference: Master Electrical Component List
DEFINITION: Use this chart if either the front or the rear fog lamp is inoperative.
1
Did you perform the Lighting System Diagnostic System Check?
Go to Step 2
Go to Diagnostic System Check - Lighting Systems
2
1. Turn ON the ignition, with the engine OFF.
2. Turn ON the park lamps.
3. Turn ON the fog lamps.
Do both fog lamps illuminate?
Go to Testing for Intermittent and Poor Connections in Wiring Systems
Go to Step 3
3
Did only one lamp illuminate?
Go to Step 11
Go to Step 4
4
1. Install a scan tool.
2. Turn ON the ignition, with the engine OFF.
3. With the scan tool, command the inoperable fog lamp relay ON and OFF.
Do the fog lamps turn ON and OFF with each command?
Go to Step 5
Go to Step 6
5
1. Remove and disconnect the front or the rear fog lamp switch.
2. Install a jumper, between the fused F/TNKDR battery positive voltage supply circuit and the inoperable fog lamp switch signal circuit at the front or the rear fog lamp switch.
Do the fog lamps illuminate?
Go to Step 12
Go to Step 9
6
1. Remove the fog lamp relay.
2. Install a fused jumper across the switch relay connection.
Do the fog lamps turn ON?
Go to Step 7
Go to Step 10
7
1. Reinstall the fog lamp relay.
2. Disconnect the BCM connector C1.
3. Install a fused jumper at the BCM connector C1 between the fog lamp relay control circuit and ground.
Do the fog lamps illuminate?
Go to Step 15
Go to Step 8
8
Test for a short to battery positive voltage, open or a poor connection in the fog lamp relay control circuit. Refer to Circuit Testing and Wiring Repairs in Wiring Systems.
Did you find and complete the repair?
Go to Step 17
Go to Step 13
9
Test for short to ground, open or a poor connection in the fog lamp switch signal circuit. Refer to Circuit Testing and Wiring Repairs in Wiring Systems.
Did you find and complete the repair?
Go to Step 17
Go to Step 16
10
Test for an short to ground in the fog lamp switched battery positive voltage supply circuit. Refer to Circuit Testing and Wiring Repairs in Wiring Systems.
Did you complete the repair?
Go to Step 17
Go to Step 14
11
Repair the open or high resistance in the inoperative fog lamp power supply or ground circuit. Refer to Circuit Testing and Wiring Repairs in Wiring Systems.
Did you complete the repair?
Go to Step 17
--
12
Replace the fog lamp switch. Refer to Fog Lamp Switch Replacement - Front .
Did you complete the replacement?
Go to Step 17
--
13
Replace the fog lamp relay. Refer to Relay Replacement in Wiring Systems.
Did you complete the replacement?
Go to Step 17
--
14
Replace the underhood fuse block. Refer to Underhood Electrical Center or Junction Block Replacement in Wiring Systems.
Did you complete the replacement?
Go to Step 17
--
15
Important
Perform the setup procedure for the body control module (BCM). Refer to Body Control Module (BCM) Programming/RPO Configuration in Body Control System.
Replace the BCM. Refer to Body Control Module Replacement in Body Control Systems.
Did you complete the replacement?
Go to Step 17
--
16
Repair an open, high resistance or short to ground in the F/TNKDR fused battery positive voltage supplied circuit. Refer to Circuit Testing and Wiring Repairs in Wiring Systems.
Did you complete the repair?
Go to Step 17
--
17
Operate the system in order to verify the repair.
Did you correct the condition?
System OK
Go to Step 2
Document ID# 671014
2002 Chevrolet Corvette
Fog Lamps Inoperative
Step
Action
Yes
No
Schematic Reference: Fog Lights Schematics
Connector End View Reference: Master Electrical Component List
DEFINITION: Use this chart if either the front or the rear fog lamp is inoperative.
1
Did you perform the Lighting System Diagnostic System Check?
Go to Step 2
Go to Diagnostic System Check - Lighting Systems
2
1. Turn ON the ignition, with the engine OFF.
2. Turn ON the park lamps.
3. Turn ON the fog lamps.
Do both fog lamps illuminate?
Go to Testing for Intermittent and Poor Connections in Wiring Systems
Go to Step 3
3
Did only one lamp illuminate?
Go to Step 11
Go to Step 4
4
1. Install a scan tool.
2. Turn ON the ignition, with the engine OFF.
3. With the scan tool, command the inoperable fog lamp relay ON and OFF.
Do the fog lamps turn ON and OFF with each command?
Go to Step 5
Go to Step 6
5
1. Remove and disconnect the front or the rear fog lamp switch.
2. Install a jumper, between the fused F/TNKDR battery positive voltage supply circuit and the inoperable fog lamp switch signal circuit at the front or the rear fog lamp switch.
Do the fog lamps illuminate?
Go to Step 12
Go to Step 9
6
1. Remove the fog lamp relay.
2. Install a fused jumper across the switch relay connection.
Do the fog lamps turn ON?
Go to Step 7
Go to Step 10
7
1. Reinstall the fog lamp relay.
2. Disconnect the BCM connector C1.
3. Install a fused jumper at the BCM connector C1 between the fog lamp relay control circuit and ground.
Do the fog lamps illuminate?
Go to Step 15
Go to Step 8
8
Test for a short to battery positive voltage, open or a poor connection in the fog lamp relay control circuit. Refer to Circuit Testing and Wiring Repairs in Wiring Systems.
Did you find and complete the repair?
Go to Step 17
Go to Step 13
9
Test for short to ground, open or a poor connection in the fog lamp switch signal circuit. Refer to Circuit Testing and Wiring Repairs in Wiring Systems.
Did you find and complete the repair?
Go to Step 17
Go to Step 16
10
Test for an short to ground in the fog lamp switched battery positive voltage supply circuit. Refer to Circuit Testing and Wiring Repairs in Wiring Systems.
Did you complete the repair?
Go to Step 17
Go to Step 14
11
Repair the open or high resistance in the inoperative fog lamp power supply or ground circuit. Refer to Circuit Testing and Wiring Repairs in Wiring Systems.
Did you complete the repair?
Go to Step 17
--
12
Replace the fog lamp switch. Refer to Fog Lamp Switch Replacement - Front .
Did you complete the replacement?
Go to Step 17
--
13
Replace the fog lamp relay. Refer to Relay Replacement in Wiring Systems.
Did you complete the replacement?
Go to Step 17
--
14
Replace the underhood fuse block. Refer to Underhood Electrical Center or Junction Block Replacement in Wiring Systems.
Did you complete the replacement?
Go to Step 17
--
15
Important
Perform the setup procedure for the body control module (BCM). Refer to Body Control Module (BCM) Programming/RPO Configuration in Body Control System.
Replace the BCM. Refer to Body Control Module Replacement in Body Control Systems.
Did you complete the replacement?
Go to Step 17
--
16
Repair an open, high resistance or short to ground in the F/TNKDR fused battery positive voltage supplied circuit. Refer to Circuit Testing and Wiring Repairs in Wiring Systems.
Did you complete the repair?
Go to Step 17
--
17
Operate the system in order to verify the repair.
Did you correct the condition?
System OK
Go to Step 2
Document ID# 671014
2002 Chevrolet Corvette
Melting Slicks
Joined: Nov 2004
Posts: 2,275
Likes: 6
From: Lake Oswego, Near Portland Oregon
one piece of advice though, make sure you hook up your new fog light switch so that the fog lights can't turn on without the parking lights on first, use a parking light power (brown wire) for power to your switch and then use a relay to keep the fog light power off the parking lights circuit. otherwise you could forget you have your fog lights on a drain the battery.
also there are no relays for the stock headlights, so you can't just insert a diode and make a high and low beam mod work. you'll have to add a relay to do the trick. there are a couple of threads about how to do this, not very difficult to do at all.
also there are no relays for the stock headlights, so you can't just insert a diode and make a high and low beam mod work. you'll have to add a relay to do the trick. there are a couple of threads about how to do this, not very difficult to do at all.
Melting Slicks
Joined: Nov 2004
Posts: 2,275
Likes: 6
From: Lake Oswego, Near Portland Oregon
Did you try fresh bulbs yet???? or check the voltage at the bulb socket????? Until you know FOR SURE that there is or is not power at the bulb, no point in worrying about the computer. If new bulbs or voltage check at the socket confirms no power out to the lamps, then worry about the fuses. and last, worry about the computer. If it gets that far, I can't be of much further help as I don't have a 'diagnostic tree' of the procedure for the computer system.
2 dead bulbs can fool the best of us, even almost new bulbs can fail early, and throw you off looking for other faults..Yeah, even I have been bit this asumption in the past, and is why I mention it again...Do not assume that the bulbs are good, CONFIRM and then move on if they are confirmed good.
Jennifer
2 dead bulbs can fool the best of us, even almost new bulbs can fail early, and throw you off looking for other faults..Yeah, even I have been bit this asumption in the past, and is why I mention it again...Do not assume that the bulbs are good, CONFIRM and then move on if they are confirmed good.
Jennifer
