


Techron (Fuel Gauge issues)

Thread Starter
Instructor

Joined: Oct 2006
Posts: 172
Likes: 0
Would Techron work if the Fuel Tank Module ASM needs to be replaced? I know that part is $552.00... Just a question for the people who have used it.. If it would not work when to use Techron?
Race Director


Joined: Jul 2004
Posts: 16,795
Likes: 62
From: Lake Havasu City, AZ
The question is how do you know your ASM needs to be changed...
ineffective detergency in some gasolines results in sulfur deposits on the sending unit..... Techron can fix this.
corrosion on the ground connection can result in erratic gas gauge readings....
Techron cannot help, but cleaning the ground can.
ineffective detergency in some gasolines results in sulfur deposits on the sending unit..... Techron can fix this.
corrosion on the ground connection can result in erratic gas gauge readings....
Techron cannot help, but cleaning the ground can.
Melting Slicks


Joined: Jan 2007
Posts: 3,021
Likes: 133
From: Conejo Valley CA
Sorry to deliver bad news but I am in the camp that techron won't work. It doesn't hurt if the fuel gauges are reading properly to prevent problems, but once they've go bad, they're bad. The problem is caused by sulfur induced corrosion on the fuel level sensor which is part of the fuel sending unit assembly (don't know what an "ASM" is). I think in one of the tanks, you can purchase the fuel level sensor individually, but I know for the other tank, you're forced to buy the entire fuel sending unit.
To know for sure, for around $150, you can have your local Chevy dealer perform a detailed test. They know how to perform this test because this problem has a GM TSB (technical service bulletin) published about it for GM's techs. Not that I am a fan of having the car serviced at the dealership, but for this repair, it makes sense.
I had both of my fuel sending unit assemblies replaced and ever since, the gas gauges work great. In fact, the only gas that goes in my car is Chevron 91 and no other (because of the techron additive in the gas)!

Safety Car

Joined: May 2008
Posts: 4,237
Likes: 11
From: Lacombe Louisiana
I think Seafoam works better than the techron additive to fix your gauge.It has been well documented over and over here in this forum,so replacing your sending units was prob a waste of good money.I dont think it will help in the fuel transfer problem though.
Race Director
Joined: May 2005
Posts: 11,992
Likes: 1,331
From: Middletown, DE

I must be insane, then. It's not a "camp" issue. My gauge crapped out 100 miles after a fillup, I threw in a bottle of Techron (smaller bottle btw), and it worked fine for about 5-6 fillups. Did it again, same thing. When I refilled WITHOUT adding Techron after it had crapped out, it would go 100 miles and crap out again. Tried this a few times. Then put in the Techron and it worked. Again.
So as far as I am concerned, Techron works. Period. Others may have different results.
Now I know that's not a cure, but 6-8 bottles of Techron per year is an easy and relatively cheap way to mask the symptoms. What I am trying to isolate now is whether the frequency of needing Techron is reduced depending on the quality of the gas (unfortunately cannot get Chevron or Texaco around here). Shell seems a bit better than the others, but I cannot prove this...
Safety Car
Joined: Aug 2007
Posts: 4,506
Likes: 0
From: This is not a Song, It's an Outburst: Or, The Establishment Blues; Sixto Diaz Rodriguez
I had the problem once, added a bottle of Techron, problem never came back, but, where I am, I use Chevron-93 w/Techron. Recently this was discussed in a different thread and someone posted Shell has the Techron additive, albeit, under a different brand name, so Shell may be your answer. 
Race Director

Joined: Oct 2007
Posts: 14,107
Likes: 26
From: 4th on the list of top 100 in USA Ga.
Sorry to deliver bad news but I am in the camp that techron won't work. It doesn't hurt if the fuel gauges are reading properly to prevent problems, but once they've go bad, they're bad. The problem is caused by sulfur induced corrosion on the fuel level sensor which is part of the fuel sending unit assembly (don't know what an "ASM" is). I think in one of the tanks, you can purchase the fuel level sensor individually, but I know for the other tank, you're forced to buy the entire fuel sending unit.
To know for sure, for around $150, you can have your local Chevy dealer perform a detailed test. They know how to perform this test because this problem has a GM TSB (technical service bulletin) published about it for GM's techs. Not that I am a fan of having the car serviced at the dealership, but for this repair, it makes sense.
I had both of my fuel sending unit assemblies replaced and ever since, the gas gauges work great. In fact, the only gas that goes in my car is Chevron 91 and no other (because of the techron additive in the gas)!
To know for sure, for around $150, you can have your local Chevy dealer perform a detailed test. They know how to perform this test because this problem has a GM TSB (technical service bulletin) published about it for GM's techs. Not that I am a fan of having the car serviced at the dealership, but for this repair, it makes sense.
I had both of my fuel sending unit assemblies replaced and ever since, the gas gauges work great. In fact, the only gas that goes in my car is Chevron 91 and no other (because of the techron additive in the gas)!
Corvette Stories
The Best of Corvette for Corvette Enthusiasts

Top 10 Most Expensive Corvettes Ever Sold on Bring A Trailer
Brett Foote
10 Things Every Corvette Owner Needs (2026 Edition)
Michael S. Palmer
8 Most "Only Corvette Owners Understand" Quirks and Problems
Pouria Savadkouei
10 Reasons the C6 Z06 is Still A Performance Benchmark After 20 Years
Joe Kucinski
How Much Horsepower Every Corvette Engine "LOST" in 1972
Joe Kucinski
Top 10 DOs and DON'Ts for Protecting Your Convertible Top!
Michael S. Palmer
Top 10 Most Explosive Corvettes Ever Made: Power-to-Weight Ratio Ranked!
Joe Kucinski
150 hp to 1,250 hp: Every Corvette Generation Compared by the Specs That Matter
Joe Kucinski
8 Coolest Corvette Pace Cars (and Replicas) of All Time
Verdad GallardoRace Director
Joined: May 2005
Posts: 11,992
Likes: 1,331
From: Middletown, DE
I had the problem once, added a bottle of Techron, problem never came back, but, where I am, I use Chevron-93 w/Techron. Recently this was discussed in a different thread and someone posted Shell has the Techron additive, albeit, under a different brand name, so Shell may be your answer.
Safety Car
Joined: Aug 2007
Posts: 4,506
Likes: 0
From: This is not a Song, It's an Outburst: Or, The Establishment Blues; Sixto Diaz Rodriguez
Here's another thread that discussed fuel additives by Chevron/Texaco/Shell. 
http://forums.corvetteforum.com/c5-g...n-techron.html
http://forums.corvetteforum.com/c5-g...n-techron.html

Instructor
Joined: Aug 2005
Posts: 130
Likes: 0
From: Lothian MD
With my 2002 Coupe, if the fuel guage is acting up I put in Techron, and no more problems for about seven tank fulls. A BMW service advisor put me onto Techron back in 1986. It was great for "fixing" deposit buildups in my 1984 four cylinder 318i.

Melting Slicks
Joined: Jan 2007
Posts: 3,021
Likes: 133
From: Conejo Valley CA
Perhaps I was unlucky. When my C5 Z first started showing problems such as the gauge reading 3/4 full after I filled the tank, I tried techron and Seafoam... for me at least it didn't do squat. Let's just see precisely what this problem really is...
After I replaced my fuel sensors, the dealership was kind enough to let me take this picture of the deposit damage on my fuel level sensor they removed,
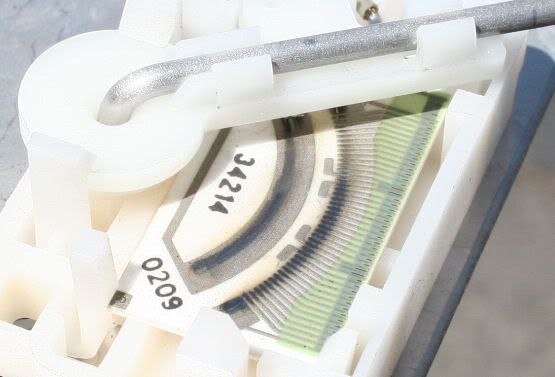
As you can see in the picture, on the metallic traces, which should be as shiny as a new silver dollar, you can see the corrosion of the traces... the black residue on the traces. I am sorry but I am skeptical that Techron or Seafoam can reverse this damage. I do believe that as part of one's fuel maintenance, it can aid in the prevention of it.
What would really be cool is if someone who has this problem could take pictures of their fuel level sensors before adding techron and then again say 6 months later after adding techron or Seafoam. If the outcome was positive, I would become a believer.
After I replaced my fuel sensors, the dealership was kind enough to let me take this picture of the deposit damage on my fuel level sensor they removed,
As you can see in the picture, on the metallic traces, which should be as shiny as a new silver dollar, you can see the corrosion of the traces... the black residue on the traces. I am sorry but I am skeptical that Techron or Seafoam can reverse this damage. I do believe that as part of one's fuel maintenance, it can aid in the prevention of it.
What would really be cool is if someone who has this problem could take pictures of their fuel level sensors before adding techron and then again say 6 months later after adding techron or Seafoam. If the outcome was positive, I would become a believer.
Race Director
Joined: May 2005
Posts: 11,992
Likes: 1,331
From: Middletown, DE
Perhaps I was unlucky. When my C5 Z first started showing problems such as the gauge reading 3/4 full after I filled the tank, I tried techron and Seafoam... for me at least it didn't do squat. Let's just see precisely what this problem really is...
After I replaced my fuel sensors, the dealership was kind enough to let me take this picture of the deposit damage on my fuel level sensor they removed,
As you can see in the picture, on the metallic traces, which should be as shiny as a new silver dollar, you can see the corrosion of the traces... the black residue on the traces. I am sorry but I am skeptical that Techron or Seafoam can reverse this damage. I do believe that as part of one's fuel maintenance, it can aid in the prevention of it.
What would really be cool is if someone who has this problem could take pictures of their fuel level sensors before adding techron and then again say 6 months later after adding techron or Seafoam. If the outcome was positive, I would become a believer.
Your experience makes me a little bit curious about the "why" and whether in fact there is some visible reversal of the corrosion when the Techron fix works. But, really all I care about is that Techron stops my problem, albeit temporarily...
Melting Slicks
Joined: Jan 2007
Posts: 3,021
Likes: 133
From: Conejo Valley CA
Maybe your sensors were too far gone. Hard to imagine you are not a believer when so many folks have experienced the symptom reversal for themselves. We're surely not making it up.
Your experience makes me a little bit curious about the "why" and whether in fact there is some visible reversal of the corrosion when the Techron fix works. But, really all I care about is that Techron stops my problem, albeit temporarily...
Your experience makes me a little bit curious about the "why" and whether in fact there is some visible reversal of the corrosion when the Techron fix works. But, really all I care about is that Techron stops my problem, albeit temporarily...
We probably need a chemist/chemical engineer to chime in to correct me if I am wrong but here is my belief on how this problem is making the gas gauges go bad: The corrosive buildup is not acting as a "plaque", but more like a "rust" to the electrical contacts. (As you know, rust can eat through metal until there is no more metal). Consequently, the trace ultimately open circuits. Once it's open circuited, you're SOL (Surely Out of Luck) because now the correct information in the form of an electrical signal cannot make it to the gauges (the fuel level information is modulated in to electrical information by the movement of the mechanical floater).
If there are any experts out there that understand the deterioration process of these fuel sensors, please feel free to correct me.
Last edited by Z06ster; Sep 20, 2009 at 02:13 AM. Reason: Clarification of my position
Tech Contributor

Joined: Dec 2003
Posts: 19,384
Likes: 87
From: Horncastle Lincolnshire, England
2023 C5 of the Year Finalist - Unmodified
My view FWIW is that it depends on when you use the Techron. Pictures of the sender I'd seen in the past have visible sulfur deposits rather than the pitting on yours.
The analogy I'd offer is that if you allow a bolt to go rusty and then try to clean it it'll never really work well again. It'll be pitted and the nut will turn badly. If you lubricate it as soon as you see signs of rust forming it'll stay useable for years.
In my view the sender is the same. Pre-emptive Techron (or Seafoam) will keep the corrosion or sulfur build up from getting established. Treat the symptoms early. Using Chevron or Shell will help.
I had the problem 3 years ago and two bottles of Techron fixed it. Its never reocurred.
Last edited by DeeGee; Sep 20, 2009 at 02:32 AM.

Team Owner


Joined: May 2001
Posts: 25,058
Likes: 1,265
From: Virginia
St. Jude Donor '11
My view FWIW is that it depends on when you use the Techron. Pictures of the sender I'd seen in the past have visible sulfur deposits rather than the pitting on yours.
The analogy I'd offer is that if you allow a bolt to go rusty and then try to clean it it'll never really work well again. It'll be pitted and the nut will turn badly. If you lubricate it as soon as you see signs of rust forming it'll stay useable for years.
In my view the sender is the same. Pre-emptive Techron (or Seafoam) will keep the corrosion or sulfur build up from getting established. Treat the symptoms early. Using Chevron or Shell will help.
I had the problem 3 years ago and two bottles of Techron fixed it. Its never reocurred.
The analogy I'd offer is that if you allow a bolt to go rusty and then try to clean it it'll never really work well again. It'll be pitted and the nut will turn badly. If you lubricate it as soon as you see signs of rust forming it'll stay useable for years.
In my view the sender is the same. Pre-emptive Techron (or Seafoam) will keep the corrosion or sulfur build up from getting established. Treat the symptoms early. Using Chevron or Shell will help.
I had the problem 3 years ago and two bottles of Techron fixed it. Its never reocurred.
Herehere

Le Mans Master

Joined: Feb 2009
Posts: 5,253
Likes: 9
From: Northwest CT
My view FWIW is that it depends on when you use the Techron. Pictures of the sender I'd seen in the past have visible sulfur deposits rather than the pitting on yours.
The analogy I'd offer is that if you allow a bolt to go rusty and then try to clean it it'll never really work well again. It'll be pitted and the nut will turn badly. If you lubricate it as soon as you see signs of rust forming it'll stay useable for years.
In my view the sender is the same. Pre-emptive Techron (or Seafoam) will keep the corrosion or sulfur build up from getting established. Treat the symptoms early. Using Chevron or Shell will help.
I had the problem 3 years ago and two bottles of Techron fixed it. Its never reocurred.
The analogy I'd offer is that if you allow a bolt to go rusty and then try to clean it it'll never really work well again. It'll be pitted and the nut will turn badly. If you lubricate it as soon as you see signs of rust forming it'll stay useable for years.
In my view the sender is the same. Pre-emptive Techron (or Seafoam) will keep the corrosion or sulfur build up from getting established. Treat the symptoms early. Using Chevron or Shell will help.
I had the problem 3 years ago and two bottles of Techron fixed it. Its never reocurred.
 You must have caught it early on.
Mine, not so fortunate. I bought a garage queen that must have sat with crappy fuel without the techron addative.
Now I have probs often. I am fighting it w/ techron...that helps, but only very temporary. I put a bottle in w/last fill & it failed today.
I have used 7 bottles so far this driving season. I started having the issue the very day I bought it. I called the previous owner and he was SO SURPRISED!
So I imagine mine looks like the picture of the one replaced.
Looks like I am in for replacement soon.
Where is the ground located? I can try cleaning that first if I can find it.
Still a blast to drive even without the damn gauge.

Le Mans Master
Joined: Jan 2004
Posts: 9,488
Likes: 1,743
From: Knoxville Tn
I have had that problem from time to time.
My (albeit temporary) fix is to get fuel level down to less than 1/2 tank. (good gosh man you can estimate can't you?) Add a large bottle of Techron and allow to soak over night. The gauge should start working on the next fillup. I try to use only Texaco (also has techron), however once the unit is corroded it seems to corrode again. This usually lasts for 8-10 + tanks full.
I assume it's like soaking a dish overnight, it loosens the crud and the scraping of the sensor arm cleans the contact point..
Tech Contributor
Joined: Dec 2003
Posts: 19,384
Likes: 87
From: Horncastle Lincolnshire, England
2023 C5 of the Year Finalist - Unmodified
If all else fails, here's the fix. Anyone who needs the word doc with pics let me know
Document ID# 776239
2002 Chevrolet Corvette
________________________________________
Fuel Sender Assembly Replacement W/O FFS
Tools Required
� J 34730-1A Fuel Pressure Gauge
� J 37088-A Tool Set, Fuel Line Quick Connect Separator
Removal Procedure (Left or Right)
Caution
Before servicing any electrical component, the ignition key must be in the OFF or LOCK position and all electrical loads must be OFF, unless instructed otherwise in these procedures. If a tool or equipment could easily come in contact with a live exposed electrical terminal, also disconnect the negative battery cable. Failure to follow these precautions may cause personal injury and/or damage to the vehicle or its components.
1. Disconnect the negative battery cable.
2. Relieve the fuel system pressure. Refer to the Fuel Pressure Relief Procedure .
Caution
To avoid any vehicle damage, serious personal injury or death when major components are removed from the vehicle and the vehicle is supported by a hoist, support the vehicle with jack stands at the opposite end from which the components are being removed.
3. Raise the vehicle. Refer to Lifting and Jacking the Vehicle in General Information.
4. Remove the rear wheel and tire assembly. Refer to Tire and Wheel Removal and Installation in Tires and Wheels.
5. Clean all of the fuel connections and the surrounding areas before disconnecting the fuel pipes in order to avoid possible contamination of the fuel system.
6. Drain the fuel tanks. Refer to Fuel Tank Draining Procedure .
7. Remove the fuel tank shield.
8. Mark or identify each fuel pipe in order to aid in installing the pipes in their original positions.
9. Disconnect the quick-connect fittings from the fuel sender. Refer to Quick Connect Fitting(s) Service (Plastic Collar) .
10. Cap all of the fuel pipes.
11. Disconnect the fuel sender electrical connector.
12. Remove the fuel tank strap.
13. Support the fuel tank.
14. Remove the fuel sender attaching bolts.
15. Remove the float arm retaining clip and the float arm for the left fuel sender only.
16. Carefully remove the fuel sender with the gasket.
17. Clean the gasket sealing surfaces.
Installation Procedure (Right)
1. Inspect the fuel sender gasket for damage and replace if necessary.
Important
Do not bend or twist the float arm.
2. Insert the float arm through the fuel tank opening.
3. The fuel sender may need to be rotated in order to facilitate the installation.
4. Align the fuel sender gasket tab (2) with the fuel sender cover mark (1).
5. Align the fuel sender cover mark (1) with the fuel tank mark.
Pic 2
6. Hand tighten the fuel sender attaching bolts until finger tight.
Notice
Refer to Fastener Notice in Cautions and Notices.
7. Tighten the fuel sender assembly attaching bolts in sequence.
Tighten
Tighten the bolt to 7 N�m (62 lb in).
8. Connect the fuel sender fuel feed pipe (1) (from the jet pump to the left tank, and the fuel feed rear crossover pipe (2) from the left tank to the jet pump). Refer to Quick Connect Fitting(s) Service (Plastic Collar) .
See Pic 2
9. Connect the fuel sender electrical connector.
Pic 3
Pic 4
10. Install the fuel tank strap (3).
11. Install the fuel tank strap bolts (1, 2, 4).
Tighten
o Tighten the bolt (2) to 25 N�m (18 lb ft).
o Tighten the bolt (1) to 25 N�m (18 lb ft).
o Tighten the remaining bolts (4) to 25 N�m (18 lb ft).
Pic 5
12. Install the fuel tank shield (1).
13. Install the fuel tank shield mount bolt (2).
14. Install the fuel tank shield mount nut (3).
Tighten
o Tighten the fuel tank shield mount bolt to 25 N�m (18 lb ft).
o Tighten the fuel tank shield mount nut to 12 N�m (106 lb in).
15. Install the rear wheel and tire assembly. Refer to Tire and Wheel Removal and Installation in Tires and Wheels.
16. Lower the vehicle.
17. Refill the fuel system.
18. Install the fuel filler cap.
19. Connect the negative battery cable.
20. Perform the following procedure in order to inspect for leaks:
A. Turn the ignition switch ON for 2 seconds.
B. Turn the ignition switch OFF for 10 seconds.
C. Turn the ignition switch ON.
D. Inspect for fuel leaks.
Program the transmitters. Refer to Transmitter Programming in Keyless Entry.
Installation Procedure (Left)
Pic 6
1. Install fuel pump strainer in the same position as noted during disassembly. Push on the outer edge of the strainer ferrule until the strainer is fully seated.
2. Install a sender gasket on the fuel sender.
3. Insert the fuel sender through the fuel tank opening.
4. The fuel sender may need to be rotated in order to facilitate the installation.
Important
Do not bend or twist the float arm.
5. Insert the float and the float arm into the fuel tank opening.
6. Install the float arm retaining clip.
See Pic 2
7. Align the fuel sender gasket tab (1) with the fuel sender cover mark (2).
8. Align the fuel sender cover mark (2) with the fuel tank mark.
9. Tighten the fuel sender attaching bolts until the bolts are finger tight.
See Pic 2
10. Tighten the fuel sender assembly attaching bolts in proper sequence.
Tighten
Tighten bolts to 7 N�m (62 lb in).
11. Connect the fuel sender fuel feed pipe (1) from the jet pump to the left tank, to the fuel return rear pipe (2), and to the fuel feed rear pipe (3). Refer to Quick Connect Fitting(s) Service (Plastic Collar) .
12. Connect the fuel sender electrical connector.
See Pic 4
13. Install the fuel tank strap (3).
14. Install the fuel tank strap bolts (1, 2, 4).
Tighten
o Tighten the bolt (2) to 25 N�m (18 lb ft).
o Tighten the bolt (1) to 25 N�m (18 lb ft).
o Tighten the remaining bolts (4) to 25 N�m (18 lb ft).
See Pic 5
Install the fuel tank shield (1).
15. Install the fuel tank shield mount bolt (2).
16. Install the fuel tank shield mount nut (3).
Tighten
o Tighten the fuel tank shield mount bolt to 25 N�m (18 lb ft).
o Tighten the fuel tank shield mount nut to 12 N�m (106 lb in).
17. Install the rear wheel and tire assembly. Refer to Tire and Wheel Removal and Installation in Tires and Wheels.
18. Lower the vehicle.
19. Refill the fuel system.
20. Install the fuel filler cap.
21. Connect the negative battery cable.
22. Perform the following procedure in order to inspect for leaks:
A. Turn the ignition switch ON for 2 seconds.
B. Turn the ignition switch OFF for 10 seconds.
C. Turn the ignition switch ON.
D. Inspect for fuel leaks.
Program the transmitters. Refer to Transmitter Programming in Keyless Entry.
________________________________________
Document ID# 776239
2002 Chevrolet Corvette
Document ID# 776239
2002 Chevrolet Corvette
________________________________________
Fuel Sender Assembly Replacement W/O FFS
Tools Required
� J 34730-1A Fuel Pressure Gauge
� J 37088-A Tool Set, Fuel Line Quick Connect Separator
Removal Procedure (Left or Right)
Caution
Before servicing any electrical component, the ignition key must be in the OFF or LOCK position and all electrical loads must be OFF, unless instructed otherwise in these procedures. If a tool or equipment could easily come in contact with a live exposed electrical terminal, also disconnect the negative battery cable. Failure to follow these precautions may cause personal injury and/or damage to the vehicle or its components.
1. Disconnect the negative battery cable.
2. Relieve the fuel system pressure. Refer to the Fuel Pressure Relief Procedure .
Caution
To avoid any vehicle damage, serious personal injury or death when major components are removed from the vehicle and the vehicle is supported by a hoist, support the vehicle with jack stands at the opposite end from which the components are being removed.
3. Raise the vehicle. Refer to Lifting and Jacking the Vehicle in General Information.
4. Remove the rear wheel and tire assembly. Refer to Tire and Wheel Removal and Installation in Tires and Wheels.
5. Clean all of the fuel connections and the surrounding areas before disconnecting the fuel pipes in order to avoid possible contamination of the fuel system.
6. Drain the fuel tanks. Refer to Fuel Tank Draining Procedure .
7. Remove the fuel tank shield.
8. Mark or identify each fuel pipe in order to aid in installing the pipes in their original positions.
9. Disconnect the quick-connect fittings from the fuel sender. Refer to Quick Connect Fitting(s) Service (Plastic Collar) .
10. Cap all of the fuel pipes.
11. Disconnect the fuel sender electrical connector.
12. Remove the fuel tank strap.
13. Support the fuel tank.
14. Remove the fuel sender attaching bolts.
15. Remove the float arm retaining clip and the float arm for the left fuel sender only.
16. Carefully remove the fuel sender with the gasket.
17. Clean the gasket sealing surfaces.
Installation Procedure (Right)
1. Inspect the fuel sender gasket for damage and replace if necessary.
Important
Do not bend or twist the float arm.
2. Insert the float arm through the fuel tank opening.
3. The fuel sender may need to be rotated in order to facilitate the installation.
4. Align the fuel sender gasket tab (2) with the fuel sender cover mark (1).
5. Align the fuel sender cover mark (1) with the fuel tank mark.
Pic 2
6. Hand tighten the fuel sender attaching bolts until finger tight.
Notice
Refer to Fastener Notice in Cautions and Notices.
7. Tighten the fuel sender assembly attaching bolts in sequence.
Tighten
Tighten the bolt to 7 N�m (62 lb in).
8. Connect the fuel sender fuel feed pipe (1) (from the jet pump to the left tank, and the fuel feed rear crossover pipe (2) from the left tank to the jet pump). Refer to Quick Connect Fitting(s) Service (Plastic Collar) .
See Pic 2
9. Connect the fuel sender electrical connector.
Pic 3
Pic 4
10. Install the fuel tank strap (3).
11. Install the fuel tank strap bolts (1, 2, 4).
Tighten
o Tighten the bolt (2) to 25 N�m (18 lb ft).
o Tighten the bolt (1) to 25 N�m (18 lb ft).
o Tighten the remaining bolts (4) to 25 N�m (18 lb ft).
Pic 5
12. Install the fuel tank shield (1).
13. Install the fuel tank shield mount bolt (2).
14. Install the fuel tank shield mount nut (3).
Tighten
o Tighten the fuel tank shield mount bolt to 25 N�m (18 lb ft).
o Tighten the fuel tank shield mount nut to 12 N�m (106 lb in).
15. Install the rear wheel and tire assembly. Refer to Tire and Wheel Removal and Installation in Tires and Wheels.
16. Lower the vehicle.
17. Refill the fuel system.
18. Install the fuel filler cap.
19. Connect the negative battery cable.
20. Perform the following procedure in order to inspect for leaks:
A. Turn the ignition switch ON for 2 seconds.
B. Turn the ignition switch OFF for 10 seconds.
C. Turn the ignition switch ON.
D. Inspect for fuel leaks.
Program the transmitters. Refer to Transmitter Programming in Keyless Entry.
Installation Procedure (Left)
Pic 6
1. Install fuel pump strainer in the same position as noted during disassembly. Push on the outer edge of the strainer ferrule until the strainer is fully seated.
2. Install a sender gasket on the fuel sender.
3. Insert the fuel sender through the fuel tank opening.
4. The fuel sender may need to be rotated in order to facilitate the installation.
Important
Do not bend or twist the float arm.
5. Insert the float and the float arm into the fuel tank opening.
6. Install the float arm retaining clip.
See Pic 2
7. Align the fuel sender gasket tab (1) with the fuel sender cover mark (2).
8. Align the fuel sender cover mark (2) with the fuel tank mark.
9. Tighten the fuel sender attaching bolts until the bolts are finger tight.
See Pic 2
10. Tighten the fuel sender assembly attaching bolts in proper sequence.
Tighten
Tighten bolts to 7 N�m (62 lb in).
11. Connect the fuel sender fuel feed pipe (1) from the jet pump to the left tank, to the fuel return rear pipe (2), and to the fuel feed rear pipe (3). Refer to Quick Connect Fitting(s) Service (Plastic Collar) .
12. Connect the fuel sender electrical connector.
See Pic 4
13. Install the fuel tank strap (3).
14. Install the fuel tank strap bolts (1, 2, 4).
Tighten
o Tighten the bolt (2) to 25 N�m (18 lb ft).
o Tighten the bolt (1) to 25 N�m (18 lb ft).
o Tighten the remaining bolts (4) to 25 N�m (18 lb ft).
See Pic 5
Install the fuel tank shield (1).
15. Install the fuel tank shield mount bolt (2).
16. Install the fuel tank shield mount nut (3).
Tighten
o Tighten the fuel tank shield mount bolt to 25 N�m (18 lb ft).
o Tighten the fuel tank shield mount nut to 12 N�m (106 lb in).
17. Install the rear wheel and tire assembly. Refer to Tire and Wheel Removal and Installation in Tires and Wheels.
18. Lower the vehicle.
19. Refill the fuel system.
20. Install the fuel filler cap.
21. Connect the negative battery cable.
22. Perform the following procedure in order to inspect for leaks:
A. Turn the ignition switch ON for 2 seconds.
B. Turn the ignition switch OFF for 10 seconds.
C. Turn the ignition switch ON.
D. Inspect for fuel leaks.
Program the transmitters. Refer to Transmitter Programming in Keyless Entry.
________________________________________
Document ID# 776239
2002 Chevrolet Corvette