


Driver-side headlight won't pop up...

Thread Starter
Advanced

Joined: Aug 2007
Posts: 72
Likes: 0
From: Woodinville WA
Hi. I could sure use some help from a few of the headlight experts on this forum. I've tried to find a post or posts on the problem I'm having, and haven't found a specific fix yet, so I thought I'd see if I can get some help here. (OR - if the post exists, please point me to it!)
I have a 2000 coupe that once used HID's, which were a wonderful improvement... when they worked. Bought from a vendor on this forum: nice enough fella 'n all, but the HID's were a real headache for my car (for some reason). One or both HID's occasionally wouldn't light up at all - even with the resistor fix, and in less than a year - one of the HID ballasts went dead. So I bought another set of HID's, from the same vendor, along with the resistor/s - and I continued to have problems: one of the HID lights would sometimes not come on, and sometimes the headlight buckets (one or both) would not come up. Got tired of the problem after spending alot of money with my mechanic trying to diagnose what was causing the issues with a supposedly plug-n-play part, and after burning out one of the headlight modules ($250 part), I finally threw in the towel on the HID's. Back to regular headlights...
But to my dismay (actually, I'm about to pull my hair out), going back to plain ol' higher candlepower headlights from Schmucks didn't erase the problem. Here's what's happening now that I've gone from HID's back to regular lights:
1. The driver side headlight door doesn't pop up, but the passenger side does. Passenger side ALWAYS goes up. Issue seems to be driver-side specific.
2. The driver side headlight occasionally comes up when I turn on the lights during the daytime, but never comes up at nighttime. For a while, during the day, both headlight buckets would come up every time I turned them on. This occurred day after day, to my amazement. Then, I'd do the same drill in the dark just a few hours later, and only the driver side light comes up. Go figure. For the last two days, however, when I've tried the lights during the day -- the driver side stays down. For two days now, I've not been able to get the driver side bucket to come up at all, day or night.
3. The headlight on the driver side is lit up: it's just that the driver side bucket doesn't come up. So there's juice to the bulb itself, and it appears to be just a bucket issue.
I know it's not a gear problem: I replaced the plastic gears last year with the brass gear fix. And since the bucket - up until two days ago - coming up during various daytime tests, I don't think the bucket is stuck or held up. Seems to me to be an intermitant electrical issue, possibly one that is triggered by a day/night sensor of some kind???
Also, I turn my lights on manually from the column: I don't use the automatic light feature, cuz it seems to make the problem worse when the lights are on auto. In addition, I have tried turning the lights on slowly (waiting a few seconds before going from running lights to headlights on), fast, and every combination I can think of. Brights on, brights off, you name it... I think I've tried it. Bigger fuse too. Nothing seems to fix the problem.
Anyone have any thoughts on what might be causing the headlight door to stay down, even though it occasionally came to life during daylight hours (until recently)? Thanks in advance to all who care to comment. Much appreciated.
Tech Contributor


Joined: Dec 2003
Posts: 19,384
Likes: 87
From: Horncastle Lincolnshire, England
2023 C5 of the Year Finalist - Unmodified
Heres the troubleshooting guide. Its designed to be read as a table so ping me with your e mail if youd like the word version.
FWIW I'd be focussing on the headlamp module both the motor and the ground. If the lights are coming on, the lighting circuits are fine.
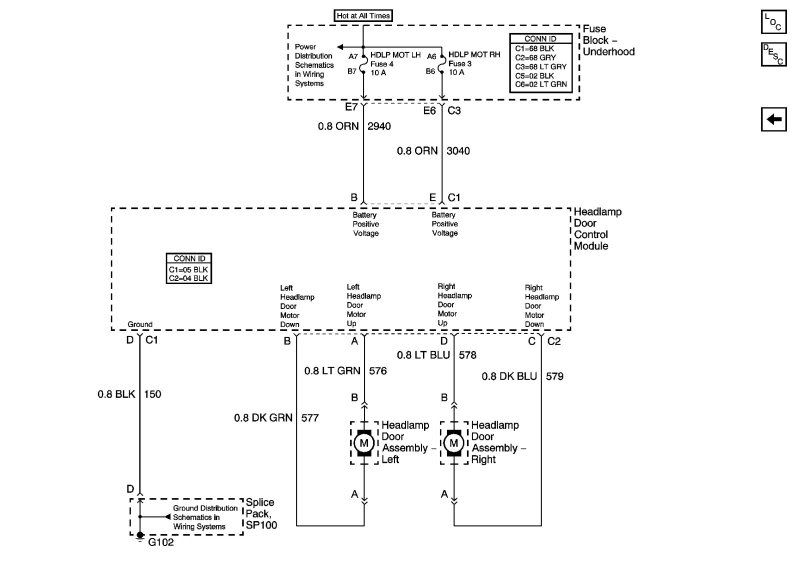
I've also attached the wiring diagram
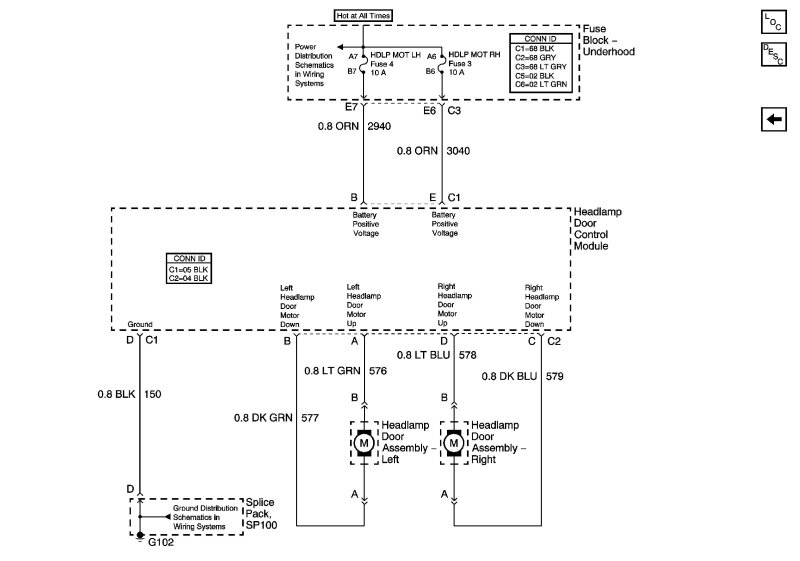
Document ID# 661511
2002 Chevrolet Corvette
________________________________________
Headlamp Door(s) Inoperative
Step Action Yes No
Schematic Reference: Headlight Doors Schematics
1 Did you perform the Diagnostic System Check? Go to Step 2
Go to Diagnostic System Check - Lighting Systems
2 Turn the headlamps ON and OFF.
Do the headlamp doors open and close? Go to Testing for Intermittent and Poor Connections in Wiring Systems Go to Step 3
3 Is only one headlamp door inoperative? Go to Step 9
Go to Step 4
4 Are the headlamp doors closed at all times? Go to Step 5
Go to Step 7
5 1. Remove the right hand headlamp assembly.
2. Disconnect the control module connectors C1 and C2 to the actuator for the headlamp opening door.
3. Turn the headlamps ON.
4. Connect a test lamp between the headlamps ON input circuit and a known good ground at connector C1. Refer to Circuit Testing in Wiring Systems.
Does the test lamp illuminate? Go to Step 6
Go to Step 13
6 Connect a test lamp between the headlamps ON input circuit and the ground circuit of connector C1.
Does the test lamp illuminate? Go to Step 11
Go to Step 14
7 1. Turn OFF the headlamp switch.
2. Disconnect the actuator control module to the headlamp opening door.
3. Using a test lamp, probe between the headlamp OFF input circuit and ground.
Does the test lamp illuminate? Go to Step 8
Go to Step 11
8 1. Disconnect connector C209.
2. Using a test lamp, probe between the headlamp OFF input circuit (female side) and ground.
Does the test lamp illuminate? Go to Step 12
Go to Step 15
9 Test the power and ground circuit of the headlamp door control for a poor connection or an open. Refer to Circuit Testing and Wiring Repairs in Wiring Systems.
Did you find and correct the condition? Go to Step 19
Go to Step 10
10 Inspect the harness connector for headlamp opening door assembly for a poor connection. Refer to Testing for Intermittent and Poor Connections and Connector Repairs in Wiring Systems.
Did you find and complete the repair? Go to Step 19
Go to Step 16
11 Inspect the harness connector for headlamp opening door actuator control module for a poor connection. Refer to Testing for Intermittent and Poor Connections and Connector Repairs in Wiring Systems.
Did you find and complete the repair? Go to Step 19
Go to Step 17
12 Inspect the harness connector for multifunction turn signal lever for a poor connection. Refer to Testing for Intermittent and Poor Connections and Connector Repairs in Wiring Systems.
Did you find and complete the repair? Go to Step 19
Go to Step 18
13 Repair a poor connector or an open in the headlamp ON input circuit. Refer to Circuit Testing and Wiring Repairs in Wiring Systems.
Did you complete the repair? Go to Step 19
--
14 Repair a poor connector or an open in the ground circuit. Refer to Circuit Testing and Wiring Repairs in Wiring Systems.
Did you complete the repair? Go to Step 19
--
15 Repair a short to battery positive voltage in the headlamps OFF input circuit. Refer to Circuit Testing and Wiring Repairs in Wiring Systems.
Did you complete the repair? Go to Step 19
--
16 Replace the headlamp opening door assembly. Refer to Headlamp Opening Door Replacement .
Did you complete the replacement? Go to Step 19
--
17 Replace the control module for the headlamp opening door actuator. Refer to Headlamp Control Module Replacement .
Did you complete the replacement? Go to Step 19
--
18 Replace the multifunction turn signal lever. Refer to Multifunction Turn Signal Lever Replacement - On Vehicle in Steering Wheel and Column - Tilt.
Did you complete the replacement? Go to Step 19
--
19 Operate the system in order to verify the repair.
Did you correct the condition? System OK Go to Step 2
________________________________________
Document ID# 661511
2002 Chevrolet Corvette
FWIW I'd be focussing on the headlamp module both the motor and the ground. If the lights are coming on, the lighting circuits are fine.
I've also attached the wiring diagram
Document ID# 661511
2002 Chevrolet Corvette
________________________________________
Headlamp Door(s) Inoperative
Step Action Yes No
Schematic Reference: Headlight Doors Schematics
1 Did you perform the Diagnostic System Check? Go to Step 2
Go to Diagnostic System Check - Lighting Systems
2 Turn the headlamps ON and OFF.
Do the headlamp doors open and close? Go to Testing for Intermittent and Poor Connections in Wiring Systems Go to Step 3
3 Is only one headlamp door inoperative? Go to Step 9
Go to Step 4
4 Are the headlamp doors closed at all times? Go to Step 5
Go to Step 7
5 1. Remove the right hand headlamp assembly.
2. Disconnect the control module connectors C1 and C2 to the actuator for the headlamp opening door.
3. Turn the headlamps ON.
4. Connect a test lamp between the headlamps ON input circuit and a known good ground at connector C1. Refer to Circuit Testing in Wiring Systems.
Does the test lamp illuminate? Go to Step 6
Go to Step 13
6 Connect a test lamp between the headlamps ON input circuit and the ground circuit of connector C1.
Does the test lamp illuminate? Go to Step 11
Go to Step 14
7 1. Turn OFF the headlamp switch.
2. Disconnect the actuator control module to the headlamp opening door.
3. Using a test lamp, probe between the headlamp OFF input circuit and ground.
Does the test lamp illuminate? Go to Step 8
Go to Step 11
8 1. Disconnect connector C209.
2. Using a test lamp, probe between the headlamp OFF input circuit (female side) and ground.
Does the test lamp illuminate? Go to Step 12
Go to Step 15
9 Test the power and ground circuit of the headlamp door control for a poor connection or an open. Refer to Circuit Testing and Wiring Repairs in Wiring Systems.
Did you find and correct the condition? Go to Step 19
Go to Step 10
10 Inspect the harness connector for headlamp opening door assembly for a poor connection. Refer to Testing for Intermittent and Poor Connections and Connector Repairs in Wiring Systems.
Did you find and complete the repair? Go to Step 19
Go to Step 16
11 Inspect the harness connector for headlamp opening door actuator control module for a poor connection. Refer to Testing for Intermittent and Poor Connections and Connector Repairs in Wiring Systems.
Did you find and complete the repair? Go to Step 19
Go to Step 17
12 Inspect the harness connector for multifunction turn signal lever for a poor connection. Refer to Testing for Intermittent and Poor Connections and Connector Repairs in Wiring Systems.
Did you find and complete the repair? Go to Step 19
Go to Step 18
13 Repair a poor connector or an open in the headlamp ON input circuit. Refer to Circuit Testing and Wiring Repairs in Wiring Systems.
Did you complete the repair? Go to Step 19
--
14 Repair a poor connector or an open in the ground circuit. Refer to Circuit Testing and Wiring Repairs in Wiring Systems.
Did you complete the repair? Go to Step 19
--
15 Repair a short to battery positive voltage in the headlamps OFF input circuit. Refer to Circuit Testing and Wiring Repairs in Wiring Systems.
Did you complete the repair? Go to Step 19
--
16 Replace the headlamp opening door assembly. Refer to Headlamp Opening Door Replacement .
Did you complete the replacement? Go to Step 19
--
17 Replace the control module for the headlamp opening door actuator. Refer to Headlamp Control Module Replacement .
Did you complete the replacement? Go to Step 19
--
18 Replace the multifunction turn signal lever. Refer to Multifunction Turn Signal Lever Replacement - On Vehicle in Steering Wheel and Column - Tilt.
Did you complete the replacement? Go to Step 19
--
19 Operate the system in order to verify the repair.
Did you correct the condition? System OK Go to Step 2
________________________________________
Document ID# 661511
2002 Chevrolet Corvette
Burning Brakes


Joined: Apr 2004
Posts: 866
Likes: 1
From: Bakersfield, Blown 402 Z06 Ca
If you have any contact cleaner pull the plug apart and spray it real good. A friend has been having this problem and pulling the and just blowing inside has helped. The gear is bad in his so he ordered a new motor. Hope this will help. Could just need a good cleaning. Good Luck. Gary.

Race Director

Joined: Jan 2003
Posts: 19,802
Likes: 0
From: San Antonio Texas
St. Jude Donor '05-'06-'08
Heres the troubleshooting guide. Its designed to be read as a table so ping me with your e mail if youd like the word version.
FWIW I'd be focussing on the headlamp module both the motor and the ground. If the lights are coming on, the lighting circuits are fine.
I've also attached the wiring diagram
Document ID# 661511
2002 Chevrolet Corvette
________________________________________
Headlamp Door(s) Inoperative
Step Action Yes No
Schematic Reference: Headlight Doors Schematics
1 Did you perform the Diagnostic System Check? Go to Step 2
Go to Diagnostic System Check - Lighting Systems
2 Turn the headlamps ON and OFF.
Do the headlamp doors open and close? Go to Testing for Intermittent and Poor Connections in Wiring Systems Go to Step 3
3 Is only one headlamp door inoperative? Go to Step 9
Go to Step 4
4 Are the headlamp doors closed at all times? Go to Step 5
Go to Step 7
5 1. Remove the right hand headlamp assembly.
2. Disconnect the control module connectors C1 and C2 to the actuator for the headlamp opening door.
3. Turn the headlamps ON.
4. Connect a test lamp between the headlamps ON input circuit and a known good ground at connector C1. Refer to Circuit Testing in Wiring Systems.
Does the test lamp illuminate? Go to Step 6
Go to Step 13
6 Connect a test lamp between the headlamps ON input circuit and the ground circuit of connector C1.
Does the test lamp illuminate? Go to Step 11
Go to Step 14
7 1. Turn OFF the headlamp switch.
2. Disconnect the actuator control module to the headlamp opening door.
3. Using a test lamp, probe between the headlamp OFF input circuit and ground.
Does the test lamp illuminate? Go to Step 8
Go to Step 11
8 1. Disconnect connector C209.
2. Using a test lamp, probe between the headlamp OFF input circuit (female side) and ground.
Does the test lamp illuminate? Go to Step 12
Go to Step 15
9 Test the power and ground circuit of the headlamp door control for a poor connection or an open. Refer to Circuit Testing and Wiring Repairs in Wiring Systems.
Did you find and correct the condition? Go to Step 19
Go to Step 10
10 Inspect the harness connector for headlamp opening door assembly for a poor connection. Refer to Testing for Intermittent and Poor Connections and Connector Repairs in Wiring Systems.
Did you find and complete the repair? Go to Step 19
Go to Step 16
11 Inspect the harness connector for headlamp opening door actuator control module for a poor connection. Refer to Testing for Intermittent and Poor Connections and Connector Repairs in Wiring Systems.
Did you find and complete the repair? Go to Step 19
Go to Step 17
12 Inspect the harness connector for multifunction turn signal lever for a poor connection. Refer to Testing for Intermittent and Poor Connections and Connector Repairs in Wiring Systems.
Did you find and complete the repair? Go to Step 19
Go to Step 18
13 Repair a poor connector or an open in the headlamp ON input circuit. Refer to Circuit Testing and Wiring Repairs in Wiring Systems.
Did you complete the repair? Go to Step 19
--
14 Repair a poor connector or an open in the ground circuit. Refer to Circuit Testing and Wiring Repairs in Wiring Systems.
Did you complete the repair? Go to Step 19
--
15 Repair a short to battery positive voltage in the headlamps OFF input circuit. Refer to Circuit Testing and Wiring Repairs in Wiring Systems.
Did you complete the repair? Go to Step 19
--
16 Replace the headlamp opening door assembly. Refer to Headlamp Opening Door Replacement .
Did you complete the replacement? Go to Step 19
--
17 Replace the control module for the headlamp opening door actuator. Refer to Headlamp Control Module Replacement .
Did you complete the replacement? Go to Step 19
--
18 Replace the multifunction turn signal lever. Refer to Multifunction Turn Signal Lever Replacement - On Vehicle in Steering Wheel and Column - Tilt.
Did you complete the replacement? Go to Step 19
--
19 Operate the system in order to verify the repair.
Did you correct the condition? System OK Go to Step 2
________________________________________
Document ID# 661511
2002 Chevrolet Corvette
Great Article ! !
Instructor
Joined: Jul 2009
Posts: 112
Likes: 0
From: Garland Texas
I have been having a similar issue atfer the gear change. The one thing I do that makes it work for a bit is to manually turn the **** just a bit. Honestly the **** feels really tight. Once I turn the **** a bit , the lights work perfectly. After sitting for a bit then the driver's side will not open unless I turn the **** a bit. I may go ahead and try to cleaning the connection, especially since it has been off and on so much for replacing the gear.
Last edited by rathi134; Oct 22, 2009 at 03:22 PM.
Instructor
Joined: Sep 2011
Posts: 109
Likes: 0
I have been having a similar issue atfer the gear change. The one thing I do that makes it work for a bit is to manually turn the **** just a bit. Honestly the **** feels really tight. Once I turn the **** a bit , the lights work perfectly. After sitting for a bit then the driver's side will not open unless I turn the **** a bit. I may go ahead and try to cleaning the connection, especially since it has been off and on so much for replacing the gear.
With the lights retracted I turn the **** one full turn toward open and the driver's side will extend and then retract. But it won't do it extend again until I do the same drill. As the OP said, the **** feels very tight.
I understand the motor works on resistance to shut off and go on, but it acts like there is a limit switch or misalignment of the operating "rod" that I may have done when I replaced the gears. Is that possible?
The contacts were all cleaned etc, and the head lights come on regardless of whether the assembly goes up and down.
Thanks for any help...
Corvette Stories
The Best of Corvette for Corvette Enthusiasts

Top 10 Most Expensive Corvettes Ever Sold on Bring A Trailer
Brett Foote
10 Things Every Corvette Owner Needs (2026 Edition)
Michael S. Palmer
8 Most "Only Corvette Owners Understand" Quirks and Problems
Pouria Savadkouei
10 Reasons the C6 Z06 is Still A Performance Benchmark After 20 Years
Joe Kucinski
How Much Horsepower Every Corvette Engine "LOST" in 1972
Joe Kucinski
Top 10 DOs and DON'Ts for Protecting Your Convertible Top!
Michael S. Palmer
Top 10 Most Explosive Corvettes Ever Made: Power-to-Weight Ratio Ranked!
Joe Kucinski
150 hp to 1,250 hp: Every Corvette Generation Compared by the Specs That Matter
Joe Kucinski
8 Coolest Corvette Pace Cars (and Replicas) of All Time
Verdad GallardoInstructor
Joined: Sep 2011
Posts: 109
Likes: 0
Basically, except for it operating a lot noisier now, I haven't gained anything since the same symptoms remain as before the gear change.
My original nylon gear still had all it's teeth but there was a lot of rust that I cleaned up. Also, the old grease had a lot in common with brown gelatine. Was useless as a lubricant any more.
Last edited by red-in-la; Oct 12, 2011 at 08:13 PM.


Melting Slicks


Joined: Mar 2008
Posts: 2,453
Likes: 347
From: SC
I'm just taking a shot here, I recently had the same problem. It would open if I manually turned the **** a bit. I replaced the gear, and when I had it apart, the metal motor housing that attaches to the plastic gear housing was a bit loose. There are four metal "fingers" so to speak that hold the metal housing to the plastic gear case. There was not much contact between the metal worm and the plastic gear since it was a sloppy fit together. I tapped the fingers tighter with a nail set and it tightened the connection up. Maybe if this is loose it is not making full contact and thus opening the headlight until you move the motor by turning the ****.
Like I said, it's just a shot but maybe something to look into. My passenger side motor was nice and tight and I never had a problem with it opening. I have an 02 but I think the motors are the same as a 2000.
Like I said, it's just a shot but maybe something to look into. My passenger side motor was nice and tight and I never had a problem with it opening. I have an 02 but I think the motors are the same as a 2000.

Instructor

Joined: Jul 2004
Posts: 227
Likes: 6
From: Houston TX
It is odd that you say the motor is noisier now. That was not my experience after repairing.
I am not sure if your problems began after an HID install or not, but if so, my other suggestion is to consider the 12V relay harness below.
This finally fixed my intermttant "pop up" problems that I had experienced after installing HID bulbs in the stock housings.
Good Luck.
http://shop.jwmotoring.com/product.sc?productId=27
"Some cars have problems using stock wiring for HID conversion kits. This relay helps draw power direcly from the battery and not the stock system. If your HID kit has flicker or one bulb on and one off you need this!"
Instructor
Joined: Sep 2011
Posts: 109
Likes: 0
thanks, guido7834... without a vise I was reluctant to bang on the motor on the kitchen table  So I used vice grips to tighten up the tabs. The vice grips worked quite well imho. The motor is / was pretty snug to gear case when I reinstalled the assembly.
maskell, sorry if I misled you with my comment about the noise. The noise is not coming so much from the motor as the gears themselves. There's a reason GM went with the nylon and that was 'cuz it was quieter is my guess.
Also, I never did a HID install. All I did was change the gear, thinking it was what was causing my headlight not to go up and down.
So I used vice grips to tighten up the tabs. The vice grips worked quite well imho. The motor is / was pretty snug to gear case when I reinstalled the assembly.maskell, sorry if I misled you with my comment about the noise. The noise is not coming so much from the motor as the gears themselves. There's a reason GM went with the nylon and that was 'cuz it was quieter is my guess.
Also, I never did a HID install. All I did was change the gear, thinking it was what was causing my headlight not to go up and down.

Race Director

Joined: Aug 2003
Posts: 13,421
Likes: 8
From: Lake Mary Florida
Before you go much further, spend some time reading Bill Curlee's thread on electrical issues on C5s.
Electrical Sticky
This is also a worthwhile sticky for DIY'ers: DIY Fixes
Electrical Sticky
This is also a worthwhile sticky for DIY'ers: DIY Fixes
Instructor
Joined: Sep 2011
Posts: 109
Likes: 0
Before you go much further, spend some time reading Bill Curlee's thread on electrical issues on C5s.
Electrical Sticky
This is also a worthwhile sticky for DIY'ers: DIY Fixes
Electrical Sticky
This is also a worthwhile sticky for DIY'ers: DIY Fixes
What seems to be my biggest problem is that the motor does not shut down soon enough when retracting, allowing the control arm to go over
center - if that makes sense. That would seem to be why I can manually open the bucket one turn on the motor and it works - once. Then it's
rinse and repeat 'cuz the control arm went over center again on the way down.
Last edited by red-in-la; Oct 13, 2011 at 12:17 AM. Reason: iPad formatting severely limited
Race Director
Joined: Aug 2003
Posts: 13,421
Likes: 8
From: Lake Mary Florida
Re-check your installation of the arm assembly. When I installed a new set, one was problematic getting the arm assembly set in the right configuration before I seated the nut. One went together no issue the other I had to redo a couple times until it was correct. Just a thought, spurred after you mentioned how it goes over center. That obviously should not happen. I mention this because I recall you saying you've done the gear rebuild.
Instructor
Joined: Sep 2011
Posts: 109
Likes: 0
Another way of opening up the light bucket (video): http://www.corvette-web-central.com/C5repair.html
And, if you are into torque values I came across these:
Torque Settings
All Data Diy
Headlamp Mounting Bolts 20 N.m (15 lb ft)
Headlamp Mounting Nuts 10 N.m (89 lb in)
Headlamp Bezel Retaining Screws 1.9 N.m (17 lb in)
Headlamp Capsule Retaining Screws 3.5 N.m (31 lb in)
Headlamp Intermediate Bracket Screws 1.9 N.m (17 lb in)
Headlamp Opening Door Screws 1.9 N.m (17 lb in)
Race Director
Joined: Aug 2003
Posts: 13,421
Likes: 8
From: Lake Mary Florida
Freeze frame it where it shows the arms (about 3/4) and study the arms perhaps there's a hint there to compare against your installation.
Problem I see is its only the removal, its the installation/setup that is the trick.
Wonder if you can get a good enough view of the arms, and nut and verify that the arms are completely seated, and of course then the nut completely secure. If that arm is not seated on the keyed area of the shaft, it's not going to operate correctly. That's what I'm thinking might be the issue.
Also I believe the motor should be manually run one way or the other before assembling it. That is if the lamps were up it needs to be manually set to the full open position as you install it.
Race Director
Joined: Aug 2003
Posts: 13,421
Likes: 8
From: Lake Mary Florida
Now I remember why it seemed important to me about the arms. I just reviewed the removal/installation procedures in the FSM. It specifically says to take note of the linkage to motor relationship for reassembly.
Then during the installation, it says to place the pivot arm in the position noted prior to removal.
The pivot arm nut only gets 5.6Nm torque while the other two get 6.8Nm.
Then during the installation, it says to place the pivot arm in the position noted prior to removal.
The pivot arm nut only gets 5.6Nm torque while the other two get 6.8Nm.