


 It is there for a reason. Some members have trimed the air dam a bit to help with clearance problems though.

Front Air Dam
Administrator


Joined: Mar 2001
Posts: 368,319
Likes: 24,777
From: In a parallel universe. Currently own 2014 Stingray Coupe.
C7 of the Year - Modified Finalist 2021
MO Events Coordinator
St. Jude Co-Organizer
St. Jude Donor '03 thru '25
NCM Sinkhole Donor
CI 5, 8 & 11 Veteran
Corvette Stories
The Best of Corvette for Corvette Enthusiasts

Top 10 Most Expensive Corvettes Ever Sold on Bring A Trailer
Brett Foote
10 Things Every Corvette Owner Needs (2026 Edition)
Michael S. Palmer
8 Most "Only Corvette Owners Understand" Quirks and Problems
Pouria Savadkouei
10 Reasons the C6 Z06 is Still A Performance Benchmark After 20 Years
Joe Kucinski
How Much Horsepower Every Corvette Engine "LOST" in 1972
Joe Kucinski
Top 10 DOs and DON'Ts for Protecting Your Convertible Top!
Michael S. Palmer
Top 10 Most Explosive Corvettes Ever Made: Power-to-Weight Ratio Ranked!
Joe Kucinski
150 hp to 1,250 hp: Every Corvette Generation Compared by the Specs That Matter
Joe Kucinski
8 Coolest Corvette Pace Cars (and Replicas) of All Time
Verdad Gallardo
Tech Contributor


Joined: Dec 2003
Posts: 19,384
Likes: 87
From: Horncastle Lincolnshire, England
2023 C5 of the Year Finalist - Unmodified
This is a topic that comes up quite often. My advice is that it’s a bad decision for a high performance sports car capable of 170 mph+. You’re affecting performance and handling if you do.
The C5 is a “bottom feeder” in other words the cooling air which feeds the radiator is drawn in from below. The air deflector in the centre diverts air into the radiator. If you’re in any doubt about the effect of reducing flow into the radiator, pop a plastic shopping bag up there and watch the temperatures rise. To that end it’s important to keep the intake clear of debris. Without it, you’re relying mostly on venturi effect to pull air in. There’s a reason why fitting forced air induction kits gives extra HP. The engine likes to breath. So if you take it off you’ll probably lose a few HP and the engine will run hotter.
The end caps are fitted for different reasons. Basic aerodynamic theory says that if you put a flat plate into the airflow it causes “form” drag. Once air hits the deflector it will naturally flow to the outer ends. When it breaks off it will cause further drag and turbulence. The end caps are aerodynamic fairings and smooth the airflow allowing it to travel efficiently under the car
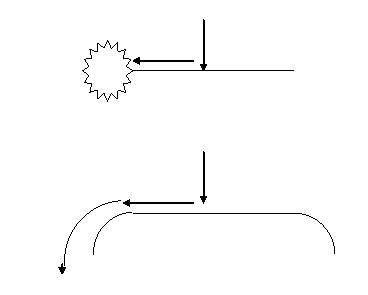
At high speeds you want smooth airflow under the floor of the car. Turbulence will cause instability and loss of downforce and performance.
The bottom line is that you can remove them but there’s an impact. If you drive around at the National speed limit and avoid Vegas you’ll never notice. If you take it to the track or run in high temperatures it’s not advisable. And if you do take them off, do the right thing and put them back on before you sell the car.
Heres how to replace the air deflector if you go that way:
Air Deflector Replacement - Front Bumper Fascia
Removal Procedure
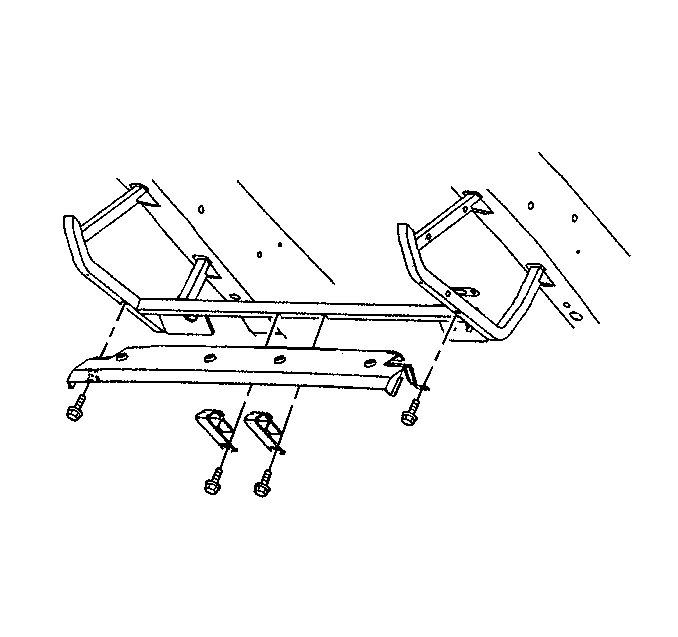
1. Raise and support the vehicle. Refer to Lifting and Jacking the Vehicle in General Information.
2. Remove the center air deflector bolts.
3. Remove the air deflector from the vehicle.
Installation Procedure
1. Position the center air deflector between the side valances.
Notice
Use the correct fastener in the correct location. Replacement fasteners must be the correct part number for that application. Fasteners requiring replacement or fasteners requiring the use of thread locking compound or sealant are identified in the service procedure. Do not use paints, lubricants, or corrosion inhibitors on fasteners or fastener joint surfaces unless specified. These coatings affect fastener torque and joint clamping force and may damage the fastener. Use the correct tightening sequence and specifications when installing fasteners in order to avoid damage to parts and systems.
2. Install the center air deflector and attaching bolts.
Tighten
Tighten the air deflector bolts to 7 N•m (62 lb in).
3. Lower the vehicle.
The aero pieces just screw on
The C5 is a “bottom feeder” in other words the cooling air which feeds the radiator is drawn in from below. The air deflector in the centre diverts air into the radiator. If you’re in any doubt about the effect of reducing flow into the radiator, pop a plastic shopping bag up there and watch the temperatures rise. To that end it’s important to keep the intake clear of debris. Without it, you’re relying mostly on venturi effect to pull air in. There’s a reason why fitting forced air induction kits gives extra HP. The engine likes to breath. So if you take it off you’ll probably lose a few HP and the engine will run hotter.
The end caps are fitted for different reasons. Basic aerodynamic theory says that if you put a flat plate into the airflow it causes “form” drag. Once air hits the deflector it will naturally flow to the outer ends. When it breaks off it will cause further drag and turbulence. The end caps are aerodynamic fairings and smooth the airflow allowing it to travel efficiently under the car
At high speeds you want smooth airflow under the floor of the car. Turbulence will cause instability and loss of downforce and performance.
The bottom line is that you can remove them but there’s an impact. If you drive around at the National speed limit and avoid Vegas you’ll never notice. If you take it to the track or run in high temperatures it’s not advisable. And if you do take them off, do the right thing and put them back on before you sell the car.
Heres how to replace the air deflector if you go that way:
Air Deflector Replacement - Front Bumper Fascia
Removal Procedure
1. Raise and support the vehicle. Refer to Lifting and Jacking the Vehicle in General Information.
2. Remove the center air deflector bolts.
3. Remove the air deflector from the vehicle.
Installation Procedure
1. Position the center air deflector between the side valances.
Notice
Use the correct fastener in the correct location. Replacement fasteners must be the correct part number for that application. Fasteners requiring replacement or fasteners requiring the use of thread locking compound or sealant are identified in the service procedure. Do not use paints, lubricants, or corrosion inhibitors on fasteners or fastener joint surfaces unless specified. These coatings affect fastener torque and joint clamping force and may damage the fastener. Use the correct tightening sequence and specifications when installing fasteners in order to avoid damage to parts and systems.
2. Install the center air deflector and attaching bolts.
Tighten
Tighten the air deflector bolts to 7 N•m (62 lb in).
3. Lower the vehicle.
The aero pieces just screw on
Last edited by DeeGee; Nov 8, 2009 at 12:04 PM.
Instructor


Joined: Jul 2008
Posts: 210
Likes: 12
From: Phoenix AZ
It was a different car, but when the air dam was taken off my Thunderbird turbo coupe I had to constantly watch the engine temp and had several times when I had to pull over to let the car cool down. Might be different with the vette...

Race Director


Joined: Aug 1999
Posts: 11,119
Likes: 672
From: SE Pennsylvania
St. Jude Donor '03 thru '26
Oldtimer
Contact Gene Culley for a great price on a new dam, It is necessary ! I bought a extra set just because the part is nearing a point ( I think) were it will be discontinued by GM, if not already. 
Intermediate

Joined: Aug 2009
Posts: 48
Likes: 2
For the C6: http://www.mamotorworks.com/corvette...-166-7549.html