








[PICS]LG Header Install Complete!

Thread Starter
Safety Car


Joined: Sep 2007
Posts: 3,816
Likes: 16
From: Anchorage Alaska
St. Jude Donor '08-'09-'10
 [PICS]LG Header Install Complete!
Hi guys...
today I finished up the install of my new LG Long tube headers. My brother and I spent the weekend on this project and had a lot of fun and a few hiccups, but in the end it was nothing we couldn't handle.
I have only been able to run the car in my driveway since the snow will be sticking around until late March or early April. But I've been content to rev the engine and enjoy the incredibly awesome sound! The note is so much throatier, a bit louder, and the car just rumbles with power. This is great stuff!
So, on to the pictures...
First things first, we had to ensure that our garage fridge had the requisite supplies:

Next, I set up my workbench with a laptop, dialed in to Cajundude's website with the install guide, and my new Craftsman toolkit.

Here is one more shot of the stuff going in:

Have the car supported on 4 jackstands, with the 4 tires underneath for a little extra insurance.

First step! Starting to remove the old exhaust. We started at the joint between the stock manifolds and the H-pipe.

My brother Jeremy unbolting his side of the H-pipe. We ran into one issue; the studs on the stock manifold were bent, so the flange on the stock piece would not come off. He hammered them straight and we continued on.


The stock H-pipe is dropped out, with the rear O2 sensor wires still connected.


While the H-pipe was out, I installed the new LG tunnel plate. What a huge difference! Look at these next few pictures, which include some side-by-side shots. The stock unit is clearly a joke.


Skipping ahead a bit, we are getting to the meat and potatoes of the new goods! Here, we have the headers installed, and the first parts of the X-pipe and high flow cats loosely attached. I didn't take any pictures of installing the new stuff since we had a few issues: The RH header's 3" end was a little oblong and didn't want to receive the high flow cat. We had to pry open the end of the cat a little and muscle it on. Eventually it went. As well, the 16" pipe that follows the cat on the drivers side had an oblong end too. An hour with a C-clamp later, I had it squeezed back into a mostly round shape and got it to work. Other than these two issues, the pipes assembled well.
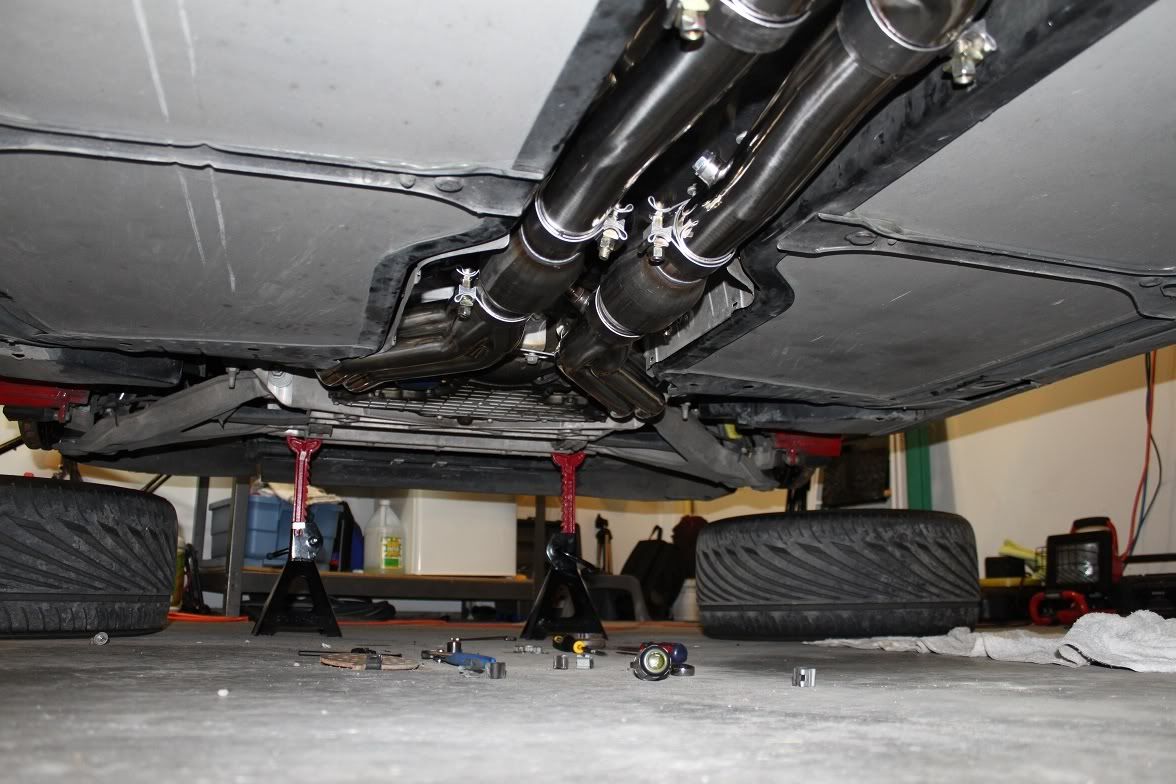
When it came time to mate the rear of the X-pipe to the stock Z06 exhaust, it was a seamless fit! all four bolts slid right into place. Couldn't have asked for a better fit.

Here's some pics of the headers, with the top part of the engine mostly put back together.


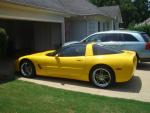
Lastly, a shot of my Vette in the driveway, happily idling away with the new headers!

Right now, she runs great, but after revving the engine and letting the idle fall back down, sometimes it dips to about 500 and then picks back up. Not sure what is causing that but it's a minor thing at this point. I'll need to get a road test (in April) out of the way to see how it's really going to perform.
today I finished up the install of my new LG Long tube headers. My brother and I spent the weekend on this project and had a lot of fun and a few hiccups, but in the end it was nothing we couldn't handle.
I have only been able to run the car in my driveway since the snow will be sticking around until late March or early April. But I've been content to rev the engine and enjoy the incredibly awesome sound! The note is so much throatier, a bit louder, and the car just rumbles with power. This is great stuff!
So, on to the pictures...
First things first, we had to ensure that our garage fridge had the requisite supplies:
Next, I set up my workbench with a laptop, dialed in to Cajundude's website with the install guide, and my new Craftsman toolkit.
Here is one more shot of the stuff going in:
Have the car supported on 4 jackstands, with the 4 tires underneath for a little extra insurance.
First step! Starting to remove the old exhaust. We started at the joint between the stock manifolds and the H-pipe.
My brother Jeremy unbolting his side of the H-pipe. We ran into one issue; the studs on the stock manifold were bent, so the flange on the stock piece would not come off. He hammered them straight and we continued on.
The stock H-pipe is dropped out, with the rear O2 sensor wires still connected.
While the H-pipe was out, I installed the new LG tunnel plate. What a huge difference! Look at these next few pictures, which include some side-by-side shots. The stock unit is clearly a joke.
Skipping ahead a bit, we are getting to the meat and potatoes of the new goods! Here, we have the headers installed, and the first parts of the X-pipe and high flow cats loosely attached. I didn't take any pictures of installing the new stuff since we had a few issues: The RH header's 3" end was a little oblong and didn't want to receive the high flow cat. We had to pry open the end of the cat a little and muscle it on. Eventually it went. As well, the 16" pipe that follows the cat on the drivers side had an oblong end too. An hour with a C-clamp later, I had it squeezed back into a mostly round shape and got it to work. Other than these two issues, the pipes assembled well.
When it came time to mate the rear of the X-pipe to the stock Z06 exhaust, it was a seamless fit! all four bolts slid right into place. Couldn't have asked for a better fit.
Here's some pics of the headers, with the top part of the engine mostly put back together.
Lastly, a shot of my Vette in the driveway, happily idling away with the new headers!
Right now, she runs great, but after revving the engine and letting the idle fall back down, sometimes it dips to about 500 and then picks back up. Not sure what is causing that but it's a minor thing at this point. I'll need to get a road test (in April) out of the way to see how it's really going to perform.

Team Owner


Joined: Sep 2001
Posts: 23,283
Likes: 906
From: Lake Elsinore, CA
Congrats on the excellent install!  Nice work. That tunnel plate and the headers are gorgeous - eye candy too nice to hide under the car.
You may want to try an idle relearn to get the idle steady - you shouldn't need a tune to get headers to idle smoothly when they're the only mod.
Enjoy the new power and sound!
Nice work. That tunnel plate and the headers are gorgeous - eye candy too nice to hide under the car.You may want to try an idle relearn to get the idle steady - you shouldn't need a tune to get headers to idle smoothly when they're the only mod.
Enjoy the new power and sound!
Corvette Stories
The Best of Corvette for Corvette Enthusiasts

Top 10 Most Explosive Corvettes Ever Made: Power-to-Weight Ratio Ranked!
Joe Kucinski
150 hp to 1,250 hp: Every Corvette Generation Compared by the Specs That Matter
Joe Kucinski
8 Coolest Corvette Pace Cars (and Replicas) of All Time
Verdad Gallardo
Top 10 Corvette Engines RANKED by Peak Torque (70+ Years of Muscle!)
Joe Kucinski
Corvette ZR1X Will Be Pacing the Indy 500, And Could Probably Race, Too!
Verdad Gallardo
Top 10 Corvettes Coming to Mecum Indy 2026!
Brett Foote
Top 10 C9 Corvette MUST-HAVES to Fix These C8 Generation Flaws!
Michael S. Palmer
10 Revolutionary 'Corvette Firsts' Most People Don't Know
Joe Kucinski
5 Reasons to Upgrade to an LS6-Powered Corvette; 5 Reasons to Stay LT2
Michael S. Palmer
Melting Slicks


Joined: Nov 2007
Posts: 2,001
Likes: 2
From: Auburn Michigan
That looks awesome. Someday I am gonna install long tubes but i am gonna have someone else do it. Heck I am all stressed out over my up coming vararam install I could never do a header job without having a heart attack
I could never do a header job without having a heart attack





Instructor

Joined: Feb 2009
Posts: 234
Likes: 0
From: Tuscaloosa AL
Looks great! Gotta love shiny new parts. 
On a different topic, is your serpentine belt missing a rib? Maybe you had taken it loose before and it just appears to be missing one; can't really tell from the pic.
On a different topic, is your serpentine belt missing a rib? Maybe you had taken it loose before and it just appears to be missing one; can't really tell from the pic.
Thread Starter
Safety Car
Joined: Sep 2007
Posts: 3,816
Likes: 16
From: Anchorage Alaska
St. Jude Donor '08-'09-'10
-removed fuel rail covers. easy.
-remove the air tube on drivers side; disconnect air tube on pax side.
-removed coil packs. easy. 5 bolts and one white clip each. Disconnect spark plug wires carefully (or replace, like I did)
-removed alternator. not too bad. pull the tensioner; slide belt off; undo a clip, a 13mm bolt, and 2 big 15mm bolts. pries out.
-removed the passenger side valve cover. 4 bolts, comes right off.
-removed the oil dipstick. secured with 1 15mm bolt. A little awkward fishing it back into place; I had to go under the car again and look up to see the port, but it wasn't really too hard.
-removed plug wires and spark plugs, since I was replacing them anyway. In any case you must remove the plug wires. The headers WILL FIT if you don't have the spark plugs removed. Just don't ding them or they might break.
Here is Cajundude's writeup, which I used for about 90% of the process:
http://www.cajundude.com/longtubes.htm
Lots of pictures, lots of good advice. FAR superior to the LG-supplied instructions. however, Cajun installed headers that were a little different than mine so I had to make some changes to the process by about page 4.
I have to admit I found this job quite intimidating before I began; but since my car is stuck in the garage until April anyway, knowing I had months to correct or solve any issues was a great help. Then halfway through, when we ran into the issues, I'll admit I even felt a twinge of "what the hell have I done?!?" So, we took a break... saw Avatar in 3D at the cinema; called it a night. Next morning we were back at it and in good spirits. Now, my only worry is, "what if I didn't REALLY get all the wires away from the header? What if I burst into flames going down the highway next summer?"
My serpentine belt is fully intact. It's probably just lying at a wierd angle. When I re-routed the belt after the install was done, I made sure it was seated and it was full-width at every pulley.
Thanks for all the compliments! I do wish I would have taken more pictures, but...what I did get isn't too bad.

Thread Starter
Safety Car
Joined: Sep 2007
Posts: 3,816
Likes: 16
From: Anchorage Alaska
St. Jude Donor '08-'09-'10
To fish the drivers side header in from the bottom, we ALMOST had enough room. It was necessary to raise the car one more inch with the floor jack to get it past one point. Otherwise, we had sufficient room to work. The passenger side went in from above, and there were no issues with floor proximity on that one. I didn't get pictures of the actual "install" since it was a pretty fussy hour of maneuvering with those pipes, but eventually they DID fit.

Intermediate
Joined: Jan 2007
Posts: 47
Likes: 0
From: ELK GROVE CA
Nice job it looks sweet I want to install long tube headers on my vette but here in California the smog regulations suck big time and some told me to install the short headers but the gain in HP is minimal and the sound is not the same maybe one day I will just have to pull the trigger.
Instructor
Joined: Feb 2009
Posts: 234
Likes: 0
From: Tuscaloosa AL
Ah, my apologies. Somehow, my eyes were drawn to your PS pump pulley and not the large, gaping space in the bracket where your alternator belongs.
