


ppphhhhsss
Thread Starter
Intermediate

Joined: Sep 2010
Posts: 41
Likes: 1
From: Tulsa Oklahoma
I bought my first vette 3 weeks ago, i have found many tips and fixs on this site. I am disappointed the search section of this site to be so vague, someone please help me. I have a passenger side driving light out, the daytime one. I search under everything and come up with joke of the day and so on. I don't get it. I am on the c5 forum and see things from the 60's. What do i do?? Thanks
Administrator


Joined: Mar 2001
Posts: 368,536
Likes: 24,826
From: In a parallel universe. Currently own 2014 Stingray Coupe.
C7 of the Year - Modified Finalist 2021
MO Events Coordinator
St. Jude Co-Organizer
St. Jude Donor '03 thru '26
NCM Sinkhole Donor
CI 5, 8 & 11 Veteran
You can access the DRL from underneath the front fascia. There is an access panel that can be removed and then you have full access to the fog/turnsignals/DRLs sockets. I think I have a file that will describe the process for removal of the DRL bulbs. PM me your e-mail address if you want a copy.
Melting Slicks

Joined: Jun 2007
Posts: 2,704
Likes: 4
From: Lone Star State
Melting Slicks
Joined: Nov 2006
Posts: 2,431
Likes: 3
From: Iowa City Iowa
Good luck at getting into the "thread". However, if you even have basic mechanical skills, simply lift the front end of your vette slightly or put it on a rack and remove the access panel to reach the area where your burnt out bulb is located--no biggie!!!
PS- you might want to replace both bulbs with LED's as the OEM bulb gets the housing pretty hot and can actually melt the top area. Be sure you understand the hyper-flash possibility before you decide to replace the bulbs with LED's.
PS- you might want to replace both bulbs with LED's as the OEM bulb gets the housing pretty hot and can actually melt the top area. Be sure you understand the hyper-flash possibility before you decide to replace the bulbs with LED's.

Melting Slicks

Joined: Aug 2000
Posts: 2,618
Likes: 5
From: Overland Park KS
You should only use ADVANCED search. The basic search is worthless, I NEVER even try to use it.
With Advanced Search you can:
Tell it to search thread titles or entire thread (almost always use titles myself).
Then you can select which forums you want to search in. There are a couple other things you can select but I never do. Near the bottom you can save your search criteria so you don't have to change it each time you search.
Works great every time.
Safety Car


Joined: Sep 2005
Posts: 4,063
Likes: 104
From: Southeast, Tennessee
St. Jude Donor '09 thru '26
You should only use ADVANCED search. The basic search is worthless, I NEVER even try to use it.
With Advanced Search you can:
Tell it to search thread titles or entire thread (almost always use titles myself).
Then you can select which forums you want to search in. There are a couple other things you can select but I never do. Near the bottom you can save your search criteria so you don't have to change it each time you search.
Works great every time.
With Advanced Search you can:
Tell it to search thread titles or entire thread (almost always use titles myself).
Then you can select which forums you want to search in. There are a couple other things you can select but I never do. Near the bottom you can save your search criteria so you don't have to change it each time you search.
Works great every time.

Corvette Stories
The Best of Corvette for Corvette Enthusiasts

Every 2027 Corvette Engine Explained
Joe Kucinski
Designer Imagines A Corvette That Looks More Like a Corvette Than the Corvette
Verdad Gallardo
10 Ugly Corvettes That We Still Kinda Love
Joe Kucinski
Top 10 Most Expensive Corvettes Ever Sold on Bring A Trailer
Brett Foote
10 Things Every Corvette Owner Needs (2026 Edition)
Michael S. Palmer
8 Most "Only Corvette Owners Understand" Quirks and Problems
Pouria Savadkouei
10 Reasons the C6 Z06 is Still A Performance Benchmark After 20 Years
Joe Kucinski
How Much Horsepower Every Corvette Engine "LOST" in 1972
Joe Kucinski
Top 10 DOs and DON'Ts for Protecting Your Convertible Top!
Michael S. Palmer
Pro


Joined: Aug 2010
Posts: 545
Likes: 4
From: Calgary Alberta
Per service manual. PM an email address and I can send you the version with pictures.
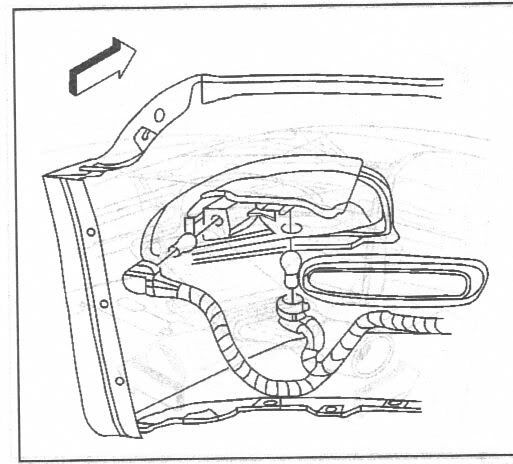
Park/Turn Signal/Side Marker Lamp Replacement
Removal Procedure
Raise and support the vehicle. Refer to Lifting and Jacking the Vehicle in General Information.
Remove the front fascia lower closeout panel. Refer to Close Out Panel - Front Bumper Fascia Lower in Bumpers.
Release the brake caliper cooling duct from the front fascia, and position the duct aside.
Remove the front turn signal lamp bracket retaining spring from the lamp bracket.
Remove the lamp bracket retaining spring from the front fascia.
Remove the front turn signal lamp bracket retaining screws.
Disconnect the sockets from the lamp.
Remove the lamp, with the bracket, from the vehicle.
Remove the lamp to bracket retaining screws.
Remove the lamp from the bracket.
Installation Procedure
Install the front park/turn signal and sidemarker lamp into position on the front turn signal lamp bracket.
Notice
Use the correct fastener in the correct location. Replacement fasteners must be the correct part number for that application. Fasteners requiring replacement or fasteners requiring the use of thread locking compound or sealant are identified in the service procedure. Do not use paints, lubricants, or corrosion inhibitors on fasteners or fastener joint surfaces unless specified. These coatings affect fastener torque and joint clamping force and may damage the fastener. Use the correct tightening sequence and specifications when installing fasteners in order to avoid damage to parts and systems.
Install the front park/turn signal and sidemarker lamp to bracket retaining screws. Tighten
Tighten the front park/turn signal and sidemarker lamp to bracket retaining screws to 2 N�m (18 lb in).
Install the sockets to the lamp.
Install the lamp, with the bracket, to the front fascia.
Align the lamp to the opening in the front fascia and hold the lamp firmly in place against the fascia, while installing the front turn signal lamp bracket retaining screws. Tighten
Tighten the front turn signal lamp bracket retaining screws to 3 N�m (27 lb in).
Install the lamp bracket retaining spring to the front fascia.
Install the front turn signal lamp bracket retaining spring to the lamp bracket.
Position the brake caliper cooling duct to the front fascia and press the duct toward the fascia to secure.
Install the front fascia lower closeout panel. Refer to Close Out Panel - Front Bumper Fascia Lower in Bumpers.
Pro
Joined: Aug 2009
Posts: 537
Likes: 4
From: Roseville Ca.
Or you can just move the brake duct vent over and put your hand through the opening, pinch the socket clip and pull the socket out the vent...depending on the size of your hands. Take me a few minutes...good luck.
Tech Contributor


Joined: Dec 2003
Posts: 19,384
Likes: 87
From: Horncastle Lincolnshire, England
2023 C5 of the Year Finalist - Unmodified
Here are some pics to help.
You'll get three suggestions
Go in through the brake ducts - not easy with a Z06 or if you have screens
Go in through the bottom by taking out the bottom panel

The one that works for me is:
Turn on the headlights and back off one position to kill the lights.
Unscrew the 3 small screws on the black plastic housing around the headlight. Gently pull the housing clear. Reach down around the headlight unit and release the bulb holder. It comes out by turning the bulb holder a � turn counter clockwise but it has a plastic clip which you need to squeeze to release it. Here’s how the bulb fits into the lamp unit. The DRL bulb is the lower of the two.
Here’s the light socket. This one’s after market but it gives you the idea. You can see the clip you need to squeeze.

Change the bulb. It’s a push fit into the lamp holder. Push it home firmly but don’t handle the glass. Use latex gloves if you have them. Reseat the bulb holder and turn clockwise until it clicks back in place. Put the plastic headlight housing back in place making sure to locate the small plastic tab in the bracket on the headlamp cover. Replace the 3 screws and close the lights.
It’s a 10 minute job. Some guys have had the lights close if they’ve taken a while to do the fix. If you’re worried about that, disconnect the battery once the lights are up.
The bulb is a 4157NA. It's a dual filament bulb so its possible for the DRLs to be working when the T/S is out and vice versa.
Some guys with big arms remove the hood adjusting screw for better access. Guys with even bigger arms have had to take off the headlight cover. Four torx screws (2 back, 1 each side). Take the back ones off first with the lamps down. Raise the lights and take the side ones out.
You'll get three suggestions
Go in through the brake ducts - not easy with a Z06 or if you have screens
Go in through the bottom by taking out the bottom panel
The one that works for me is:
Turn on the headlights and back off one position to kill the lights.
Unscrew the 3 small screws on the black plastic housing around the headlight. Gently pull the housing clear. Reach down around the headlight unit and release the bulb holder. It comes out by turning the bulb holder a � turn counter clockwise but it has a plastic clip which you need to squeeze to release it. Here’s how the bulb fits into the lamp unit. The DRL bulb is the lower of the two.
Here’s the light socket. This one’s after market but it gives you the idea. You can see the clip you need to squeeze.
Change the bulb. It’s a push fit into the lamp holder. Push it home firmly but don’t handle the glass. Use latex gloves if you have them. Reseat the bulb holder and turn clockwise until it clicks back in place. Put the plastic headlight housing back in place making sure to locate the small plastic tab in the bracket on the headlamp cover. Replace the 3 screws and close the lights.
It’s a 10 minute job. Some guys have had the lights close if they’ve taken a while to do the fix. If you’re worried about that, disconnect the battery once the lights are up.
The bulb is a 4157NA. It's a dual filament bulb so its possible for the DRLs to be working when the T/S is out and vice versa.
Some guys with big arms remove the hood adjusting screw for better access. Guys with even bigger arms have had to take off the headlight cover. Four torx screws (2 back, 1 each side). Take the back ones off first with the lamps down. Raise the lights and take the side ones out.
Last edited by DeeGee; Sep 24, 2010 at 01:05 AM.
Le Mans Master

Joined: Jun 2007
Posts: 6,301
Likes: 6
From: LAND OF OZ Kansas
The lazy way from the top. Raise your bucket lights. Take off the 3 phillips screws from the the bucket lighs covers off. Take the black plastic cover off the bucket lights. Reach the day time running lights, DRLs, from the top of the vehicle. Swap the burnt out bulbs. Replace the socket on the DRLS. replace the black plastic cover and the 3 phillips bulbs. You have your DRS working again with out taking the 20, exhagerating here, screws from the bottom of the car.
Le Mans Master
Joined: Jun 2007
Posts: 6,301
Likes: 6
From: LAND OF OZ Kansas
 . Sad but true
 .
.
Drifting

Joined: Feb 2007
Posts: 1,793
Likes: 7
From: Santa Maria Ca.
The lazy way from the top. Raise your bucket lights. Take off the 3 phillips screws from the the bucket lighs covers off. Take the black plastic cover off the bucket lights. Reach the day time running lights, DRLs, from the top of the vehicle. Swap the burnt out bulbs. Replace the socket on the DRLS. replace the black plastic cover and the 3 phillips bulbs. You have your DRS working again with out taking the 20, exhagerating here, screws from the bottom of the car.
They will pinch you pretty good if that happens--and if your wife happens to be standing nearby at the time,she could possibly soil herself from laughing so hard....