


Bulb replacement
Le Mans Master


Joined: Mar 2004
Posts: 8,700
Likes: 298
From: Ft. Lauderdale Fl
http://gmprotectionplanwarranty.com/...t-Corvette.pdf
Enjoy. Here's a free owners manual ....hope its the correct year.
Enjoy. Here's a free owners manual ....hope its the correct year.
Last edited by runner140*; Oct 1, 2010 at 07:58 AM. Reason: add
Melting Slicks

Joined: Jun 2007
Posts: 2,704
Likes: 4
From: Lone Star State
Piece of cake if you or someone you know have small hands lol
http://www.youtube.com/watch?v=BaUEoD2CH4k
http://www.youtube.com/watch?v=BaUEoD2CH4k
Advanced

Joined: Jun 2009
Posts: 65
Likes: 0
Piece of cake if you or someone you know have small hands lol
http://www.youtube.com/watch?v=BaUEoD2CH4k
http://www.youtube.com/watch?v=BaUEoD2CH4k
 Excellent video and tips from Junkman2000. Had to replace my right front bulb this morning and have another tip to supplement this great video. The video is right on, but this tip enables you to see the bulb holder in the lens.
 The lens on both sides are held in place on the bumper with small springs. Grab a paperback novel about 1 inch thick, press the top of the lens and the lens can be lifted upward about an inch. Watch your fingers, as the lens will pop back into position without something holding it in place.
While holding the lens up, place a corner of the paperback in the hole between the bumper and the lens to keep from scratching your paint. You can then see the bulb holder in the bottom of the lens. There is a small tab that must be pressed to release the bulb holder from the lens. If you don't know that tab is there, it can be a tough time removing the holder from the lens.
Going through the space between the lens and the bumper, I used a channel lock pliers and carefully disconnected the holder from the lens. Reach into the brake duct, pull the connector and bulb out exactly as shown in the video, replace the bulb, and then insert the bulb and holder into the socket in the lens. With the lens held up with the paperback, you can easily see the hole in the bottom of the lens. When you remove the paperback, the lens will fall right back into place.

Tech Contributor

Joined: Dec 2003
Posts: 19,384
Likes: 87
From: Horncastle Lincolnshire, England
2023 C5 of the Year Finalist - Unmodified
Here ya go:
You'll get three suggestions
Go in through the brake ducts - not easy with a Z06 or if you have screens
Go in through the bottom by taking out the bottom panel

The one that works for me is:
Turn on the headlights and back off one position to kill the lights.
Unscrew the 3 small screws on the black plastic housing around the headlight. Gently pull the housing clear. Reach down around the headlight unit and release the bulb holder. It comes out by turning the bulb holder a � turn counter clockwise but it has a plastic clip which you need to squeeze to release it. Here�s how the bulb fits into the lamp unit. The DRL bulb is the lower of the two.
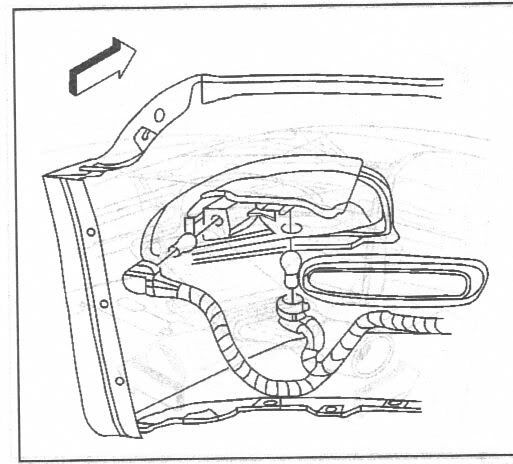
Here�s the light socket. This one�s after market but it gives you the idea. You can see the clip you need to squeeze.

Change the bulb. It�s a push fit into the lamp holder. Push it home firmly but don�t handle the glass. Use latex gloves if you have them. Reseat the bulb holder and turn clockwise until it clicks back in place. Put the plastic headlight housing back in place making sure to locate the small plastic tab in the bracket on the headlamp cover. Replace the 3 screws and close the lights.
It�s a 10 minute job. Some guys have had the lights close if they�ve taken a while to do the fix. If you�re worried about that, disconnect the battery once the lights are up.
The bulb is a 4157NA
Some guys with big arms remove the hood adjusting screw for better access. Guys with even bigger arms have had to take off the headlight cover. Four torx screws (2 back, 1 each side). Take the back ones off first with the lamps down. Raise the lights and take the side ones out.
You'll get three suggestions
Go in through the brake ducts - not easy with a Z06 or if you have screens
Go in through the bottom by taking out the bottom panel
The one that works for me is:
Turn on the headlights and back off one position to kill the lights.
Unscrew the 3 small screws on the black plastic housing around the headlight. Gently pull the housing clear. Reach down around the headlight unit and release the bulb holder. It comes out by turning the bulb holder a � turn counter clockwise but it has a plastic clip which you need to squeeze to release it. Here�s how the bulb fits into the lamp unit. The DRL bulb is the lower of the two.
Here�s the light socket. This one�s after market but it gives you the idea. You can see the clip you need to squeeze.
Change the bulb. It�s a push fit into the lamp holder. Push it home firmly but don�t handle the glass. Use latex gloves if you have them. Reseat the bulb holder and turn clockwise until it clicks back in place. Put the plastic headlight housing back in place making sure to locate the small plastic tab in the bracket on the headlamp cover. Replace the 3 screws and close the lights.
It�s a 10 minute job. Some guys have had the lights close if they�ve taken a while to do the fix. If you�re worried about that, disconnect the battery once the lights are up.
The bulb is a 4157NA
Some guys with big arms remove the hood adjusting screw for better access. Guys with even bigger arms have had to take off the headlight cover. Four torx screws (2 back, 1 each side). Take the back ones off first with the lamps down. Raise the lights and take the side ones out.
Corvette Stories
The Best of Corvette for Corvette Enthusiasts

Top 10 Most Expensive Corvettes Ever Sold on Bring A Trailer
Brett Foote
10 Things Every Corvette Owner Needs (2026 Edition)
Michael S. Palmer
8 Most "Only Corvette Owners Understand" Quirks and Problems
Pouria Savadkouei
10 Reasons the C6 Z06 is Still A Performance Benchmark After 20 Years
Joe Kucinski
How Much Horsepower Every Corvette Engine "LOST" in 1972
Joe Kucinski
Top 10 DOs and DON'Ts for Protecting Your Convertible Top!
Michael S. Palmer
Top 10 Most Explosive Corvettes Ever Made: Power-to-Weight Ratio Ranked!
Joe Kucinski
150 hp to 1,250 hp: Every Corvette Generation Compared by the Specs That Matter
Joe Kucinski
8 Coolest Corvette Pace Cars (and Replicas) of All Time
Verdad Gallardo

Melting Slicks
Joined: Jun 2010
Posts: 2,809
Likes: 3
From: Yorktown Virginia

The tab you have to push in is towards the front of the car and above a lip so I had to reach around the bulb and push the tab in from the outside of the car, just replaced mine today.
And that reminds me I need to put my brake duct back in place.