


Drl replacement?
Thread Starter
Melting Slicks

Joined: Jun 2010
Posts: 2,809
Likes: 3
From: Yorktown Virginia
So last Thursday I had to go through some pretty high water to get out of school, would have stopped and backed up but I had cars behind me. But anyways as if that wasn't painful enough apparently my passenger side Drl was under water when I had to go through the "puddle" and when I came out it blew.
I have a new bulb but I'm not sure how to get to it to replace it, I remember seeing a post on here saying that you had to remove the headlight or something like that but I couldn't find that post when I looked. So what do I need to remove to replace it cause there is no way i can fit my had under the frame rail and all the way over to the light.
I have a new bulb but I'm not sure how to get to it to replace it, I remember seeing a post on here saying that you had to remove the headlight or something like that but I couldn't find that post when I looked. So what do I need to remove to replace it cause there is no way i can fit my had under the frame rail and all the way over to the light.

Banned Scam/Spammer
Joined: Feb 2007
Posts: 50,093
Likes: 267
From: Oklahoma City
St. Jude Donor '09-'10-'11-'12-'13-'14-'15-'16-'17,'19,'22
I like to raise the front and go through the access panels on each side.
Here is another way to do it
http://www.youtube.com/watch?v=BaUEoD2CH4k
Here is another way to do it
http://www.youtube.com/watch?v=BaUEoD2CH4k
Thread Starter
Melting Slicks
Joined: Jun 2010
Posts: 2,809
Likes: 3
From: Yorktown Virginia
Thanks
I was thinking that I would be able to go from underneath but dont feel like backing out all the cars to get to the lift or laying on my back with the car on ramps, did that when installing a vararam on my dads car and its a pain from what I remember to get to the right side from below.
So I guess I can try and fit my hand in from the front.
And I really hope I dont have to go through another puddle like that again.
Tech Contributor


Joined: Dec 2003
Posts: 19,384
Likes: 87
From: Horncastle Lincolnshire, England
2023 C5 of the Year Finalist - Unmodified
Just a thought but the turn signal housing should be water tight. If it let in water you may have a cracked housing. Its very common here. The heat of the DRLs causes the top surface to burn through which lets in water.
As for changing the bulb, you'll get three suggestions
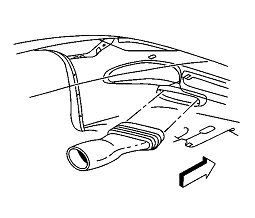
Go in through the brake ducts - not easy with a Z06 or if you have screens
Go in through the bottom by taking out the bottom panel

The one that works for me is:
Turn on the headlights and back off one position to kill the lights.
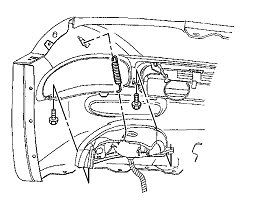
Unscrew the 3 small screws on the black plastic housing around the headlight. Gently pull the housing clear. Reach down around the headlight unit and release the bulb holder. It comes out by turning the bulb holder a � turn counter clockwise but it has a plastic clip which you need to squeeze to release it. Here’s how the bulb fits into the lamp unit. The DRL bulb is the lower of the two.
Here’s the light socket. This one’s after market but it gives you the idea. You can see the clip you need to squeeze.

Change the bulb. It’s a push fit into the lamp holder. Push it home firmly but don’t handle the glass. Use latex gloves if you have them. Reseat the bulb holder and turn clockwise until it clicks back in place. Put the plastic headlight housing back in place making sure to locate the small plastic tab in the bracket on the headlamp cover. Replace the 3 screws and close the lights.
It’s a 10 minute job. Some guys have had the lights close if they’ve taken a while to do the fix. If you’re worried about that, disconnect the battery once the lights are up.
The bulb is a 4157NA
Some guys with big arms remove the hood adjusting screw for better access. Guys with even bigger arms have had to take off the headlight cover. Four torx screws (2 back, 1 each side). Take the back ones off first with the lamps down. Raise the lights and take the side ones out.
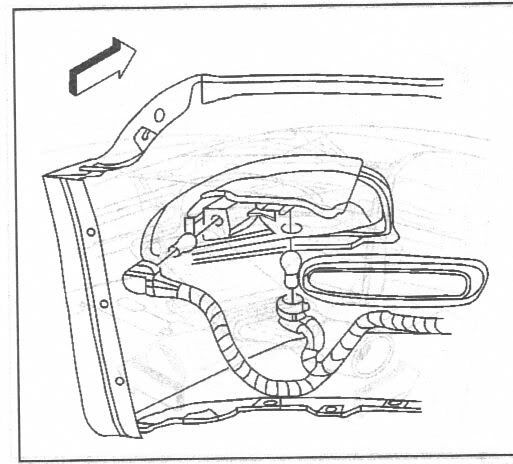
If you decide to inspect the housing you may want to go in from below. Heres how to do it:
Document ID# 655625
2002 Chevrolet Corvette
________________________________________
Park/Turn Signal/Side Marker Lamp Replacement
Removal Procedure
1. Raise and support the vehicle. Refer to Lifting and Jacking the Vehicle in General Information.
2. Remove the front fascia lower closeout panel.
3. Release the brake caliper cooling duct from the front fascia, and position the duct aside.
4. Remove the front turn signal lamp bracket retaining spring from the lamp bracket.
5. Remove the lamp bracket retaining spring from the front fascia.
6. Remove the front turn signal lamp bracket retaining screws.
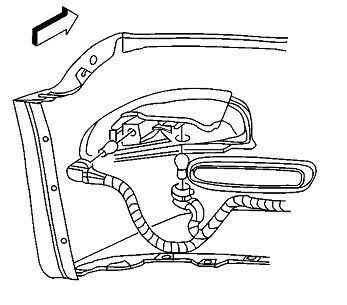
7. Disconnect the sockets from the lamp.
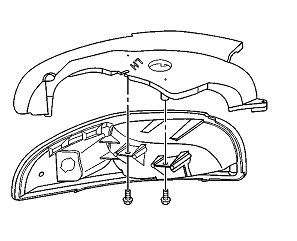
8. Remove the lamp, with the bracket, from the vehicle.
9. Remove the lamp to bracket retaining screws.
10. Remove the lamp from the bracket.
Installation Procedure
1. Install the front park/turn signal and sidemarker lamp into position on the front turn signal lamp bracket.
Notice
Use the correct fastener in the correct location. Replacement fasteners must be the correct part number for that application. Fasteners requiring replacement or fasteners requiring the use of thread locking compound or sealant are identified in the service procedure. Do not use paints, lubricants, or corrosion inhibitors on fasteners or fastener joint surfaces unless specified. These coatings affect fastener torque and joint clamping force and may damage the fastener. Use the correct tightening sequence and specifications when installing fasteners in order to avoid damage to parts and systems.
2. Install the front park/turn signal and sidemarker lamp to bracket retaining screws.
Tighten
Tighten the front park/turn signal and sidemarker lamp to bracket retaining screws to 2 N•m (18 lb in).
3. Install the sockets to the lamp.
4. Install the lamp, with the bracket, to the front fascia.
5. Align the lamp to the opening in the front fascia and hold the lamp firmly in place against the fascia, while installing the front turn signal lamp bracket retaining screws.
Tighten
Tighten the front turn signal lamp bracket retaining screws to 3 N•m (27 lb in).
6. Install the lamp bracket retaining spring to the front fascia.
7. Install the front turn signal lamp bracket retaining spring to the lamp bracket.
8. Position the brake caliper cooling duct to the front fascia and press the duct toward the fascia to secure.
9. Install the front fascia lower closeout panel. Refer to Close Out Panel - Front Bumper Fascia Lower in Bumpers.
As for changing the bulb, you'll get three suggestions
Go in through the brake ducts - not easy with a Z06 or if you have screens
Go in through the bottom by taking out the bottom panel
The one that works for me is:
Turn on the headlights and back off one position to kill the lights.
Unscrew the 3 small screws on the black plastic housing around the headlight. Gently pull the housing clear. Reach down around the headlight unit and release the bulb holder. It comes out by turning the bulb holder a � turn counter clockwise but it has a plastic clip which you need to squeeze to release it. Here’s how the bulb fits into the lamp unit. The DRL bulb is the lower of the two.
Here’s the light socket. This one’s after market but it gives you the idea. You can see the clip you need to squeeze.
Change the bulb. It’s a push fit into the lamp holder. Push it home firmly but don’t handle the glass. Use latex gloves if you have them. Reseat the bulb holder and turn clockwise until it clicks back in place. Put the plastic headlight housing back in place making sure to locate the small plastic tab in the bracket on the headlamp cover. Replace the 3 screws and close the lights.
It’s a 10 minute job. Some guys have had the lights close if they’ve taken a while to do the fix. If you’re worried about that, disconnect the battery once the lights are up.
The bulb is a 4157NA
Some guys with big arms remove the hood adjusting screw for better access. Guys with even bigger arms have had to take off the headlight cover. Four torx screws (2 back, 1 each side). Take the back ones off first with the lamps down. Raise the lights and take the side ones out.
If you decide to inspect the housing you may want to go in from below. Heres how to do it:
Document ID# 655625
2002 Chevrolet Corvette
________________________________________
Park/Turn Signal/Side Marker Lamp Replacement
Removal Procedure
1. Raise and support the vehicle. Refer to Lifting and Jacking the Vehicle in General Information.
2. Remove the front fascia lower closeout panel.
3. Release the brake caliper cooling duct from the front fascia, and position the duct aside.
4. Remove the front turn signal lamp bracket retaining spring from the lamp bracket.
5. Remove the lamp bracket retaining spring from the front fascia.
6. Remove the front turn signal lamp bracket retaining screws.
7. Disconnect the sockets from the lamp.
8. Remove the lamp, with the bracket, from the vehicle.
9. Remove the lamp to bracket retaining screws.
10. Remove the lamp from the bracket.
Installation Procedure
1. Install the front park/turn signal and sidemarker lamp into position on the front turn signal lamp bracket.
Notice
Use the correct fastener in the correct location. Replacement fasteners must be the correct part number for that application. Fasteners requiring replacement or fasteners requiring the use of thread locking compound or sealant are identified in the service procedure. Do not use paints, lubricants, or corrosion inhibitors on fasteners or fastener joint surfaces unless specified. These coatings affect fastener torque and joint clamping force and may damage the fastener. Use the correct tightening sequence and specifications when installing fasteners in order to avoid damage to parts and systems.
2. Install the front park/turn signal and sidemarker lamp to bracket retaining screws.
Tighten
Tighten the front park/turn signal and sidemarker lamp to bracket retaining screws to 2 N•m (18 lb in).
3. Install the sockets to the lamp.
4. Install the lamp, with the bracket, to the front fascia.
5. Align the lamp to the opening in the front fascia and hold the lamp firmly in place against the fascia, while installing the front turn signal lamp bracket retaining screws.
Tighten
Tighten the front turn signal lamp bracket retaining screws to 3 N•m (27 lb in).
6. Install the lamp bracket retaining spring to the front fascia.
7. Install the front turn signal lamp bracket retaining spring to the lamp bracket.
8. Position the brake caliper cooling duct to the front fascia and press the duct toward the fascia to secure.
9. Install the front fascia lower closeout panel. Refer to Close Out Panel - Front Bumper Fascia Lower in Bumpers.
Last edited by DeeGee; Oct 3, 2010 at 02:37 AM.
Corvette Stories
The Best of Corvette for Corvette Enthusiasts

5 Best & 5 Worst Corvette Daily Drivers
Joe Kucinski
The Headlights of Every Corvette Generation Explained
Joe Kucinski
5 Best & 5 Most Overrated Corvette Track Packages of All Time!
Joe Kucinski
Every 2027 Corvette Engine Explained
Joe Kucinski
Designer Imagines A Corvette That Looks More Like a Corvette Than the Corvette
Verdad Gallardo
10 Ugly Corvettes That We Still Kinda Love
Joe Kucinski
Top 10 Most Expensive Corvettes Ever Sold on Bring A Trailer
Brett Foote
10 Things Every Corvette Owner Needs (2026 Edition)
Michael S. Palmer
8 Most "Only Corvette Owners Understand" Quirks and Problems
Pouria Savadkouei
Thread Starter
Melting Slicks
Joined: Jun 2010
Posts: 2,809
Likes: 3
From: Yorktown Virginia
Thanks for the suggestion oh how the water may be getting in though.
I am just really glad I have not installed the Vararam system on my car.


Thread Starter
Melting Slicks
Joined: Jun 2010
Posts: 2,809
Likes: 3
From: Yorktown Virginia

Le Mans Master


Joined: Aug 2009
Posts: 5,197
Likes: 190
From: ALL governments are legalized mobsters, so doesn't matter where I live :(
More then likely, water got in through cracks at the top of the bumper light caused by aging, and heat from your DRL's. I strongly suggest you pick yourself up some new corner lights. I just finished installing my new clear lenses today and it made a world of difference with LED bulbs.
Thread Starter
Melting Slicks
Joined: Jun 2010
Posts: 2,809
Likes: 3
From: Yorktown Virginia
More then likely, water got in through cracks at the top of the bumper light caused by aging, and heat from your DRL's. I strongly suggest you pick yourself up some new corner lights. I just finished installing my new clear lenses today and it made a world of difference with LED bulbs.
If I can get this job I had an interview for I will get a few more things since I will have a constant income versus mowing grass.
Burning Brakes

Joined: Aug 2004
Posts: 810
Likes: 0
From: Inland Empire CA

Thread Starter
Melting Slicks
Joined: Jun 2010
Posts: 2,809
Likes: 3
From: Yorktown Virginia