


Help! Signal Indicators Bulb Replace ?
Thread Starter
Drifting


Joined: Mar 2006
Posts: 1,369
Likes: 79
From: West Coast
Silly question of the night....
Need to change out the front Signal Indicator Bulbs, ironically Owners Manual doesn't even acknowledge they exist?
I can see them with hood and headlights up, but can't reach them ?
Is there a simple trick that I am missing on this?
Thanks

Need to change out the front Signal Indicator Bulbs, ironically Owners Manual doesn't even acknowledge they exist?
I can see them with hood and headlights up, but can't reach them ?
Is there a simple trick that I am missing on this?
Thanks
Team Owner

Joined: Mar 2004
Posts: 58,501
Likes: 1,828
From: Oklahoma City OK
C6 of Year Finalist (appearance mods) 2019
Race Director


Joined: Apr 2005
Posts: 11,138
Likes: 11
From: Fremont CA
St. Jude Donor '06-'07-'08-'09-'10-'11-'12-'13-'14-'15-'16-'17-'18-'19-'20
NCM Sinkhole Donor
You can also pop the headlights by turning them all the way on then backing off one click. Then you can reach in and access the lights. They require a push / twist / pull motion.
WARNING: after (15? 20?) minutes the lights will close DANGEROUS. You should be able to complete the task in 2-3 minutes with no issues. Just don't stop in the middle for a beer.
WARNING: after (15? 20?) minutes the lights will close DANGEROUS. You should be able to complete the task in 2-3 minutes with no issues. Just don't stop in the middle for a beer.
Le Mans Master


Joined: Oct 2004
Posts: 9,369
Likes: 4
From: Zephyrhills, Florida
St. Jude Donor '06-'07-'08-'09-'10-'11-'12-'13
Tech Contributor

Joined: Dec 2003
Posts: 19,384
Likes: 87
From: Horncastle Lincolnshire, England
2023 C5 of the Year Finalist - Unmodified
You'll get three suggestions
Go in through the brake ducts - not easy with a Z06 or if you have screens
Go in through the bottom by taking out the bottom panel

The one that works for me is:
Turn on the headlights and back off one position to kill the lights.
Unscrew the 3 small screws on the black plastic housing around the headlight. Gently pull the housing clear. Reach down around the headlight unit and release the bulb holder. It comes out by turning the bulb holder a � turn counter clockwise but it has a plastic clip which you need to squeeze to release it. Here�s how the bulb fits into the lamp unit. The DRL bulb is the lower of the two.
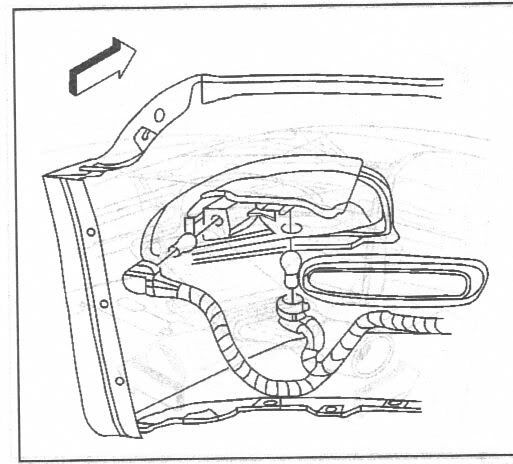
Here�s the light socket. This one�s after market but it gives you the idea. You can see the clip you need to squeeze.

BTW, if you ever need to replace this socket the part #s are GM 12083689, AC Delco LS15 or Dorman 85882 (Thanks to UM Rebel)
Change the bulb. It�s a push fit into the lamp holder. Push it home firmly but don�t handle the glass. Use latex gloves if you have them. Reseat the bulb holder and turn clockwise until it clicks back in place. Put the plastic headlight housing back in place making sure to locate the small plastic tab in the bracket on the headlamp cover. Replace the 3 screws and close the lights.
It�s a 10 minute job. Some guys have had the lights close if they�ve taken a while to do the fix. If you�re worried about that, disconnect the battery once the lights are up.
The bulb is a 4157NA
Some guys with big arms remove the hood adjusting screw for better access. Guys with even bigger arms have had to take off the headlight cover. Four torx screws (2 back, 1 each side). Take the back ones off first with the lamps down. Raise the lights and take the side ones out.
Go in through the brake ducts - not easy with a Z06 or if you have screens
Go in through the bottom by taking out the bottom panel
The one that works for me is:
Turn on the headlights and back off one position to kill the lights.
Unscrew the 3 small screws on the black plastic housing around the headlight. Gently pull the housing clear. Reach down around the headlight unit and release the bulb holder. It comes out by turning the bulb holder a � turn counter clockwise but it has a plastic clip which you need to squeeze to release it. Here�s how the bulb fits into the lamp unit. The DRL bulb is the lower of the two.
Here�s the light socket. This one�s after market but it gives you the idea. You can see the clip you need to squeeze.
BTW, if you ever need to replace this socket the part #s are GM 12083689, AC Delco LS15 or Dorman 85882 (Thanks to UM Rebel)
Change the bulb. It�s a push fit into the lamp holder. Push it home firmly but don�t handle the glass. Use latex gloves if you have them. Reseat the bulb holder and turn clockwise until it clicks back in place. Put the plastic headlight housing back in place making sure to locate the small plastic tab in the bracket on the headlamp cover. Replace the 3 screws and close the lights.
It�s a 10 minute job. Some guys have had the lights close if they�ve taken a while to do the fix. If you�re worried about that, disconnect the battery once the lights are up.
The bulb is a 4157NA
Some guys with big arms remove the hood adjusting screw for better access. Guys with even bigger arms have had to take off the headlight cover. Four torx screws (2 back, 1 each side). Take the back ones off first with the lamps down. Raise the lights and take the side ones out.
Corvette Stories
The Best of Corvette for Corvette Enthusiasts

Top 10 Most Expensive Corvettes Ever Sold on Bring A Trailer
Brett Foote
10 Things Every Corvette Owner Needs (2026 Edition)
Michael S. Palmer
8 Most "Only Corvette Owners Understand" Quirks and Problems
Pouria Savadkouei
10 Reasons the C6 Z06 is Still A Performance Benchmark After 20 Years
Joe Kucinski
How Much Horsepower Every Corvette Engine "LOST" in 1972
Joe Kucinski
Top 10 DOs and DON'Ts for Protecting Your Convertible Top!
Michael S. Palmer
Top 10 Most Explosive Corvettes Ever Made: Power-to-Weight Ratio Ranked!
Joe Kucinski
150 hp to 1,250 hp: Every Corvette Generation Compared by the Specs That Matter
Joe Kucinski
8 Coolest Corvette Pace Cars (and Replicas) of All Time
Verdad GallardoAdministrator


Joined: Mar 2001
Posts: 368,319
Likes: 24,777
From: In a parallel universe. Currently own 2014 Stingray Coupe.
C7 of the Year - Modified Finalist 2021
MO Events Coordinator
St. Jude Co-Organizer
St. Jude Donor '03 thru '25
NCM Sinkhole Donor
CI 5, 8 & 11 Veteran
Good luck. I've found going through the bottom access panel is easiest for me.


Burning Brakes

Joined: Jan 2011
Posts: 777
Likes: 0
From: Sooke BC
 .
.
Race Director
Joined: Apr 2005
Posts: 11,138
Likes: 11
From: Fremont CA
St. Jude Donor '06-'07-'08-'09-'10-'11-'12-'13-'14-'15-'16-'17-'18-'19-'20
NCM Sinkhole Donor
Safety Car

Joined: Apr 2007
Posts: 3,640
Likes: 83
From: . New York
Actually, about the lights closing, its really no big deal, there's a manual **** right there (remove the rubber cap and turn) to raise em if you need to work on them. When you are done, just turn them on and off again right from the switch and they will close/open back to where they belong.
Before I started taking the lights apart to do the HID projectors I was reticent to screw with anything fearing that when I put it back together something wouldnt line up. The way its designed, thats not gonna happen. The open/close cycle is regulated by resistance at each end, so where ever you leave them when you hit the switch they just go to the end of their travel and stop, even if one was half open and the other was closed.
Also, you dont have to worry about taking the top covers off, they sit on screw height adjusters and that wont change unless you "screw" with them. The panel comes off with four screws and you have access to the light buckets, you lay the panel back on (it just sits on the adjusters), install screws and it lines back up no problem.

Race Director

Joined: Aug 2003
Posts: 13,421
Likes: 8
From: Lake Mary Florida
I was just going to say if you don't have large arms, then you might be able to go through the lamp door up method. As stated above just roll the one up manually. For safety disconnect the harness.
Remove the plastic cover around the lamp three screws, note how it slips under a small lip on the front of the underside of the lamp door. Reach in and rotate it out, DeeGee has excellent pictures.
You'll probably need to drive up on ramps or raise the one side to remove the cover panels underneath, if you go with the underside panel method.
Race Director
Joined: Apr 2005
Posts: 11,138
Likes: 11
From: Fremont CA
St. Jude Donor '06-'07-'08-'09-'10-'11-'12-'13-'14-'15-'16-'17-'18-'19-'20
NCM Sinkhole Donor
Actually, about the lights closing, its really no big deal, there's a manual **** right there (remove the rubber cap and turn) to raise em if you need to work on them. When you are done, just turn them on and off again right from the switch and they will close/open back to where they belong.
Before I started taking the lights apart to do the HID projectors I was reticent to screw with anything fearing that when I put it back together something wouldnt line up. The way its designed, thats not gonna happen. The open/close cycle is regulated by resistance at each end, so where ever you leave them when you hit the switch they just go to the end of their travel and stop, even if one was half open and the other was closed.
Also, you dont have to worry about taking the top covers off, they sit on screw height adjusters and that wont change unless you "screw" with them. The panel comes off with four screws and you have access to the light buckets, you lay the panel back on (it just sits on the adjusters), install screws and it lines back up no problem.
Before I started taking the lights apart to do the HID projectors I was reticent to screw with anything fearing that when I put it back together something wouldnt line up. The way its designed, thats not gonna happen. The open/close cycle is regulated by resistance at each end, so where ever you leave them when you hit the switch they just go to the end of their travel and stop, even if one was half open and the other was closed.
Also, you dont have to worry about taking the top covers off, they sit on screw height adjusters and that wont change unless you "screw" with them. The panel comes off with four screws and you have access to the light buckets, you lay the panel back on (it just sits on the adjusters), install screws and it lines back up no problem.
