


Weather Stripping Leak
Thread Starter
Advanced


Joined: Oct 2006
Posts: 53
Likes: 1
From: Beaufort SC
Hey all! I am enjoying my new corvette immensely but im running into a problem it seems to leak from the weather stripping from the middle of the passenger and driver side windows.
I checked it further and on the passenger side you can pull the weather stripping away from the car in the middle but its still attached at both ends.
The driver side doesnt move but both seem to be leaking from the little holes on the bottom of the weather stripping inside right in the middle.
Is the way to fix this is grab some sealant remove both top weather strippings above the side windows clean it up a bit and fill it with sealant before putting them back in?
Thanks! this is a targa top not a hardtop the howtos i found were for hardtops
Burning Brakes

Joined: Aug 2006
Posts: 1,233
Likes: 16
From: Cancer Sucks - please donate to Corvettes Conquer Cancer
Cruise-In X Veteran
St. Jude Donor '08-'09
One thing that might help is to get a small tube of Dielectric grease ( light bulb grease ) and apply this to all your weatherstripping by just rubbing it onto the weatherstripping - TBH not sure why this works but it does - i do this to the weatherstriping on my vette every spring - it also helps quiet any sounds between the removable roof and the weatherstripping on a Coupe - hope this helps
bob
bob
Safety Car

Joined: Apr 2007
Posts: 3,640
Likes: 83
From: . New York
The die electric grease is the proper (recommended) dressing for the weather stripping but he is describing being able to pull it away....grease is not gonna help that.
Well I looked for the link but cant find it in the ton of them I have on here. There was one a short time ago that had the exploded diagram of how the weather strip comes off the targa. I seem to recall two screws on each side . . .never did it myself though.
Try advanced search above and take a look, Id start with that.
Tech Contributor


Joined: Dec 2003
Posts: 19,384
Likes: 87
From: Horncastle Lincolnshire, England
2023 C5 of the Year Finalist - Unmodified
I'll dig out the procedure for replacing the weatherstrip for you and post it up.
How does the weatherstrip look? Is it damaged or distorted? If it looks OK its probably bestter to remove it, clean it up and refix it.
How does the weatherstrip look? Is it damaged or distorted? If it looks OK its probably bestter to remove it, clean it up and refix it.
Tech Contributor
Joined: Dec 2003
Posts: 19,384
Likes: 87
From: Horncastle Lincolnshire, England
2023 C5 of the Year Finalist - Unmodified
Document ID# 656777
2002 Chevrolet Corvette
________________________________________
Weatherstrip Replacement - Lift Off Panel
Removal Procedure
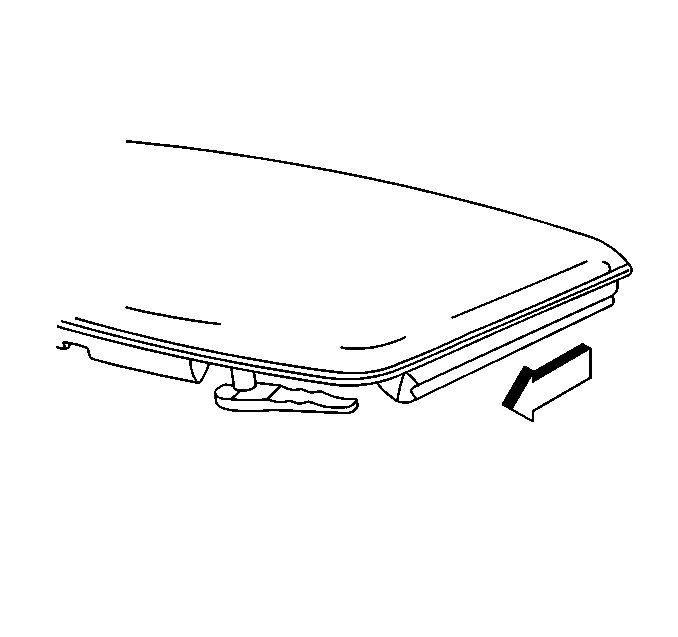
1. Remove the roof lift off panel.
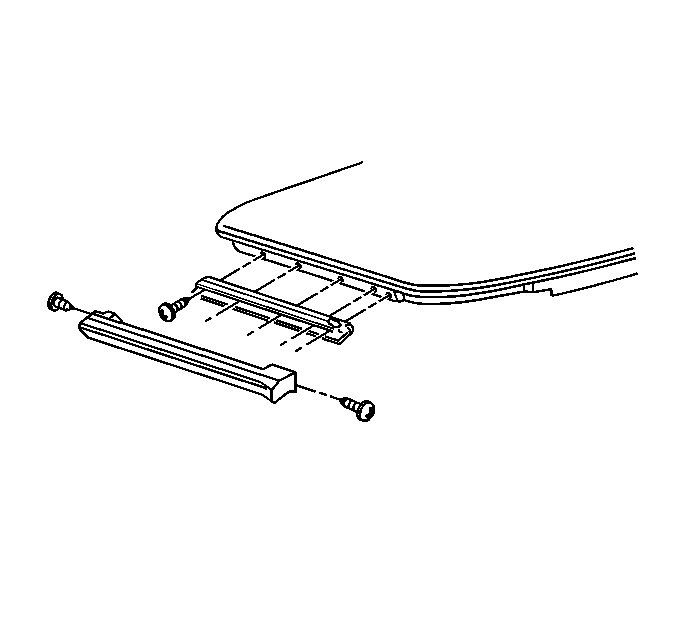
2. Remove the screws from the ends of the weatherstrip.
3. Remove the weatherstrip from the weatherstrip retainer.
4. Clean the surface with 3M� adhesive remover P/N 8984 or equivalent.
Installation Procedure
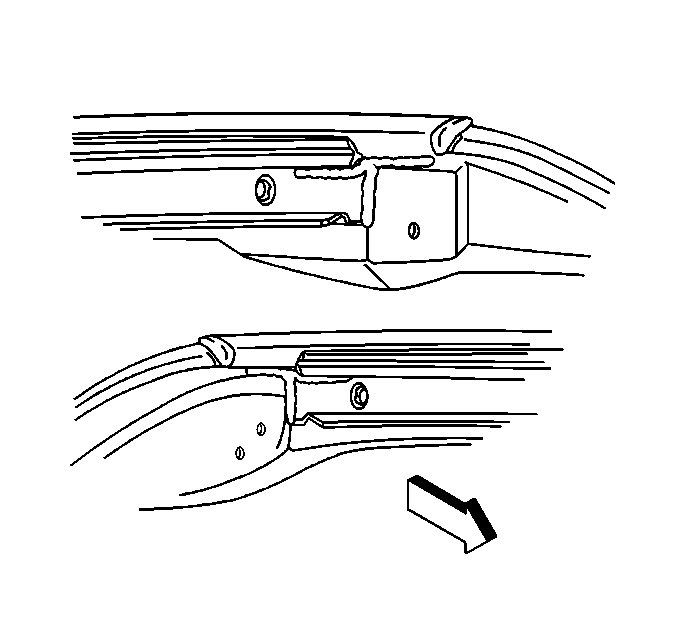
1. Apply a 6.0 X 40 mm (0.25 X 1.5 in) bead of sealer GM P/N 12345739 Canadain P/N 10953541 to the front and rear corners of the retainer as shown in the illustration.
o Apply the bead of sealer to the roof.
o Apply the bead of sealer to the retainer.
o Apply the bead of sealer to the ends of the retainer.
Important
Do not touch the adhesive backing on the new weatherstrip.
2. Remove the protective backing from the foam tape on the ends of the new weatherstrip, or install two sided tape 3M� P/N 06377 or equivalent to the ends of a reused weatherstrip.
3. Install the weatherstrip into the retainer using a nylon spatula or your fingers. Start at the forward edge and work rearward.
Notice
Use the correct fastener in the correct location. Replacement fasteners must be the correct part number for that application. Fasteners requiring replacement or fasteners requiring the use of thread locking compound or sealant are identified in the service procedure. Do not use paints, lubricants, or corrosion inhibitors on fasteners or fastener joint surfaces unless specified. These coatings affect fastener torque and joint clamping force and may damage the fastener. Use the correct tightening sequence and specifications when installing fasteners in order to avoid damage to parts and systems.
4. Install the screws at the ends of the weatherstrip. Hold the weatherstrip to prevent the weatherstrip from rotating.
Tighten
Tighten the side weatherstrip screws to 3 N�m (27 lb in).
5. Install the roof panel.
2002 Chevrolet Corvette
________________________________________
Weatherstrip Replacement - Lift Off Panel
Removal Procedure
1. Remove the roof lift off panel.
2. Remove the screws from the ends of the weatherstrip.
3. Remove the weatherstrip from the weatherstrip retainer.
4. Clean the surface with 3M� adhesive remover P/N 8984 or equivalent.
Installation Procedure
1. Apply a 6.0 X 40 mm (0.25 X 1.5 in) bead of sealer GM P/N 12345739 Canadain P/N 10953541 to the front and rear corners of the retainer as shown in the illustration.
o Apply the bead of sealer to the roof.
o Apply the bead of sealer to the retainer.
o Apply the bead of sealer to the ends of the retainer.
Important
Do not touch the adhesive backing on the new weatherstrip.
2. Remove the protective backing from the foam tape on the ends of the new weatherstrip, or install two sided tape 3M� P/N 06377 or equivalent to the ends of a reused weatherstrip.
3. Install the weatherstrip into the retainer using a nylon spatula or your fingers. Start at the forward edge and work rearward.
Notice
Use the correct fastener in the correct location. Replacement fasteners must be the correct part number for that application. Fasteners requiring replacement or fasteners requiring the use of thread locking compound or sealant are identified in the service procedure. Do not use paints, lubricants, or corrosion inhibitors on fasteners or fastener joint surfaces unless specified. These coatings affect fastener torque and joint clamping force and may damage the fastener. Use the correct tightening sequence and specifications when installing fasteners in order to avoid damage to parts and systems.
4. Install the screws at the ends of the weatherstrip. Hold the weatherstrip to prevent the weatherstrip from rotating.
Tighten
Tighten the side weatherstrip screws to 3 N�m (27 lb in).
5. Install the roof panel.
Thread Starter
Advanced
Joined: Oct 2006
Posts: 53
Likes: 1
From: Beaufort SC
Thanks! Ill remove it and do that. weather stripping isnt cracked or anything just doesnt look like its sealed right. Espically in the middle of it just the ends are seated the middle can pull away.
Just one question from what ive read it doesnt say anything about sealing up the middle of the weather stripping so that it will hold to the top instead of pulling away like it currently is should it be fine? im assuming the tape in the ends will hold it down tight on both sides.
Just one question from what ive read it doesnt say anything about sealing up the middle of the weather stripping so that it will hold to the top instead of pulling away like it currently is should it be fine? im assuming the tape in the ends will hold it down tight on both sides.
Tech Contributor

Joined: Dec 2006
Posts: 10,962
Likes: 29
From: Van Buren Arkansas
Wounded Warrior Escort '11
Be very careful with your weatherstrip as GM has seriously jacked up the price of replacements. Last I saw, they are nearly $500 for the pair, yes, $500 for two simple pieces of rubber.
Corvette Stories
The Best of Corvette for Corvette Enthusiasts

10 Most Common Corvette Problems of the Last 20 Years!
Joe Kucinski
5 MOST and 5 LEAST Popular Corvette Model Years in History!
Joe Kucinski
2027 Corvette Buyer's Guide: Everything You Need to Know!
Joe Kucinski
10 Things C8 Corvette Owners Hate (But Won't Tell You)
Joe Kucinski
10 Best Corvettes Coming to Barrett-Jackson Palm Beach 2026!
Brett Foote
Every Corvette Grand Sport Explained! (C2, C4, C6, C7, & C8)
Joe Kucinski
Grand Sport & Grand Sport X Launch Alongside All-New 535hp LS6 V8!
Michael S. Palmer
5 Reasons Bad Drivers Crash & 5 Ways to Avoid a Costly Mistake!
Joe Kucinski
7 Bolt-On Upgrades From Extreme Online Store to Level Up Your C6 Corvette
Pouria SavadkoueiTech Contributor
Joined: Dec 2003
Posts: 19,384
Likes: 87
From: Horncastle Lincolnshire, England
2023 C5 of the Year Finalist - Unmodified

Safety Car
Joined: Apr 2007
Posts: 3,640
Likes: 83
From: . New York
===============
Important
Do not touch the adhesive backing on the new weatherstrip.
2. Remove the protective backing from the foam tape on the ends of the new weatherstrip, or install two sided tape 3M� P/N 06377 or equivalent to the ends of a reused weatherstrip.
===============
I've never had it apart, but I think that means the middle (well all of) the strip originaly has adhesive on it already. They direct you to add more to the ends.
You might try taking it apart (its not doing anything now) and it may be apparent where you need to put some additional adhesive.
And Thanks Dee, Pretty sure you posted this before but I couldnt find the link (too many links ) but I have it now
Important
Do not touch the adhesive backing on the new weatherstrip.
2. Remove the protective backing from the foam tape on the ends of the new weatherstrip, or install two sided tape 3M� P/N 06377 or equivalent to the ends of a reused weatherstrip.
===============
I've never had it apart, but I think that means the middle (well all of) the strip originaly has adhesive on it already. They direct you to add more to the ends.
You might try taking it apart (its not doing anything now) and it may be apparent where you need to put some additional adhesive.
And Thanks Dee, Pretty sure you posted this before but I couldnt find the link (too many links
) but I have it now
Tech Contributor
Joined: Dec 2003
Posts: 19,384
Likes: 87
From: Horncastle Lincolnshire, England
2023 C5 of the Year Finalist - Unmodified

3rd Gear
Joined: Aug 2011
Posts: 3
Likes: 0
From: Colombo
Can anyone tell me how to remove weatherstrip safely ? I do not want to mess it up ?
auto movers|auto movers
auto movers|auto movers
Burning Brakes
Joined: Jul 2004
Posts: 1,202
Likes: 5
The latest GM weatherstipping dressing is Dupont Krytox...make sure you have a platinum Visa before you venture out to buy some. The Krytox lasts a lot longer than the greasy dielectic grease. I purchased the Krytox that comes in the tube, not the GM liquid stuff.