


Head light aim
Thread Starter
Le Mans Master


Joined: Jul 2011
Posts: 7,426
Likes: 970
From: Morristown New Jersey
Oldtimer
I just replaced my headlight bulbs, but the left seems to be aimed very low and I have no idea where the right one is aimed. Anyone with an idea??
Safety Car


Joined: Apr 2007
Posts: 3,640
Likes: 83
From: . New York
http://forums.corvetteforum.com/c5-g...djustment.html
Might want to investigate that link at the top of the page....the search one, click on it...select advanced search...and type in what you need to know )"headlight adjust").
Many questions come up over and over and search may help ya get the answer without waiting for someone to reply.
Just a thought.
The link above has what you're looking for.
Enjoy
Tech Contributor


Joined: Dec 2003
Posts: 19,384
Likes: 87
From: Horncastle Lincolnshire, England
2023 C5 of the Year Finalist - Unmodified
Assuming you have stock lights, it's probably either the bulb that's unseated or the headlight unit incorrectly mounted in the cradle. Are both lights out of true? If so, its probably the latter. If its only low beam thats out, concentrate on the bulb for starters.
Here's a How To I put out a while ago which might help.
Aiming Stock Headlights
Preparation
Chose a white wall to project the lights onto
Mark a vertical centreline on the screen in line with the center of the car (black tape?)
(look over the roof of the car to get the line)
Measure the height from the floor to the center of the headlight capsule
Mark a horizontal aiming line on the screen
Measure the distance between the centreline of the right headlight module and the center of the left headlight module.
Position the vertical tapes this distance to the right and left of the screen centreline
Lubricate the adjustment screws before adjusting See Note
Adjustments
Raise the hood
Raise the headlights
Remove the headlamp adjustment screw plug
Turn on the low beam headlights and block the light from projecting onto the screen from the passenger headlight
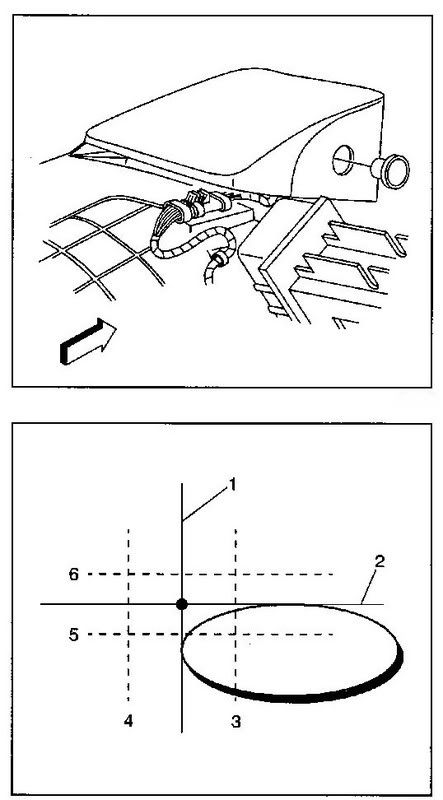
Check the horizontal aim
Adjust the horizontal aim adjusting screw to align the left edge of the high intensity zone with the headlight vertical centreline
The left edge of the beam should lie within 4” to the left and 4” to the right
of the vertical centreline.
Check the vertical aim
Adjust the vertical aim adjusting screw to align the top edge of the high intensity zone with the headlight horizontal centreline
The left edge of the beam should lie within 2” above and 2.5” below the lamp horizontal centreline.
Reinstall the headlamp adjustment screw plug
Repeat for the other headlight
Turn off the lights and close the hood
This is the pattern you're looking for
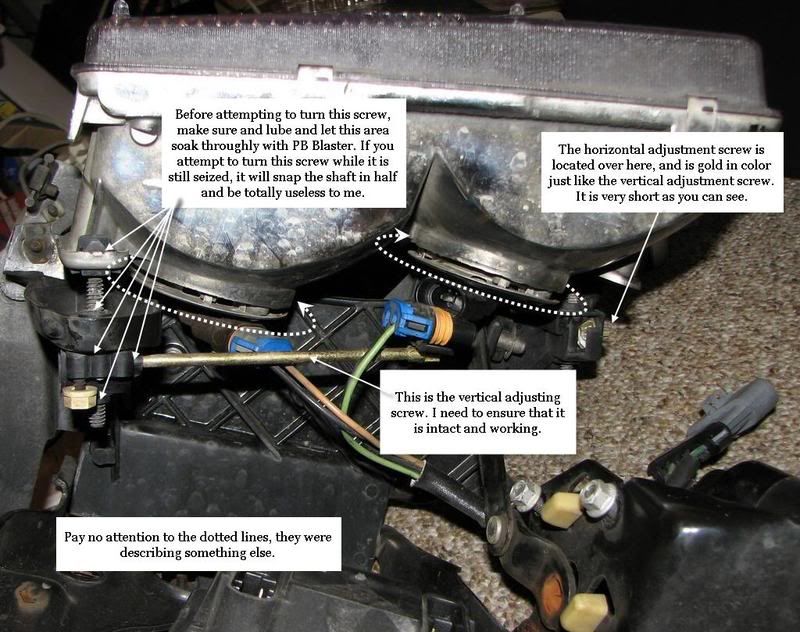
Advice Frome LonestarFRC:
Lubrication may not be enough. The problem is that the spray can't actually penetrate to where it's needed. There's a little internal gear-drive mechanism involved.
Important! If you attempt to make any adjustments, especially one involving the up/down adjuster and it doesn't move, or you meet a lot of resistance, stop right there. Do NOT attempt to force things. You will ABSOLUTELY break the long "goldenrod' (gold colored rod about 3" long). This is not an "if" or "maybe". Do NOT force it by twisting your wrench/nut-driver harder and harder. Once broken, these pieces are NOT available as a separate repair piece from GM. They will only sell you the entire headlight assembly.
If yours are frozen up, do a search on this issue. Many many posts about it. "Goldenrods" is one if the terms that may be helpful when doing a search. There IS a way to unfreeze the gear-drive mechanism but it involves removal of the headlight assembly to get access.
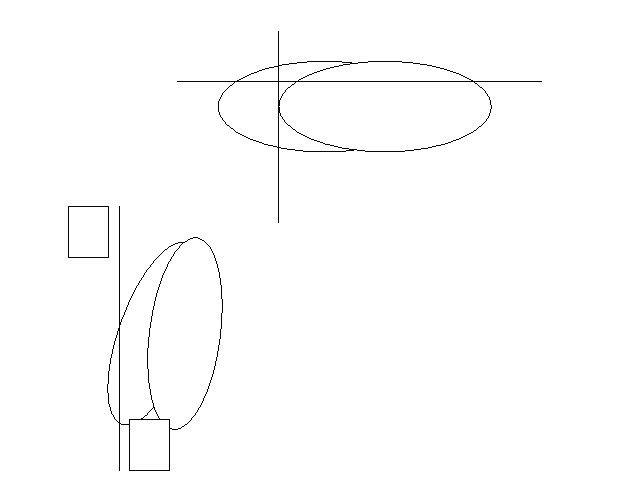
You can see how the bulbs fit into the headlight unit in this picture (thanks to Junkman for the pic)
Here's a How To I put out a while ago which might help.
Aiming Stock Headlights
Preparation
Chose a white wall to project the lights onto
Mark a vertical centreline on the screen in line with the center of the car (black tape?)
(look over the roof of the car to get the line)
Measure the height from the floor to the center of the headlight capsule
Mark a horizontal aiming line on the screen
Measure the distance between the centreline of the right headlight module and the center of the left headlight module.
Position the vertical tapes this distance to the right and left of the screen centreline
Lubricate the adjustment screws before adjusting See Note
Adjustments
Raise the hood
Raise the headlights
Remove the headlamp adjustment screw plug
Turn on the low beam headlights and block the light from projecting onto the screen from the passenger headlight
Check the horizontal aim
Adjust the horizontal aim adjusting screw to align the left edge of the high intensity zone with the headlight vertical centreline
The left edge of the beam should lie within 4” to the left and 4” to the right
of the vertical centreline.
Check the vertical aim
Adjust the vertical aim adjusting screw to align the top edge of the high intensity zone with the headlight horizontal centreline
The left edge of the beam should lie within 2” above and 2.5” below the lamp horizontal centreline.
Reinstall the headlamp adjustment screw plug
Repeat for the other headlight
Turn off the lights and close the hood
This is the pattern you're looking for
Advice Frome LonestarFRC:
Lubrication may not be enough. The problem is that the spray can't actually penetrate to where it's needed. There's a little internal gear-drive mechanism involved.
Important! If you attempt to make any adjustments, especially one involving the up/down adjuster and it doesn't move, or you meet a lot of resistance, stop right there. Do NOT attempt to force things. You will ABSOLUTELY break the long "goldenrod' (gold colored rod about 3" long). This is not an "if" or "maybe". Do NOT force it by twisting your wrench/nut-driver harder and harder. Once broken, these pieces are NOT available as a separate repair piece from GM. They will only sell you the entire headlight assembly.
If yours are frozen up, do a search on this issue. Many many posts about it. "Goldenrods" is one if the terms that may be helpful when doing a search. There IS a way to unfreeze the gear-drive mechanism but it involves removal of the headlight assembly to get access.
You can see how the bulbs fit into the headlight unit in this picture (thanks to Junkman for the pic)
Last edited by DeeGee; Oct 27, 2011 at 01:48 AM.
Thread Starter
Le Mans Master
Joined: Jul 2011
Posts: 7,426
Likes: 970
From: Morristown New Jersey
Oldtimer
Assuming you have stock lights, it's probably either the bulb that's unseated or the headlight unit incorrectly mounted in the cradle. Are both lights out of true? If so, its probably the latter. If its only low beam thats out, concentrate on the bulb for starters.
I need to see if they are unseated. I don't remember the original bulbs being so out of whack. I have very little distance view. The left bulb is focused on 15 feet in front of the car and I have no idea where the right one is 'aimed'.
I need to see if they are unseated. I don't remember the original bulbs being so out of whack. I have very little distance view. The left bulb is focused on 15 feet in front of the car and I have no idea where the right one is 'aimed'.
Tech Contributor
Joined: Dec 2003
Posts: 19,384
Likes: 87
From: Horncastle Lincolnshire, England
2023 C5 of the Year Finalist - Unmodified
If both lights are out it may just be that they are badly adjusted. 15 feet is still way too close. It'll be obvious where they're aimed when you point them at the garage door (or whatever you use).
Make sure you lubricate the adjusting rods before playing with them.
Last edited by DeeGee; Oct 27, 2011 at 02:22 AM.
Administrator


Joined: Mar 2001
Posts: 368,360
Likes: 24,785
From: In a parallel universe. Currently own 2014 Stingray Coupe.
C7 of the Year - Modified Finalist 2021
MO Events Coordinator
St. Jude Co-Organizer
St. Jude Donor '03 thru '26
NCM Sinkhole Donor
CI 5, 8 & 11 Veteran
Great information - saved this for future use.
Thread Starter
Le Mans Master
Joined: Jul 2011
Posts: 7,426
Likes: 970
From: Morristown New Jersey
Oldtimer
I only replaced the low beams-the highs are fine, which made me suspicious of my installation. It's a bit dicey for a first timer, especially the hysterical warnings: DON'T TOUCH THE BULB!!. I think I will remove the unit so I can see what I'm doing.
Thread Starter
Le Mans Master
Joined: Jul 2011
Posts: 7,426
Likes: 970
From: Morristown New Jersey
Oldtimer
Just rechecked in the rain. They were both seated improperly. I am glad they did not move around. I don't have a garage door, so I pointed them towards the rear bumper of my white car and they line up much better.
Corvette Stories
The Best of Corvette for Corvette Enthusiasts

Top 10 Most Expensive Corvettes Ever Sold on Bring A Trailer
Brett Foote
10 Things Every Corvette Owner Needs (2026 Edition)
Michael S. Palmer
8 Most "Only Corvette Owners Understand" Quirks and Problems
Pouria Savadkouei
10 Reasons the C6 Z06 is Still A Performance Benchmark After 20 Years
Joe Kucinski
How Much Horsepower Every Corvette Engine "LOST" in 1972
Joe Kucinski
Top 10 DOs and DON'Ts for Protecting Your Convertible Top!
Michael S. Palmer
Top 10 Most Explosive Corvettes Ever Made: Power-to-Weight Ratio Ranked!
Joe Kucinski
150 hp to 1,250 hp: Every Corvette Generation Compared by the Specs That Matter
Joe Kucinski
8 Coolest Corvette Pace Cars (and Replicas) of All Time
Verdad Gallardo
Tech Contributor
Joined: Dec 2003
Posts: 19,384
Likes: 87
From: Horncastle Lincolnshire, England
2023 C5 of the Year Finalist - Unmodified
Drifting

Joined: Nov 2005
Posts: 1,320
Likes: 242
From: NW Chicago
St. Jude Donor '12-'13-'14-'15
Chose a white wall to project the lights onto
Mark a vertical centreline on the screen in line with the center of the car (black tape?)
(look over the roof of the car to get the line)
What is the distance of the screen to the car( headlights)?
Mark a vertical centreline on the screen in line with the center of the car (black tape?)
(look over the roof of the car to get the line)
What is the distance of the screen to the car( headlights)?
Thread Starter
Le Mans Master
Joined: Jul 2011
Posts: 7,426
Likes: 970
From: Morristown New Jersey
Oldtimer
 dunno, you didn't tell me!
Race Director

Joined: Jul 2007
Posts: 18,681
Likes: 47
From: Reno is so close to Hell you can see Sparks , State Of Confusion
St. Jude Donor '12-'13-'14
I would bet money one of your bulbs are not seated right, It is a pain to get them installed right, It took me a few trys before I got mine mounted right.
Bill
Bill
Last edited by Mr.Bill; Oct 28, 2011 at 09:48 PM.
Thread Starter
Le Mans Master
Joined: Jul 2011
Posts: 7,426
Likes: 970
From: Morristown New Jersey
Oldtimer
Safety Car
Joined: Apr 2007
Posts: 3,640
Likes: 83
From: . New York
I bent the crap outta the little metal fingers that surround the mounting hole on the last halogen swap I did before I went to the HID projectors. I didnt even know it until I disassembled it all to do the swap, I never would have understood what was bent by feeling around in there.
Come to think of it, when I first got the car the lights were aimed rediculously low and they werent aimed alike, so maybe some of the bending was prior to my ownership.
Anyway, its not really a lot of work to take the carriers out or to disassemble enough to actually see what your doing in there. Might as well get it straightened out now so future bulb replacement wont aggravate ya.
Good luck
Thread Starter
Le Mans Master
Joined: Jul 2011
Posts: 7,426
Likes: 970
From: Morristown New Jersey
Oldtimer
My left low beam is still not correct. A long backroad ride last nite confirmed it. It's aimed way down in front/middle of the car, while re-installing the right beam corrected the aim. I will try AGAIN to reinstall the left, but if not, should I just re-aim the light? At this point I don't remember WTH the original aim was like.
I reinstalled the left low beam, used mirror and gooseneck light to be sure it was seated properly. THEN I aimed that light. It was way off according to DG's directions. Took a ride this evening and much better now, tho' I still don't think the lights are the greatest after all.
I reinstalled the left low beam, used mirror and gooseneck light to be sure it was seated properly. THEN I aimed that light. It was way off according to DG's directions. Took a ride this evening and much better now, tho' I still don't think the lights are the greatest after all.
Last edited by chasboy; Nov 7, 2011 at 06:25 PM.