


Rear Diffuser install PIC HEAVY!
Thread Starter
Burning Brakes


Joined: Oct 2008
Posts: 800
Likes: 12
From: Wichita Kansas
Hello all just thought I would share my experience with installing the rear diffuser on my Vette. So here we go.
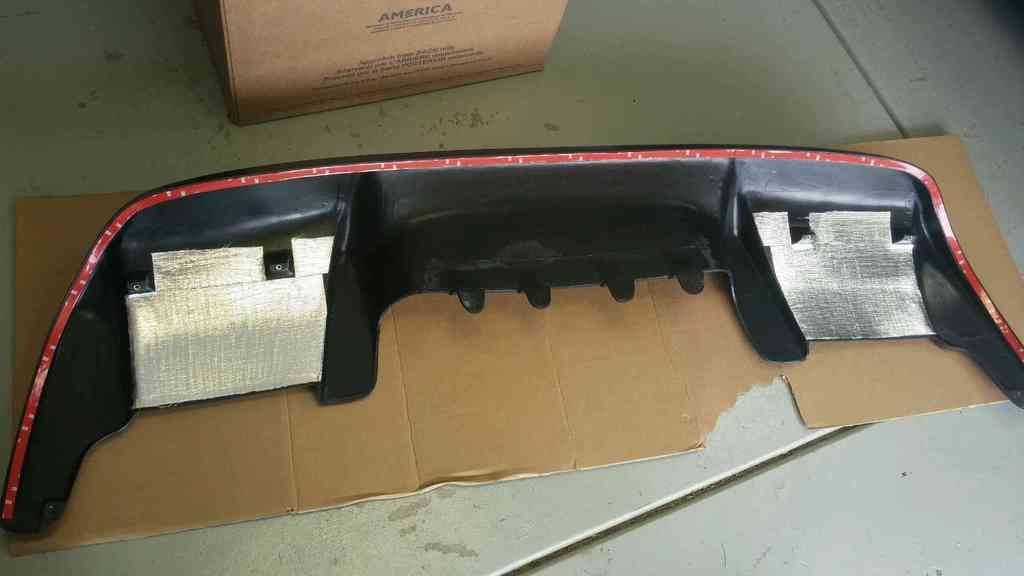
First thing I did was take some 100 grit sanding paper to all the contact areas for the double sided tape and the heat shielding tape in the muffler area. Just to rough it up a bit because the finish is pretty slick on the inside of the diffuser. Also wipe all sanded areas clean with alcohol afterwards.
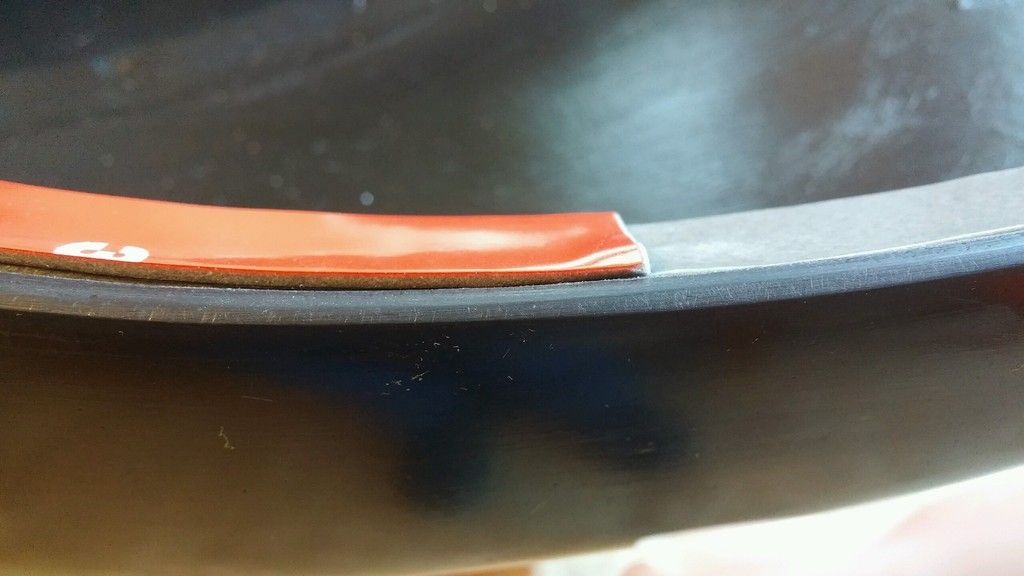
For the double sided mounting tape I used 2 layers as the 3M tape just isn�t thick enough to make contact with the bumper after you bolt it on.

Next I had to remove the mufflers and as you can see I have the massive Magnaflow and they will fit under the diffuser with a little trick.
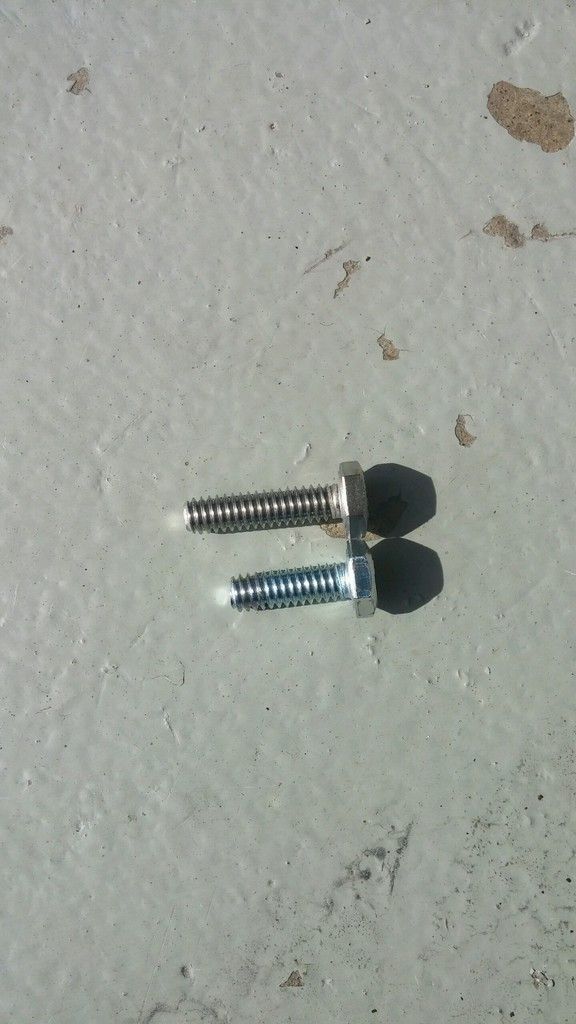
Went to the store and found 2 bolts that are 1" for the 2 outside mounting holes as the 3/4" bolts that came with it didn't reach far enough to thread in for me. With that added 1/4" it was very easy. (Make sure to clean the mounting area on the bumper for the double sided tape before bolting up.)
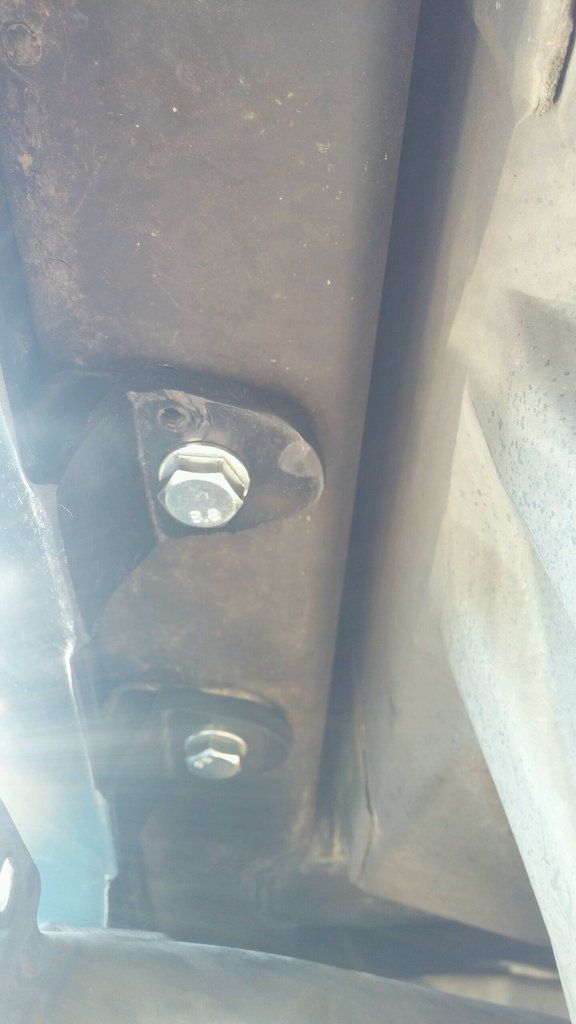
Drilled the 4 holes per directions when lined up. As far as the factory center bumper retainers go I absolutely could not get those to go back in after mounting the diffuser so I found some 10mm threaded bolts and threaded them into the 4 holes ( I really don't recommend this but it's the only thing I could get to work.)
If you have a large muffler set up like I do you will have to line up and tighten down the 4 main mounting bolts that go through the vents in the bumper as they will NOT be accessible after you put the mufflers in place. Now is a good time for the center retainers if you can get them to work or the center bolts like I had to. The 2 forward side screws can still be reached afterwards though.
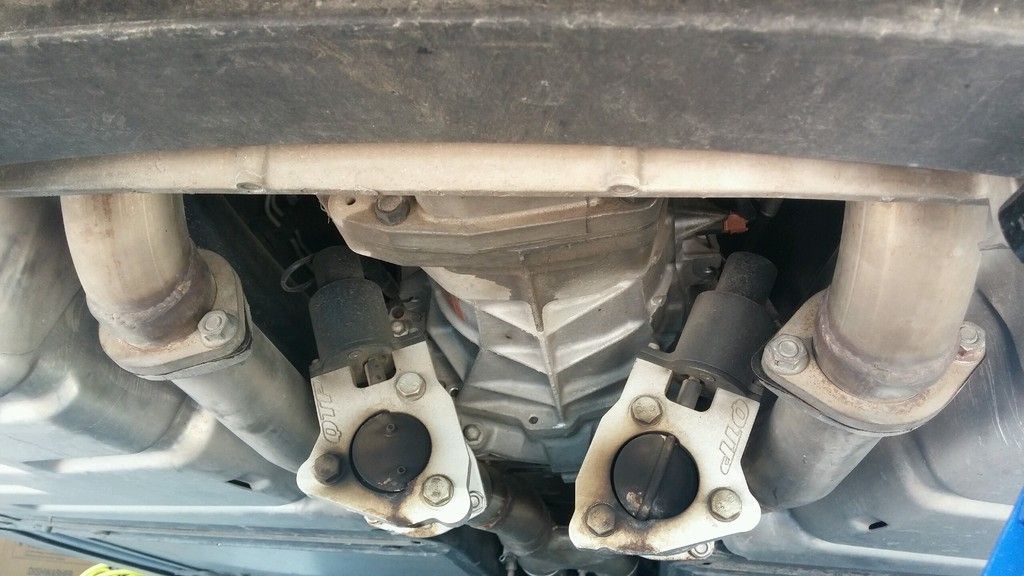
I had to unbolt the exhaust pipes at the transaxle so that I could fit the mufflers inside the diffuser once bolted on otherwise I could not fit them in. Taking off the rear wheels helps with a lot more room for the big *** mufflers.

Here are the mufflers crammed into place and the pipes reattached. Yes they make contact with the diffuser.
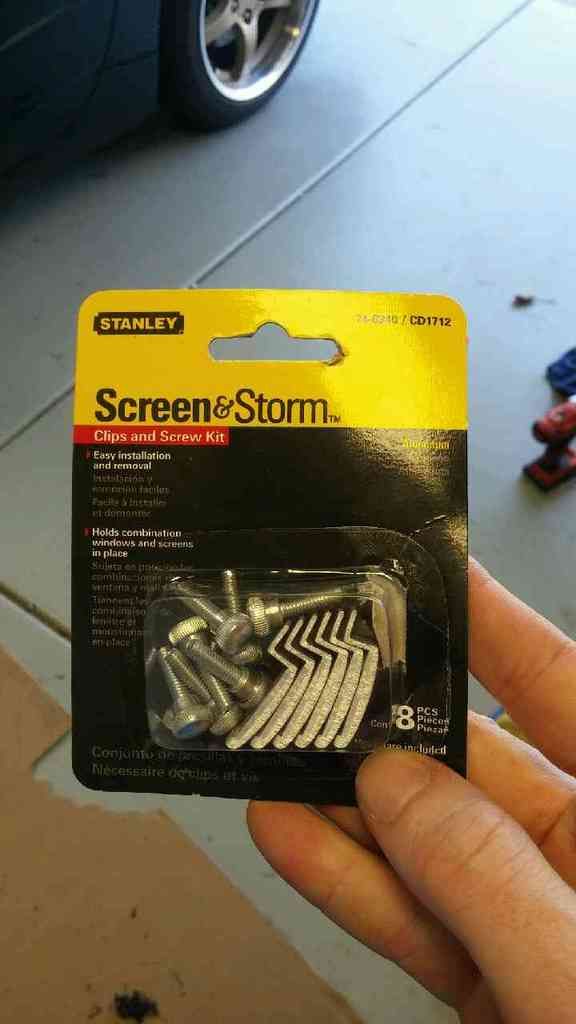
For the 2 forward side attach screws I would highly recommend going to the hardware store and picking up these little brackets for a few dollars as they work 100 times better than the washers in the kit for holding the front to the bumper.
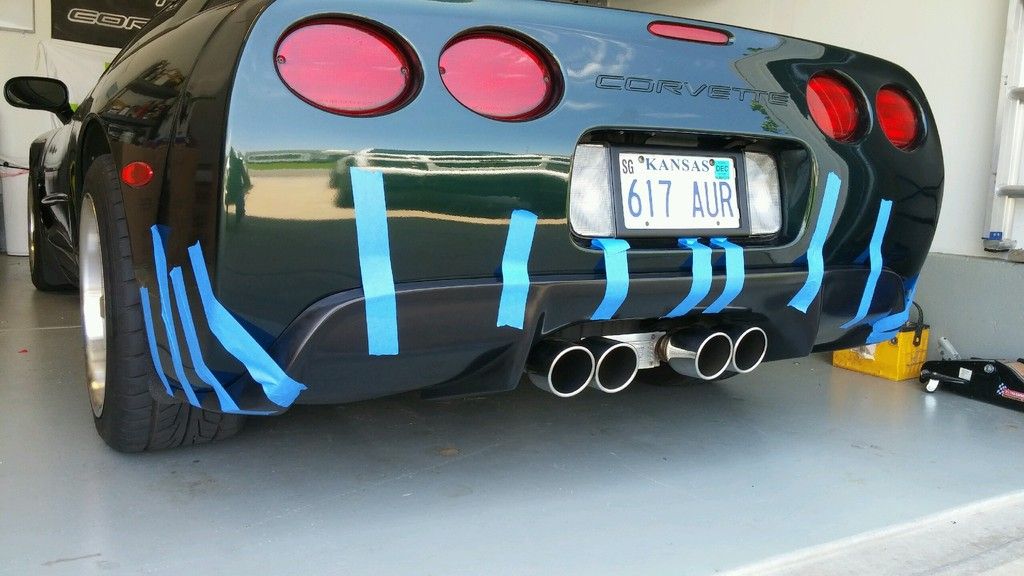
After everything is lined up and tight peel the ribbon off the mounting tape and then to aid in the tape sticking to the bumper I used blue tape to keep pressure on the diffuser for an hour or 2.
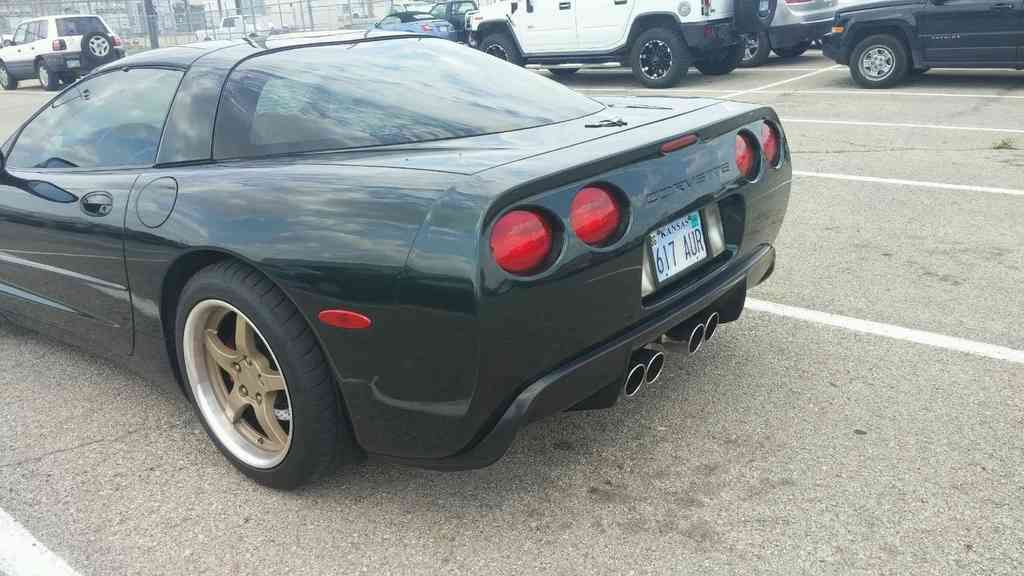
After 1,000 miles on the Hot Rod Power Tour everything is still in place!
Enjoy!
Melting Slicks


Joined: Aug 2015
Posts: 3,123
Likes: 304
Hmmmm, glad you like it. As for me, I'm not convinced.
It looks too aggressive for the lines of the car. And the gap makes it look like something "stuck on", and is about to fall off the car. Just my opinion......
Anyhoo, like I said, it's all about YOU.....
Shakey
It looks too aggressive for the lines of the car. And the gap makes it look like something "stuck on", and is about to fall off the car. Just my opinion......
Anyhoo, like I said, it's all about YOU.....
Shakey
NCM Lifetime Member


Joined: Aug 2015
Posts: 5,346
Likes: 4,295
From: Cunningham, TN
2021 Corvette of the Year - Modified
2020 C5 of the Year Winner- Modified
C5 of Year Finalist (appearance mods) 2019
St. Jude Donor '18 thru '26
Awesome write up, pics, and instructions. Thank you for taking the time to share.
Your car looks great with this mod!
Your car looks great with this mod!
Corvette Stories
The Best of Corvette for Corvette Enthusiasts

5 Best & 5 Worst Corvette Daily Drivers
Joe Kucinski
The Headlights of Every Corvette Generation Explained
Joe Kucinski
5 Best & 5 Most Overrated Corvette Track Packages of All Time!
Joe Kucinski
Every 2027 Corvette Engine Explained
Joe Kucinski
Designer Imagines A Corvette That Looks More Like a Corvette Than the Corvette
Verdad Gallardo
10 Ugly Corvettes That We Still Kinda Love
Joe Kucinski
Top 10 Most Expensive Corvettes Ever Sold on Bring A Trailer
Brett Foote
10 Things Every Corvette Owner Needs (2026 Edition)
Michael S. Palmer
8 Most "Only Corvette Owners Understand" Quirks and Problems
Pouria SavadkoueiBurning Brakes
Joined: Dec 2011
Posts: 858
Likes: 75
From: Medford, Oregon
 ....That's the beauty of doing mods, some will like it, and some will not !! I personally don't think that this diffuser is aggressive at all, kinda tame, but to each their own. I will say that I agree with others to some degree that it would work better with other elements added to the car to complete a theme. Good work, keep on having fun !!...
Thread Starter
Burning Brakes
Joined: Oct 2008
Posts: 800
Likes: 12
From: Wichita Kansas
Thanks for the positive feedback guys, I like the way it looks but I dunno there are only so many things you can do with a C5 body wise. Figured I would try this for a break from the same old stuff and it's easy to remove if I get tired of it, as you don't have to drill the stock bumper at all for install.
Administrator


Joined: Mar 2001
Posts: 368,744
Likes: 24,887
From: In a parallel universe. Currently own 2014 Stingray Coupe.
C7 of the Year - Modified Finalist 2021
MO Events Coordinator
St. Jude Co-Organizer
St. Jude Donor '03 thru '26
NCM Sinkhole Donor
CI 5, 8 & 11 Veteran
Thanks for the write-up. The diffuser looks good on the car.


Thread Starter
Burning Brakes
Joined: Oct 2008
Posts: 800
Likes: 12
From: Wichita Kansas
It does sag down just a little bit in the middle of the area touching the muffler from the heat and wind pulling on it. Would be nice if they would build them with a little renforcement in that area. Just a thin metal rod or strap molded in that area would be enough to keep it from sagging. I may look into fitting a strap of some sort in there.


Racer

Joined: May 2016
Posts: 472
Likes: 83
From: Lafayette LA
Man I was excited when I saw this. I really wanted to like it, but I agree with the few guys in here commenting that it needs more. It stands out enough to really need a whole kit or something else to make it look like it fits in. Side skirts would possibly help off set it a little. It could also be that it's a dark diffuser on a car colored car. I'm willing to bet it would probably pop differently on a red or yellow vette. I painted the bottom area of my Z06 to set it off and I think it looks clean (Millennium Yellow).
I'm not saying it looks bad, just that it looks a little out of place and maybe needs to be part of a whole kit or something to balance it out.
That exhaust sitting on it worries me too. I'd hate to spend a chunk of change on a body piece only to have it melt.
I'm not saying it looks bad, just that it looks a little out of place and maybe needs to be part of a whole kit or something to balance it out.
That exhaust sitting on it worries me too. I'd hate to spend a chunk of change on a body piece only to have it melt.
Burning Brakes

Joined: Mar 2014
Posts: 807
Likes: 239
It does sag down just a little bit in the middle of the area touching the muffler from the heat and wind pulling on it. Would be nice if they would build them with a little renforcement in that area. Just a thin metal rod or strap molded in that area would be enough to keep it from sagging. I may look into fitting a strap of some sort in there.

Drifting

Joined: Jan 2015
Posts: 1,256
Likes: 157
From: Pennsylvania
If it was mine I would find a way to vent it like the factory bumper. Regardless of functionality it looks better than a oem bumper in my opinion. There are countless people that put things on there car that have no function at all where diffusers are supposed to aid aerodynamics.
Drifting

Joined: Oct 2008
Posts: 1,595
Likes: 191
From: Wilmington DE
I was big supporter of having this made. With that said after looking at it does stand out a bit. I think an upper spoiler is needed to balance it out. A SLP or Carrivaggio style would flow best with the curves. Side skirts and a front lip would help too when looking at the car as a whole