


How difficult to fix A/C vacuum issue
Thread Starter
Drifting


Joined: Jun 2003
Posts: 1,510
Likes: 3
From: Life moves pretty fast... if you don't stop and look around once in a while, you could miss it!
CI 6-8-9 Veteran
I believe that I have the issue with a vacuum line either pulled off or damaged, as there are no changes when I move the A/C through the various vent options. How hard is it to get at the vacuum line and where is the exact location? I've tried to find it, ( I believe it is at the back of the manifold) but have had no luck. I've also heard that the issue may also be with a line accessed via the fender well. Any help would be appreciated, particularly pics and steps for correction. Thanks Zuti 
Melting Slicks


Joined: Jan 2004
Posts: 3,138
Likes: 37
From: Burbank. CA.
I think it's very difficult. I won't be any help. After reading many threads on this problem I still can't find any vacuum lines. I have had the battery out three times, plus took out the fender well lining.
I'm going to have to take it to the dealer.
Maybe you will have better luck.
Steve
I'm going to have to take it to the dealer.
Maybe you will have better luck.
Steve

Safety Car


Joined: Nov 2003
Posts: 4,979
Likes: 5
From: San Diego, CA "leaf" "tee" "e"
Look on www.ls1howto.com for the LS6 intake manifold installation how-to. It has a picture of a vacuum tube on the back.

Tech Contributor


Joined: Dec 1999
Posts: 32,910
Likes: 2,402
From: Anthony TX
CI 6,7,8,9,11 Vet
St. Jude Donor '08
The connection on the back of the manifold is very difficult to get to! You can bearly see it with a mirror. You are better off removing the manifold if infact it is off. Here are come pictures of the connection:

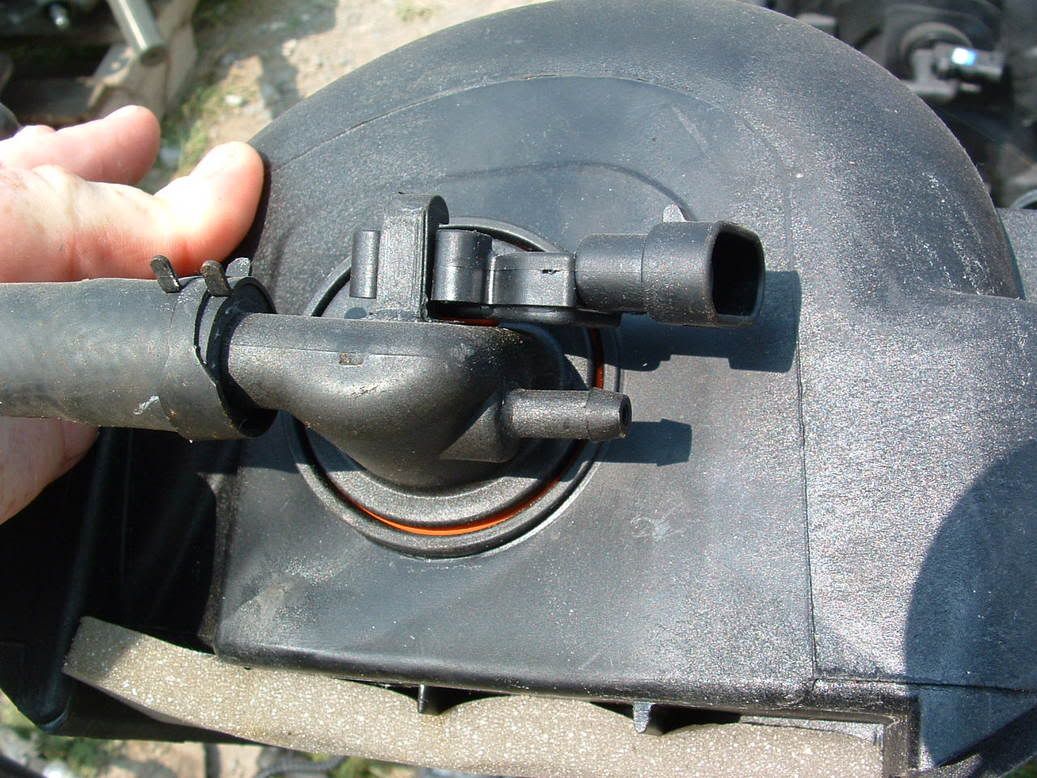
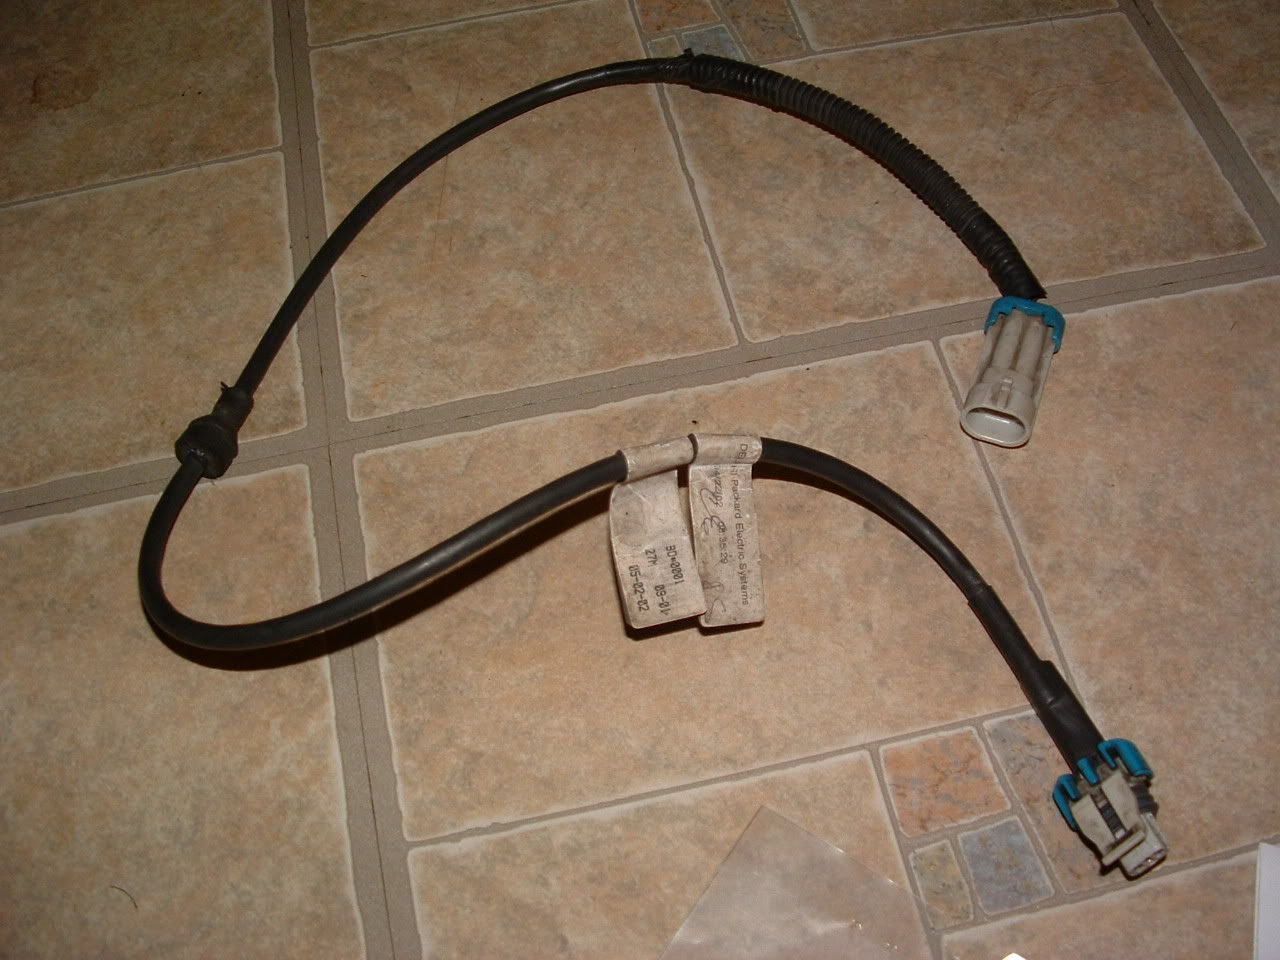
There is a panel in the passengers wheel well that can be removed. Once it is removed, you can access the vacuum resoviour. It will have three lines. Vacuum from the manifold, a vacuum line going to the HVAC controller module:


and a vacuum line giong to the A.I.R. Injection pump in the drivers side head light area.

If you start the car and check for vacuum at the resivour that will tell you a lot!
Please let me know if you need any more help!
BC
There is a panel in the passengers wheel well that can be removed. Once it is removed, you can access the vacuum resoviour. It will have three lines. Vacuum from the manifold, a vacuum line going to the HVAC controller module:
and a vacuum line giong to the A.I.R. Injection pump in the drivers side head light area.
If you start the car and check for vacuum at the resivour that will tell you a lot!
Please let me know if you need any more help!
BC

Pro

Joined: Jun 2005
Posts: 593
Likes: 1
Originally Posted by Zuti
I believe that I have the issue with a vacuum line either pulled off or damaged, as there are no changes when I move the A/C through the various vent options. How hard is it to get at the vacuum line and where is the exact location? I've tried to find it, ( I believe it is at the back of the manifold) but have had no luck. I've also heard that the issue may also be with a line accessed via the fender well. Any help would be appreciated, particularly pics and steps for correction. Thanks Zuti
Only takes a few minutes to take coils frame and valve cover off.
Pro
Joined: Jun 2005
Posts: 593
Likes: 1
Those images are not for all model years 97-01 years are different as to AIR and vaccum reserve for HVAC then 01-05 years
Originally Posted by Bill Curlee
The connection on the back of the manifold is very difficult to get to! You can bearly see it with a mirror. You are better off removing the manifold if infact it is off. Here are come pictures of the connection:
There is a panel in the passengers wheel well that can be removed. Once it is removed, you can access the vacuum resoviour. It will have three lines. Vacuum from the manifold, a vacuum line going to the HVAC controller module:
If you start the car and check for vacuum at the resivour that will tell you a lot!
Please let me know if you need any more help!
BC

Le Mans Master

Joined: Oct 2003
Posts: 6,126
Likes: 19
From: Streamwood illinois
Originally Posted by boosted_z06
You can either take out intake bolts and slide it forward a bit or remove the right side coils and valve cover giving you more room to reach back to where MAP sensor and vaccum hoses are.
Only takes a few minutes to take coils frame and valve cover off.
Only takes a few minutes to take coils frame and valve cover off.
if you can turn your hand right you canget it in there. I've done it many times
Dave
Corvette Stories
The Best of Corvette for Corvette Enthusiasts

Top 10 Most Expensive Corvettes Ever Sold on Bring A Trailer
Brett Foote
10 Things Every Corvette Owner Needs (2026 Edition)
Michael S. Palmer
8 Most "Only Corvette Owners Understand" Quirks and Problems
Pouria Savadkouei
10 Reasons the C6 Z06 is Still A Performance Benchmark After 20 Years
Joe Kucinski
How Much Horsepower Every Corvette Engine "LOST" in 1972
Joe Kucinski
Top 10 DOs and DON'Ts for Protecting Your Convertible Top!
Michael S. Palmer
Top 10 Most Explosive Corvettes Ever Made: Power-to-Weight Ratio Ranked!
Joe Kucinski
150 hp to 1,250 hp: Every Corvette Generation Compared by the Specs That Matter
Joe Kucinski
8 Coolest Corvette Pace Cars (and Replicas) of All Time
Verdad Gallardo
Pro
Joined: Jun 2005
Posts: 593
Likes: 1
Originally Posted by mountainbiker2
I think it's very difficult. I won't be any help. After reading many threads on this problem I still can't find any vacuum lines. I have had the battery out three times, plus took out the fender well lining.
I'm going to have to take it to the dealer.
Maybe you will have better luck.
Steve
I'm going to have to take it to the dealer.
Maybe you will have better luck.
Steve
Thread Starter
Drifting
Joined: Jun 2003
Posts: 1,510
Likes: 3
From: Life moves pretty fast... if you don't stop and look around once in a while, you could miss it!
CI 6-8-9 Veteran
Originally Posted by Bill Curlee
The connection on the back of the manifold is very difficult to get to! You can bearly see it with a mirror. You are better off removing the manifold if infact it is off. Here are come pictures of the connection:
There is a panel in the passengers wheel well that can be removed. Once it is removed, you can access the vacuum resoviour. It will have three lines. Vacuum from the manifold, a vacuum line going to the HVAC controller module:
and a vacuum line giong to the A.I.R. Injection pump in the drivers side head light area.
If you start the car and check for vacuum at the resivour that will tell you a lot!
Please let me know if you need any more help!
BC
Tech Contributor
Joined: Dec 1999
Posts: 32,910
Likes: 2,402
From: Anthony TX
CI 6,7,8,9,11 Vet
St. Jude Donor '08
Manifold is a SNAP to remove! I remove the fuel rails and injector as one assembly, disconnect and remove the wiring harnesses, (You can leave it attached to the fuel line and just move the rails and injectors to the side) remove the bolts and then the manifold.
I strongly recommend removing the manifold completly from the engine. You will most likely find dirt, sand and dust between each intake port. There is dead space between each port and debries sometimes collects there.
The entire removal process took us about 30 mim and is 10 times easier than the old Chevy iron and aluminum manifolds!! You will find that the vacuum line/fitting is VERY SHORT and that it is easily damaged or knocked off when the manifold is serviced.
Here are some pics to help you understand how things work:
MANIFOLD WITH DIRT AND SAND BETWEEN THE PORTS
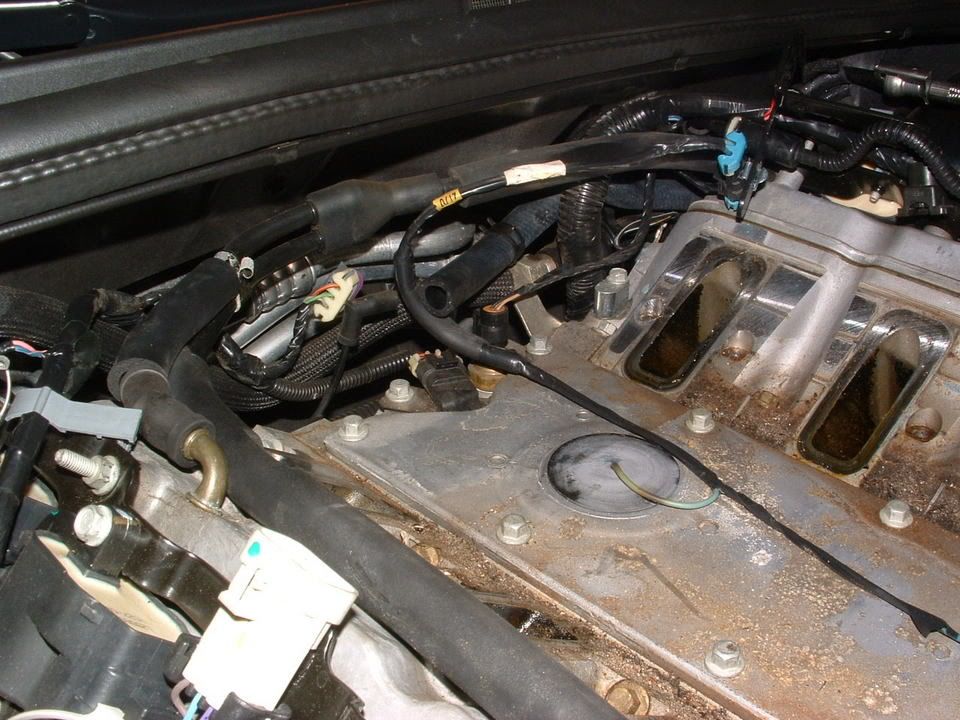
VACUUM LINES AND CONNECTIONS BEHIND THE MANIFOLD

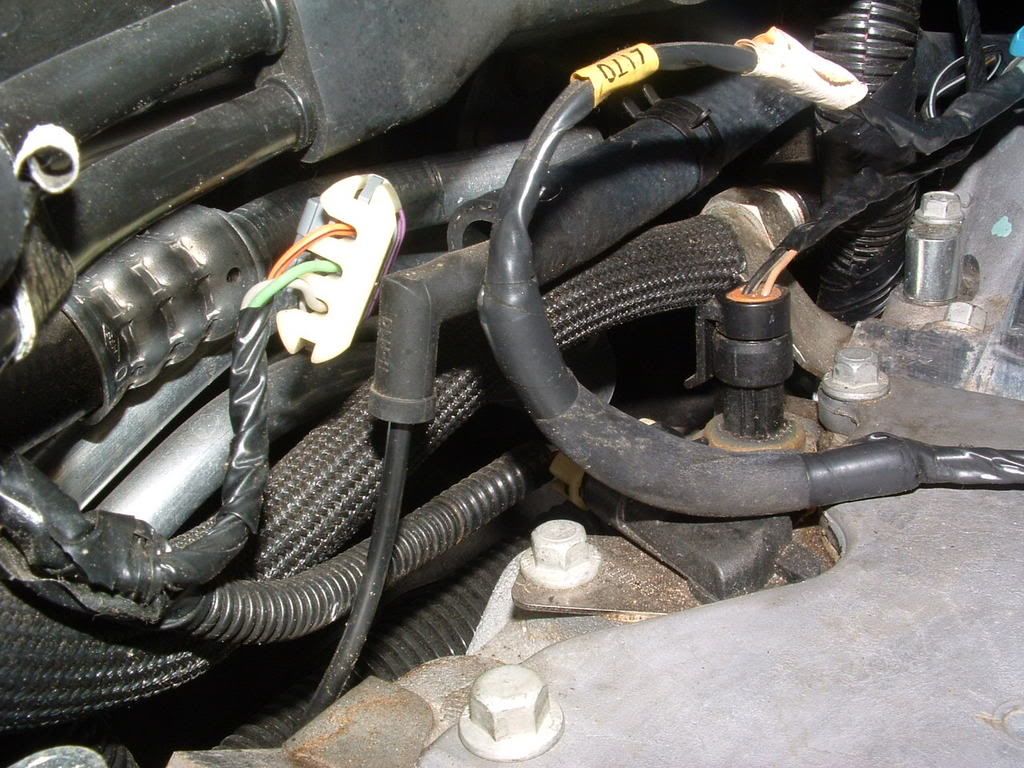
THE 90 DEG RUBBER VACUUM FITTING
CLOSE UP OF DIRT BETWEEN THE PORTS

Hope these help understand more about what to expect.
BC
I strongly recommend removing the manifold completly from the engine. You will most likely find dirt, sand and dust between each intake port. There is dead space between each port and debries sometimes collects there.
The entire removal process took us about 30 mim and is 10 times easier than the old Chevy iron and aluminum manifolds!! You will find that the vacuum line/fitting is VERY SHORT and that it is easily damaged or knocked off when the manifold is serviced.
Here are some pics to help you understand how things work:
MANIFOLD WITH DIRT AND SAND BETWEEN THE PORTS
VACUUM LINES AND CONNECTIONS BEHIND THE MANIFOLD
THE 90 DEG RUBBER VACUUM FITTING
CLOSE UP OF DIRT BETWEEN THE PORTS
Hope these help understand more about what to expect.
BC
Thread Starter
Drifting
Joined: Jun 2003
Posts: 1,510
Likes: 3
From: Life moves pretty fast... if you don't stop and look around once in a while, you could miss it!
CI 6-8-9 Veteran
Bill,
Great pics and info. How do you remove the sand and dirt without getting it into the ports? Rags in the ports? Also, regarding the vacuum lines accessed via the fender well, what's the best way to test for vacuum on those. I'll probably check there first before removing the manifold. Any thoughts? Zuti
Great pics and info. How do you remove the sand and dirt without getting it into the ports? Rags in the ports? Also, regarding the vacuum lines accessed via the fender well, what's the best way to test for vacuum on those. I'll probably check there first before removing the manifold. Any thoughts? Zuti
Tech Contributor
Joined: Dec 1999
Posts: 32,910
Likes: 2,402
From: Anthony TX
CI 6,7,8,9,11 Vet
St. Jude Donor '08
The hose coming from the intake manifold is black. It should be the ONLY one with vacuum on it when the engine is running. I would start the engine and remove lines until you find a vacuum source. If you find none, I recommend purchasing/renting or borrowing a vacuum pump and applying vacuun to the lines. I use a Mity Mite Hand operated vacuum pump. It works great and pumps a decient amount of air.
The ones that maintain a vacuum are the ones that go to the HVAC and the AIR system.
Bill C
The ones that maintain a vacuum are the ones that go to the HVAC and the AIR system.
Bill C
Thread Starter
Drifting
Joined: Jun 2003
Posts: 1,510
Likes: 3
From: Life moves pretty fast... if you don't stop and look around once in a while, you could miss it!
CI 6-8-9 Veteran
Bill,
I removed the passenger side wheeel well panel as well as the panel in the passenger side foot well and was unable to find anything that resembeled the vacuum resorvoir that is pictured. My car is a '98, is it possible that the components have changed with newer C5s? I don't want to remove the manifold if the problem is elsewhere. i may have to see the dealer on this one. any thoughts? PS... Thanks for your help and all of the great pics and info. Zuti
I removed the passenger side wheeel well panel as well as the panel in the passenger side foot well and was unable to find anything that resembeled the vacuum resorvoir that is pictured. My car is a '98, is it possible that the components have changed with newer C5s? I don't want to remove the manifold if the problem is elsewhere. i may have to see the dealer on this one. any thoughts? PS... Thanks for your help and all of the great pics and info. Zuti
Tech Contributor
Joined: Dec 1999
Posts: 32,910
Likes: 2,402
From: Anthony TX
CI 6,7,8,9,11 Vet
St. Jude Donor '08
The reservoir is a black plastic (sort of) can shapped. Believe me,,, it's in there. It is wayyyy back in the corner near the frame. There should be 3 lines attached to it. All C5's are the same. Take a look again. Use a good strong light.
Bill
Bill
Safety Car
Joined: Aug 2000
Posts: 4,154
Likes: 1
From: Murphy TX
Cruise-In II Veteran
Originally Posted by Zuti
I don't want to remove the manifold if the problem is elsewhere.
Instructor


Joined: Dec 2003
Posts: 159
Likes: 17
From: Aliso Viejo CA
I had this same problem on my 99. It was due to a leaking battery that had been replaced long before, but there continued to be damage below the battery. If you take the battery out and the tray the battery sits in you can get to the hoses. Unfortunately, the vacuum hoses are wrapped with the wire harness. However, this becomes easier to locate because you will see that some of the plastic tape around the wires will be damaged. This is the best place to start looking. Someone mentioned using a small vacuum pump. This worked well for me. I connected the pump to various vacuum lines and then listened for air leaks while pumped on the vacuum pump (that does sound very good). It�s not a hard job, but it�s a little awkward to get to all the harnesses. Good luck.