


EBCM replacement

Thread Starter
Intermediate

Joined: Jul 2005
Posts: 42
Likes: 1
Originally Posted by Twil1ght
As many of you have run into the EBCM failure (DIC code C1214 - Sol Valve relay Contact or coil CKT Open) and the infamous Service Traction Control/Service Active Handling/Service ABS - and let's not leave out the "shame you into the service center" lights that won't go off the dash, I thought I'd take a minute to say I just replaced my EBCM.
I got the part from gmpartsdirect.com for nearly half what the stealership wants for it. And as far as putting it in - you could grab 2 or 3 kids off the short bus and let all of them take turns following your instructions and the slowest one would take about 30 minutes. It's a complete joke. I did mine from the topside and wouldn't even have had to get under the car except that I dropped a bolt and had to pick it up off the ground.
Put the part in, turned key to on position, watched the lights go off after a month of looking at them, checked for codes, system has joy - Did a quick test with competitive driving, perfect results - time for a beer.
EDIT: The instructions I used:
Removal Procedure
1. Turn the ignition switch to the OFF position.
2. Disconnect the EBCM harness connector.
3. Remove the two insulator nuts.
4. Lift the EBCM/BPMV out of the bracket high enough to
allow clearance to remove the insulator mounting bolt and
the EBCM.
5. Remove the insulator mounting bolt from the EBCM.
6. Remove the four EBCM to BPMV bolts.
7. Separate the EBCM from the BPMV by gently pulling apart
until
separated.
8. Carefully remove the seal.
The seal may by reused if it is not cut or damaged.
Installation Procedure
1. Clean the BPMV seal surface with alcohol using a clean
rag.
2. Install the seal to the BPMV if it is not cut or damaged.
3. Install the EBCM to the BPMV.
4. Tighten the four mounting bolts in the following equence:
- First pass to 27 inch Ibs.
- Second pass to 53 inch Ibs.
Important: If the insulator nut was removed it must be replaced with a new insulator nut.
5. Install the front EBCM insulator mounting bolt. Tighten
the bolt to 10 ft. Ibs.
6. Install the EBCM/BPMV into the bracket.
7. Install the two insulator nuts. Tighten the two insulator
nuts to 89 inch Ibs.
8. Connect the EBCM harness connector. Important: Both
sides of the EBCM harness connector must be engaged
with lever before closing.
9. Turn the ignition switch to the ON position; do NOT start
the engine.
10. Perform the Diagnostic System Check - ABS. (Don't let this scare you - this basically means let the car do what the car does, and show you that everything is OK with the system, and then investigate the DIC codes which should be cleared)
What type, and size driver did you use to remove the four screws holding the EBCM to the BPMV? Did you remove the hoses that cross the top of the EBCM? Did you replace the insulator nuts or use the original ones?
Safety Car


Joined: Jul 2001
Posts: 4,661
Likes: 67
From: Ocean Springs MS
Originally Posted by cloneman315
now this is different than the bcm in the passenger floor board?if so were is this one and what does it do

Tech Contributor


Joined: Dec 1999
Posts: 32,910
Likes: 2,402
From: Anthony TX
CI 6,7,8,9,11 Vet
St. Jude Donor '08
I have LOT's of pictures, recommendations and expierences with this system from resolving the problems on my 02 Z06!
I always recommend that you check EVERY electrical connection and ground in and on that system before you replace the components. The parts are EXPENSIVE and 80% of the time, the failure is caused by a bad connection or in some cases the system just isnt used enough and the poppet valves and pump just stick. There have been a few of us that have expierenced EBTCM or BPMV failures and have needed to replace the modules. There have been a higher percentage of people who have had bad electrical connections, blown fuses, bad grounds or have just had to hammer the brakes to make the system do it's thing!
If you have a wheel speed sensor failure, always inspect and check the female pins in the wiring harness. they have a bad habit of not providing a good connection.
Bill
Thread Starter
Intermediate
Joined: Jul 2005
Posts: 42
Likes: 1
This DTC 1214 continues to be intermittent on my 2002 coupe. After cleaning the chasis grounds, cleaning the EBCM connector, replacing the fuses for the ABS, the service lights stopped coming on for two weeks. Then they began coming on again as before, after driving for five to ten miles. After the car sits overnight or while I am at work they are allways off. My drive to work is about fourteen miles each way. Now last week I drove on a longer trip, for about thirtyfive miles each way, and while driving the lights went out. They came on as usual when I began the trip. Today the lights did not come on, when they usually do, after driving five to ten miles. At this point I do not believe the EBCM is the problem. Hopefully the longer trip reset something?
Anyone have similar results?
Anyone have similar results?

Racer
Joined: Feb 2001
Posts: 277
Likes: 0
From: Brentwood Calif
I just had the Brake Pressure Modulator valve (EBCM) replaced under the GMPP warranty and the right front wheel speed sensor. The brake pressure modulator was $973 and the wheel speed sensor was $393 so with labor was about $1846 and change.
I am glad to see that if I get the c1214 code again I have some other recourse than the dealer. WOW.
The code for the front right wheel was c1226
Thank you for this post. CalHusker
I am glad to see that if I get the c1214 code again I have some other recourse than the dealer. WOW.
The code for the front right wheel was c1226
Thank you for this post. CalHusker
Burning Brakes


Joined: Sep 2005
Posts: 1,208
Likes: 2
From: Long Beach CA
the ebcm is the logic (computer)of the abs and the brake pressure modular valve is the mechanical (hydralic) of the abs. two different parts. it is possible for both parts to be bad with a code c1214, but majority of the time its just the EBCM
Burning Brakes
Joined: Aug 2000
Posts: 956
Likes: 0
From: College Station Texas
Cruise-In II Veteran
Trying to resolve this on my 2001 as well. This is excellent information!!! Thanks guys - ya'll are the best.
Bill - do you have any pictures of the EBCM? Gene at karshop needs to be sure exactly what part I need and I'm clueless.
Bill - do you have any pictures of the EBCM? Gene at karshop needs to be sure exactly what part I need and I'm clueless.
Corvette Stories
The Best of Corvette for Corvette Enthusiasts

Top 10 Most Expensive Corvettes Ever Sold on Bring A Trailer
Brett Foote
10 Things Every Corvette Owner Needs (2026 Edition)
Michael S. Palmer
8 Most "Only Corvette Owners Understand" Quirks and Problems
Pouria Savadkouei
10 Reasons the C6 Z06 is Still A Performance Benchmark After 20 Years
Joe Kucinski
How Much Horsepower Every Corvette Engine "LOST" in 1972
Joe Kucinski
Top 10 DOs and DON'Ts for Protecting Your Convertible Top!
Michael S. Palmer
Top 10 Most Explosive Corvettes Ever Made: Power-to-Weight Ratio Ranked!
Joe Kucinski
150 hp to 1,250 hp: Every Corvette Generation Compared by the Specs That Matter
Joe Kucinski
8 Coolest Corvette Pace Cars (and Replicas) of All Time
Verdad GallardoBurning Brakes
Joined: Aug 2000
Posts: 956
Likes: 0
From: College Station Texas
Cruise-In II Veteran
What does this mean:
What tool do I need?
4. Tighten the four mounting bolts in the following equence:
- First pass to 27 inch Ibs.
- Second pass to 53 inch Ibs.
- First pass to 27 inch Ibs.
- Second pass to 53 inch Ibs.
Tech Contributor
Joined: Dec 1999
Posts: 32,910
Likes: 2,402
From: Anthony TX
CI 6,7,8,9,11 Vet
St. Jude Donor '08
Why yes I do!!! 
Why do you think you need to replace the EBTCM??????????????? Have you tried all of the recommended (FREE) repair procedures first??
Here are your EBTCM pictures:
The EBTCM and BPMV are located in front of the alternator and behind the radiator.

The EBTCM is the electrical protion and looks like this:
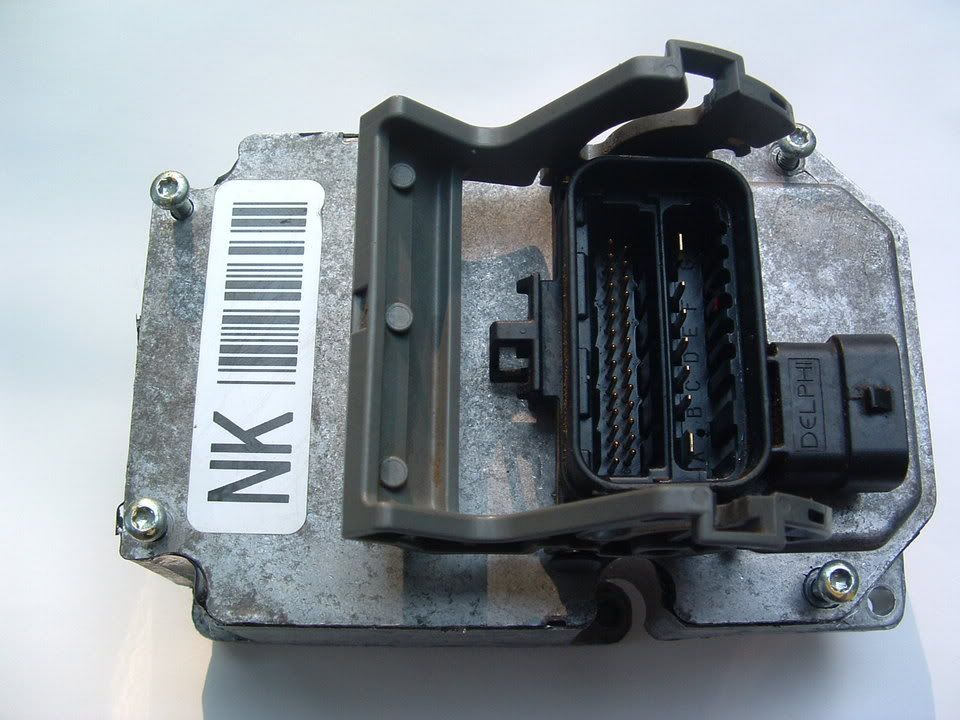
It is secured to the BPMV with foru torx head screws. To properly secure the EBTCM to the BPMV, you use a torque wrench to first tighten the screws to 27 in/lbs and then go back and tighten them to a finial pass to 53 in/lbs.
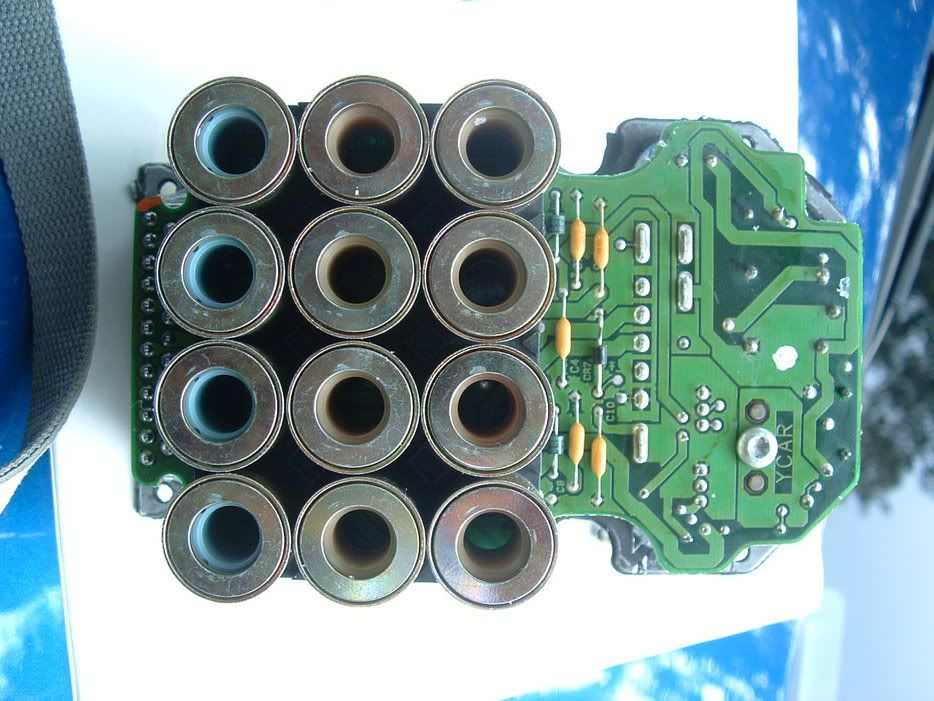
Here is the inside of the module (electrical module removed):
I have more pictures if you send me your e-mail address.
BC
Why do you think you need to replace the EBTCM??????????????? Have you tried all of the recommended (FREE) repair procedures first??
Here are your EBTCM pictures:
The EBTCM and BPMV are located in front of the alternator and behind the radiator.
The EBTCM is the electrical protion and looks like this:
It is secured to the BPMV with foru torx head screws. To properly secure the EBTCM to the BPMV, you use a torque wrench to first tighten the screws to 27 in/lbs and then go back and tighten them to a finial pass to 53 in/lbs.
Here is the inside of the module (electrical module removed):
I have more pictures if you send me your e-mail address.
BC

Racer
Joined: May 2003
Posts: 392
Likes: 0
From: Austin TX
I am sorry to resurrect this thread, but I just got this same problem in my 03 vert and am quite perplexed -- esp since the warranty JUST RAN OUT a month or so ago...
I checked the codes and it gets C1214HC, which immediately comes back after clearing.
I have three questions: Are there members who have fixed this by "hammering the brakes"? Also, are there any definitive tests to differentiate between a "logic" failure and the "mechanical" failure (two different modules IIRC)? What are the "recommended (FREE) repair procedures" to try first?
Last edited by dmcantrell; May 3, 2006 at 02:56 PM.
Racer
Joined: May 2003
Posts: 392
Likes: 0
From: Austin TX
Also, one more thing :
I just called my buddy and the Chevy House and he said that the part # I got here (12216561) was NOT the correct part # for the 2003 C5 that I have. He gave me a different number (10343433) and said that the 12216561 has NOT been replaced by 10343433.
Thoughts?
I just called my buddy and the Chevy House and he said that the part # I got here (12216561) was NOT the correct part # for the 2003 C5 that I have. He gave me a different number (10343433) and said that the 12216561 has NOT been replaced by 10343433.
Thoughts?


Burning Brakes
Joined: Nov 2004
Posts: 988
Likes: 4
From: Livermore CA
When the "Service Active Handling" is illuminated does the system still operate? And in replacing the EBCM are any hydraulic ports opened up (fluid lost)? It looks like in Bill's post that some type of fittings (the 12 annular looking things on the circuit board) are exposed.
Racer
Joined: May 2003
Posts: 392
Likes: 0
From: Austin TX
Originally Posted by Just Enough
When the "Service Active Handling" is illuminated does the system still operate?
edit:
I found this post and this thread
Last edited by dmcantrell; May 3, 2006 at 03:49 PM.
Tech Contributor
Joined: Dec 1999
Posts: 32,910
Likes: 2,402
From: Anthony TX
CI 6,7,8,9,11 Vet
St. Jude Donor '08
There is NO fluid to module interface! The module is DRY! The coils fit over small spools that have valves inside of them. The valves are operated by an electromagnetic field supplied by the coils
For everyone having the dreaded 1214 code, I may have a plan to see if the EBTCM is the true culprit. When I was in the Navy and we were experiencing intermittent electrical problems on a piece of equipment, every once in a while "MECHANICAL agitation" of the electrical equipment would solve the problem.
This is what I recommend. Using a small plastic hammer or something similar, lightly tap the front of the EBTCM on the lower right corner of the module The area will be on the right hand side of the lower electrical connection:
It's the area above the smaller plug at the bottom of the module. The reason your getting the 1214 code is that a relay in the module (System Relay) is not working properly.
If the electrical contacts inside the relay are dirty or burnt, the vibration from striking the module may change the symptoms or may clear them up for a while. This is by NO MEANS a fix or cure all!! In fact, it could make it worse or it may not do anything. Its just something to try!
If you beat the hell out of it,, your on your own brother!!! I would tap it just hard enough to vibrate the relays that are in that area :

If it changes the symptoms or clears up the problem, it will give you a better idea that the expensive EBTCM is the problem and you will feel a LOT better about purchasing a new one.
Bill C
For everyone having the dreaded 1214 code, I may have a plan to see if the EBTCM is the true culprit. When I was in the Navy and we were experiencing intermittent electrical problems on a piece of equipment, every once in a while "MECHANICAL agitation" of the electrical equipment would solve the problem.
This is what I recommend. Using a small plastic hammer or something similar, lightly tap the front of the EBTCM on the lower right corner of the module The area will be on the right hand side of the lower electrical connection:
It's the area above the smaller plug at the bottom of the module. The reason your getting the 1214 code is that a relay in the module (System Relay) is not working properly.
If the electrical contacts inside the relay are dirty or burnt, the vibration from striking the module may change the symptoms or may clear them up for a while. This is by NO MEANS a fix or cure all!! In fact, it could make it worse or it may not do anything. Its just something to try!
If you beat the hell out of it,, your on your own brother!!! I would tap it just hard enough to vibrate the relays that are in that area :
If it changes the symptoms or clears up the problem, it will give you a better idea that the expensive EBTCM is the problem and you will feel a LOT better about purchasing a new one.
Bill C

Intermediate
Joined: Aug 2005
Posts: 44
Likes: 1
Bill,
Just curious. How hard was it to open your EBCM? I gave up after trying to pry it open with a screwdriver. I thought maybe the electronics were potted inside.
Your theory about jarring the relay by tapping on the module makes sense. It may explain why removing and reinstalling my EBCM caused it to work for awhile.
Tech Contributor
Joined: Dec 1999
Posts: 32,910
Likes: 2,402
From: Anthony TX
CI 6,7,8,9,11 Vet
St. Jude Donor '08
Yea,,seperating the module from the case is really tough!!! They pour in a silicone gel that adhears to the sides of the case!!
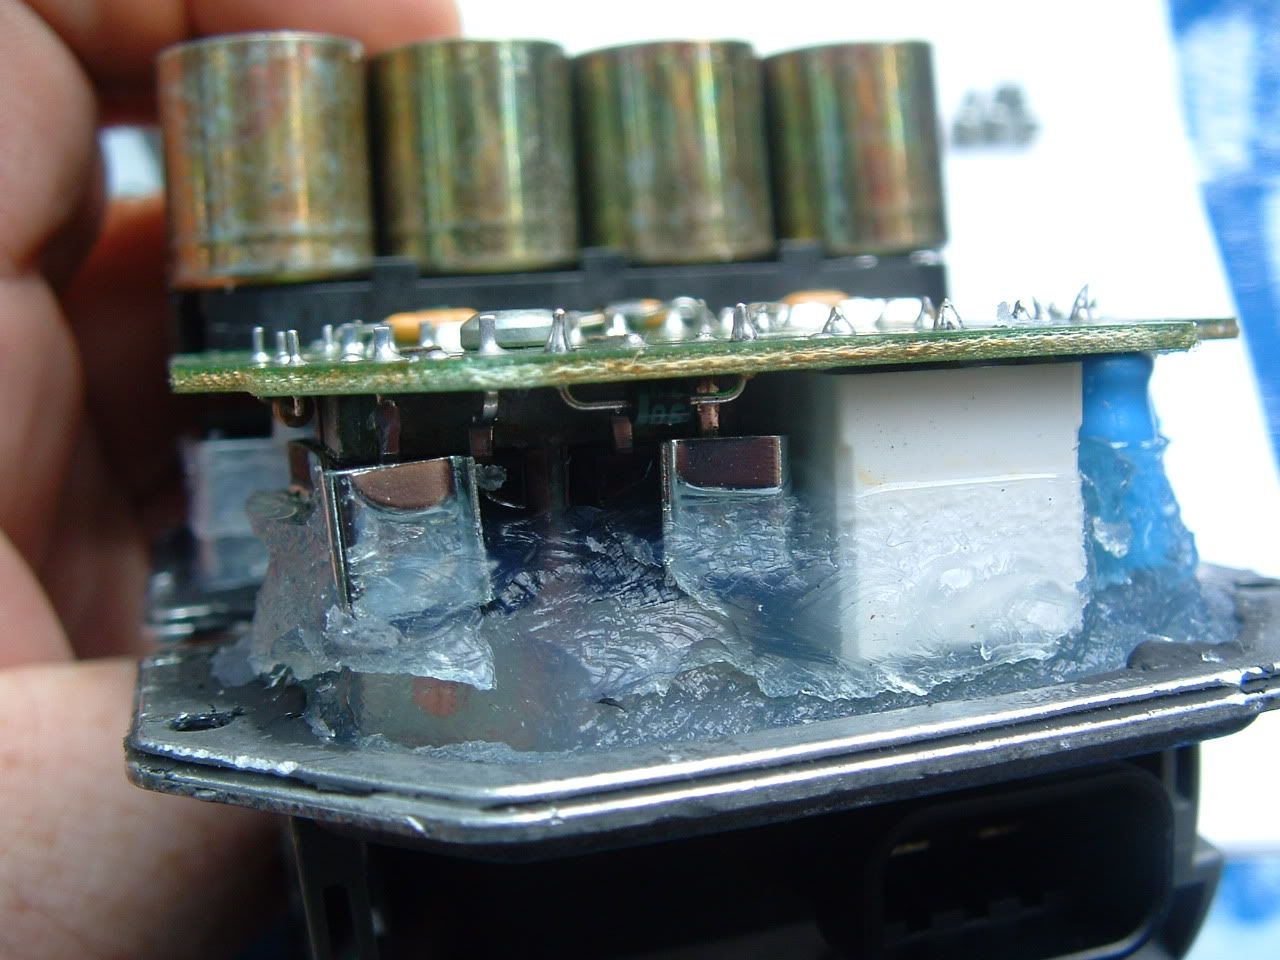
You can see what is left of the Gel in this photo.
It can be done! Just get it started and keep inserting bigger prying tools!
BC
You can see what is left of the Gel in this photo.
It can be done!
Just get it started and keep inserting bigger prying tools! BC
Safety Car
Joined: Jul 2004
Posts: 4,567
Likes: 0
From: Hickory, NC
Hey thanks for the info.... I've been waiting for these two parts for 4-weeks now. The Dealership ran a SCAT(?) search for the module throughout US & Canada but couldn't locate one. GM had a 3rd-party manufacture several of them recently... as of this morning they have been received at the Pontiac, MI parts division waiting to be put in GM boxes and shipped to dealers. Understand there are about 9 vette owners waiting for them, I'm #3 on the list so two other owners have been waiting well over a month for the same part.
Thankfully I have the extended warranty.
Thankfully I have the extended warranty.