
Wiper Motor Removal Procedures


 09-24-2009, 10:40 PM
#22
6th Gear


Member Since: Sep 2002
Location: Worcester Massachusetts
Posts: 6
Likes: 0
Received 0 Likes
on
0 Posts

Your description of hte repair was very well daone and easy to follow.
I was able to almost complete the removal of the defective Wiper Motor. However, when I was removing the three torx head screws that hold the motor to the bracket. I was unable to remove one screw. I worked on this for over three hours to no avail.
Eventually I had to drill the offense screw out in order to get the motor out. Now here I am with a new motor to put in and I am now without a screw.
Does anyone know where I can get one of these screws? I ahve tried four seperate GM dealers and several salvage yards. No one has this screw. I even went so far as to email the Corvette Plant. No answer as of yet.
If anyone has ideas or someplace to get this i would appreciate it.
09-25-2009, 07:39 AM
#23
Tech Contributor


Member Since: Dec 1999
Location: Anthony TX
Posts: 32,736
Received 2,180 Likes
on
1,583 Posts
CI 6,7,8,9,11 Vet
St. Jude Donor '08

Why not just take the screw to home depo or a hardware store, figure out what METRIC size the threads are and find the correct length screw. Who cares what head the screw is. Any screw head design will work. After you find the correct screw type later down the road, you can replace it if you desire.
BC
BC
09-25-2009, 09:59 AM
#24
6th Gear
Member Since: Sep 2002
Location: Worcester Massachusetts
Posts: 6
Likes: 0
Received 0 Likes
on
0 Posts
I tried that. Home Depot, Lowes, and my local Hardware store.
No one could find the correct thread screw.
Besides, I would rather repalce it with the correct screw.
I like my Corvette to retain most of its original parts including hardware.
No one could find the correct thread screw.
Besides, I would rather repalce it with the correct screw.
I like my Corvette to retain most of its original parts including hardware.
11-16-2009, 12:53 PM
#25
Safety Car

Member Since: Jul 2007
Location: We've gone on holiday by mistake
Posts: 4,582
Likes: 0
Received 0 Likes
on
0 Posts
As far as the plastic fastners, do you really just pry the middle part up with a screwdriver? I tried doing that at it looked like they would get tore up. Are they supposed to be reusable? Is it better to push them through from the bottom side? Thanks for any help.


 05-21-2010, 09:50 AM
#28
8th Gear

Member Since: Oct 2009
Location: Dumont NJ
Posts: 8
Likes: 0
Received 0 Likes
on
0 Posts
Hello
I am new to vette forum but not to the forums in general. So, I did the search on the drain channel mod on C5 but could not find any.
On the forums I frequent, a newbie asking simple question would immediately be responded by "Do a Search"
Would you kindly post links on how and where to mod the drain channel?
I also have the non stopping wiper that I just pulled the F10 fuse at the moment.
Have any of you experience the washer fluid button flying off at the end of the washer control stem? I am missing the spring inside it and would hate to have to replace the whole thing if I can just get a new cap and spring inside.
Last edited by red_z06; 05-21-2010 at 09:53 AM.
07-17-2010, 04:18 PM
#29
Intermediate
Member Since: Jul 2010
Location: Canton MI
Posts: 27
Likes: 0
Received 0 Likes
on
0 Posts
Ok I just took my motor out and after you get that middle torx screw out of the motor, take a socket and use a hammer and hit it once or twice it will jar it loose then you can just lift off the arms (cam) from the shaft of the motor.
I also cut the bottom of the udders to so that everything can just fall out of them.
When I unplugged my motor and tilted it up and shook it, tuns of water came out of the inside of the plastic plug where the wire harness plugs into. I was actually surprised on how much water came out. I'll be re-installing the motor tomorrow.
Thanks for the photos and help this was very informative. Can you imagine some people will take their car in and blow 110.00 on a new motor or the stealership will tell you it needs a new motor when it doesn't! then labor on top of that!.
I honestly think someone designed it this way so that later on you buy after market reman motors. lol. Do it yourself save a tun of cash thats for sure.
Here are some more photos on what to do when you get your motor out:
Take off the cover of the motor using a Torx 20 bit (3 screws)

Remove all the old gunk from the cover and take your hair drier and dry out the circuit board, this is how they re manufacture these motors. There is not much that can go wrong with them, I believe there is a kit you can buy, as for the circuit board if something gets fried a competent electronics technician can fix it for you.

Make sure you remove the gunk and make sure everything is greased well also on the other half.

When your done cleaning everything up you can use gasket maker or roap sealer to seal the motor up. I found some in the garage. You won't need this much this is just an example. Be neat with it and make sure it's sealed all the way around.

I also cut the bottom of the udders to so that everything can just fall out of them.
When I unplugged my motor and tilted it up and shook it, tuns of water came out of the inside of the plastic plug where the wire harness plugs into. I was actually surprised on how much water came out. I'll be re-installing the motor tomorrow.
Thanks for the photos and help this was very informative. Can you imagine some people will take their car in and blow 110.00 on a new motor or the stealership will tell you it needs a new motor when it doesn't! then labor on top of that!.
I honestly think someone designed it this way so that later on you buy after market reman motors. lol. Do it yourself save a tun of cash thats for sure.
Here are some more photos on what to do when you get your motor out:
Take off the cover of the motor using a Torx 20 bit (3 screws)
Remove all the old gunk from the cover and take your hair drier and dry out the circuit board, this is how they re manufacture these motors. There is not much that can go wrong with them, I believe there is a kit you can buy, as for the circuit board if something gets fried a competent electronics technician can fix it for you.
Make sure you remove the gunk and make sure everything is greased well also on the other half.
When your done cleaning everything up you can use gasket maker or roap sealer to seal the motor up. I found some in the garage. You won't need this much this is just an example. Be neat with it and make sure it's sealed all the way around.
Last edited by 995; 07-17-2010 at 06:08 PM.
07-17-2010, 08:41 PM
#31
Tech Contributor
Member Since: Dec 1999
Location: Anthony TX
Posts: 32,736
Received 2,180 Likes
on
1,583 Posts
CI 6,7,8,9,11 Vet
St. Jude Donor '08
995
WOW! Home Run! Excellent post! Very well documented.
BC
WOW! Home Run! Excellent post! Very well documented.
BC
Last edited by Bill Curlee; 07-17-2010 at 08:45 PM.
07-19-2010, 03:41 PM
#32
Intermediate
Member Since: Jul 2010
Location: Canton MI
Posts: 27
Likes: 0
Received 0 Likes
on
0 Posts
Got the motor back in and hooked up everything and all is well and while I had my Wiper arms off I also replaced my blades to the new BOSH Evolution 4822 (22") flexible blades. These are great..
When putting your arms back on don't tighten the nut all the way cause you will have to adjust them about 2-3 times to get them in the right spot in the off position.
Also do this work in a garage where it's shady, I have a 3rd degree sun burn now!..
Pic of my vette:

When putting your arms back on don't tighten the nut all the way cause you will have to adjust them about 2-3 times to get them in the right spot in the off position.
Also do this work in a garage where it's shady, I have a 3rd degree sun burn now!..
Pic of my vette:
Last edited by 995; 07-19-2010 at 04:49 PM.
07-21-2010, 11:20 PM
#33
Heel & Toe
Member Since: Apr 2010
Location: Carthage Texas
Posts: 22
Likes: 0
Received 0 Likes
on
0 Posts
Ran my vette through the car wash on Monday. Wipers began running on delay and would not turn off. Fuse was good, and the switch allowed the wipers to run in delay, slow, and fast modes. So I pulled the wiper motor yesterday and look what I found...
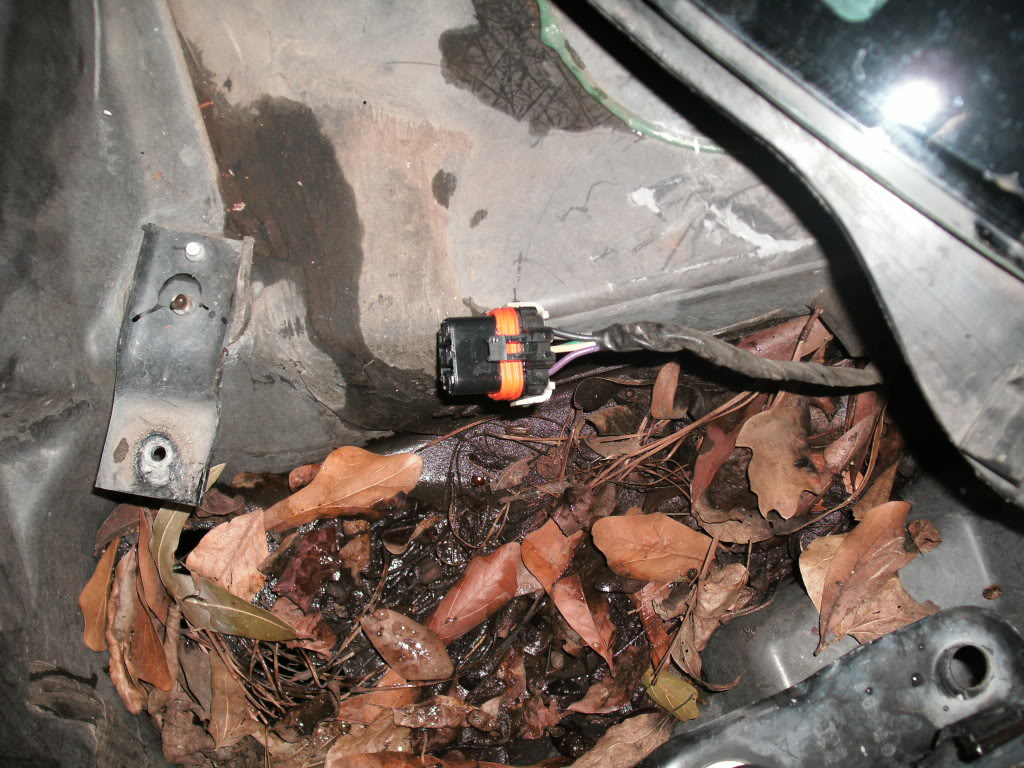
Yep, my udders were level full. 12 years worth of leaves and crap all trapped under the motor. Lifted the motor out and water began seaping out. Obviously a drainage problem. Putting a new motor in tommorrow. I hope all will be well afterwards.
Yep, my udders were level full. 12 years worth of leaves and crap all trapped under the motor. Lifted the motor out and water began seaping out. Obviously a drainage problem. Putting a new motor in tommorrow. I hope all will be well afterwards.
Last edited by bmkerrdog; 07-21-2010 at 11:29 PM.
07-22-2010, 10:23 AM
#34
Intermediate
Member Since: Jul 2010
Location: Canton MI
Posts: 27
Likes: 0
Received 0 Likes
on
0 Posts
lol I guess you didn't read the thread, why are you buying a new motor?? If your getting any reaction from the motor at all it's good. All you have to do is dry out the circuit board. This circuit board isn't really even a circuit board, it's a poor man's circuit board which means any component on it can me popped out and replaced. No need for a new motor unless your gears are all chewed up.
Last edited by 995; 07-22-2010 at 10:25 AM.
 07-23-2010, 08:55 AM
#36
Heel & Toe
Member Since: Apr 2010
Location: Carthage Texas
Posts: 22
Likes: 0
Received 0 Likes
on
0 Posts
 Got the new motor installed and all is well. Checked all the cowl drains and a/c drain on the firewall while I was at it. Hopefully no more problems will arise. Junkman had a great write up on this topic over at the digitalcorvettes forum including how to calibrate the wiper transmission.
11-16-2010, 10:41 PM
Got the new motor installed and all is well. Checked all the cowl drains and a/c drain on the firewall while I was at it. Hopefully no more problems will arise. Junkman had a great write up on this topic over at the digitalcorvettes forum including how to calibrate the wiper transmission.
11-16-2010, 10:41 PM
#38
Pro

Member Since: Jun 2008
Location: The Ham AL
Posts: 509
Likes: 0
Received 0 Likes
on
0 Posts
lol I guess you didn't read the thread, why are you buying a new motor?? If your getting any reaction from the motor at all it's good. All you have to do is dry out the circuit board. This circuit board isn't really even a circuit board, it's a poor man's circuit board which means any component on it can me popped out and replaced. No need for a new motor unless your gears are all chewed up.
05-04-2011, 10:36 PM
#39
Burning Brakes


I don't think they go to the park position, they just cycle and slam against the stops. They wont go to the park position no mater where I put the wipers. Another funny thing is when the delay is on, they pause in the middle of their travel for a second then start moving again