


Wiper Motor Removal Procedures
Thread Starter
Drifting


Joined: Dec 2002
Posts: 1,970
Likes: 29
From: Berryville Virginia
St. Jude Donor '05-'06-'07-'08
I had to replace my wiper motor, and thought I’d post my procedures. I’ll post up the pictures tonight. The whole process wasn’t very hard, but the wiper arms were a real bear to get off the arm studs.
Tools Needed:
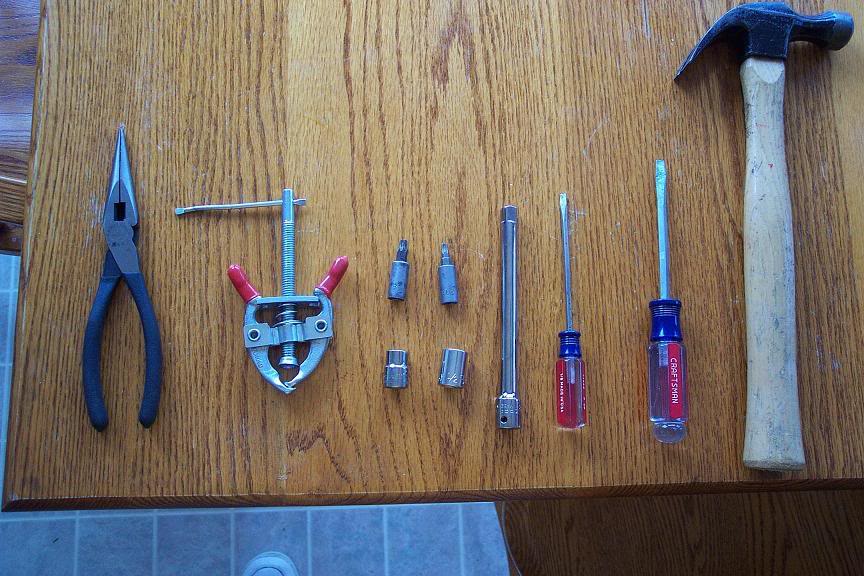
Hammer
Needle Nose Pliers
Small Common Screwdriver
Regular Common Screwdriver
T20 Torx
T30 Torx
Small Puller (I used a battery terminal puller)
Ratchet
Socket (10 MM Metric)
Socket (1/2 SAE)
5 inch extension
Parts Needed:
Wiper Motor
Removal
1. Remove 25 amp windshield wiper fuse (fuse 10) in the passenger’s side fuse box.
2. Disconnect the windshield washer hoses from the wiper arms.

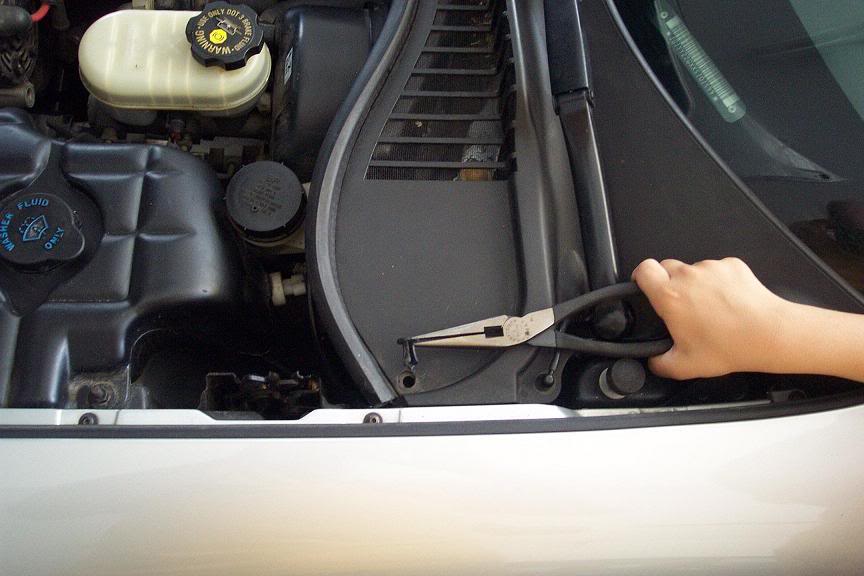
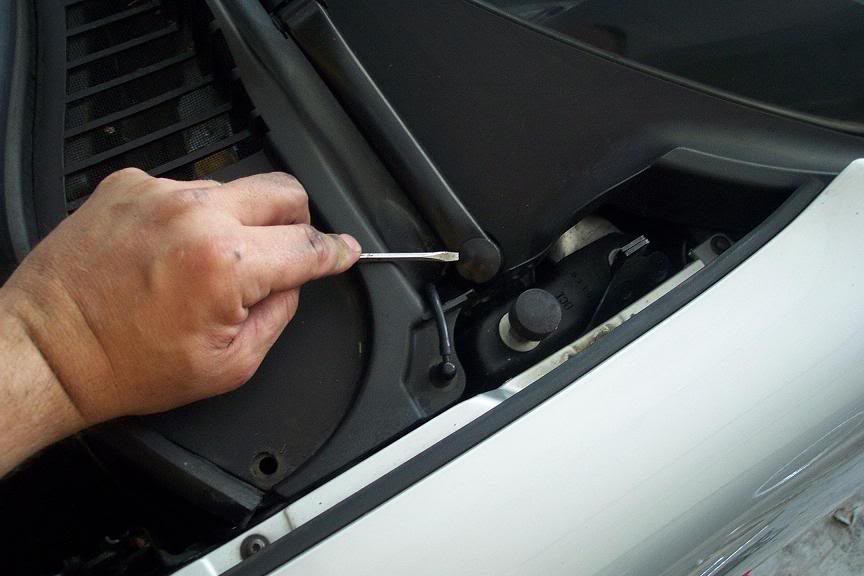
3. Remove screen tray connectors by prying the center the center section of the connector with a small screwdriver; this center section spreads the connector feet keeping the connector locked in. Take needle nose pliers and remove the outer casing.
4. Use a small screwdriver and remove windshield wiper arm nut caps. Use caution not to mar the wiper blade finish. The nut is very tight, penetrating oil sprayed onto the connecting nut will facilitate the nut removal. Remove the ½ nut underneath the cover.
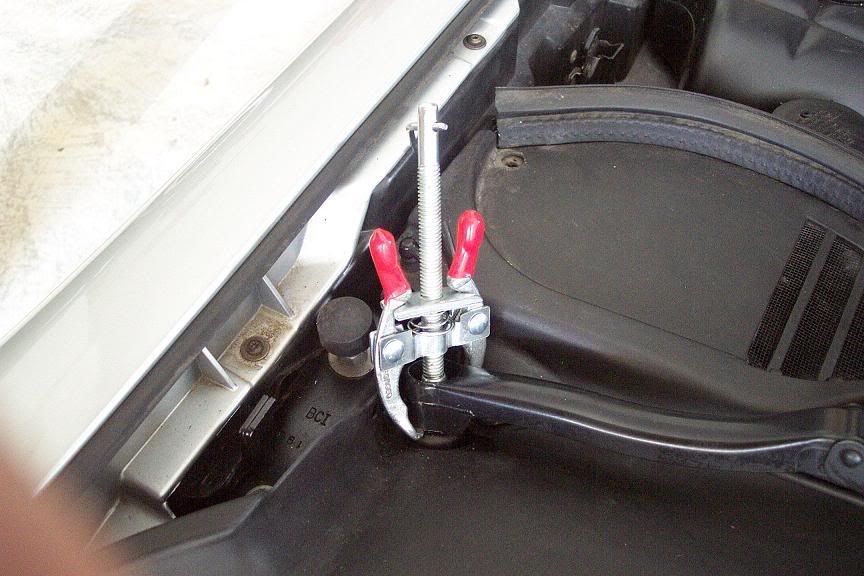
5. Remove the wiper arm by using small puller, to press the wiper stud and pull up the wiper arm.
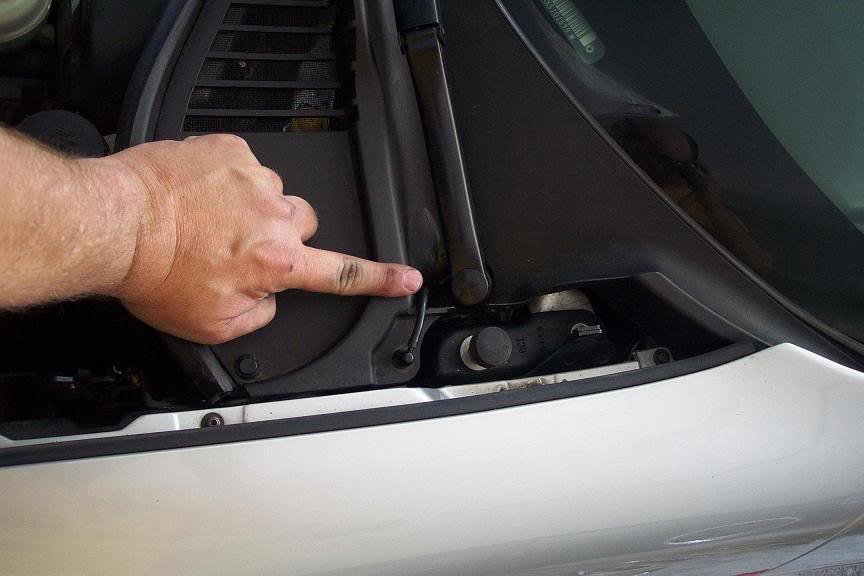
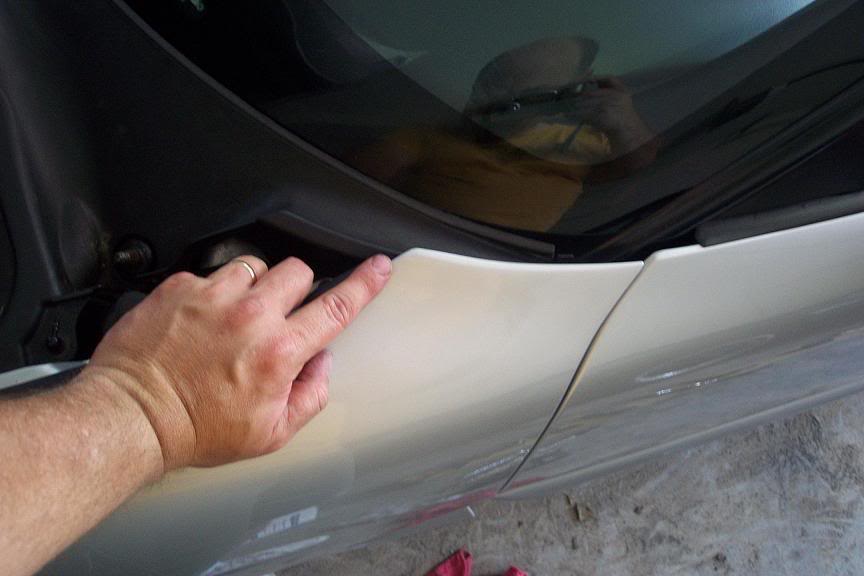
6. Carefully pull the wiper valley cover tray away from the windshield, start by pulling the corners free, where there is very little clearance between the windshield and the top corner of the fenders. Work from the corners to the center section.
7. Flip the cover over and rest on top of engine, be careful not to break the washer hose etc. This will expose the wiper transmission linkage, and the wiper motor attached to the linkage in the drivers corner of the wiper valley.

8. Remove the two 10 MM wiper transmission bolts on driver’s side.
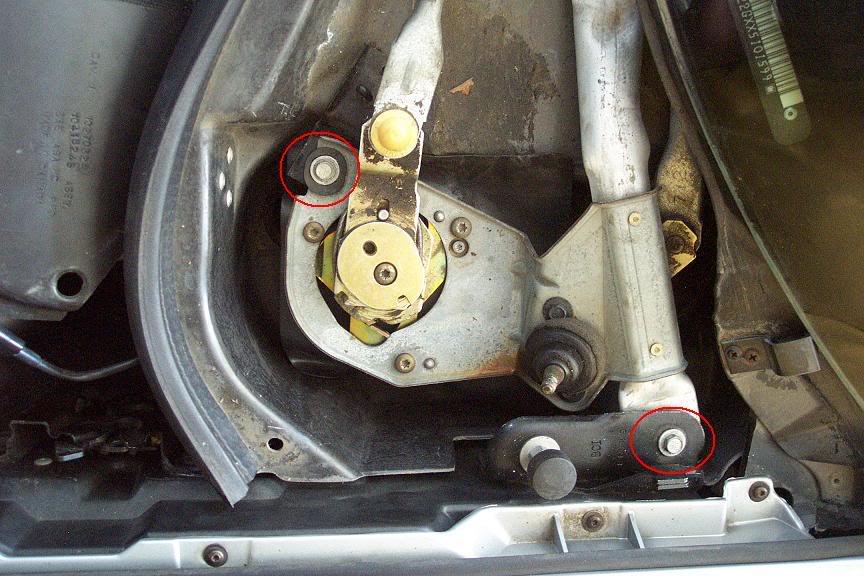
9. Remove the 10 MM wiper transmission bolt on passenger side.

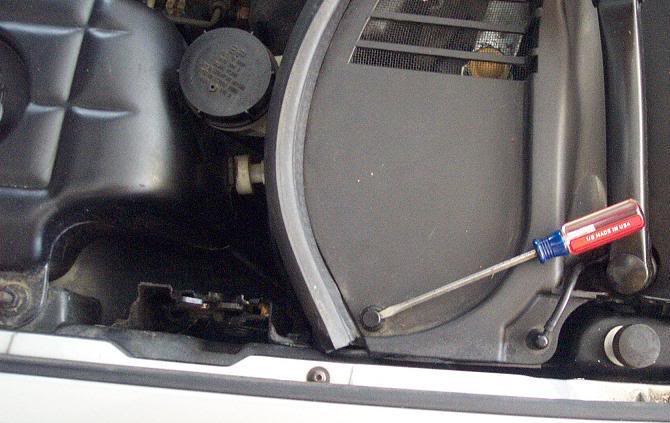
10. Remove the T30 Torx screw and lift the motor arm that connects the wiper transmission to the top of the motor.
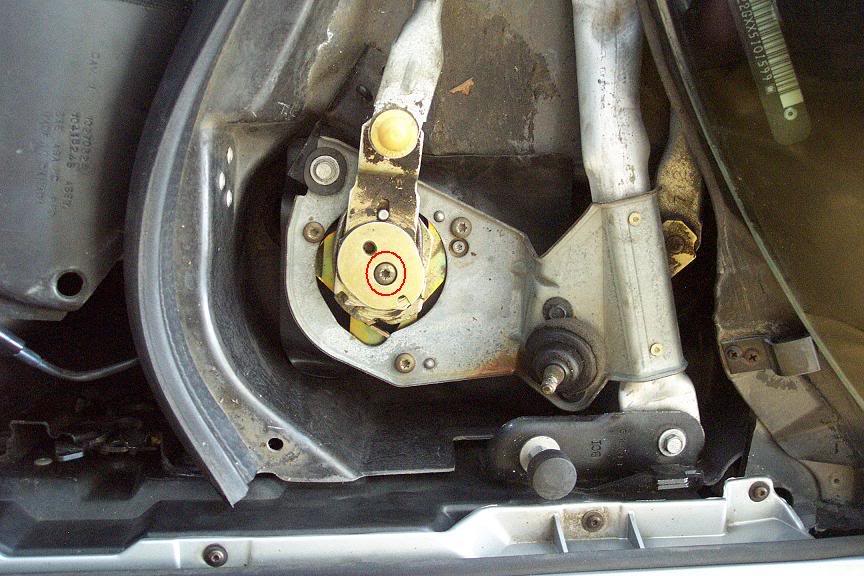
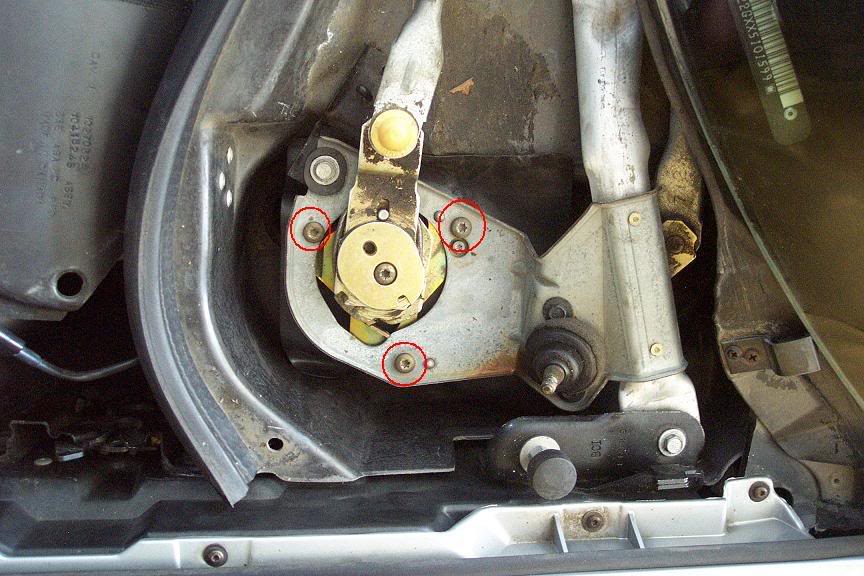
11. Remove the three T30 Torx screws that hold the motor to the wiper transmission.
12. Carefully work the transmission free to expose the wiper motor, and move away from wiper valley. Use care not to damage the transmission arms during removal or storage.

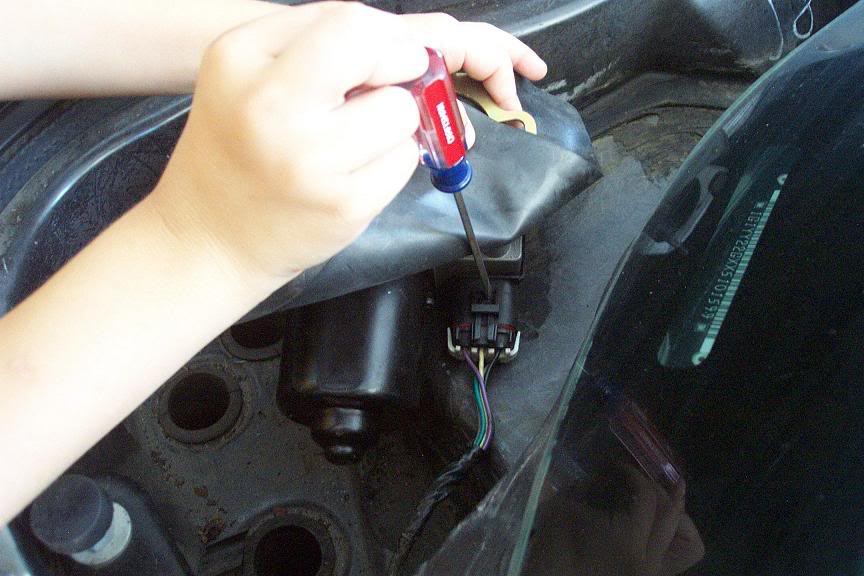
13. Take wiper motor out of valley and turn the motor over, use a small common screwdriver to depress the locking catch, and remove the electrical plug from the motor.
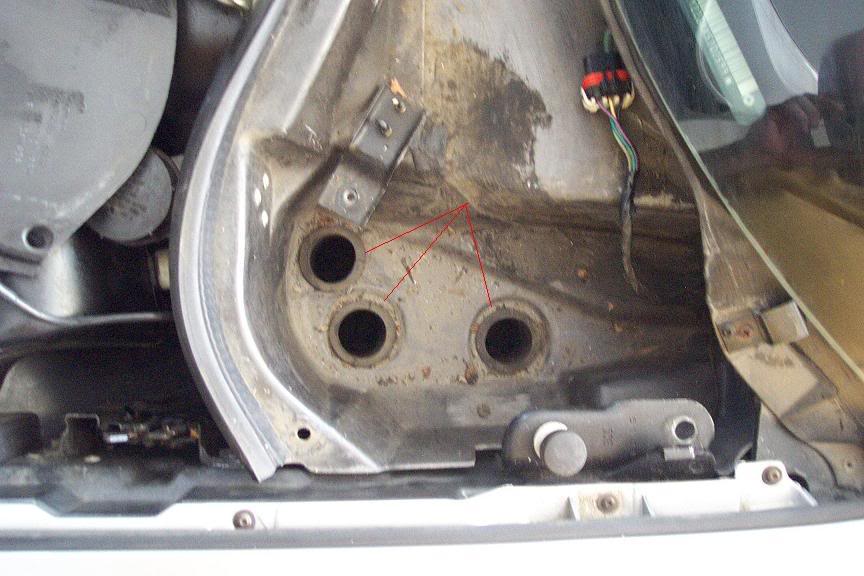
14. Clean any debris out of the three rubber drain channels (udders).
15. Remove T20 Torx screw, and separate the wiper motor plate and rubber shield from the wiper motor.

Tools Needed:
Hammer
Needle Nose Pliers
Small Common Screwdriver
Regular Common Screwdriver
T20 Torx
T30 Torx
Small Puller (I used a battery terminal puller)
Ratchet
Socket (10 MM Metric)
Socket (1/2 SAE)
5 inch extension
Parts Needed:
Wiper Motor
Removal
1. Remove 25 amp windshield wiper fuse (fuse 10) in the passenger’s side fuse box.
2. Disconnect the windshield washer hoses from the wiper arms.
3. Remove screen tray connectors by prying the center the center section of the connector with a small screwdriver; this center section spreads the connector feet keeping the connector locked in. Take needle nose pliers and remove the outer casing.
4. Use a small screwdriver and remove windshield wiper arm nut caps. Use caution not to mar the wiper blade finish. The nut is very tight, penetrating oil sprayed onto the connecting nut will facilitate the nut removal. Remove the ½ nut underneath the cover.
5. Remove the wiper arm by using small puller, to press the wiper stud and pull up the wiper arm.
6. Carefully pull the wiper valley cover tray away from the windshield, start by pulling the corners free, where there is very little clearance between the windshield and the top corner of the fenders. Work from the corners to the center section.
7. Flip the cover over and rest on top of engine, be careful not to break the washer hose etc. This will expose the wiper transmission linkage, and the wiper motor attached to the linkage in the drivers corner of the wiper valley.
8. Remove the two 10 MM wiper transmission bolts on driver’s side.
9. Remove the 10 MM wiper transmission bolt on passenger side.
10. Remove the T30 Torx screw and lift the motor arm that connects the wiper transmission to the top of the motor.
11. Remove the three T30 Torx screws that hold the motor to the wiper transmission.
12. Carefully work the transmission free to expose the wiper motor, and move away from wiper valley. Use care not to damage the transmission arms during removal or storage.
13. Take wiper motor out of valley and turn the motor over, use a small common screwdriver to depress the locking catch, and remove the electrical plug from the motor.
14. Clean any debris out of the three rubber drain channels (udders).
15. Remove T20 Torx screw, and separate the wiper motor plate and rubber shield from the wiper motor.
Last edited by Bville-Bud; May 27, 2007 at 04:59 PM.
Advanced

Joined: Jan 2007
Posts: 97
Likes: 0
From: Germany, Europe
Great job and damn well documented  .
.
Did you modified the outlet of the three udders? Imo they are miserable constructed.
My wiper motor was awash and I found the three rubber drain channels (udders) blocked with mud and leaves. The lower port of the udders are miserable constructed.
I enlarged the outlet yesterday. Now the water and dirt will be will be sluiced down.
Tom
.Did you modified the outlet of the three udders? Imo they are miserable constructed.
My wiper motor was awash and I found the three rubber drain channels (udders) blocked with mud and leaves. The lower port of the udders are miserable constructed.
I enlarged the outlet yesterday. Now the water and dirt will be will be sluiced down.
Tom
Thread Starter
Drifting
Joined: Dec 2002
Posts: 1,970
Likes: 29
From: Berryville Virginia
St. Jude Donor '05-'06-'07-'08
Great job and damn well documented .
Did you modified the outlet of the three udders? Imo they are miserable constructed.
My wiper motor was awash and I found the three rubber drain channels (udders) blocked with mud and leaves. The lower port of the udders are miserable constructed.
I enlarged the outlet yesterday. Now the water and dirt will be will be sluiced down.
Tom
.Did you modified the outlet of the three udders? Imo they are miserable constructed.
My wiper motor was awash and I found the three rubber drain channels (udders) blocked with mud and leaves. The lower port of the udders are miserable constructed.
I enlarged the outlet yesterday. Now the water and dirt will be will be sluiced down.
Tom
Intermediate
Joined: Jun 2006
Posts: 36
Likes: 0
From: NEW ZEALAND
gotta love this forum! hubby is now outside trying to clean his udders! we need the car sunday, and don't want the wipers going when they shouldn't, but we also want them to work when they should!
thanks for the help!
Debs
thanks for the help!
Debs
Corvette Stories
The Best of Corvette for Corvette Enthusiasts

Top 10 Most Expensive Corvettes Ever Sold on Bring A Trailer
Brett Foote
10 Things Every Corvette Owner Needs (2026 Edition)
Michael S. Palmer
8 Most "Only Corvette Owners Understand" Quirks and Problems
Pouria Savadkouei
10 Reasons the C6 Z06 is Still A Performance Benchmark After 20 Years
Joe Kucinski
How Much Horsepower Every Corvette Engine "LOST" in 1972
Joe Kucinski
Top 10 DOs and DON'Ts for Protecting Your Convertible Top!
Michael S. Palmer
Top 10 Most Explosive Corvettes Ever Made: Power-to-Weight Ratio Ranked!
Joe Kucinski
150 hp to 1,250 hp: Every Corvette Generation Compared by the Specs That Matter
Joe Kucinski
8 Coolest Corvette Pace Cars (and Replicas) of All Time
Verdad Gallardo


Le Mans Master


Joined: May 2006
Posts: 5,987
Likes: 18
From: DuBois PA
St. Jude Donor '11-'12-'13-'14-'15
Excellent write-up!!! I had to stumble through this last year, and this would have been very helpful!! Turned out the cam on top was not installed correctly and my wiper motor was actually good! So pay attention to how the cam is oreinted before you remove it...
FYI I believe the closed end design on the udders is to keep rodents out of the blower motor/cabin...
Turned out the cam on top was not installed correctly and my wiper motor was actually good! So pay attention to how the cam is oreinted before you remove it...FYI I believe the closed end design on the udders is to keep rodents out of the blower motor/cabin...
Advanced
Joined: Nov 2006
Posts: 70
Likes: 0
From: Siloam Springs Arkansas
I followed the instructions shown here, installed a new motor and everything went alright until I started the wipers and they don't work like they should Does anyone know What I did wrong?
Does anyone know What I did wrong?

Advanced
Joined: Nov 2006
Posts: 70
Likes: 0
From: Siloam Springs Arkansas
Le Mans Master

Joined: Sep 2003
Posts: 8,847
Likes: 795
From: Longview Texas
Taking the motor out looks straight forward, but how do you re-attach the drive linkage so that the wipers stop in the right place? I think I saw a post somewhere on how to synchronize the cam. It would be good to get that information together with this so people have the complete job.
http://forums.corvetteforum.com/c5-t...iper-arms.html
http://forums.corvetteforum.com/c5-t...iper-arms.html
Last edited by TEXHAWK0; May 23, 2009 at 07:46 PM.

Le Mans Master
Joined: Dec 2006
Posts: 7,251
Likes: 16
From: Phoenix Arizona
Taking the motor out looks straight forward, but how do you re-attach the drive linkage so that the wipers stop in the right place? I think I saw a post somewhere on how to synchronize the cam. It would be good to get that information together with this so people have the complete job.
http://forums.corvetteforum.com/c5-t...iper-arms.html
http://forums.corvetteforum.com/c5-t...iper-arms.html

Le Mans Master
Joined: Dec 2001
Posts: 7,788
Likes: 6
From: Winchester TN
Cruise-In III Veteran
Cruise-In IV Veteran
Cruise-In V Veteran
St. Jude Donor '03-'04-'05-'06-'07-'11
You should easily be able to get those at your dealer - probably in stock and probably overpriced.
I would add to this nice write up, that there is one of the plastic pop-fasteners that is different than the other four - it is located right at the passenger side hump molded into the cowl cover.
Also, I was able to just soak the wiper arm bolts with PBlaster and then firmly grasp each arm and wiggle it up and off - protect the paint of the fender on the drivers side for safety.
Finally, try to get your hands under the cowl and push up on the pop-fasteners while squeezing them underneath to get them up and out of the holes.
best regards -
mqqn


Tech Contributor


Joined: Dec 1999
Posts: 32,910
Likes: 2,402
From: Anthony TX
CI 6,7,8,9,11 Vet
St. Jude Donor '08
As far as I know,,,there there to allow water OUT and to keep things from getting in. From my expierence,,,, things (mice) can get in even if the utters are in place. Yes, you can yank them. That doesnt mean that the holes they leave still cant get clogged. Check them every once in a while!!