


Parking brake cable
Thread Starter
Racer

Joined: Aug 2002
Posts: 417
Likes: 1
From: Florida
Maybe I asked this question the wrong way. Can any one give me the directions/how tos to remove the parking brake cable at the parking brake lever assembly. Thanks in advance.
Melting Slicks


Joined: Aug 2006
Posts: 2,167
Likes: 11
From: Powell TN
Cruise-In VIII Veteran
Melting Slicks
Joined: Aug 2006
Posts: 2,167
Likes: 11
From: Powell TN
Cruise-In VIII Veteran
How are they going to wear out if you only use them when you are sitting still? 
I found this somewhere on the net and saved it. I haven't used it myself.
Adjust Parking Brake Shoes
It seems many C5's have a poor parking brake. If you are driving a 6 speed, get in the habit of leaving the transmission in gear when you park the car!! Automatics don't have the same problem because the transmission has "PARK". Their may be a couple of reasons for a poor parking brake, one of them being the parking brake shoes themselves are out of adjustment for some reason. Unless you've been driving with the parking brake partially on, the shoe should last the life of the car. They may be out of adjustment because of a faulty self-adjusting pawl which is located on the handle itself. I haven't looked into the handle problem yet, but I did set-up the parking brake shoes seeing as I had the caliper off to paint, it was just a bit more work to adjust the shoes.
1. After the wheel is removed, use a C-clamp to force the caliper pistons back into their bore a bit. This makes it easier to slip the caliper off and on the rotor. You'll need two wrenches to remove the caliper guide pin bolts. One wrench to hold the guide and another to remove the bolt. Once the bolts are out, simply lift the caliper off the rotor and place the caliper up on the A-arms in such a way that it can't fall. You don't have to disconnect the hydraulic line!!!!
2. The caliper support bracket has to be removed next using a 21 mm socket, six point if possible, and a LONG bar. If you don't have a bar long enough to give you the leverage needed, use your shorter bar with a pipe over the handle. If you don't have a 21 mm socket, a slightly worn 13/16" will do the job. These two bolts are tight and have Red Loctite on them. Be careful the support doesn't fall when you take the bolts out. Lift the support off and set it in a safe spot.
3. The rotor maybe difficult to remove because of rust between the rotor hat and axle flange. Several ways to remove a stubborn rotor, first thing I'd try is a three pound hammer and give the rotor hat several good belts between the wheel studs. Watch you don't hit a stud!!! Put the wheel nuts back on the studs if your aim is poor. Very often, the shock from the hammer will break the rust and the rotor will come free from the flange. Use the hammer between different studs and keeping a slight outward pull on the rotor while using the hammer may help too. If the hammer method won't break the rotor free, a slight amount of heat, a good propane torch is enough, applied around the studs may cause the hat to break free of the rust. If the shoes have worn into the drum on the back of the rotor or because of rust build-up on the unworn drum surface, you may have to wiggle the rotor off the parking brake shoe once the rotor is loose.
By turning the adjuster, you can expand or contract the shoe.
4. Use some emery cloth, sand the lining, just enough to remove any glaze, and use some emery cloth to sand the drum friction surface and get the unworn lip on the drum cleaned up so the rotor/drum will slip over the lining easily. When I did my car, I turned the adjuster OUT 5 clicks and tried the rotor/drum over the shoes. No drag. I gave the adjuster another 5 clicks out. No drag. Finally, after 15 clicks out, the drum fit snuggly over the shoe. This snugness eased off a bit when the wheels were put back on and everything was centered up the way it should be.
5. Clean up the mounting surfaces on the caliper support bracket, place a couple of drops of Red Loctite on the bolts, install support bracket and bolts, torque them to 125 lb. ft.. That's tight!!
6. Make sure the caliper guides are nice and free, lube them with some good synthetic caliper lube, such as made by Permatex if necessary. Re-install the caliper and pads, put a drop or two of Red Loctite on the guide bolts, install the bolts and torque to 23 lb. ft..
7. Replace the wheel assembly over the studs, install the wheel nuts and using a torque wrench, tighten the wheel nuts to 100 lb. ft. using three passes (30, 60, 100) in a criss-cross sequence.
If your parking brake handle used to come away up and wouldn't hold on the slightest hill, you will be impressed with the difference. Try the brake on a hill to make sure it works well and that it's releasing completely. The question now is, why was it so far out of adjustment? Another day, I'm going to look into the adjuster pawl on the parking brake lever to make sure it's not hung up.
This stuff about the parking brake adjusting itself if you apply the parking brake while backing up is a crock!! When you were adjusting the parking brake, did you see any mechanism that would adjust the shoe automatically? I sure didn't. I think the only automatic adjustment available is in the parking brake lever. That's a job for another day though!
Corvette Stories
The Best of Corvette for Corvette Enthusiasts

Top 10 Most Expensive Corvettes Ever Sold on Bring A Trailer
Brett Foote
10 Things Every Corvette Owner Needs (2026 Edition)
Michael S. Palmer
8 Most "Only Corvette Owners Understand" Quirks and Problems
Pouria Savadkouei
10 Reasons the C6 Z06 is Still A Performance Benchmark After 20 Years
Joe Kucinski
How Much Horsepower Every Corvette Engine "LOST" in 1972
Joe Kucinski
Top 10 DOs and DON'Ts for Protecting Your Convertible Top!
Michael S. Palmer
Top 10 Most Explosive Corvettes Ever Made: Power-to-Weight Ratio Ranked!
Joe Kucinski
150 hp to 1,250 hp: Every Corvette Generation Compared by the Specs That Matter
Joe Kucinski
8 Coolest Corvette Pace Cars (and Replicas) of All Time
Verdad GallardoBurning Brakes

Joined: Jun 2004
Posts: 860
Likes: 1
From: Birmingham AL
 Did you ever get this figured out? I need to remove my parking brake lever, and have disengaged the cable, but cannot figure out how to feed it back through the hole in the handle bracket. It has a metal collar w/ splayed-out tabs that keep it from feeding back through. I've tried pressing the tabs down, but I cannot get all at once, and they're very stubborn.
Thanks for anyone's input!
Fred

Cruising
Joined: Mar 2009
Posts: 11
Likes: 1
From: Womelsdorf PA
I have a 2004 cp. 6 speed and need to bring the emergency brake up to the stop to hold the car. It does hold but, I've not tested it on a challenging grade! Yes, I do park it in gear most of the time but would like the emergency brake to work properly.
I have read many of the threads here and find myself a bit confused! LOL The recommendation seems to be to adjust the shoes with the problem I've discribed; not the cable!?!?! Right????
And the emergency brake shoes are on both rear wheels, not just one; right? There was something about setting the emergency brake 3 times in row fairly quickly to adjust things too!?!?!?
  Just trying to get this straight and right before I have pieces in my hand wishing I would have asked!
As always your help is VERY much appreicated! Thank you and Merry Christmas........Happy Holidays!!!!
I have read many of the threads here and find myself a bit confused! LOL
The recommendation seems to be to adjust the shoes with the problem I've discribed; not the cable!?!?! Right????And the emergency brake shoes are on both rear wheels, not just one; right?
There was something about setting the emergency brake 3 times in row fairly quickly to adjust things too!?!?!? Just trying to get this straight and right before I have pieces in my hand wishing I would have asked!As always your help is VERY much appreicated! Thank you and Merry Christmas........Happy Holidays!!!!

Burning Brakes
Joined: Aug 2006
Posts: 753
Likes: 2
From: Denville NJ
Read the procedure above, it's pretty good! Just be carefull when the discs/hubs are removed. Too much fiddling or tugging on the linings will result in the spring on the back popping off. Don't panic if that happens, take an old medium size screw driver and grind a notch in it. With a decent light, you can get the spring back on. Good luck!
Instructor
Joined: Jun 2003
Posts: 187
Likes: 0
From: Orange Park Fl
i had the same symptoms and it ended up being dried up grease on the brake handle mechanism. There are some good picture of the cable assembly here.
http://forums.corvetteforum.com/c5-t...ghlight=kens86
http://forums.corvetteforum.com/c5-t...ghlight=kens86
Team Owner


Joined: May 1999
Posts: 22,830
Likes: 13
From: Columbus Ohio
CI 3-4, 8-9-10 Veteran
St. Jude Donor '06-'08-'10
Team Owner
Joined: May 2001
Posts: 36,836
Likes: 244
From: Dear Karma, I have a list of people you missed.
St. Jude Donor '08-'09-'10-'11-'12-'13-'14-'15-'16
 It is also NOT an emergency brake as some seem to think, nor was it ever intended to be.
Cruising
Joined: Mar 2009
Posts: 11
Likes: 1
From: Womelsdorf PA
 I was confused (which happens too easily sometimes!!!!) :o Knowing if it was the cable or the shoe adjustment was an issue........Thanks for the post!!!!!!!
Team Owner
Joined: May 1999
Posts: 22,830
Likes: 13
From: Columbus Ohio
CI 3-4, 8-9-10 Veteran
St. Jude Donor '06-'08-'10


Advanced
Joined: Jul 2010
Posts: 67
Likes: 0
Digging up an old thread here... Did you ever get this figured out? I need to remove my parking brake lever, and have disengaged the cable, but cannot figure out how to feed it back through the hole in the handle bracket. It has a metal collar w/ splayed-out tabs that keep it from feeding back through. I've tried pressing the tabs down, but I cannot get all at once, and they're very stubborn.
Thanks for anyone's input!
Fred
Did you ever get this figured out? I need to remove my parking brake lever, and have disengaged the cable, but cannot figure out how to feed it back through the hole in the handle bracket. It has a metal collar w/ splayed-out tabs that keep it from feeding back through. I've tried pressing the tabs down, but I cannot get all at once, and they're very stubborn.Thanks for anyone's input!
Fred
How do you get the cable removed from the parking brake lever? I have it disengaged but I can't *remove* it because of the metal tabs.
I'm trying to replace my parking brake lever.
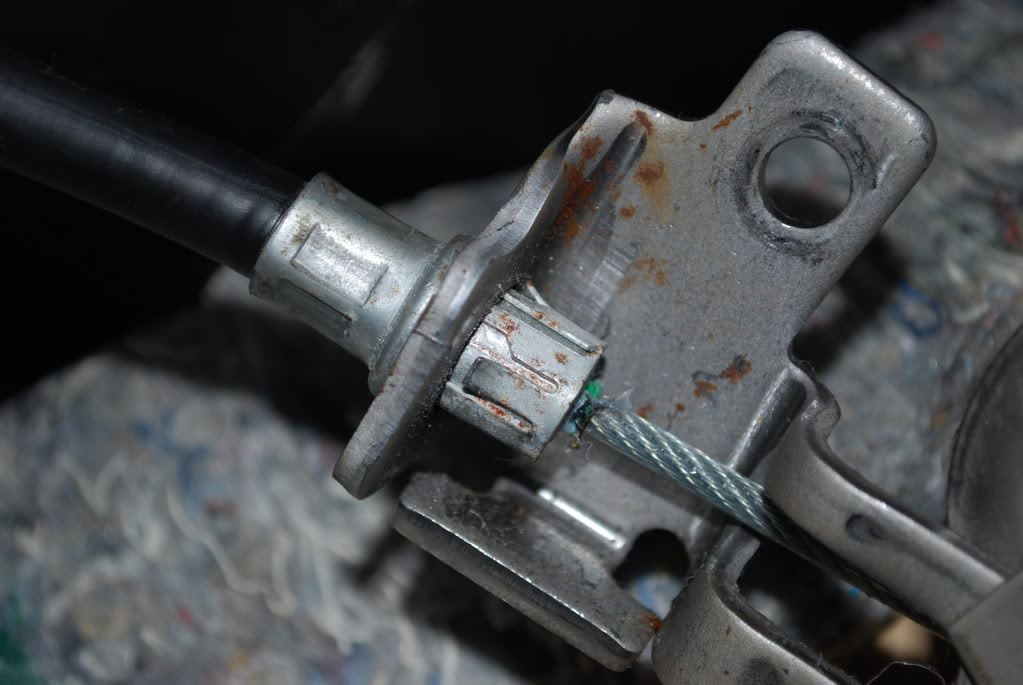
Last edited by 7.56Z06; Sep 16, 2011 at 06:45 PM. Reason: added a picture of the tabs