



Looking for Cam Swap Tips

Thread Starter
Burning Brakes


Joined: Sep 2007
Posts: 1,048
Likes: 300
From: FL
 Looking for Cam Swap Tips
Hello,
I have been researching the process of swapping a cam. Initially, this is not something I thought I would try to tackle myself but after much research I may just give it a go, unless someone really discourages me.
I have been researching for a couple of months now so that my chances of success are greatly improved. I have studied the info on LS1howto.com, reviewed hundreds of posts on cam swaps, reviewed the steps in the service manuals, and tips from a few other books. I also have HP Tuners software and a wideband installed to help with the tuning. I am looking for any additional advice that others may want to share.
Here is what I have so far. Please feel free to correct or add as necessary. Your feedback is greatly appreciated.
1. Don't use the pulley install method listed on ls1howto.com, rather purchase or make the pulley install from LS1tech.com so you do not damage the threads on the crank.
2. Use the JPR tool or similar metal rods to hold up the lifters while swapping the cam.
3. Use the Crane spring tool to replace the valve springs, two springs at a time, great feedback on this tool.
4. Do not need to remove the hood. Use the hood to support the condensor during cam swap.
5. Do not completely remove the steering rack...just move it far enough out the passenger wheel well.
6. Ideally, replace the oil pump with a high flow version, Melling or ported LS6. Be careful of the spring installed in the Melling.
7. Upgrade timing chain to the LS2 version, stronger no reported issues at 7000rpm.
8. Use the pushrod checking tool and measure before ordering pushrods.
9. Upgrade to hardened pushrods.
10. Use .002 feeler gauge to center oil pump during install.
11. Use proper 3 jaw puller for crank pulley removal.
12. Heat crank snout or use antisieze to help ease crank pulley install.
13. Lubricate the oil pump pickup tube o-ring well before reinstalling. Purchase extra o-rings just in case...
14. For an MN6, use 4th gear and the e-brake to help facilitae removal of the crank pulley bolt. A4, need a flywheel locking method.
15. Upgrade to the ARP crank pully bolt, which doesn't require the torque + degree, ARP only needs a specific torque spec.
16. Use 3/8 vacuum caps on the power steering fittings to prevent fluid loss.
17. Don't turn the steering wheel once the rack is removed, springs damage and wheel centering issues will occur.
I have been researching the process of swapping a cam. Initially, this is not something I thought I would try to tackle myself but after much research I may just give it a go, unless someone really discourages me.
I have been researching for a couple of months now so that my chances of success are greatly improved. I have studied the info on LS1howto.com, reviewed hundreds of posts on cam swaps, reviewed the steps in the service manuals, and tips from a few other books. I also have HP Tuners software and a wideband installed to help with the tuning. I am looking for any additional advice that others may want to share.
Here is what I have so far. Please feel free to correct or add as necessary. Your feedback is greatly appreciated.
1. Don't use the pulley install method listed on ls1howto.com, rather purchase or make the pulley install from LS1tech.com so you do not damage the threads on the crank.
2. Use the JPR tool or similar metal rods to hold up the lifters while swapping the cam.
3. Use the Crane spring tool to replace the valve springs, two springs at a time, great feedback on this tool.
4. Do not need to remove the hood. Use the hood to support the condensor during cam swap.
5. Do not completely remove the steering rack...just move it far enough out the passenger wheel well.
6. Ideally, replace the oil pump with a high flow version, Melling or ported LS6. Be careful of the spring installed in the Melling.
7. Upgrade timing chain to the LS2 version, stronger no reported issues at 7000rpm.
8. Use the pushrod checking tool and measure before ordering pushrods.
9. Upgrade to hardened pushrods.
10. Use .002 feeler gauge to center oil pump during install.
11. Use proper 3 jaw puller for crank pulley removal.
12. Heat crank snout or use antisieze to help ease crank pulley install.
13. Lubricate the oil pump pickup tube o-ring well before reinstalling. Purchase extra o-rings just in case...
14. For an MN6, use 4th gear and the e-brake to help facilitae removal of the crank pulley bolt. A4, need a flywheel locking method.
15. Upgrade to the ARP crank pully bolt, which doesn't require the torque + degree, ARP only needs a specific torque spec.
16. Use 3/8 vacuum caps on the power steering fittings to prevent fluid loss.
17. Don't turn the steering wheel once the rack is removed, springs damage and wheel centering issues will occur.

Team Owner


Joined: Mar 1999
Posts: 22,025
Likes: 192
From: At the beach in little Rhody
5. Do not completely remove the steering rack...just move it far enough out the passenger wheel well.
I moved it to the passenger side, then down and out the driver's side. It does give a lot more room to work with it out.
7. Upgrade timing chain to the LS2 version, stronger no reported issues at 7000rpm.
Note that using stock sprockets will not allow degreeing of the cam.
12. Heat crank snout or use antisieze to help ease crank pulley install.
I don't personally like this method but if you use it you need to heat the pulley.
17. Don't turn the steering wheel once the rack is removed, springs damage and wheel centering issues will occur.
I actually bungee it in place (I have the CLB bypass) just in case.
I moved it to the passenger side, then down and out the driver's side. It does give a lot more room to work with it out.
7. Upgrade timing chain to the LS2 version, stronger no reported issues at 7000rpm.
Note that using stock sprockets will not allow degreeing of the cam.
12. Heat crank snout or use antisieze to help ease crank pulley install.
I don't personally like this method but if you use it you need to heat the pulley.
17. Don't turn the steering wheel once the rack is removed, springs damage and wheel centering issues will occur.
I actually bungee it in place (I have the CLB bypass) just in case.
1. Check PTV of cam, especially a larger one.
2. Once the radiator is out, cover the A/C? condenser with a thick blanket or something to prevent accidental bending of fins.
3. Cover radiator with cardboard prior to removal and during re-installation to prevent bending of fins.
4. Take loads of photo's in case you forget which way a wire is run or anything else.
5. Soak pushrods in oil after cleaning them, this will pre-fill them.
6. I like Redline Assembly Lube and use it in many places including the oil pump o-ring, the valve stems, top of the pushrod, etc.
7. Blow out and clean radiator while it is out of car, you will be surprised at the junk in it clogging up air flow.
8. Lubricate the rubber bushings on the front stabilizer bar while off.
9. Make sure you have good accurate torque wrenches.
10. I found re-filling coolant with the front of the car in the air helps keeps air out of the system.
11. Once the water pump is off, I pump out the block a bit to make sure the coolant isn't drizzling down the block the whole time you are working.
12. I use an aluminum foil channel that I make to ensure the coolant from the two hoses that attach to the passenger side of the water pump don't go all over the front spring. Same under the water pump when that is removed.
13. I pull the fans separate from the radiator, if you pull them as a unit like advised on ls1howto you will find it an unwieldy part to handle.
14. Help is always here if you run into a problem, biggest issue will be rushing so allow plenty of time for the swap.

Team Owner


Joined: May 2006
Posts: 21,473
Likes: 356
From: Palmdale, Ca----- 2009 Cyber Gray 4LT A6 F55 452 RWHP 422 RWTQ- RIP 1998 C5 734 RWHP & 585 RWTQ-----
Here is a pretty good How To - It's for Heads and Cam but you can check the cam section out
Enjoy!
http://www.ls1howto.com/index.php?article=1
Thanks,Matt
Enjoy!
http://www.ls1howto.com/index.php?article=1
Thanks,Matt
Thread Starter
Burning Brakes
Joined: Sep 2007
Posts: 1,048
Likes: 300
From: FL
Things to consider:
1. Check PTV of cam, especially a larger one.
2. Once the radiator is out, cover the A/C? condenser with a thick blanket or something to prevent accidental bending of fins.
3. Cover radiator with cardboard prior to removal and during re-installation to prevent bending of fins.
4. Take loads of photo's in case you forget which way a wire is run or anything else.
5. Soak pushrods in oil after cleaning them, this will pre-fill them.
6. I like Redline Assembly Lube and use it in many places including the oil pump o-ring, the valve stems, top of the pushrod, etc.
7. Blow out and clean radiator while it is out of car, you will be surprised at the junk in it clogging up air flow.
8. Lubricate the rubber bushings on the front stabilizer bar while off.
9. Make sure you have good accurate torque wrenches.
10. I found re-filling coolant with the front of the car in the air helps keeps air out of the system.
11. Once the water pump is off, I pump out the block a bit to make sure the coolant isn't drizzling down the block the whole time you are working.
12. I use an aluminum foil channel that I make to ensure the coolant from the two hoses that attach to the passenger side of the water pump don't go all over the front spring. Same under the water pump when that is removed.
13. I pull the fans separate from the radiator, if you pull them as a unit like advised on ls1howto you will find it an unwieldy part to handle.
14. Help is always here if you run into a problem, biggest issue will be rushing so allow plenty of time for the swap.
1. Check PTV of cam, especially a larger one.
2. Once the radiator is out, cover the A/C? condenser with a thick blanket or something to prevent accidental bending of fins.
3. Cover radiator with cardboard prior to removal and during re-installation to prevent bending of fins.
4. Take loads of photo's in case you forget which way a wire is run or anything else.
5. Soak pushrods in oil after cleaning them, this will pre-fill them.
6. I like Redline Assembly Lube and use it in many places including the oil pump o-ring, the valve stems, top of the pushrod, etc.
7. Blow out and clean radiator while it is out of car, you will be surprised at the junk in it clogging up air flow.
8. Lubricate the rubber bushings on the front stabilizer bar while off.
9. Make sure you have good accurate torque wrenches.
10. I found re-filling coolant with the front of the car in the air helps keeps air out of the system.
11. Once the water pump is off, I pump out the block a bit to make sure the coolant isn't drizzling down the block the whole time you are working.
12. I use an aluminum foil channel that I make to ensure the coolant from the two hoses that attach to the passenger side of the water pump don't go all over the front spring. Same under the water pump when that is removed.
13. I pull the fans separate from the radiator, if you pull them as a unit like advised on ls1howto you will find it an unwieldy part to handle.
14. Help is always here if you run into a problem, biggest issue will be rushing so allow plenty of time for the swap.

Tech Contributor

Joined: Dec 1999
Posts: 32,910
Likes: 2,402
From: Anthony TX
CI 6,7,8,9,11 Vet
St. Jude Donor '08
Heres a few things that I learned or figured out:
Concerning your #14
14. For an MN6, use 4th gear and the e-brake to help facilitae removal of the crank pulley bolt. A4, need a flywheel locking method.
I did the entire process my self and had to figure out how to do the damper removal myself. I used a pipe wrench to hold the old damper:

You can also see in the pic that the rack is slid out of the way and pushed forward in the passengers side. I slid mine out part way on the drivers side.
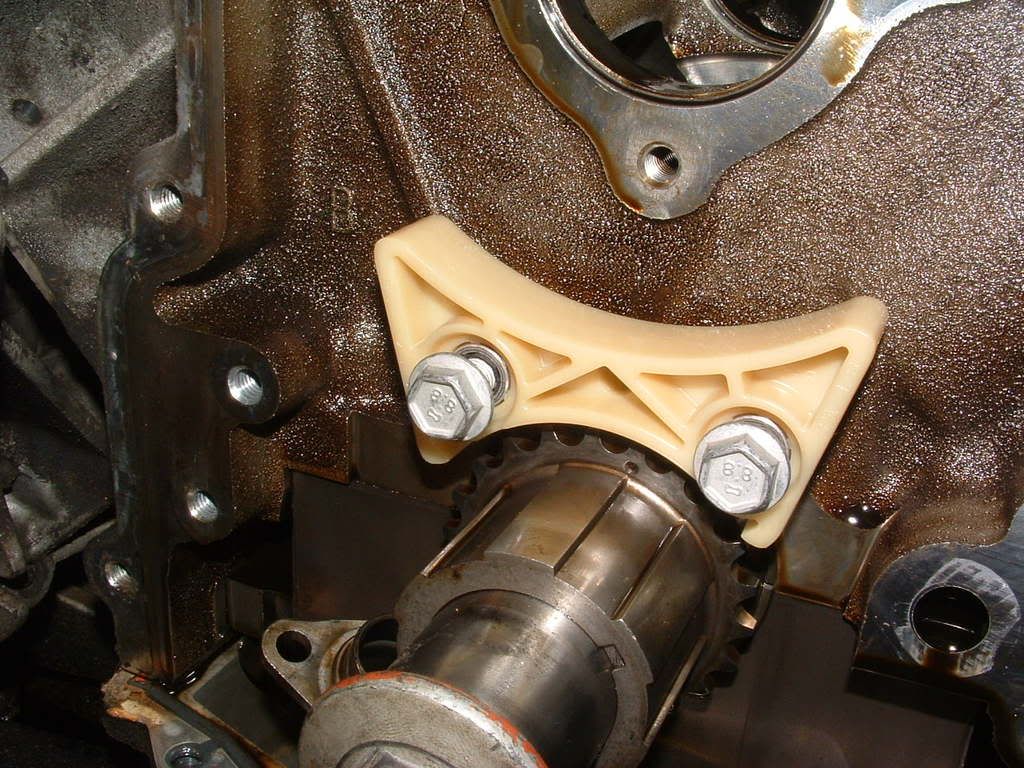
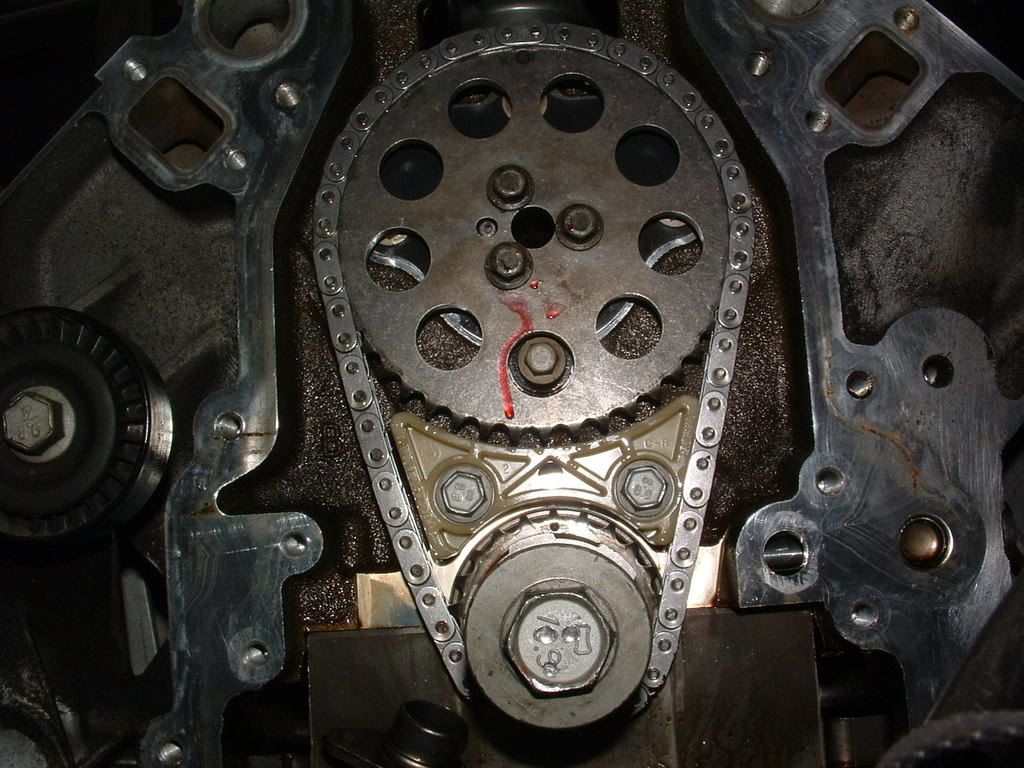
I also have an 02 ZO6 and I found that my block had provisions for a timing chain damper. If yours has one, I highly recommend installing one:
If I didn't use heat on the old damper snout, I think I would have still been trying to remove it. It was really tight. First attempt I torqued the bolt on the puller so hard that I broke the face off the damper in two places
 The damper didn't move. A little heat and it came off a lot easier.
Damper: I installed a POWERBOND under-drive pulley. It is OUTSTANDING!
I also pinned the crank. Couldn't believe how easy the process was. I used someones pinning tool. If you can rent or borrow one, it recommended.
MAKE SURE that your timing chain cover seal is installed in the CORRECT orientation. Yes it will install either way but will leak if installed in the incorrect direction.
BC
Concerning your #14
14. For an MN6, use 4th gear and the e-brake to help facilitae removal of the crank pulley bolt. A4, need a flywheel locking method.
I did the entire process my self and had to figure out how to do the damper removal myself. I used a pipe wrench to hold the old damper:
You can also see in the pic that the rack is slid out of the way and pushed forward in the passengers side. I slid mine out part way on the drivers side.
I also have an 02 ZO6 and I found that my block had provisions for a timing chain damper. If yours has one, I highly recommend installing one:
If I didn't use heat on the old damper snout, I think I would have still been trying to remove it. It was really tight. First attempt I torqued the bolt on the puller so hard that I broke the face off the damper in two places
The damper didn't move. A little heat and it came off a lot easier.Damper: I installed a POWERBOND under-drive pulley. It is OUTSTANDING!
I also pinned the crank. Couldn't believe how easy the process was. I used someones pinning tool. If you can rent or borrow one, it recommended.
MAKE SURE that your timing chain cover seal is installed in the CORRECT orientation. Yes it will install either way but will leak if installed in the incorrect direction.
BC
Burning Brakes

Joined: Aug 2004
Posts: 837
Likes: 2
From: Derry NH
If you do remove the oil pump take your time unbolting the pick-up and be extra careful not to drop any bolts in the oil pan.
My swap had a few near misses/hardships:
The power steering lines did not want to break free from the rack, that
was the hardest part of the entire process for me.
I almost stripped the threads on a cam retension plate bolt. There are not a lot a threads to work with there, so be careful.
It took me awhile to get my new oil pump lined up and the pickup installed on it. I think it was because of the angle I was tackling it.
My swap had a few near misses/hardships:
The power steering lines did not want to break free from the rack, that
was the hardest part of the entire process for me.
I almost stripped the threads on a cam retension plate bolt. There are not a lot a threads to work with there, so be careful.
It took me awhile to get my new oil pump lined up and the pickup installed on it. I think it was because of the angle I was tackling it.

Drifting

Joined: Jul 2001
Posts: 1,312
Likes: 2
From: Lake Havasu City AZ
I wouldn't use any lube on the dampner. Take a measurement from the inside edge of the dampner to the front of the crank. Mine was about .170". Clean everything good and make sure there are no raised surfaces. Install the dampner with the tool. It doesn't take a lot of torque to get the dampner back in its orginial location. Then you just torque the bolt.
Make sure to put a shop towel below the oil pump on both sides once you have the front cover off to stop anything from accidently going in. Don't try to reuse the seal..and good time to replace belts.
Good luck and don't be afraid to ask questions if you get in a bind.
Mike V
Make sure to put a shop towel below the oil pump on both sides once you have the front cover off to stop anything from accidently going in. Don't try to reuse the seal..and good time to replace belts.
Good luck and don't be afraid to ask questions if you get in a bind.
Mike V
Last edited by MikeV; Jul 15, 2008 at 10:10 AM.
Tech Contributor
Joined: Dec 1999
Posts: 32,910
Likes: 2,402
From: Anthony TX
CI 6,7,8,9,11 Vet
St. Jude Donor '08
I almost forgot to mention this. To re-install my NEW powerbond damper,,,I used a LARGE strap wrench to hold the damper while I retorqued my ARP Damper bolt. The strap wrench will also work for removing the damper bolt. Its a LARGE strap wrench!
As for removing the FLARE NUTS from the power steering rack, I purchased a set of flare nut wrenches from sears. They worked OUTSTANDING. It made all the difference in the world getting those flare nuts loose without rounding them off.
As for removing the FLARE NUTS from the power steering rack, I purchased a set of flare nut wrenches from sears. They worked OUTSTANDING. It made all the difference in the world getting those flare nuts loose without rounding them off.
Corvette Stories
The Best of Corvette for Corvette Enthusiasts

10 Reasons the C6 Z06 is Still A Performance Benchmark After 20 Years
Joe Kucinski
How Much Horsepower Every Corvette Engine "LOST" in 1972
Joe Kucinski
Top 10 DOs and DON'Ts for Protecting Your Convertible Top!
Michael S. Palmer
Top 10 Most Explosive Corvettes Ever Made: Power-to-Weight Ratio Ranked!
Joe Kucinski
150 hp to 1,250 hp: Every Corvette Generation Compared by the Specs That Matter
Joe Kucinski
8 Coolest Corvette Pace Cars (and Replicas) of All Time
Verdad Gallardo
Top 10 Corvette Engines RANKED by Peak Torque (70+ Years of Muscle!)
Joe Kucinski
Corvette ZR1X Will Be Pacing the Indy 500, And Could Probably Race, Too!
Verdad Gallardo
Top 10 Corvettes Coming to Mecum Indy 2026!
Brett Foote
Melting Slicks

Joined: Aug 1999
Posts: 3,452
Likes: 3
From: Spring, TX

You must use a flare nut wrench on the powersteering connections. I had a hell of time getting them loose both times I have done this.
Do nut use lube or heat the crank snout to get the new damper on. If you heat anything you heat the new damper in an oven before you put it on. You may need to gently heat the old damper to get it off. Use a heat gun not a torch.
You can use wooden dowels instead of the steal rods or JRP tool to hold up the lifters. I used the JRP tool. It went down the drivers side easy but I had a hell of time on the passenger side. I eventually did the spin the cam and pray method which I don't recommend.
Buy an extra bag of valve keys or locks as they go flying off into neverland during the spring swap you will want extras.
I recommend using the nylon rope in the cylinder while the piston is at TDC method for the spring swap. It is a pain to get the compression tool in the plug hole on some cylinders and if for any reason you loose air pressure there goes the valve. Plus if your valve keys are tight you can compress the spring with the valve stuck and loose airpressure at the same time the valve decides to be unstuck and again drop the valve. I learned that one the hard way the first time I did this but was lucky as the piston on that one was high enough to catch the valve and I was able to pull it back up. Major ***-pucker moment though.
Melting Slicks
Joined: Aug 1999
Posts: 3,452
Likes: 3
From: Spring, TX
Oh by the way Eddlebrock now sells a two piece front engine cover for the LS1 and LS2 blocks. You can then swap cams without pulling off all this crap. If you plan on switching cams on occassion then I would highly recommend buying this cover.
Thread Starter
Burning Brakes
Joined: Sep 2007
Posts: 1,048
Likes: 300
From: FL
Heres a few things that I learned or figured out:
Concerning your #14
14. For an MN6, use 4th gear and the e-brake to help facilitae removal of the crank pulley bolt. A4, need a flywheel locking method.
I did the entire process my self and had to figure out how to do the damper removal myself. I used a pipe wrench to hold the old damper:
You can also see in the pic that the rack is slid out of the way and pushed forward in the passengers side. I slid mine out part way on the drivers side.
I also have an 02 ZO6 and I found that my block had provisions for a timing chain damper. If yours has one, I highly recommend installing one:
If I didn't use heat on the old damper snout, I think I would have still been trying to remove it. It was really tight. First attempt I torqued the bolt on the puller so hard that I broke the face off the damper in two places The damper didn't move. A little heat and it came off a lot easier.
Damper: I installed a POWERBOND under-drive pulley. It is OUTSTANDING!
I also pinned the crank. Couldn't believe how easy the process was. I used someones pinning tool. If you can rent or borrow one, it recommended.
MAKE SURE that your timing chain cover seal is installed in the CORRECT orientation. Yes it will install either way but will leak if installed in the incorrect direction.
BC
Concerning your #14
14. For an MN6, use 4th gear and the e-brake to help facilitae removal of the crank pulley bolt. A4, need a flywheel locking method.
I did the entire process my self and had to figure out how to do the damper removal myself. I used a pipe wrench to hold the old damper:
You can also see in the pic that the rack is slid out of the way and pushed forward in the passengers side. I slid mine out part way on the drivers side.
I also have an 02 ZO6 and I found that my block had provisions for a timing chain damper. If yours has one, I highly recommend installing one:
If I didn't use heat on the old damper snout, I think I would have still been trying to remove it. It was really tight. First attempt I torqued the bolt on the puller so hard that I broke the face off the damper in two places
The damper didn't move. A little heat and it came off a lot easier.Damper: I installed a POWERBOND under-drive pulley. It is OUTSTANDING!
I also pinned the crank. Couldn't believe how easy the process was. I used someones pinning tool. If you can rent or borrow one, it recommended.
MAKE SURE that your timing chain cover seal is installed in the CORRECT orientation. Yes it will install either way but will leak if installed in the incorrect direction.
BC
Team Owner
Joined: Mar 1999
Posts: 22,025
Likes: 192
From: At the beach in little Rhody

Burning Brakes
Joined: Aug 2007
Posts: 756
Likes: 1
From: Oakton Virginia
Great tips here. I did heads/cam on my '02 Z28 a couple of years ago and I plan on doing the same on my '02 C5 this winter. Has anyone here also done a cam swap on a 4th gen fbody? Just curious how you would compare the 2 jobs. The head swap was a little challenging on the Z28 because the motor sits half under the cowl but it sounds like the cam swap might be a little more difficult on the vette because of the steering rack and the hood. Any thoughts?
Thread Starter
Burning Brakes
Joined: Sep 2007
Posts: 1,048
Likes: 300
From: FL
Great tips here. I did heads/cam on my '02 Z28 a couple of years ago and I plan on doing the same on my '02 C5 this winter. Has anyone here also done a cam swap on a 4th gen fbody? Just curious how you would compare the 2 jobs. The head swap was a little challenging on the Z28 because the motor sits half under the cowl but it sounds like the cam swap might be a little more difficult on the vette because of the steering rack and the hood. Any thoughts?
Thread Starter
Burning Brakes
Joined: Sep 2007
Posts: 1,048
Likes: 300
From: FL
Thread Starter
Burning Brakes
Joined: Sep 2007
Posts: 1,048
Likes: 300
From: FL
You must use a flare nut wrench on the powersteering connections. I had a hell of time getting them loose both times I have done this.
Do nut use lube or heat the crank snout to get the new damper on. If you heat anything you heat the new damper in an oven before you put it on. You may need to gently heat the old damper to get it off. Use a heat gun not a torch.
You can use wooden dowels instead of the steal rods or JRP tool to hold up the lifters. I used the JRP tool. It went down the drivers side easy but I had a hell of time on the passenger side. I eventually did the spin the cam and pray method which I don't recommend.
Buy an extra bag of valve keys or locks as they go flying off into neverland during the spring swap you will want extras.
I recommend using the nylon rope in the cylinder while the piston is at TDC method for the spring swap. It is a pain to get the compression tool in the plug hole on some cylinders and if for any reason you loose air pressure there goes the valve. Plus if your valve keys are tight you can compress the spring with the valve stuck and loose airpressure at the same time the valve decides to be unstuck and again drop the valve. I learned that one the hard way the first time I did this but was lucky as the piston on that one was high enough to catch the valve and I was able to pull it back up. Major ***-pucker moment though.
Thanks.
Thread Starter
Burning Brakes
Joined: Sep 2007
Posts: 1,048
Likes: 300
From: FL
Another thing...what is the trick to getting the O-ring seated correctly the first time? I see so many posts regarding low oil pressure and it be traced back to a pinched or damaged o-ring.