




Who's heated?

Tech Contributor


Joined: Jan 2007
Posts: 19,401
Likes: 1,143
From: Dyer, IN

http://www.pfyc.com/supportfiles/rostrainstall.pdf
I found this doing a google search for: "C5 corvette heated seats"
Don't be afraid to use the internet.......


Thread Starter
Drifting


Joined: Sep 2001
Posts: 1,651
Likes: 0
From: Ocean County NJ
Thanks for the post, however I saw this product and want the pros/cons from those that have it or another. Such as if heater element wire or outline of element is visible through seat cover, etc.
Tech Contributor

Joined: Dec 2003
Posts: 19,384
Likes: 87
From: Horncastle Lincolnshire, England
2023 C5 of the Year Finalist - Unmodified
Once they're fitted other than the heat you wouldn't know. No lines and no effect on the seat color or the leather quality.
Check out my How To Post #16
http://forums.corvetteforum.com/c5-t...with-pics.html
I bought my kit from Sports Imports. They have a good range and I went for the Universal Model (Product Code SIL-01) which at the time cost $160. It was particularly good because the element design allows you to trim the pads to fit the seat.
http://www.seatheater-heatedseats.co...OVMTC=standard
The kit came with very clear installation instructions. Each seat kit included a 9” x 18” backpad, a 9” x 18” seat pad, 1 electronic temperature control module, 1 dual temp high/low bi-color illuminated round switch and cable ties and insulating tape.
First disconnect the battery. Make sure you can reactivate your radio if you have the security code set. There are instructions in the Forum sticky by Leaftye.
A good wiring diagram comes with the kit.
I used the Vette Essentials website for instructions on removing the seats and the seat covers.
http://www.vetteessentials.com/instr...er_change.html
I also used the VE instructions to remove the console:
http://www.vetteessentials.com/instr...t_install.html
Seats: Run down to individual steps to 17c but stop before removing the bottom covers. I then worked the Velcro fastening inside the pads loose. Take care because the hooks re very sharp. Work out the size of pads you need and trim the pads to size. Slide the lower pad into the gap between the cover and the pad and route the wires out of the back of the seat. My kit was adhesive backed to hold the elements in place. There are connectors on the wiring harness which allow you to make the connections later. Fix the back pad into place and replace the seat cover.
Console: Dismantle the console following the instructions to step 3 to allow you to run the wires forward underneath the console to the switch mounting position. You may feel you can route the wires without stripping the console completely. Run the harness to the ashtray area from the rear of the console making sure you leave enough wire to connect to the seat looms. Run the hot wire under the edge of the console area and down into the passenger footwell to emerge next to the lower fuse panel. This is a bit fiddly. I used a wire coat hanger to thread the wire down. An alternative would be to route it directly under the carpet from the rear of the seats to the passenger footwell.
Dismantle the ashtray unit. Take off the outer door and retain. Remove the inner door of the ashtray and discard
Cut a slot in the rear side of the ashtray mount to allow the wires and connectors to route out from the switches.
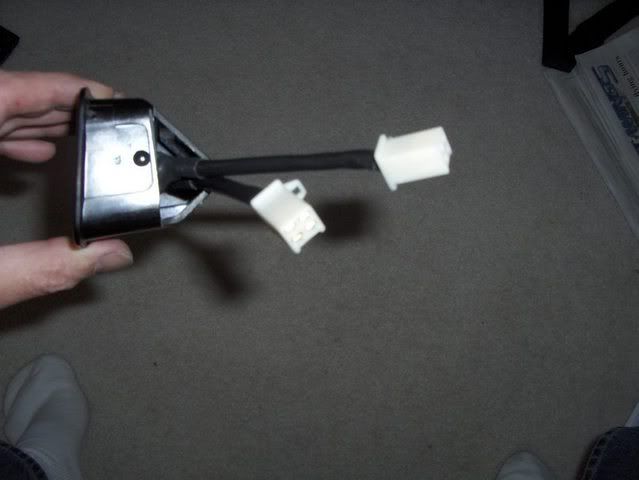
I used a small black plastic faceplate to mount the switches. Drill 2 holes 5/8” for the switches to sit snug on the plate. Pull the main wiring connector through the hole and attach to the switch. Fit the switch snug in the hole until it clicks in place. Fit the faceplate into the ashtray and screw in from the sides to hold it in place.
Reassemble the console taking care not to pinch any wires. Pull the wires through the ashtray hole. Connect to the switches.
Slot the ashtray back into place.
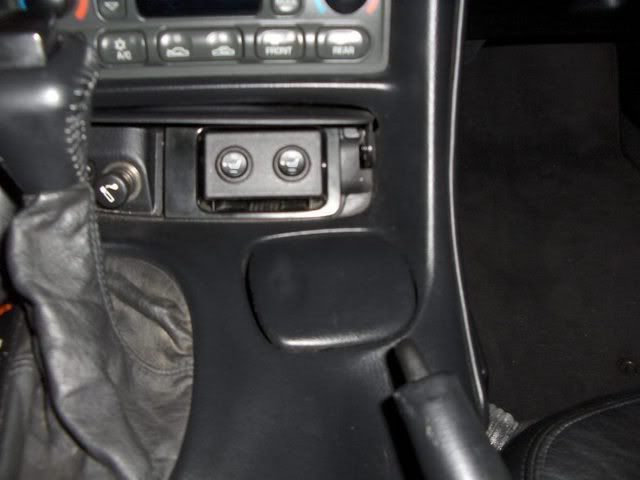
Reinstall the seats leaving access to the wires. Connect the wires from the back of the seats to the main harness connectors and secure the wires if necessary.
Connect the hot wire to a switched power supply. You can buy spade type connectors from the Company which splice onto the hot lead and will slot directly into the fuse slot in the fuse panel. The attached pic shows each wire individually attached to ~20 and #22.
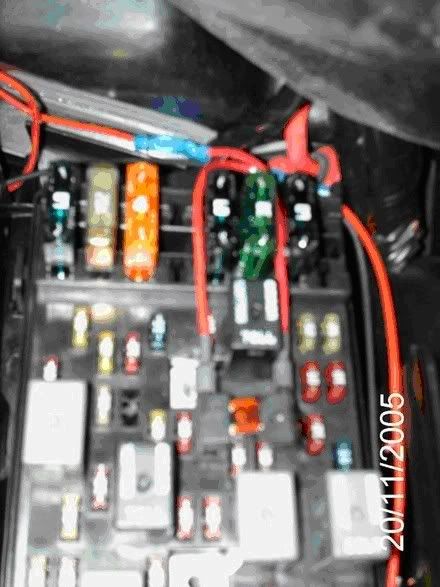
Hook the ground wire to a suitable ground. I ran through the bulkhead to the ground behind the passenger headlight.
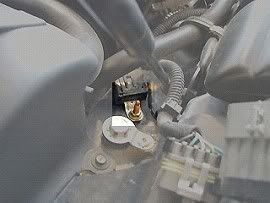
There are other grounds nearby. There's one located under the bulge of rug found beneath the dash panel on the passenger side. It’s that little overhang of carpeting located just off to the left-bottom corner of the glovebox
Reconnect the battery and test the seats.
Best Mod I ever did.
Another member posted an alternative switch mount on the AH panel. This is no use if like me you have the ride control switch

Check out my How To Post #16
http://forums.corvetteforum.com/c5-t...with-pics.html
I bought my kit from Sports Imports. They have a good range and I went for the Universal Model (Product Code SIL-01) which at the time cost $160. It was particularly good because the element design allows you to trim the pads to fit the seat.
http://www.seatheater-heatedseats.co...OVMTC=standard
The kit came with very clear installation instructions. Each seat kit included a 9” x 18” backpad, a 9” x 18” seat pad, 1 electronic temperature control module, 1 dual temp high/low bi-color illuminated round switch and cable ties and insulating tape.
First disconnect the battery. Make sure you can reactivate your radio if you have the security code set. There are instructions in the Forum sticky by Leaftye.
A good wiring diagram comes with the kit.
I used the Vette Essentials website for instructions on removing the seats and the seat covers.
http://www.vetteessentials.com/instr...er_change.html
I also used the VE instructions to remove the console:
http://www.vetteessentials.com/instr...t_install.html
Seats: Run down to individual steps to 17c but stop before removing the bottom covers. I then worked the Velcro fastening inside the pads loose. Take care because the hooks re very sharp. Work out the size of pads you need and trim the pads to size. Slide the lower pad into the gap between the cover and the pad and route the wires out of the back of the seat. My kit was adhesive backed to hold the elements in place. There are connectors on the wiring harness which allow you to make the connections later. Fix the back pad into place and replace the seat cover.
Console: Dismantle the console following the instructions to step 3 to allow you to run the wires forward underneath the console to the switch mounting position. You may feel you can route the wires without stripping the console completely. Run the harness to the ashtray area from the rear of the console making sure you leave enough wire to connect to the seat looms. Run the hot wire under the edge of the console area and down into the passenger footwell to emerge next to the lower fuse panel. This is a bit fiddly. I used a wire coat hanger to thread the wire down. An alternative would be to route it directly under the carpet from the rear of the seats to the passenger footwell.
Dismantle the ashtray unit. Take off the outer door and retain. Remove the inner door of the ashtray and discard
Cut a slot in the rear side of the ashtray mount to allow the wires and connectors to route out from the switches.
I used a small black plastic faceplate to mount the switches. Drill 2 holes 5/8” for the switches to sit snug on the plate. Pull the main wiring connector through the hole and attach to the switch. Fit the switch snug in the hole until it clicks in place. Fit the faceplate into the ashtray and screw in from the sides to hold it in place.
Reassemble the console taking care not to pinch any wires. Pull the wires through the ashtray hole. Connect to the switches.
Slot the ashtray back into place.
Reinstall the seats leaving access to the wires. Connect the wires from the back of the seats to the main harness connectors and secure the wires if necessary.
Connect the hot wire to a switched power supply. You can buy spade type connectors from the Company which splice onto the hot lead and will slot directly into the fuse slot in the fuse panel. The attached pic shows each wire individually attached to ~20 and #22.
Hook the ground wire to a suitable ground. I ran through the bulkhead to the ground behind the passenger headlight.
There are other grounds nearby. There's one located under the bulge of rug found beneath the dash panel on the passenger side. It’s that little overhang of carpeting located just off to the left-bottom corner of the glovebox
Reconnect the battery and test the seats.
Best Mod I ever did.
Another member posted an alternative switch mount on the AH panel. This is no use if like me you have the ride control switch
Last edited by DeeGee; Dec 2, 2008 at 04:16 PM.
Team Owner


Joined: May 2003
Posts: 23,480
Likes: 9
From: East Meadow NY
St. Jude Donor '12

Racer

Joined: Aug 2005
Posts: 277
Likes: 6
From: Raleigh NC
I installed the PFYC kit 3 years ago in my 2001 convertible - details & pix are here: http://forums.corvetteforum.com/c5-g...post1553007196

Tech Contributor


Joined: Dec 1999
Posts: 32,910
Likes: 2,402
From: Anthony TX
CI 6,7,8,9,11 Vet
St. Jude Donor '08
I have PFYC heated seats installed in my 98 Coupe (now sold) 02 ZO6 and 98 Wrangler 4.0
The install is very straight forward and pretty easy.
Couple of notes:
The heating area for the lap of the seat (due to the design of the seat) is fairly small. The stiched area in the middle of the seat attaches to the seat bun with metal rods and precludes the seat heating element from being placed "FORWARD" under the leg area of the seat. Not a big deal but just something to think about. You will only be able to heat that small square "RIBBED" area.
Also make sure that you position the back rest heating element to the area of your BACK that you want heated. If you place it too low, you will just have to reposition it again later to get it where it should have been positioned in the first place.
I had to be creative and placed the ON/OFF button for the passengers seat in the glove box. Works well there for me. The ZO6 passengers seat doesnt have lots of room to install the ON/OFF switch.
My wife LOVED the heated seat addition!!
Hope this helps.
The install is very straight forward and pretty easy.
Couple of notes:
The heating area for the lap of the seat (due to the design of the seat) is fairly small. The stiched area in the middle of the seat attaches to the seat bun with metal rods and precludes the seat heating element from being placed "FORWARD" under the leg area of the seat. Not a big deal but just something to think about. You will only be able to heat that small square "RIBBED" area.
Also make sure that you position the back rest heating element to the area of your BACK that you want heated. If you place it too low, you will just have to reposition it again later to get it where it should have been positioned in the first place.
I had to be creative and placed the ON/OFF button for the passengers seat in the glove box. Works well there for me. The ZO6 passengers seat doesnt have lots of room to install the ON/OFF switch.
My wife LOVED the heated seat addition!!
Hope this helps.
Corvette Stories
The Best of Corvette for Corvette Enthusiasts

Top 10 Most Explosive Corvettes Ever Made: Power-to-Weight Ratio Ranked!
Joe Kucinski
150 hp to 1,250 hp: Every Corvette Generation Compared by the Specs That Matter
Joe Kucinski
8 Coolest Corvette Pace Cars (and Replicas) of All Time
Verdad Gallardo
Top 10 Corvette Engines RANKED by Peak Torque (70+ Years of Muscle!)
Joe Kucinski
Corvette ZR1X Will Be Pacing the Indy 500, And Could Probably Race, Too!
Verdad Gallardo
Top 10 Corvettes Coming to Mecum Indy 2026!
Brett Foote
Top 10 C9 Corvette MUST-HAVES to Fix These C8 Generation Flaws!
Michael S. Palmer
10 Revolutionary 'Corvette Firsts' Most People Don't Know
Joe Kucinski
