


Help I'm stuck, crank pulley!!!!
Thread Starter
Racer


Joined: May 2006
Posts: 384
Likes: 0
From: Anaheim CA
I'm installing my ASP pulley but I don't know how far to go with the installation tool so that is seats correctly at the correct spot on the crank. Should the crank snout and pulley be flush with each other? As it sits now the pulley is sticking out between 1/8" to 1/4" pictured below. So should I just use the old stock bolt and torque it to 240 ft lbs. or can I keep going with the installation tool and when do I stop? I know if I use the old bolt method I run the risk of it breaking inside the crank and I don't want that to happen. So what do you guys suggest?


TIA
Manny
TIA
Manny
Tech Contributor


Joined: Jan 2007
Posts: 19,448
Likes: 1,155
From: Dyer, IN
Thread Starter
Racer
Joined: May 2006
Posts: 384
Likes: 0
From: Anaheim CA
Thanks,
Manny
Tech Contributor
Joined: Jan 2007
Posts: 19,448
Likes: 1,155
From: Dyer, IN
That's exactly how I did it when I did my vortech install.
Team Owner


Joined: Mar 1999
Posts: 22,025
Likes: 192
From: At the beach in little Rhody
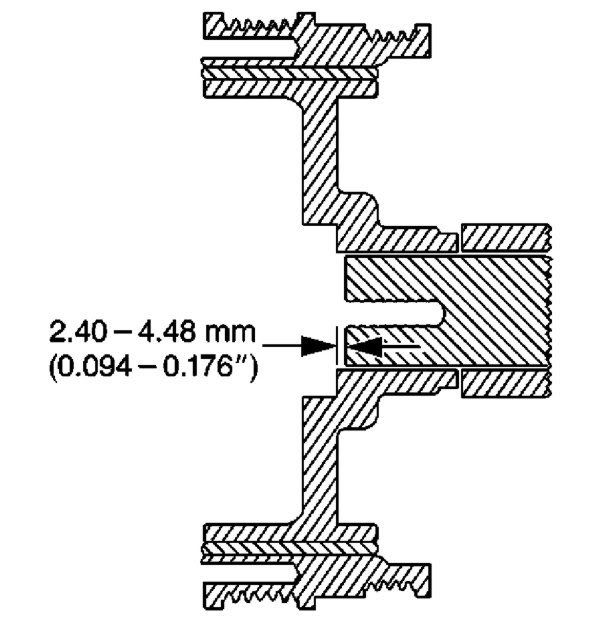
The numbers shown in the manual (link above) are based on the stock hub. When I installed my ATI, I used the difference in hub length to establish new values for the distance that the crank sits down in the hub. Bottom line is that you may not be able to achieve the numbers in the diagram. Maybe if you post or contact the vendor that sold you the ASP, they can measure hub length so you can figure out if it is bottomed out. It should be but that will verify. Once bottomed, the rest of your method is correct.

Burning Brakes


Joined: Aug 2003
Posts: 878
Likes: 1
From: Anaheim CA
The numbers shown in the manual (link above) are based on the stock hub. When I installed my ATI, I used the difference in hub length to establish new values for the distance that the crank sits down in the hub. Bottom line is that you may not be able to achieve the numbers in the diagram. Maybe if you post or contact the vendor that sold you the ASP, they can measure hub length so you can figure out if it is bottomed out. It should be but that will verify. Once bottomed, the rest of your method is correct.
Mike G.
Team Owner
Joined: Mar 1999
Posts: 22,025
Likes: 192
From: At the beach in little Rhody
Personally, here is what I would do:
1. Get hub length of ASP (from vendor or someone who has one and can measure, i.e., don't remove to measure) and stock to figure out difference and what the measured value should be.
2. Measure to ensure you have it correctly bottomed.
3. Install old bolt, torque accordingly to 240
4. Pin the crank (I assume you are end on pinning, not the ATI kit)
5. Install new bolt and follow tightening sequence of 37 lb-ft and prescribed rotation
I would do #1 because I don't know where the hub is without seeing it, and if it hung up for some reason and you install the old bolt and torque, without adequate thread engagement you could damage the crank threads.
Corvette Stories
The Best of Corvette for Corvette Enthusiasts

Top 10 Most Expensive Corvettes Ever Sold on Bring A Trailer
Brett Foote
10 Things Every Corvette Owner Needs (2026 Edition)
Michael S. Palmer
8 Most "Only Corvette Owners Understand" Quirks and Problems
Pouria Savadkouei
10 Reasons the C6 Z06 is Still A Performance Benchmark After 20 Years
Joe Kucinski
How Much Horsepower Every Corvette Engine "LOST" in 1972
Joe Kucinski
Top 10 DOs and DON'Ts for Protecting Your Convertible Top!
Michael S. Palmer
Top 10 Most Explosive Corvettes Ever Made: Power-to-Weight Ratio Ranked!
Joe Kucinski
150 hp to 1,250 hp: Every Corvette Generation Compared by the Specs That Matter
Joe Kucinski
8 Coolest Corvette Pace Cars (and Replicas) of All Time
Verdad Gallardo
Advanced
Joined: Mar 2008
Posts: 84
Likes: 0
From: Laplace Louisiana
When I did mine I didn't want to risk the old bolt so I went to this place that sold all kinds of strong bolts, it was this bolt warehouse anyway I bought a couple of different length bolt to make sure it wasn't to long or short and worked it on.

Team Owner


Joined: Sep 2001
Posts: 23,283
Likes: 906
From: Lake Elsinore, CA
Pulley position has to be correct to acheive proper belt alignment. I used the manual method on a few of these and the belts always aligned correctly. Use the manual method, including the hub to crank measurement and it will align properly.
Le Mans Master

Joined: Sep 2003
Posts: 6,276
Likes: 227
From: Farmington CT
Cruise-In VII Veteran
Drifting

Joined: Sep 2006
Posts: 1,757
Likes: 13
From: Stillman Valley Illinois
I don't care what the book says. The factory bolt is TTY (Torque To Yield) read as ONE TIME USE ONLY. If you use the old bolt, you run the risk of snapping it off in the crank. GM makes a balencer installation tool that you can easily replicate for under $30. Snap that bolt off in the crank, and you are in a WORLD of Hurt
 I made my installation tool for $27 from the McMaster Carr catalog.
Tech Contributor
Joined: Jan 2007
Posts: 19,448
Likes: 1,155
From: Dyer, IN
I don't care what the book says. The factory bolt is TTY (Torque To Yield) read as ONE TIME USE ONLY. If you use the old bolt, you run the risk of snapping it off in the crank. GM makes a balencer installation tool that you can easily replicate for under $30. Snap that bolt off in the crank, and you are in a WORLD of Hurt I made my installation tool for $27 from the McMaster Carr catalog.
I made my installation tool for $27 from the McMaster Carr catalog.
Thread Starter
Racer
Joined: May 2006
Posts: 384
Likes: 0
From: Anaheim CA
So many ways to do it!!!!! Can't I just use my installation tool to push the pulley on all the way as far as I can and then torque the new bolt down to 37ft lbs plus 140 degrees? Correct me if I'm wrong but the 240 ft lbs thing for the old bolt is to seat the pulley properly, 37 ft lbs is to preload the new bolt, and then the additional 140 degrees is to stretch the bolt into place correct? Anyone have a picture of your asp pulley fully seated?
Manny
Can't I just use my installation tool to push the pulley on all the way as far as I can and then torque the new bolt down to 37ft lbs plus 140 degrees? Correct me if I'm wrong but the 240 ft lbs thing for the old bolt is to seat the pulley properly, 37 ft lbs is to preload the new bolt, and then the additional 140 degrees is to stretch the bolt into place correct? Anyone have a picture of your asp pulley fully seated?Manny
Tech Contributor
Joined: Jan 2007
Posts: 19,448
Likes: 1,155
From: Dyer, IN
 with the comment above. Follow the manual procedure and you can't go wrong. You could always pin it to the crank as well.
Pro

Joined: Apr 2005
Posts: 749
Likes: 2
From: West Yarmouth MA.

Melting Slicks

Joined: Jun 2005
Posts: 2,396
Likes: 52
From: Sicamous BC
I'm having an alignment problem with my ASP underdrive & the A/C. I suspect I did not seat the pulley properly & did not do the measurement vettenuts pointed before installation.
If you can from the under side lay a straight edge against the under-drive pulley ribs to the A/C pulley, if you can see a misalignment....well.
I will have to disassemble the front of my car to find the problem, the steering rack blah blah not very happy.
If you can from the under side lay a straight edge against the under-drive pulley ribs to the A/C pulley, if you can see a misalignment....well.
I will have to disassemble the front of my car to find the problem, the steering rack blah blah not very happy.