


Help I'm stuck, crank pulley!!!!

Burning Brakes


Joined: Oct 2004
Posts: 931
Likes: 35
From: Rowlett, Texas
I carefully measured my ASP before installing; and it bottomed out 0.015from the end of the crank; similar to your photo, and within spec.
It's crank interface length was exactly the same as the stocker.
So, you probably have it down properly.
It took a lot of torque to bottom it out, probably every bit of the 240 that is recommended, but when it hit bottom it was pretty obvious.
So, be sure you have plenty of threads engaged in the crank (10) and then lean on it one more time. Then measure the depth, and install the new bolt per the procedure.
I believe that most of the issues with installing dampers are due to trying to pull the damper on with the stock bolt, and stripping the crank threads before enough threads are engaged; not pulling the damper all the way on before installing the final bolt, or re-using the old bolt.
DG
DG

Burning Brakes

Joined: Aug 2003
Posts: 878
Likes: 1
From: Anaheim CA
Hey guys,
I know he hasn't responded yet, but he got the pulley on and pinned it without any problems.
He used the installation tool to get it on, then used the old bolt and torqued it to 240ft lbs, then installed the new GM bolt torquing it to 37ft lbs + 140 degrees.
Mike G.
I know he hasn't responded yet, but he got the pulley on and pinned it without any problems.
He used the installation tool to get it on, then used the old bolt and torqued it to 240ft lbs, then installed the new GM bolt torquing it to 37ft lbs + 140 degrees.
Mike G.
Tech Contributor


Joined: May 2008
Posts: 2,843
Likes: 16
From: Howell Michigan
St. Jude Donor '09-'10-'11
Race Director


Joined: May 2005
Posts: 15,960
Likes: 21
From: West Norriton PA
St. Jude Donor '08

Tech Contributor


Joined: Dec 1999
Posts: 32,910
Likes: 2,402
From: Anthony TX
CI 6,7,8,9,11 Vet
St. Jude Donor '08
I will tell you that if you heat the damper hub up to about 140-150 degrees with an electric heat gun or a propane torch, it installs and removes SOOOOOOOOOO much easier!
I made my own install tool for ZERO dollars! Used the old bolt, hacked off the head and welded it to some SAE all thread!
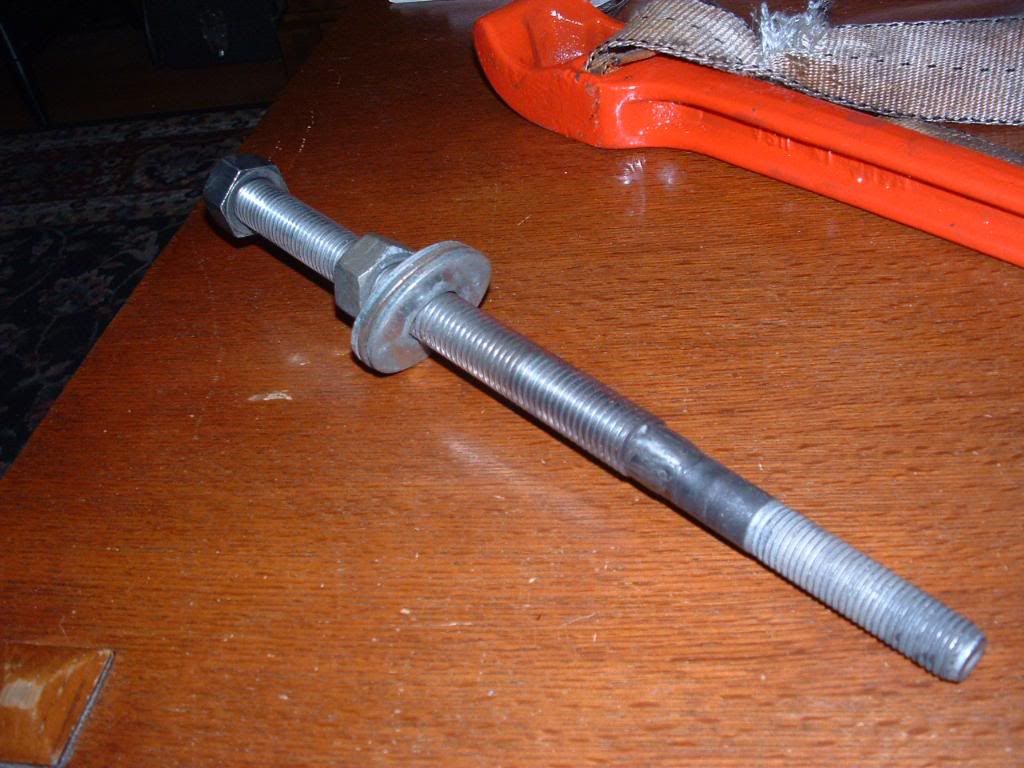

The strap wrench makes the removal/ install process a ONE MAN job!
If you heat the hub, you will NEVER, come close to the limits of the used bolt during installation!
Bill
I made my own install tool for ZERO dollars! Used the old bolt, hacked off the head and welded it to some SAE all thread!
The strap wrench makes the removal/ install process a ONE MAN job!
If you heat the hub, you will NEVER, come close to the limits of the used bolt during installation!
Bill
Corvette Stories
The Best of Corvette for Corvette Enthusiasts

Every 2027 Corvette Engine Explained
Joe Kucinski
Designer Imagines A Corvette That Looks More Like a Corvette Than the Corvette
Verdad Gallardo
10 Ugly Corvettes That We Still Kinda Love
Joe Kucinski
Top 10 Most Expensive Corvettes Ever Sold on Bring A Trailer
Brett Foote
10 Things Every Corvette Owner Needs (2026 Edition)
Michael S. Palmer
8 Most "Only Corvette Owners Understand" Quirks and Problems
Pouria Savadkouei
10 Reasons the C6 Z06 is Still A Performance Benchmark After 20 Years
Joe Kucinski
How Much Horsepower Every Corvette Engine "LOST" in 1972
Joe Kucinski
Top 10 DOs and DON'Ts for Protecting Your Convertible Top!
Michael S. PalmerMelting Slicks

Joined: May 2006
Posts: 2,303
Likes: 40
From: Edmonton Alberta
Race Director
Joined: May 2005
Posts: 15,960
Likes: 21
From: West Norriton PA
St. Jude Donor '08
You have any pictures of the crank snout ? Sounds to me like your crank snout might be tore up.
Melting Slicks
Joined: May 2006
Posts: 2,303
Likes: 40
From: Edmonton Alberta
I have an ASP pulley on and I'm going back to the stocker - haven't made the switch yet. I'm waiting for the GM balancer to be sent up from U.S.
I'm not making huge power like some of the guys here on CF, so the stocker should be fine, (400 rwhp only).
I'm not making huge power like some of the guys here on CF, so the stocker should be fine, (400 rwhp only).
Melting Slicks
Joined: May 2006
Posts: 2,303
Likes: 40
From: Edmonton Alberta
UPDATE: Crank snout was in excellent shape, no issues with it. I wasn't able to get a GM harmonic balancer anywhere, (tried GM Parts House, GM Parts Direct, Trade Motion and GM Canada). Delivery date was unknown and the backorder wasn't an option. I purchased a Powerbond with a stock configuration and will see how this performs now.
Race Director
Joined: May 2005
Posts: 15,960
Likes: 21
From: West Norriton PA
St. Jude Donor '08
UPDATE: Crank snout was in excellent shape, no issues with it. I wasn't able to get a GM harmonic balancer anywhere, (tried GM Parts House, GM Parts Direct, Trade Motion and GM Canada). Delivery date was unknown and the backorder wasn't an option. I purchased a Powerbond with a stock configuration and will see how this performs now.
 Pin the crank while your there!!!!

AMP Racing


Joined: Aug 2006
Posts: 10,757
Likes: 589
From: Washington TWP NJ
2023 C5 of the Year Finalist - Modified
2017 C5 of Year Finalist
St. Jude Donor '09-'10-'11-'12
Bill,
That strap wrench will hold the pulley from turning even at 200+ lbft of torque?
Can you use a impact wrench to remove the old bolt?
To the OP, glad you got it on the right way. This forum is a great resource.
That strap wrench will hold the pulley from turning even at 200+ lbft of torque?
Can you use a impact wrench to remove the old bolt?
To the OP, glad you got it on the right way. This forum is a great resource.
Tech Contributor
Joined: Dec 1999
Posts: 32,910
Likes: 2,402
From: Anthony TX
CI 6,7,8,9,11 Vet
St. Jude Donor '08
That strap wrench will hold a LOT more than 200 ft/lbs!! I had NO problem applying 240 FT/LBs with it!
You can use a impact wrench but, I have had better results with a big breaker bar.
BC
You can use a impact wrench but, I have had better results with a big breaker bar.
BC
Pro

Joined: Oct 2007
Posts: 679
Likes: 4
From: TremontonUT UT
Here is a little trick I learned many , many years ago. If you want to expand the ID of a hub/bearing etc. place it on a 100 watt light bulb for a couple minutes. Pinion bearings fall on the the shaft. Be careful not to over heat. Later! Frank
Tech Contributor
Joined: Dec 1999
Posts: 32,910
Likes: 2,402
From: Anthony TX
CI 6,7,8,9,11 Vet
St. Jude Donor '08
Ive done a bunch of damper installs on C5s. A 100 watt bulb in the case of the damper to crank snout fit,,, just wont work effectively!
You need a little more BTUs. Like a TORCH or a Paint Stripper heat gun!
Ive used both and they both work FINE. The stripper gun just takes a little longer. Heat the hub up quickly, position it on the snout and then press it on with the tool. It will slide smoothly and easily but there will still be some force thats needed to get it down the snout and seated!If you heat the damper HUB up to approx 140-150 degrees, it will go much easier (it will NOT just drop on
 ) Heating it to 140-150 deg will not hurt the damper or the rubber dampening material inside the damper. Your engine gets a LOT hotter than that during daily driving.
 BC