


LS6 Head Bolt Question
Thread Starter
Pro

Joined: Feb 2009
Posts: 587
Likes: 0
From: Columbus Ohio
Got a problem and I need a little help. Here is what happened.
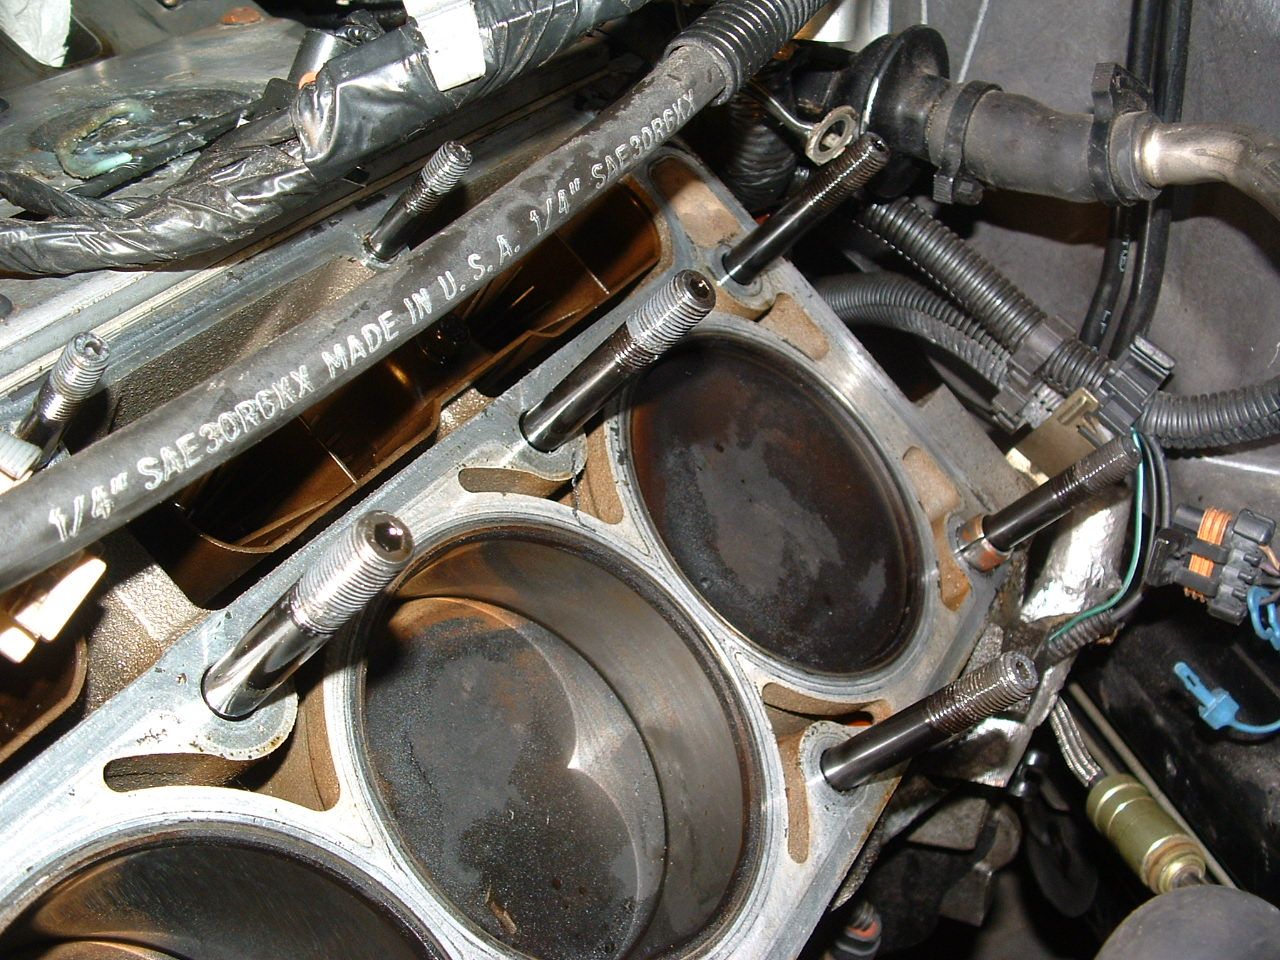
I was finishing up a cam install and bolting on the passenger side head as a friend was doing the drivers side. On the second 90 degree turn of the torque sequence he went about 45 degrees too far and stripped the thread out of the block. Its the long bolt (15mm head, 11mm thread ?) which goes through the center of the head between cyls. 3 and 5.
I personally cleaned all the holes twice, it didn't hydraulic. He said the bolt just lost tension and turned freely.
Is the best solution a heli-coil or time-sert ?
Am I correct that this bolt is 11mm thread ?
What is the thread pitch ?
Thanks
B
Last edited by blazer427X3; Apr 9, 2010 at 11:04 AM.
Tech Contributor


Joined: Jan 2007
Posts: 19,516
Likes: 1,189
From: Dyer, IN
Got a problem and I need a little help. Here is what happened.
I was finishing up a cam install and bolting on the passenger side head as a friend was doing the drivers side. On the second 90 degree turn of the torque sequence he went about 45 degrees too far and stripped the thread out of the block. Its the long bolt (15mm head, 11mm thread ?) which goes through the center of the head between cyls. 3 and 5.
I personally cleaned all the holes twice, it didn't hydraulic. He said the bolt just lost tension and turned freely.
Is the best solution a heli-coil or time-sert ?
Am I correct that this bolt is 11mm thread ?
What is the thread pitch ?
Thanks
B
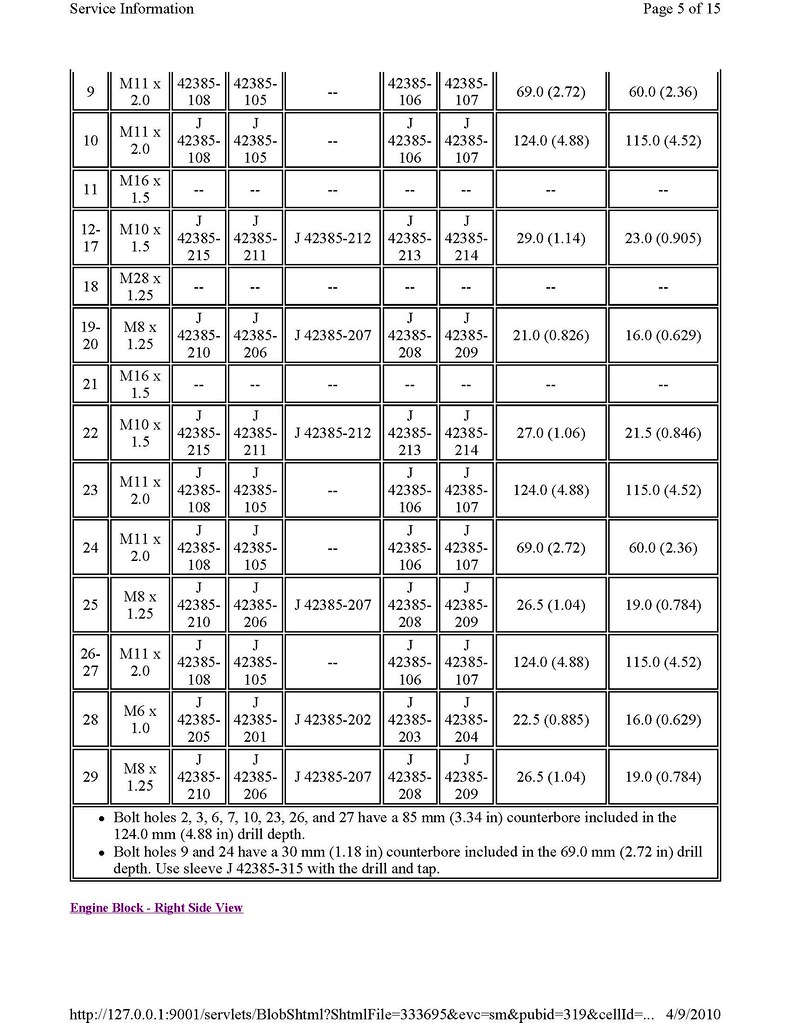
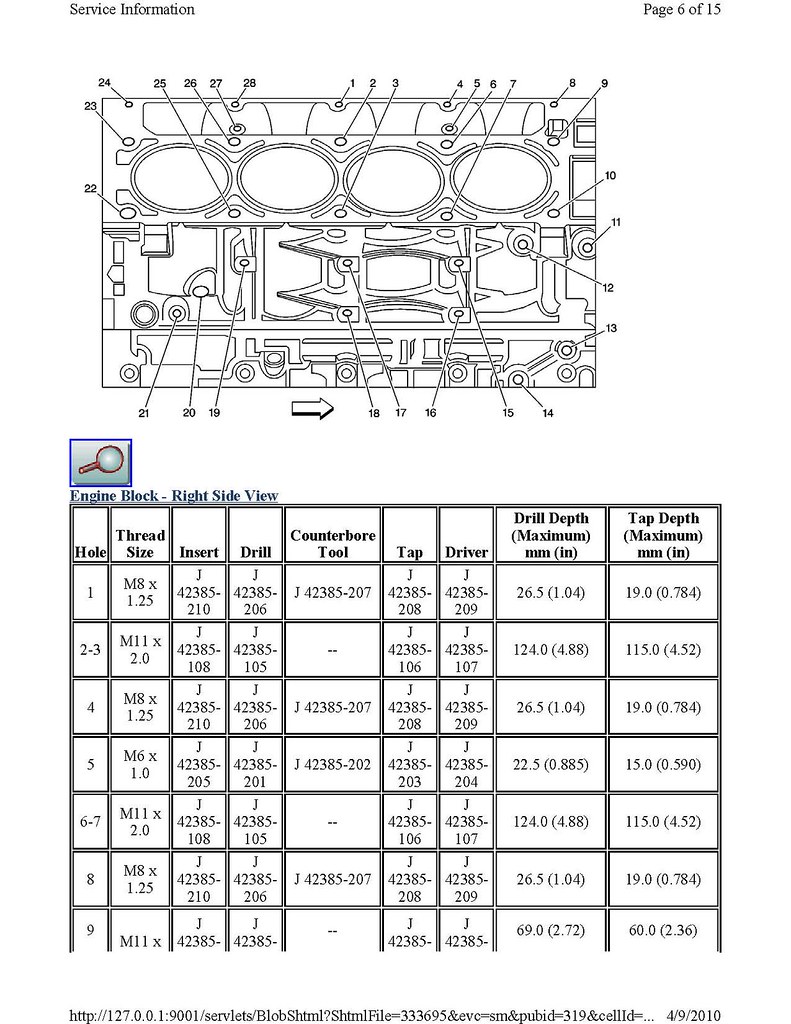
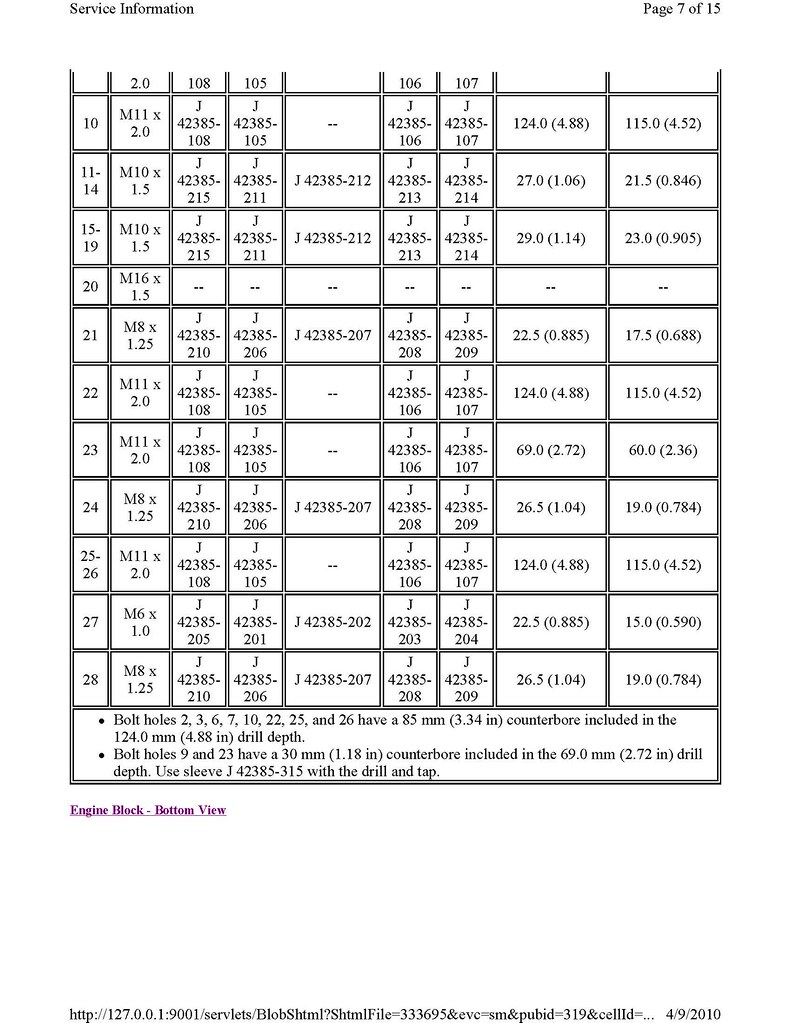
Below is from the 2003 service manual:

Thread Starter
Pro
Joined: Feb 2009
Posts: 587
Likes: 0
From: Columbus Ohio
Thanks Lucky thats exactly what I needed. 
The head bolts were new and I will of course be buying another set. He felt terrible about the mistake, so did I for that matter but the guy was just trying to help.
The head bolts were new and I will of course be buying another set. He felt terrible about the mistake, so did I for that matter but the guy was just trying to help.
Tech Contributor
Joined: Jan 2007
Posts: 19,516
Likes: 1,189
From: Dyer, IN
No problem. I would have posted the specific year service manual, but I found an omission in the electronic version. While 2000 contains the bolts specs, it is left out of the 2001-2002(at least in my electronic version), and then picks up again in 2003-04. Strange.
Thread Starter
Pro
Joined: Feb 2009
Posts: 587
Likes: 0
From: Columbus Ohio
I got an answer back from time-sert and here is the information they gave me:
P/n J-42385-100 M11x2.0 Head bolt repair kit price $450.30
Kit includes all the tools and 10 inserts.
Additional inserts may be ordered separately at any time.
 $450.00 !!!! I've seen used short blocks for sale for that amount or slightly less.
I tried NAPA to see if helicoil had a solution. They had no listing for an 11mm with 2.0 pitch.
P/n J-42385-100 M11x2.0 Head bolt repair kit price $450.30
Kit includes all the tools and 10 inserts.
Additional inserts may be ordered separately at any time.
$450.00 !!!! I've seen used short blocks for sale for that amount or slightly less.I tried NAPA to see if helicoil had a solution. They had no listing for an 11mm with 2.0 pitch.
Thread Starter
Pro
Joined: Feb 2009
Posts: 587
Likes: 0
From: Columbus Ohio
Just in case anyone else runs into this problem, here are two options.
1. You can drill the 11mm holes to 7/16" and then run a 1/2" tap to make threads. You can get the new bolts from ARP. This might be a good solution if you are doing all the holes but to repair just one its probably not the best move. I was told that it would be difficult to evenly torque the one oddball size to match the existing 11mm holes.
2. After talking to a tech guy at ARP here is their advice. When dealing with damaged threads in one hole, they suggested that I put a stud on that hole only and use a new set of head bolts (obviously) on all the rest. The stud is longer than the stock head bolt and has a "bottoming nose". As long as it can get a bite on good thread past the damaged portion they have had good results with this. He also recommends blue loctite or equivalent on the stud threads down in the block. So if anyone decides to go this route, here are part numbers for the ARP single stud fix.
912-0011 - long tool to chase the 11mm threads
ATP7.325-1LGB - stud (1ea.)
200-8605 - nut (1ea.)
APW-78 - washer (1ea.)
Hopefully nobody will ever need this info but if so, it will be available here on the website with a search.

B
1. You can drill the 11mm holes to 7/16" and then run a 1/2" tap to make threads. You can get the new bolts from ARP. This might be a good solution if you are doing all the holes but to repair just one its probably not the best move. I was told that it would be difficult to evenly torque the one oddball size to match the existing 11mm holes.
2. After talking to a tech guy at ARP here is their advice. When dealing with damaged threads in one hole, they suggested that I put a stud on that hole only and use a new set of head bolts (obviously) on all the rest. The stud is longer than the stock head bolt and has a "bottoming nose". As long as it can get a bite on good thread past the damaged portion they have had good results with this. He also recommends blue loctite or equivalent on the stud threads down in the block. So if anyone decides to go this route, here are part numbers for the ARP single stud fix.
912-0011 - long tool to chase the 11mm threads
ATP7.325-1LGB - stud (1ea.)
200-8605 - nut (1ea.)
APW-78 - washer (1ea.)
Hopefully nobody will ever need this info but if so, it will be available here on the website with a search.
B
Last edited by blazer427X3; Apr 9, 2010 at 02:59 PM.
Corvette Stories
The Best of Corvette for Corvette Enthusiasts

5 Best & 5 Worst Corvette Daily Drivers
Joe Kucinski
The Headlights of Every Corvette Generation Explained
Joe Kucinski
5 Best & 5 Most Overrated Corvette Track Packages of All Time!
Joe Kucinski
Every 2027 Corvette Engine Explained
Joe Kucinski
Designer Imagines A Corvette That Looks More Like a Corvette Than the Corvette
Verdad Gallardo
10 Ugly Corvettes That We Still Kinda Love
Joe Kucinski
Top 10 Most Expensive Corvettes Ever Sold on Bring A Trailer
Brett Foote
10 Things Every Corvette Owner Needs (2026 Edition)
Michael S. Palmer
8 Most "Only Corvette Owners Understand" Quirks and Problems
Pouria Savadkouei
Thread Starter
Pro
Joined: Feb 2009
Posts: 587
Likes: 0
From: Columbus Ohio
Yeah, when he first said "oh **** !" and told me what happened I told him that wasn't a funny thing to joke about.
When I realized he wasn't kidding I started putting tools away and turning off lights. I literally had to walk away, my stomach was in knots. I figure I was about 20 minutes away from adding fluids and firing the engine up.
When I realized he wasn't kidding I started putting tools away and turning off lights. I literally had to walk away, my stomach was in knots. I figure I was about 20 minutes away from adding fluids and firing the engine up.
Tech Contributor
Joined: Jan 2007
Posts: 19,516
Likes: 1,189
From: Dyer, IN
Yeah, when he first said "oh **** !" and told me what happened I told him that wasn't a funny thing to joke about.
When I realized he wasn't kidding I started putting tools away and turning off lights. I literally had to walk away, my stomach was in knots. I figure I was about 20 minutes away from adding fluids and firing the engine up.
When I realized he wasn't kidding I started putting tools away and turning off lights. I literally had to walk away, my stomach was in knots. I figure I was about 20 minutes away from adding fluids and firing the engine up.

Drifting

Joined: Oct 2006
Posts: 1,773
Likes: 2
From: San Diego CA


Thread Starter
Pro
Joined: Feb 2009
Posts: 587
Likes: 0
From: Columbus Ohio
UPDATE
Well, the threads were too badly hosed to chase and use the stud.
It looks as though my only choice is to have a TimeSert installed which is the recommended fix according to GM. I've had conflicting opinions on drilling just one hole out to 1/2". Some people say if you do one, do them all and others say it should be fine. I'm just not sure about having one oddball sized hole and bolt.
So, the end result is I'll try the TimeSert and hope for the best, I will probably use that single stud to reduce the amount of twisting force on the insert since you only tighten them a little past hand-tight. The bad part is that I will always be wondering if its going to hold. I expect I will be looking for a short block at some time in the future.
To end on a positive note, I did find a great idea for my old block when I do the swap.
Tech Contributor


Joined: Sep 2005
Posts: 1,731
Likes: 82
From: New Market AL
My search for "How to Repair Block Threads" brought up this thread, so I figure I'll add my experience. Yesterday I was well on my way to re-assembly on a friend's 2004 C5 (which just has a little over 30k miles). I installed a 3,000 rpm stall converter, Magnaflow catback, TSP headers & x-pipe, Torquer V3 cam, Vararam, 30# injectors, underdrive pulley, and was just finishing the torque down for his new PRC 215 heads. When I went to tighten the front mid-length head bolt it started getting easier and then just spun. When I took it out it had a nice collection of the block's threads wound up in the bolt. I went to the passenger side and found the same problem with that front headbolt - threads came out of the block without even reaching 22 ft*lbs. All of the other bolt holes were fine - just the front mid-length hole on each side. And trust me, there wasn't any debris or fluid in the holes. So Monday morning it looks like I'll be ordering a Kent Moore J-42385-100 LS1 thread repair kit. So much for finishing it up this weekend. Very weird to have these two threads fail like that.

Tech Contributor


Joined: Dec 1999
Posts: 32,910
Likes: 2,402
From: Anthony TX
CI 6,7,8,9,11 Vet
St. Jude Donor '08
My search for "How to Repair Block Threads" brought up this thread, so I figure I'll add my experience. Yesterday I was well on my way to re-assembly on a friend's 2004 C5 (which just has a little over 30k miles). I installed a 3,000 rpm stall converter, Magnaflow catback, TSP headers & x-pipe, Torquer V3 cam, Vararam, 30# injectors, underdrive pulley, and was just finishing the torque down for his new PRC 215 heads. When I went to tighten the front mid-length head bolt it started getting easier and then just spun. When I took it out it had a nice collection of the block's threads wound up in the bolt. I went to the passenger side and found the same problem with that front headbolt - threads came out of the block without even reaching 22 ft*lbs. All of the other bolt holes were fine - just the front mid-length hole on each side. And trust me, there wasn't any debris or fluid in the holes. So Monday morning it looks like I'll be ordering a Kent Moore J-42385-100 LS1 thread repair kit. So much for finishing it up this weekend. Very weird to have these two threads fail like that.

 And I thought a broken starter boss was bad!
Thats had to be a very bad feeling!
Can you take some pictures of the before during and final repair. It might help someone in the future.
If the block can be drilled and repaired with a helicoil, the helicoil is supposed to be as strong if not stronger than the original threads.
Good luck on your repairs and let us know how you make out.
Something to consider,,,,, When your all done, install ARP Head Studs. I have them and MAN,,, there FANTASTIC!
They screw into the block by hand to bottom out and your DONE.
BC
Tech Contributor
Joined: Sep 2005
Posts: 1,731
Likes: 82
From: New Market AL
Good idea on documenting the repair. I'll be sure to setup the camera on a tripod and make a detailed how-to repair.
I have ARP studs in the 408 I built for my Nova and ARP bolts in my Corvette's LS1. I'm certainly sold on the stud idea after this experience. This almost might break me from working on other people's cars. If I screw up the thread repair it might mean a new block. That pun was intentional by the way.
I have ARP studs in the 408 I built for my Nova and ARP bolts in my Corvette's LS1. I'm certainly sold on the stud idea after this experience. This almost might break me from working on other people's cars. If I screw up the thread repair it might mean a new block. That pun was intentional by the way.