


Starting Issues
Thread Starter
Racer


Joined: Dec 2001
Posts: 406
Likes: 1
From: Ocean Pines Maryland
Wondering if anyone can help me out. I have '98 m6 with 130,000 miles on the car and under 5000 miles on the engine. I have a new starter and a new battery. About every three days or so, the car won't start. It will have electical power but won't crank. I had a new starter put on last August, took it to the garage again and they replaced the starter under warranty. Started great for two days but then once again, didn't start. It does start after letting it sit for a couple minutes.
Any ideas? Anything to do with the clutch?
Appreciate any thoughts.
Any ideas? Anything to do with the clutch?
Appreciate any thoughts.
Melting Slicks


Joined: Oct 2007
Posts: 2,383
Likes: 13
From: Kinston North Carolina
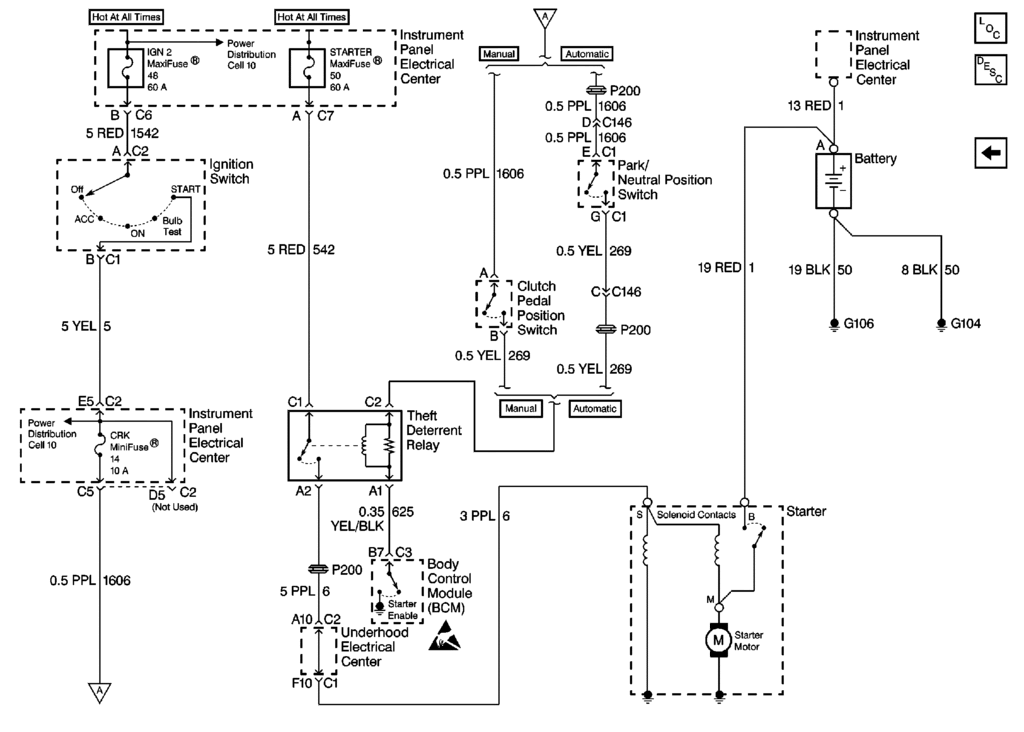
Lots of post on starting issues if you do the Search thing! If you want to do some troubleshooting, here's the schematic. I don't understand just keep changing starters.
---------------------------------------
---------------------------------------
Last edited by byronhunter; Apr 26, 2010 at 09:23 PM.
Thread Starter
Racer
Joined: Dec 2001
Posts: 406
Likes: 1
From: Ocean Pines Maryland
My first concern was that maybe the repair shop put in a used starter in place of a new one. Their sister shop checked it out and found a defect in the starter and replaced it under warranty.
It just does this on approximately every 4-5 starts or so.
I'm just looking for ideas before going back to the shop.
Thanks.
Tech Contributor
Joined: Dec 2006
Posts: 10,962
Likes: 29
From: Van Buren Arkansas
Wounded Warrior Escort '11
Ok, so you are not hearing the starter solenoid do its major click or anything. Since you have a new starter and new battery, use a meter and check the static voltage across the battery with the ignition turned off. You need a minimum of 12.5vdc for things to even think about working.
Next, if you haven't checked the battery cables to insure they are clean and tight to the battery, needs to be done. Also, check the battery cable to the starter solenoid and don't forget that its electrically hot down there. Now I don't remember if the battery's negative cable is connected to the motor block down there like it is on the C-6 or not, but you need to make sure its clean and tight as well.
Next, what is the status of the security light in the IP Cluster when you attempt to start the car? Have you pulled the codes yet? The clutch switch....have you checked it with a meter yet?

Tech Contributor


Joined: Dec 1999
Posts: 32,910
Likes: 2,402
From: Anthony TX
CI 6,7,8,9,11 Vet
St. Jude Donor '08
" The security light has been staying on periodically. "
Thats a clue... Something is NOT happy!!
CODES?
READING YOUR Engine Diagnostic Codes
The Diagnostic Display Mode is entered with the following procedure:
1) Turn on the ignition but don't start the engine.
2) Press the RESET button to turn off any warning messages. (i.e. door open, trunk open ect)
3) Press and hold OPTIONS
4) While holding OPTIONS, press FUEL four times within a 10-second period.
Initially, on-board diagnostics go into an Automatic Mode which shows diagnostic codes in a pre-set sequence: PCM - TCS - RTD - BCM - IPC - RADIO - HVAC - LDCM - RDCM - SCM - RFA. All codes will be displayed for each. ( i.e. PCM = 4 codes) If none are present in a given module, you will see No More Codes on the display.
There are two kinds of diagnostic codes, Current and History designated with a letter suffix, �C� or �H�. A current C code indicates a malfunction is present and active in the module displaying data. A history code indicates a problem existed sometime in the last 40 or 50 ignition cycles. When not accompanied by a current code of the same number, it's potential evidence of a previous problem, now resolved, that was not removed by clearing the codes.
More likely it's an indication of an intermittent malfunction.
Intermittent codes are the most challenging of the diagnostics. An intermittent code may have happened once, may have happened more than once but is inconsistent or may be happening on a regular basis but not at the time the codes are displayed. History codes can also be caused by a current malfunction in a system that is not operating at the time codes are displayed. An example is the rear window defogger which doesn't operate until the Body Control Module detects engine rpm. For history codes set by a module that does not operate with the key on and engine off, a special diagnostic tool called a Scan Tester is necessary to properly diagnose the malfunction.
Once the system has displayed all modules, it goes into the manual mode which allows selection of each module using combinations of Driver Information Center buttons. Manual mode can also be entered during the automatic sequence by pressing any button except English/Metric (E/M). Once the display shows Manual Diagnostics, select a module by pressing the OPTIONS button to go forward or the TRIP button to go back. Once a module is selected, a code is displayed, and if more than one are present; press GAGES to go forward or FUEL to go back.
To exit the diagnostic mode at any time, press E/M. If you want to erase codes in a given module, press and hold the RESET button To reset the codes once in manual mode, press and hold RESET until it displays NO CODES Press OPTIONS to go to the next module. Repeat the steps until you have reset the codes in all the computer modules.
NOTE!! Only reset the codes IF you want to - it is NOT necessary to do this. Clearing a code does not repair a problem. You are simply erasing the evidence of it in the module's memory. If you clear the code/s, and extinguish the Check Engine Light, your emissions status ready will NOT allow you to pass an emissions test until you have completed the required driving cycles.
Once you have the codes, the next question is: What to do with the information?
First, consult the factory service manual. Any serious C5 Do-It-Yourself owner should invest in the Corvette Service Manual of the appropriate model year. The Service Manual is really a requirement if you want to understand and work on your C5. You can GOOGLE the DTC and also find information on it.
Here is very good site that explains the DTCs:
http://www.corvette-web-central.com/C5DTCcode.html
http://www.obd-codes.com/trouble_cod...d-ii-codes.php
Make sure to include the H or C suffix!!
Corvette Stories
The Best of Corvette for Corvette Enthusiasts

Top 10 Most Expensive Corvettes Ever Sold on Bring A Trailer
Brett Foote
10 Things Every Corvette Owner Needs (2026 Edition)
Michael S. Palmer
8 Most "Only Corvette Owners Understand" Quirks and Problems
Pouria Savadkouei
10 Reasons the C6 Z06 is Still A Performance Benchmark After 20 Years
Joe Kucinski
How Much Horsepower Every Corvette Engine "LOST" in 1972
Joe Kucinski
Top 10 DOs and DON'Ts for Protecting Your Convertible Top!
Michael S. Palmer
Top 10 Most Explosive Corvettes Ever Made: Power-to-Weight Ratio Ranked!
Joe Kucinski
150 hp to 1,250 hp: Every Corvette Generation Compared by the Specs That Matter
Joe Kucinski
8 Coolest Corvette Pace Cars (and Replicas) of All Time
Verdad Gallardo
Burning Brakes

Joined: Jan 2009
Posts: 918
Likes: 2
From: Lewisburg TN
St. Jude Donor '10-'11-'12,'14
1) check the voltage to see that its sufficient ~12.5 .
2) check with Ohm meter (set @ high OHM setting) the positive post to starter positive post, should be 0 ohms, you may need to use aan alligator clip to reach both ends.
Next check negative post to engine block or head should also be 0 ohms.
3) if your good here use a starter button, or a long screw driver from underneath to reach solenoid and connect to starter post. You can use a rubber hose sleeve on screw driver and be very careful you dont ground starter post to exhaust or any other grounded bolts etc. A starter button with alligator clips can be bought reasonably from Sears, or autoparts store.
By doing this you have checked to make sure you have the basic electric you need to turn the engine over, and the engine should spin.
Assuming it spins your problem maybe with anti theft deterrent, clutch switch (or neutral safety switch on a auto trans), ignition switch etc.
If it doesn't spin your problem is wires, connections, starter or solenoid.
Thread Starter
Racer
Joined: Dec 2001
Posts: 406
Likes: 1
From: Ocean Pines Maryland
I checked the codes. Other than the door modules issues, the one that looks like a possibility is the PCM code P1631 H start enable signal not correct.
Could that just be my key fob not working or an issue that is causing the irratic starting problems?
I'm taking it back to shop when I get a morning off, but I'd like to go in with a little more of an idea of what may be happening.
Thanks again for the help. Let me know if you want help with your golf swing!!!
Tech Contributor
Joined: Dec 1999
Posts: 32,910
Likes: 2,402
From: Anthony TX
CI 6,7,8,9,11 Vet
St. Jude Donor '08
I checked the codes. Other than the door modules issues, the one that looks like a possibility is the PCM code P1631 H start enable signal not correct.
Could that just be my key fob not working or an issue that is causing the irratic starting problems?
I'm taking it back to shop when I get a morning off, but I'd like to go in with a little more of an idea of what may be happening.
Thanks again for the help. Let me know if you want help with your golf swing!!!
Could that just be my key fob not working or an issue that is causing the irratic starting problems?
I'm taking it back to shop when I get a morning off, but I'd like to go in with a little more of an idea of what may be happening.
Thanks again for the help. Let me know if you want help with your golf swing!!!
DTC P1631 Theft Deterrent Start Enable Signal Not Correct
Circuit Description
This diagnostic tests for mismatched passwords between the BCM and PCM. Whenever replacing the BCM or PCM, follow the theft learn procedure in order for the system to learn the new password.
Conditions for Running the DTC
Mismatched passwords between the BCM and the PCM
Conditions for Setting the DTC
The PCM detects a wrong password from the BCM.
The fuel disable lockout is set.
The system has received an incorrect fuel continue password.
An invalid ignition key or malfunctioning ignition switch
The BCM was replaced.
Action Taken When the DTC Sets
The engine starts and then the engine stalls immediately.
The PCM stores the DTC information into the memory when the diagnostic runs and fails.
The Malfunction Indicator Lamp (MIL) will not illuminate.
The PCM records the operating conditions at the time during which the diagnostic fails. The PCM stores this information in the Failure Records.
Conditions for Clearing the DTC
A last test failed, or current DTC, clears when the diagnostic runs and does not fail.
A history DTC will clear after 40 consecutive warm-up cycles, if no failures are reported by this or any other non-emission related diagnostic.
Use a scan tool in order to clear the DTC.
Test Description
The numbers below refer to the step numbers on the diagnostic table.
The 11 minute and 30 second time criteria are a minimum required amount of time. The time limit can exceed this limit without interfering with the Auto Learn Procedure. Use a scan tool (VTD Auto Learn Timer equals Inactive) in order to determine when the 11 minutes has expired.
If DTC P1631 is set, this indicates that you did not follow the procedure correctly. Perform the Re-learn procedure again.
DTC P1631 Theft Deterrent System-Password incorrect Step
Action
Value(s)
Yes
No
1
Did you perform the Powertrain On-Board Diagnostic (OBD) System Check?
--
Go to Step 2
Go to Powertrain On Board Diagnostic (OBD) System Check
2
Important
Inspect for any BCM DTCs being set (except if you were sent here from PCM Replacement) before proceeding with this table. If a BCM DTC is set, refer to the appropriate BCM DTC.
Is a Tech 2 � available?
--
Go to Step 4
Go to Step 3
3
Important:
This step is for United States and Canada vehicles only.
Maintain the battery voltage while the PCM is in the Auto Learn Procedure. Follow this procedure exactly as indicated or you will have to repeat the procedure from the beginning.
Performing the following procedure causes a DTC P1630 to set when you complete the procedure. This is the intended functionality. When P1630 sets, turn OFF the ignition for 30 seconds, then turn ON the ignition and P1630 clears. If the DTC P1630 does not clear, go to the DTC P1630 table.
Turn ON the ignition leaving the engine OFF for 11 minutes.
Turn OFF the ignition for 30 seconds.
Turn ON the ignition leaving the engine OFF for 11 minutes.
Turn OFF the ignition for 30 seconds.
Turn ON the ignition leaving the engine OFF for 11 minutes or until DTC P1630 sets.
Turn OFF the ignition for 30 seconds.
Turn ON the ignition leaving the engine OFF and wait 30 seconds.
Attempt to start the engine.
Does the engine start and operate normally?
--
Go to Step 5
Go to Step 6
4
Important
Performing the following procedure causes a DTC P1630 to set when you complete the procedure. This is the intended functionality. When P1630 sets, turn OFF the ignition for 30 seconds, then turn the ignition ON and P1630 clears. If the DTC P1630 does not clear, go to the DTC P1630 table.
Enter the Service Programming System (SPS) using a Tech 2.
Enter the vehicle information.
Choose the Request Info soft key on the scan tool.
Select Done.
Follow the instructions on the Vehicle Set-up screen.
Disconnect the scan tool from the vehicle.
Connect the scan tool to the Techline terminal.
At the Techline terminal select Service Programming System (SPS) and select terminal to Tech 2 programming method.
Select Done.
Follow the instructions on the remaining screens.
Select the Vehicle Theft Re-learn option.
Select Program at the summary screen. The terminal will download information to the Tech 2.
Return the scan tool to the vehicle.
Connect the scan tool to Diagnostic Link Connector (DLC).
Select Service Programming from the Tech 2 main menu.
Answer the prompts regarding the model year and vehicle type.
Press the Theft Re-learn soft key on the Tech 2.
Follow the instructions on the remaining screens.
The PCM and the BCM will be prepared for re-learn.
A security timer will be on for approximately 11 minutes or until DTC P1630 sets. It is important that during the 11 minute-wait, the user keeps the Scan Tool connected to the vehicle.
When the PCM and the BCM are prepared to re-learn, turn OFF the ignition for 30 seconds and then start the engine.
Does the engine start and operate normally?
--
Go to Step 5
Go to Step 6
5
Important:
Monitor all DTC status parameters and note any additional DTCs before Clearing DTCs.
Clear the PCM DTCs.
Turn OFF the ignition for 30 seconds.
Attempt to start the engine.
Does the engine start and operate normally?
--
System OK
Go to Step 6
6
Are DTCs P1626, P1630 or P1631 set?
--
Go to applicable DTC table
Go to Step 2
--------------------------------------------------------------------------------
Document ID# 317253
1999 Chevrolet/Geo Corvette
Tech Contributor
Joined: Dec 1999
Posts: 32,910
Likes: 2,402
From: Anthony TX
CI 6,7,8,9,11 Vet
St. Jude Donor '08
Try this FIRST!
BCM/PCM RELEARN PROCEDURE
You will need to conduct the PCM/BCM relearn process. This matches their handshake ID's and allows them to talk to each other.
Do this before you worry about VATS issues:
1. Turn on the key for 11 minutes.
2 Turn off the key for 30 seconds.
3. Repeat 1&2 two more times.
4. Turn on the key for 30 seconds.
The car should start and run with the new BCM. Good luck and report back on your progress.
Shirl
SD Racing Enterprises
Aguila, AZ
Coutersy of MrEracer
This will sync the PCM to the New BCM but all of your RPO options will not be retained. You will need a TECH II to program them into the new BCM.
Bill Curlee