



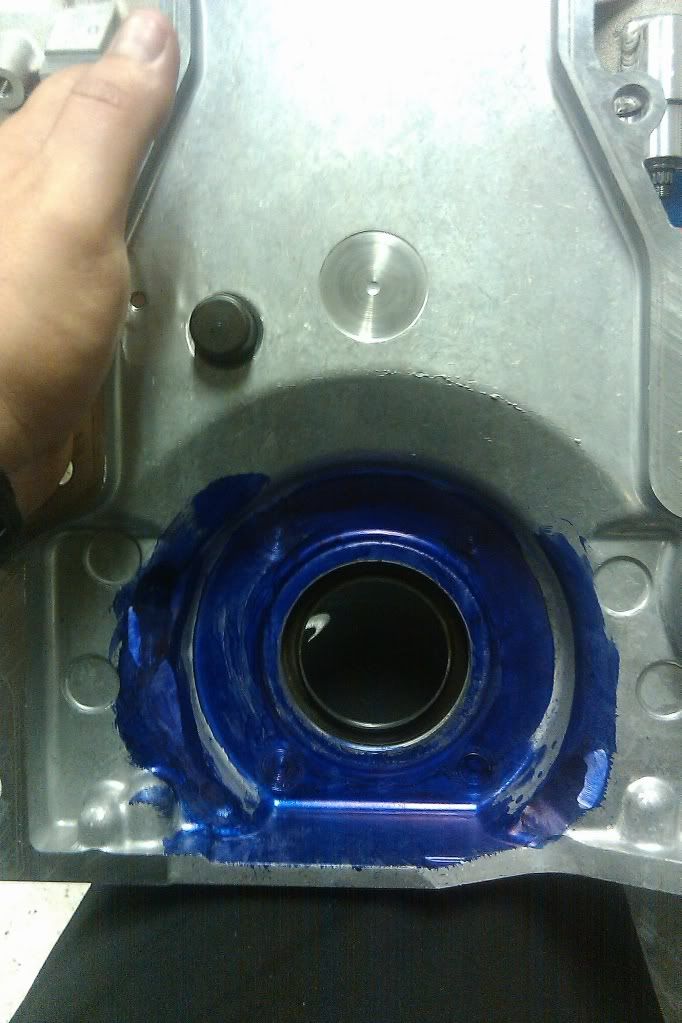
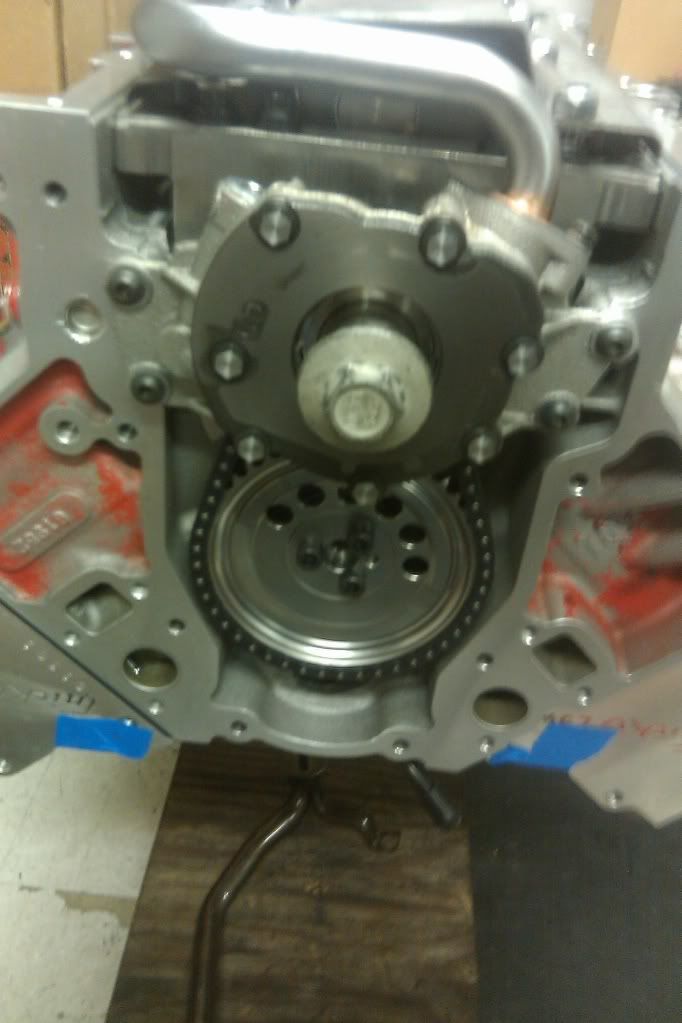

Melling HV Pump - Fit?

Thread Starter
Burning Brakes


Joined: Feb 2006
Posts: 1,085
Likes: 3
From: Ottawa Ontario, Canada

Originally Posted by Bill Curlee
Ok....................... I couldn't stand it any longer.... I went out in the shed and FOUND the BOX..... Its a M295 soooooo,, thats why it fit without any issues,
Sorry for any confusion. That one works EXCELLENT and at idle with a BIG cam,, I do NOT have any pressure issues.
Sorry for any confusion. That one works EXCELLENT and at idle with a BIG cam,, I do NOT have any pressure issues.

Originally Posted by Bill Curlee
When you get ready to change that pump,, I have some procedures and info that help make the job easier. What damper are you using????
What damper BOLT are you using?
What damper BOLT are you using?

I'll be re-using the OEM damper, assuming I can use it with the thicker pump body on the 10296. I plan to use an OEM crank bolt as well. If I was planning to have the car apart to this level several more times I'd just go ahead with the ARP bolt, but unless I need to pin the crank for a blower install I'm hoping to never see this procedure again!
Excellent cutaway pic of the oil pump O ring! Stuff like that is sure to be a big help! BTW, I'm jealous as well as I was supposed to be going to Carlisle this year but one of the crew fudged his vacation time and we had to call it off. Have fun!
Thread Starter
Burning Brakes
Joined: Feb 2006
Posts: 1,085
Likes: 3
From: Ottawa Ontario, Canada


Tech Contributor


Joined: Dec 1999
Posts: 32,910
Likes: 2,402
From: Anthony TX
CI 6,7,8,9,11 Vet
St. Jude Donor '08
Well,,,,,,,,,,,,,,,,,,,,, If your using the OLD DAMPER  that may BITE you later down the road. They have a tendency to debond and fail. If your using new OEM damper,,, thats fine. I upgraded to a POWER-BOND and an ARP bolt.
Use HEAT removing and installing the damper. HEAT THE HUB to approx 150-200 degs and you will be amazed how much easier the removal and install will be.
You can use a heat gun or a propane torch on low flame.
Make sure you put a NEW SEAL in the cover, and use some RTV in the corners of the cover seal. MAKE SURE that you put the Timing chain cover gasket on in the correct orientation or you will have a massive oil leak.
BC
that may BITE you later down the road. They have a tendency to debond and fail. If your using new OEM damper,,, thats fine. I upgraded to a POWER-BOND and an ARP bolt. Use HEAT removing and installing the damper. HEAT THE HUB to approx 150-200 degs and you will be amazed how much easier the removal and install will be.
You can use a heat gun or a propane torch on low flame.
Make sure you put a NEW SEAL in the cover, and use some RTV in the corners of the cover seal. MAKE SURE that you put the Timing chain cover gasket on in the correct orientation or you will have a massive oil leak.
BC
Last edited by Bill Curlee; Aug 23, 2011 at 11:57 PM.
Thread Starter
Burning Brakes
Joined: Feb 2006
Posts: 1,085
Likes: 3
From: Ottawa Ontario, Canada

OK, here's the way I'm picturing this works...
1 - As far as I can tell from the pictures I've searched through, the nose of the crank is one smooth non-tapered machined surface from the front of the crank to the shoulder just before the first bearing.
2 - The timing gear goes on the crank with the key in the slot. The teeth go towards the back and the "splined" oil pump drive goes out towards the front.
3 - The oil pump goes on and engages the splines on the front of the timing gear.
4 - The damper gets pushed on until the back surface presses up against the front surface of the timing gear.
NOW IF I'M RIGHT, it would make sense to me that the splined area of the timing gear would be wider than the gearotor on the oil pump, that way there would be a clearance that would allow the gearotor to move freely along the splined area. If that's the case, then the thicker pump can only move the gearotor forward until it hits the back of the balancer, and ideally I'd think there should be some clearance there...
Another thing I don't know for sure is if the I.D. of the gearotor is larger than the O.D. of the balancer... if it is larger than the balancer it could slide forward and only partially engage the splines on the timing gear.
Can someone confirm if I'm on the right track with these thoughts, or am I out to lunch? I'm basing this all on pics that were not intended to show what I'm looking for!
Thread Starter
Burning Brakes
Joined: Feb 2006
Posts: 1,085
Likes: 3
From: Ottawa Ontario, Canada
Use HEAT removing and installing the damper. HEAT THE HUB to approx 150-200 degs and you will be amazed how much easier the removal and install will be.
You can use a heat gun or a propane torch on low flame.
Make sure you put a NEW SEAL in the cover, and use some RTV in the corners of the cover seal. MAKE SURE that you put the Timing chain cover gasket on in the correct orientation or you will have a massive oil leak.
You can use a heat gun or a propane torch on low flame.
Make sure you put a NEW SEAL in the cover, and use some RTV in the corners of the cover seal. MAKE SURE that you put the Timing chain cover gasket on in the correct orientation or you will have a massive oil leak.

Thanks for all your advice so far! Looking forward to your tips on dealing with the pickup tube bolt!
Thread Starter
Burning Brakes
Joined: Feb 2006
Posts: 1,085
Likes: 3
From: Ottawa Ontario, Canada
QUESTION: Did you space the pump away from the block (forward) for extra timing chain clearance? If I remember right you took material from the front of the pump as well, correct? Just to be 100% sure, it's the 10296 HV pump you're using, right?
Thread Starter
Burning Brakes
Joined: Feb 2006
Posts: 1,085
Likes: 3
From: Ottawa Ontario, Canada
Another question regarding the oil pickup tube bolts. I've seen pickup tubes with bolts on both sides, and pickups with one bolt only - and with the one bolt on different sides!
Is it acceptable to just have one bolt holding the pickup tube in place? It would be nice if the answer is yes!
Is it acceptable to just have one bolt holding the pickup tube in place? It would be nice if the answer is yes!
Corvette Stories
The Best of Corvette for Corvette Enthusiasts

5 Best & 5 Worst Corvette Daily Drivers
Joe Kucinski
The Headlights of Every Corvette Generation Explained
Joe Kucinski
5 Best & 5 Most Overrated Corvette Track Packages of All Time!
Joe Kucinski
Every 2027 Corvette Engine Explained
Joe Kucinski
Designer Imagines A Corvette That Looks More Like a Corvette Than the Corvette
Verdad Gallardo
10 Ugly Corvettes That We Still Kinda Love
Joe Kucinski
Top 10 Most Expensive Corvettes Ever Sold on Bring A Trailer
Brett Foote
10 Things Every Corvette Owner Needs (2026 Edition)
Michael S. Palmer
8 Most "Only Corvette Owners Understand" Quirks and Problems
Pouria Savadkouei
Melting Slicks

Joined: Aug 2005
Posts: 2,960
Likes: 112
From: New Braunfels TX
I saw your pics in my search quest for info - thanks!
QUESTION: Did you space the pump away from the block (forward) for extra timing chain clearance? If I remember right you took material from the front of the pump as well, correct? Just to be 100% sure, it's the 10296 HV pump you're using, right?
QUESTION: Did you space the pump away from the block (forward) for extra timing chain clearance? If I remember right you took material from the front of the pump as well, correct? Just to be 100% sure, it's the 10296 HV pump you're using, right?
And remember the front timing cover is like a shim
Last edited by JMBLOWNWS6; Aug 24, 2011 at 12:50 AM.
Melting Slicks
Joined: Aug 2005
Posts: 2,960
Likes: 112
From: New Braunfels TX
Another question regarding the oil pickup tube bolts. I've seen pickup tubes with bolts on both sides, and pickups with one bolt only - and with the one bolt on different sides!
Is it acceptable to just have one bolt holding the pickup tube in place? It would be nice if the answer is yes!
Is it acceptable to just have one bolt holding the pickup tube in place? It would be nice if the answer is yes!

Racer

Joined: Jul 2008
Posts: 437
Likes: 3
From: Indiana
I just put on a 10296 high volume oil pump and LS2 chain. Everything lined up fine w no problems what so ever, nothing needed to be clearanced, spaced, shimmed, etc. If I remember correctly I also used the thinner o-ring, it fit much better. Lube up the oring, it helps get it on without a problem, the last thing you want to do is to chew that thing up and have to redo everything.
Also don't drop the one pick up tube bolt into the oil pan
My balancer lined up with the other pullies and I have put well over 1000 miles on the car since the install.
The hardest part for me was getting the darn gears lined up to push the pump onto the crank
The only issue i have seen is regarding a double roller timing chain
Also don't drop the one pick up tube bolt into the oil pan
My balancer lined up with the other pullies and I have put well over 1000 miles on the car since the install.
The hardest part for me was getting the darn gears lined up to push the pump onto the crank
The only issue i have seen is regarding a double roller timing chain
Last edited by About2Bite; Aug 24, 2011 at 01:34 AM.
Thread Starter
Burning Brakes
Joined: Feb 2006
Posts: 1,085
Likes: 3
From: Ottawa Ontario, Canada
I think I'm seeing the same trend developing, though from what I was told by Texas Speed it's not a 100% guarantee it will fit without some clearancing. It sounds like if there is any interferance it will be minor at worst since I'm not planning to space the pump out and will just use the LS2 chain as you have done.
Thread Starter
Burning Brakes
Joined: Feb 2006
Posts: 1,085
Likes: 3
From: Ottawa Ontario, Canada
Thread Starter
Burning Brakes
Joined: Feb 2006
Posts: 1,085
Likes: 3
From: Ottawa Ontario, Canada
What do you mean by that? Shim?
Thread Starter
Burning Brakes
Joined: Feb 2006
Posts: 1,085
Likes: 3
From: Ottawa Ontario, Canada

Melting Slicks


Joined: Dec 2003
Posts: 3,315
Likes: 17
From: Near Jacksonville Fl.
AFAIR they told me the pump gears are ~18% thicker that is what gives the higher volume.
Now at the time I was going with a double roller chain that required spacing the oil pump out further, the thicker pump body would have caused more interference with the timing cover.
I ended up using the standard Melling pump and still had to grind both the pump body and the T/C for clearance in addition I had to use button head bolts to mount the pump.
Now after all this discussion I went and looked at my old parts and it appears the balancer bottoms out on the crank timing gear and OD. of the balancer is smaller then the ID. of the pump gear.
So if your using an LS2 timing chain you may not have an issue, also mine is a 98 so there may be some differences.
I have some pic's but they are on my old HD but I haven't transferred them yet.
Just take your time and check and recheck all your clearances and you will be fine, tip check your clearance without the T/C gasket in place.
Racer
Joined: Jul 2008
Posts: 437
Likes: 3
From: Indiana
I have a 99 C5 but that shouldn't matter, I'm telling you it fit and your will no problem, the only time I have heard about needing to clearance anything is if running a double roller chain.
If you want a stronger chain go with the katech and be done with it, I ran the LS2 and the h/v pump without a problem at all. Well other than my cam bolts coming loose a day after the install but that's a whole other discussion
Oil pressure is at about 70psi cold and when the oil fully warms up ~200* it's at about 35psi.
I replaced the high pressure spring with the standard pressure spring and I'd recommend you do the same.

Racer
Joined: Jul 2008
Posts: 437
Likes: 3
From: Indiana
I have a 99 C5 but that shouldn't matter, I'm telling you it fit, and yours will, without a problem, the only time I have heard about needing to clearance anything is if running a double roller chain.
If you want a stronger chain go with the katech and be done with it, I ran the LS2 and the h/v pump without a problem at all. Well other than my cam bolts coming loose a day after the install but that's a whole other discussion
Oil pressure is at about 70psi cold and when the oil fully warms up ~200* it's at about 35psi.
I replaced the high pressure spring with the standard pressure spring and I'd recommend you do the same.
I just did this about a month ago, and did it twice so it's very fresh in my mind
Tech Contributor
Joined: Dec 1999
Posts: 32,910
Likes: 2,402
From: Anthony TX
CI 6,7,8,9,11 Vet
St. Jude Donor '08
If it were me,,, I would NOT bake the damper. Heating the ENTIRE HUB is a lot different than directly heating just the hub. It doesn't take much heat to get it to expand when you directly heat just the HUB. Were NOT talking cherry red! 
Getting it to 150 deg is very quick and does not harm the damper or other engine components. It takes a little longer with a Wagner heat gun than it does with a propane torch,
My pick up tube only had ONE bolt! ALL the C5 that I have ever worked on have only had ONE bolt.
As far as the O ring goes,,,,, that updated new thicker O ring seals a LOT better and it does fit fine. I used an inspection mirror to make sure that the O ring was properly inserted into the recess and NOT extruded out the side.
I'm pretty good at manipulating the screw and not dropping it in the pan BUT,,, I went ahead and put some paper towels in the opening to prevent it from getting away!
Make sure that you read and PRINT OUT the procedure on properly tightening the crank/damper bolt! FOLLOW THE PROCEDURE 100% and do NOT take shortcuts.
I made my OWN damper install tool from an old bolt and some all thread welded together. You need the tool to start the damper on to the crank!! Do not use the old bolt to start the damper as you may pull out the first few threads in the crank snout.
I also used a LARGE strap wrench to hold the damper still during bolt removal and bolt re-torque.. Using that procedure I can do the entire procedure MY SELF!
BC
Getting it to 150 deg is very quick and does not harm the damper or other engine components. It takes a little longer with a Wagner heat gun than it does with a propane torch,
My pick up tube only had ONE bolt! ALL the C5 that I have ever worked on have only had ONE bolt.
As far as the O ring goes,,,,, that updated new thicker O ring seals a LOT better and it does fit fine. I used an inspection mirror to make sure that the O ring was properly inserted into the recess and NOT extruded out the side.
I'm pretty good at manipulating the screw and not dropping it in the pan BUT,,, I went ahead and put some paper towels in the opening to prevent it from getting away!
Make sure that you read and PRINT OUT the procedure on properly tightening the crank/damper bolt! FOLLOW THE PROCEDURE 100% and do NOT take shortcuts.
I made my OWN damper install tool from an old bolt and some all thread welded together. You need the tool to start the damper on to the crank!! Do not use the old bolt to start the damper as you may pull out the first few threads in the crank snout.
I also used a LARGE strap wrench to hold the damper still during bolt removal and bolt re-torque.. Using that procedure I can do the entire procedure MY SELF!
BC
Thread Starter
Burning Brakes
Joined: Feb 2006
Posts: 1,085
Likes: 3
From: Ottawa Ontario, Canada
Now after all this discussion I went and looked at my old parts and it appears the balancer bottoms out on the crank timing gear and OD. of the balancer is smaller then the ID. of the pump gear.
Just take your time and check and recheck all your clearances and you will be fine, tip check your clearance without the T/C gasket in place.
Just take your time and check and recheck all your clearances and you will be fine, tip check your clearance without the T/C gasket in place.