


NEED HELP installing UD pulley
Thread Starter
Instructor

Joined: Sep 2010
Posts: 122
Likes: 0
From: mi
Ok I posted this up not that long ago about not being able to get my Powerbond UD pulley on and I thought I got it but am still having problems. All my other stock pulleys have sat flush with the crank but I have never had a UD pulley so Im not sure if this is correct. I have installed a stock pulley a few times with no problems but this one went on harder than normal. I got it to this point and it got to the point where I was fighting it to get it on anymore. Also it doesnt look like it wont go on any farther and my crank pulley and water pump pulley are perfectly inline. Here are pics, Let me know what you guys think.


Last edited by parks450; Feb 6, 2012 at 09:22 PM.

Tech Contributor


Joined: Dec 1999
Posts: 32,910
Likes: 2,402
From: Anthony TX
CI 6,7,8,9,11 Vet
St. Jude Donor '08
This is going to sound weird but it has worked EVERY TIME for me. Use a propane torch and heat up the HUB portion of the damper until its approx 200 deg. It will not take long and if you just heat the hub, it will not hurt anything on the damper crank seals or engine.
Once its at temp, use a damper install tool and it SHOULD slide on easier! If it wont go on any further. Let it cool over night and once everything is cool, reheat the HUB and REMOVE the damper and inspect the damper, crank snout and cover.
HEAT IS YOUR FRIEND! I used a little bit of wd-40 on the snout and damper and heated it up and it went on a WHOLE LOT EASIER than I ever expected!
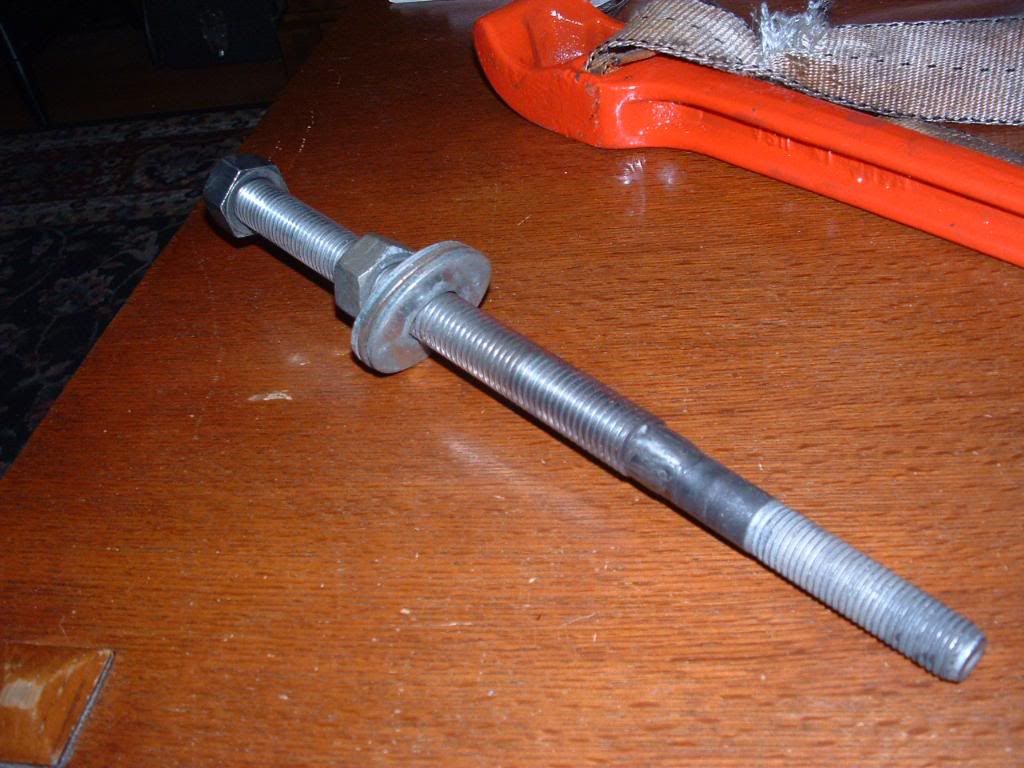
Here is my home made damper install tool. I also use a giant strap wrench and I can install it and properly torque it myself. I also up graded to an ARP Damper Bolt. Well worth the $25.

Once its at temp, use a damper install tool and it SHOULD slide on easier!
If it wont go on any further. Let it cool over night and once everything is cool, reheat the HUB and REMOVE the damper and inspect the damper, crank snout and cover.HEAT IS YOUR FRIEND! I used a little bit of wd-40 on the snout and damper and heated it up and it went on a WHOLE LOT EASIER than I ever expected!
Here is my home made damper install tool. I also use a giant strap wrench and I can install it and properly torque it myself. I also up graded to an ARP Damper Bolt. Well worth the $25.
Last edited by Bill Curlee; Feb 7, 2012 at 04:41 PM.

Pro


Joined: Sep 2008
Posts: 660
Likes: 17
From: Tustin California
If it was mine, I'd pull the pulley back and mike it and then mike the crank snout. If you are using a tool to install and it stops totally there is a reason. You say that the crank and water pump are perfectly in line and you still have a 1/2 inch to go is a red flag to me that maybe you don't have a balancer for a c5. Maybe I'm misreading your post. It is a really tight fit but I remember you posting about this a while back and They just aren't that hard to install. Bill is right on about the heat. Have you tried it? Good luck Rod
Team Owner


Joined: Mar 1999
Posts: 22,025
Likes: 192
From: At the beach in little Rhody
One of the steps in the GM installation procedure is a measurement from the edge of the pulley hub to the tip of the crank (how deep is the crank recessed). The distances provided in the manual are obviously for a stock unit. When I did my ATI, I re-measured the hub length as compared to stock so I could establish the correct depth measurement with the ATI hub. The only way to perform this step with the PB is to know the hub length and how it compares to stock. Once you have this and take the measurement you will know if the pulley has bottomed. Everything else at this point is just a guess.
I also agree with rodsvet as I have seen where several guys have received the wrong part number and although it looks correct it is not.
I also agree with rodsvet as I have seen where several guys have received the wrong part number and although it looks correct it is not.
Corvette Stories
The Best of Corvette for Corvette Enthusiasts

5 Best & 5 Worst Corvette Daily Drivers
Joe Kucinski
The Headlights of Every Corvette Generation Explained
Joe Kucinski
5 Best & 5 Most Overrated Corvette Track Packages of All Time!
Joe Kucinski
Every 2027 Corvette Engine Explained
Joe Kucinski
Designer Imagines A Corvette That Looks More Like a Corvette Than the Corvette
Verdad Gallardo
10 Ugly Corvettes That We Still Kinda Love
Joe Kucinski
Top 10 Most Expensive Corvettes Ever Sold on Bring A Trailer
Brett Foote
10 Things Every Corvette Owner Needs (2026 Edition)
Michael S. Palmer
8 Most "Only Corvette Owners Understand" Quirks and Problems
Pouria Savadkouei
Drifting


Joined: Mar 2011
Posts: 1,823
Likes: 43
From: East Aurora NY
I used the Hawk install tool and mine went on father than that.

I highlighted with a red line the distance, since it's not the easiest to see after the black coating is rubbed off the UD balancer.
I highlighted with a red line the distance, since it's not the easiest to see after the black coating is rubbed off the UD balancer.
Race Director


Joined: Apr 2007
Posts: 11,152
Likes: 890
From: South Western Ontario
It doesn't look on far enough to me.
You need to confirm the part number and then confirm the interference fit. I don't know for sure but it likely should have an interference fit something around 3 thousanths of an inch. The manual should have the info. Then, you heat the hub and press it on. If you're not sure about the torch, heat the oven to 200 degrees and throw it in there for 10 minutes before installing.
Peter
Thread Starter
Instructor
Joined: Sep 2010
Posts: 122
Likes: 0
From: mi
Yea im Going to try heating her up. It doesn't help the tool I made which is basically identical to the hawk tool, it was binding on the threads inside and I couldn't turn it even just holding it without a lot of force. So I may pick up the hawk tool and give her a try, anyone else think its overpriced? I built two of them basically identical and it was under $30. If I would have taken more time I could have perfected it