


Shifter issues

Thread Starter
Burning Brakes


Joined: Jan 2008
Posts: 1,120
Likes: 1
From: Biloxi Ms
My situation is such
I have a 99 with a aftermarket short shifter (I think Hurst, but not sure... it was installed by the previous owner).
A few months ago the joy stick is loose and slopping around and I cant get the car into gear.
I pull the dash and console off to find the shifter plate off the shifter box.
I dont remember seeing the nuetral alignment peg when I had it apart.
So I bolt down the shifter again (given I remember feeling like it didnt bolt down enough and I remember feeling like the bolts were grabbing enough of the threads), and everything was fine.
It seemed like after it was bolted down my shifter was alot better from how it had been for years.
Ok, heres the issue.
Today without any warning the shifter repeated the same action. Luckily I was able to get home in 3rd gear and now I am trying to get everything setup for tomorrows tear down and hopefully improvement.
I have a tap and die set and I plan to clean the threads and hopefully that will help it grab more. I plan to use new longer bolts to get the ful length grabbing. I plan to use some thread lock to hold the bolts in. (any suggestions on which to use? red / blue?). And I figure that since I have it apart, if i can I would like to align it but, I would like some directions with pictures on how to align this. Also i would like to know how to align this IF the alignment peg is missing.
Anything you can suggest to help me complete this correctly so it will fix the nasty 1st and 5th gear engagement, and hopefully this floppy shifter issue will not happen again.
thanks in advance for your advice

Tech Contributor


Joined: Dec 1999
Posts: 32,910
Likes: 2,402
From: Anthony TX
CI 6,7,8,9,11 Vet
St. Jude Donor '08
A picture of what you have would help to guide you.
Low strength thread locker is all you need. Use a thin metal wire to measure the depth of the shifter box holes. Then measure the thickness of the shifter flange and obtain a bolt a little shorter than the hole plus the flange thickness.
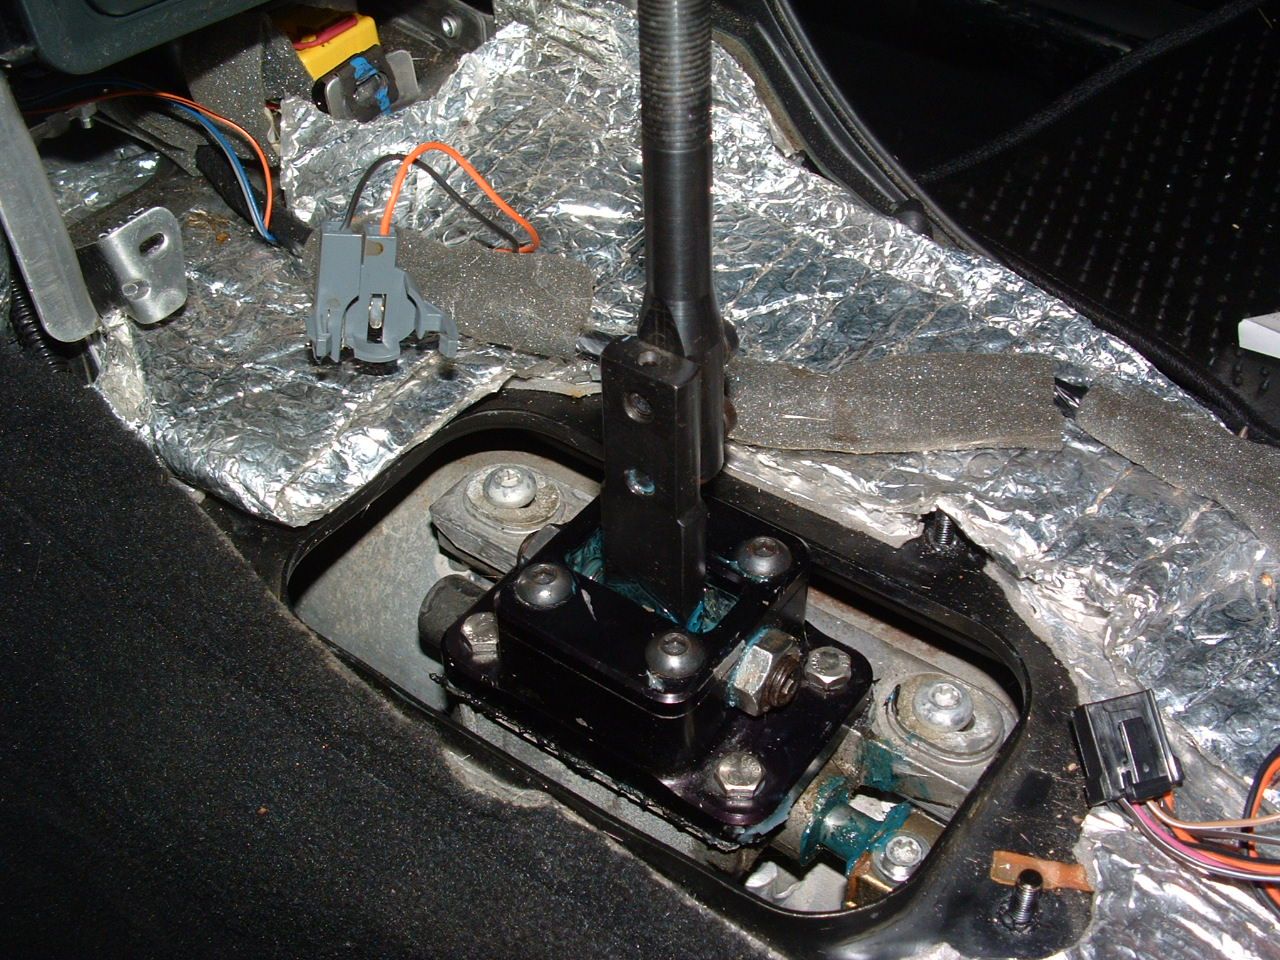
once the bolt thing is resolved,, shift the trans into N and attempt to insert a drill bit into the alignment hole. If the shifter shaft isn't aligned to the hole, loosen the two bolts that secure the box to the torque tube and move the box forward or aft until the drill bit slips down into the holes.
Re tighten the two bolts.
NOTE!!! if you have a NON ZO6,, your box bolts will have a rubber grommets for an isolation mount.. Make sure that it is NOT deteriorated or damaged and sloppy.
Here is my KIRBAN Shifter vs Stock ZO6
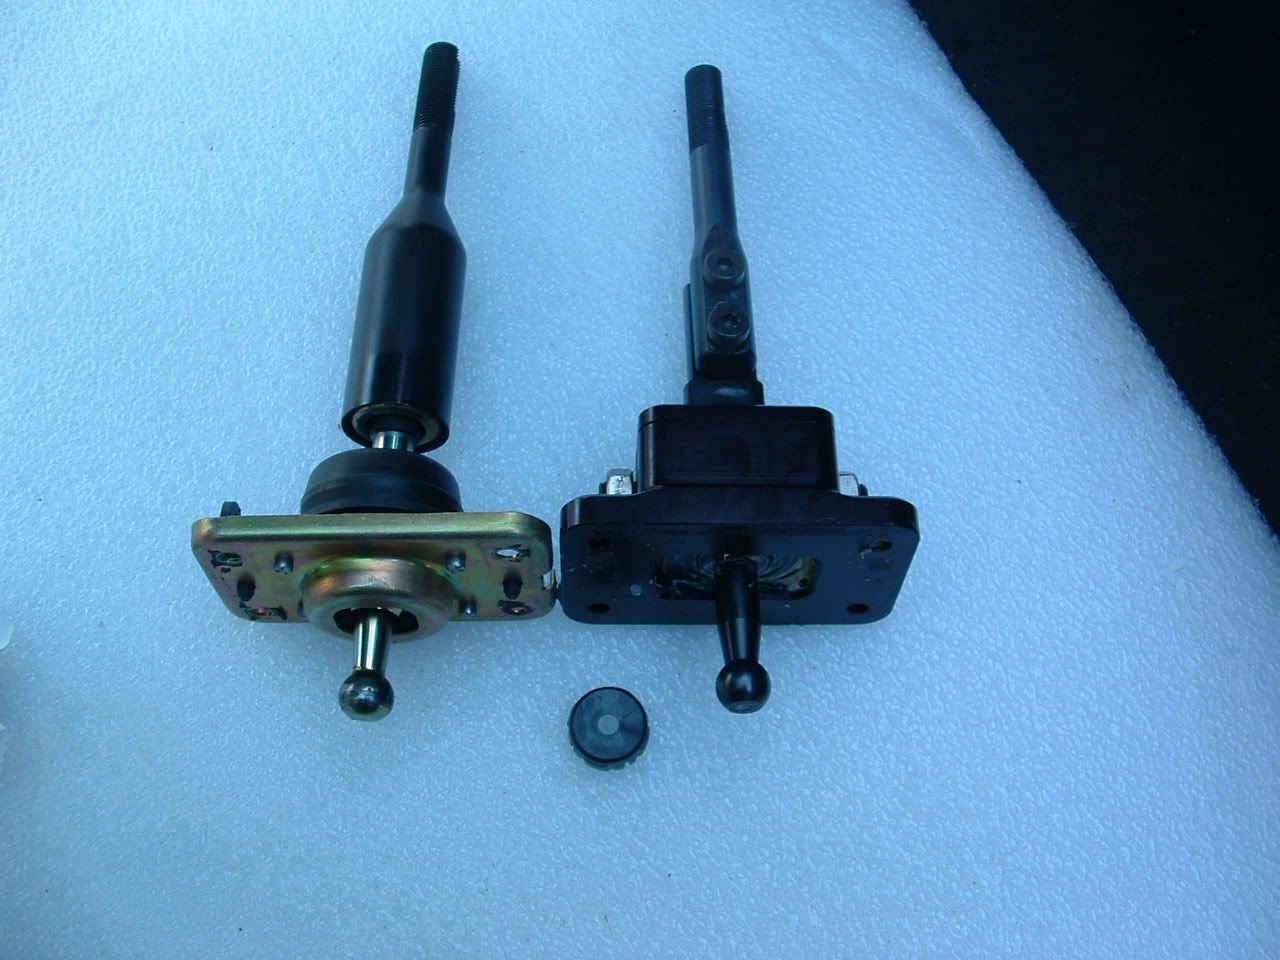


Stock alignment pin and its in a ZO6 solid bushing set up.
Note! Don't over torque the bolts.. Make sure that the bushings are not damaged and the black shift yoke ball is not sloppy in the yoke.
Bill
Low strength thread locker is all you need. Use a thin metal wire to measure the depth of the shifter box holes. Then measure the thickness of the shifter flange and obtain a bolt a little shorter than the hole plus the flange thickness.
once the bolt thing is resolved,, shift the trans into N and attempt to insert a drill bit into the alignment hole. If the shifter shaft isn't aligned to the hole, loosen the two bolts that secure the box to the torque tube and move the box forward or aft until the drill bit slips down into the holes.
Re tighten the two bolts.
NOTE!!! if you have a NON ZO6,, your box bolts will have a rubber grommets for an isolation mount.. Make sure that it is NOT deteriorated or damaged and sloppy.
Here is my KIRBAN Shifter vs Stock ZO6
Stock alignment pin and its in a ZO6 solid bushing set up.
Note! Don't over torque the bolts.. Make sure that the bushings are not damaged and the black shift yoke ball is not sloppy in the yoke.
Bill
Last edited by Bill Curlee; Mar 16, 2013 at 09:25 PM.
Thread Starter
Burning Brakes
Joined: Jan 2008
Posts: 1,120
Likes: 1
From: Biloxi Ms
Bill thanks for the info
Question... is the torque for the bolts 22ft/lbs?
(For all torx head and the hex head bolts)
Also, I dont have a Z06 but if possible would setting up the shifter as a Z06 wouldnt hurt or change anything right?
And, is there a way to replace the rubber grommets or switch to a z06 style at the local parts store or hardware shop (since 1- its sunday, 2- I really dont want to wait on the parts to come in at the local stealership, and 3- possibly could get the same results with less price?)
Thanks again!!
Tech Contributor
Joined: Dec 1999
Posts: 32,910
Likes: 2,402
From: Anthony TX
CI 6,7,8,9,11 Vet
St. Jude Donor '08
Bill thanks for the info
Question... is the torque for the bolts 22ft/lbs?
(For all torx head and the hex head bolts)
Also, I dont have a Z06 but if possible would setting up the shifter as a Z06 wouldnt hurt or change anything right?
And, is there a way to replace the rubber grommets or switch to a z06 style at the local parts store or hardware shop (since 1- its sunday, 2- I really dont want to wait on the parts to come in at the local stealership, and 3- possibly could get the same results with less price?)
Thanks again!!
Question... is the torque for the bolts 22ft/lbs?
(For all torx head and the hex head bolts)
Also, I dont have a Z06 but if possible would setting up the shifter as a Z06 wouldnt hurt or change anything right?
And, is there a way to replace the rubber grommets or switch to a z06 style at the local parts store or hardware shop (since 1- its sunday, 2- I really dont want to wait on the parts to come in at the local stealership, and 3- possibly could get the same results with less price?)
Thanks again!!
The ZO6 solid bushings are NO LONGER available from the dealer. Check with ZIP Products for better bushings
Shift Linkage Adjustment
Apply the parking brake.
Remove the shift control closeout boot. Refer to Shift Control Shift Closeout Boot Replacement .
Place the shifter into NEUTRAL.
Press down to engage the shift control neutral lock pin.
Loosen the transmission shift rod clamp bolt.
Loosen the shift control mounting bolts.
Check that the shift control locator (on the underside of the shift control) is installed into the shifter bracket on the side of the driveline support assembly.
Notice
Use the correct fastener in the correct location. Replacement fasteners must be the correct part number for that application. Fasteners requiring replacement or fasteners requiring the use of thread locking compound or sealant are identified in the service procedure. Do not use paints, lubricants, or corrosion inhibitors on fasteners or fastener joint surfaces unless specified. These coatings affect fastener torque and joint clamping force and may damage the fastener. Use the correct tightening sequence and specifications when installing fasteners in order to avoid damage to parts and systems.
Tighten the shift control mounting bolts. Tighten
Tighten the shift control mounting bolts to 30 N�m (22 lb ft).
Tighten the transmission shift rod clamp bolt. Tighten
Tighten the transmission shift rod clamp bolt to 30 N�m (22 lb ft).
Lift to release the shift control neutral lock pin.
Install the shift control closeout boot. Refer to Shift Control Shift Closeout Boot Replacement .
Release the parking brake.
--------------------------------------------------------------------------------
Document ID# 239720
2001 Chevrolet/Geo Corvette
.
Instructor


Joined: Apr 2006
Posts: 169
Likes: 0
From: Brighton Mi
A picture of what you have would help to guide you.
Low strength thread locker is all you need. Use a thin metal wire to measure the depth of the shifter box holes. Then measure the thickness of the shifter flange and obtain a bolt a little shorter than the hole plus the flange thickness.
once the bolt thing is resolved,, shift the trans into N and attempt to insert a drill bit into the alignment hole. If the shifter shaft isn't aligned to the hole, loosen the two bolts that secure the box to the torque tube and move the box forward or aft until the drill bit slips down into the holes.
Re tighten the two bolts.
NOTE!!! if you have a NON ZO6,, your box bolts will have a rubber grommets for an isolation mount.. Make sure that it is NOT deteriorated or damaged and sloppy.
Here is my KIRBAN Shifter vs Stock ZO6
Stock alignment pin and its in a ZO6 solid bushing set up.
Note! Don't over torque the bolts.. Make sure that the bushings are not damaged and the black shift yoke ball is not sloppy in the yoke.
Bill
Team Owner


Joined: May 2001
Posts: 87,314
Likes: 1,585
From: Western NY
For those who are not aware of this adjustment procedure, the picture above, in Bill's post, shows the alignment pin in place during the adjustment. Once everything is tightened down, the pin is removed. Failure to remove the pin, will result in an inability to shift gears.
Also, in Bill's post, he mentioned aftermarket shift box bushings (polyurethane). I recently installed them in my car. They most definitely stiffened up the action of my shifter. Although my '01 is a low mile car, the OE rubber bushings were showing their age.
If you decide to get the bushings from ZIP, one installation tip: The OE bushings, being rubber, will "accommodate" any irregularities in the oval shaped opening on the shift box. It's a cast piece, with a "reasonably well machined" oval shaped opening, where the bushings press in. The aftermarket poly parts are not as accommodating of any inaccuracies in the shape of this opening, and I had to apply a little "file to fit" action, in order to get the new bushings to fit snugly.
Corvette Stories
The Best of Corvette for Corvette Enthusiasts

150 hp to 1,250 hp: Every Corvette Generation Compared by the Specs That Matter
Joe Kucinski
8 Coolest Corvette Pace Cars (and Replicas) of All Time
Verdad Gallardo
Top 10 Corvette Engines RANKED by Peak Torque (70+ Years of Muscle!)
Joe Kucinski
Corvette ZR1X Will Be Pacing the Indy 500, And Could Probably Race, Too!
Verdad Gallardo
Top 10 Corvettes Coming to Mecum Indy 2026!
Brett Foote
Top 10 C9 Corvette MUST-HAVES to Fix These C8 Generation Flaws!
Michael S. Palmer
10 Revolutionary 'Corvette Firsts' Most People Don't Know
Joe Kucinski
5 Reasons to Upgrade to an LS6-Powered Corvette; 5 Reasons to Stay LT2
Michael S. Palmer