


 I've read about this till I sick of reading... I'm nervous and apprehensive...


How much wobble is acceptable?

Le Mans Master

Joined: Mar 2011
Posts: 6,835
Likes: 302
From: Columbia SC

Steve , I will look the next time I get my car out and let you know. But, if I see an issue you will be blamed.

Thread Starter
Le Mans Master
Joined: Feb 2012
Posts: 6,644
Likes: 479
From: OK
About the only thing you can expect from an OEM replacement is to spend a few less $$$ up front. I have had an aftermarket balancer on my 04 since 2009. But not because the OEM failed. I also have mine pinned, something that is not necessary for stock engine setups. Plenty of threads on who favors what brand aftermarket balancer so I won't mention the brand of mine.
If you are going to do this yourself be certain to heed all the warnings about locking the steering wheel so as not to move it and mark everything on the rack prior to disassembly so that it doesn't get moved on reassembly. I disabled my CLB so I could use the column lock to prevent the steering wheel from moving.
If you are going to do this yourself be certain to heed all the warnings about locking the steering wheel so as not to move it and mark everything on the rack prior to disassembly so that it doesn't get moved on reassembly. I disabled my CLB so I could use the column lock to prevent the steering wheel from moving.
Pro


Joined: Jan 2010
Posts: 669
Likes: 13
I put an LS3 balancer on mine from a C6 Vette, works great. Spring the $ for an ARP bolt so that you don't have to replace it if you take it apart again in the future, the stock bolt is TTY so it's only good for a single use.

Tech Contributor


Joined: Dec 1999
Posts: 32,910
Likes: 2,402
From: Anthony TX
CI 6,7,8,9,11 Vet
St. Jude Donor '08
Ive done this too many times to count. Here are some tips and info:
- ARP BOLT!
- I used the Power Bond Dampener and I also pinned it to the crank
- I have removed the rack and I have also removed the radiator and just pushed the passengers side of the rack forward and up to have access to the dampener bolt and to be able to install and use the puller.
- HEAT the dampener "HUB" with a Wagner heat gun or a propane torch to about 200 degs. Doesn't need to be schorching hot to make a big difference in force to remove or reinstall it. You will be amazed at how much easier it is to pull OFF and press back ON using heat!
- DO NOT use the old bolt to press the dampener on to the crank!!! NOTE, You DO use the old bolt to properly SEAT the dampener fully on to the crank once it is properly pressed on using the OTC Tool.
I used a BIG Strap Wrench to hold the dampener and prevent the engine from turning when I did my finial torque on the ARP BOLT.
 MAKE SURE that you secure the steering wheel STRAIGHT and the wheels are pointing straight and do not rotate the steering wheel while the rack and steering shaft are disconnected. When you reinstall the rack, make sure that the wheels are pointed STRAIGHT.
- I removed the radiator / fan shroud mainly because I was also doing a cam but that gives you the most working room.
- Replace the front cover seal and MAKE SURE that you put oil on the rubber seal and on the damper sealing surface before reassembly.
- If you are this far and have the dampener off, it would be a GREAT time to replace the oil pump & the timing chain. If you have never replaced the timing chain, it is strongly recommended as the LS1/LS6 chain is weak. The rollers are NOT solid and can split in half.
- The LS2/2/7 chain is a fantastic OEM replacement and works well and is not expensive.
- If you do remove the front cover, NOTE that the cover gasket will fit two ways. ONLY ONE WAY is the correct way. If you put it on backwards you will have a massive oil leak!
- Get a good set of flair nut wrenches to remove the hydraulic line flare nuts from the PS Rack. I sware that they use Gorillas to torque those flare nuts to the rack!! A normal wrench most of the time rounds off the flare nuts. I used Sears Craftsmen flare nut wrenches and they worked very well.
Good time to COMPLETELY flush and drain the radiator and the block and refill it with good stuff. I used a wet and dry vac to get ALL the old antifreeze out of the block. Clean the radiator and condenser while its apart. Use DISTILLED water and the correct dilution of DEXCOOL to refill.
MAKE SURE that you properly reattach the and seat the fan shroud on the radiator or it will come loose down the road when it 100 degrees out in the middle of no where! ASK ME HOW I KNOW!!!
 YES the engine will start running a lot hotter than it normally does if it pops loose and separates from the radiator .
- IF,,, You use an OEM Dampener bolt, it is a TORQUE TO YEILD bolt and there is a very specific procedure that you MUST use to reinstall it and torque it in place. If you don't follow the torque procedure, you will most likely be doing this job again in the near future as the bolt can and will come loose. You MUST purchase and install a NEW OEM DAMPENER BOLT each time you remove it.
Well,,, I THINK,,,, I covered just about everything...
Some pictures for you:
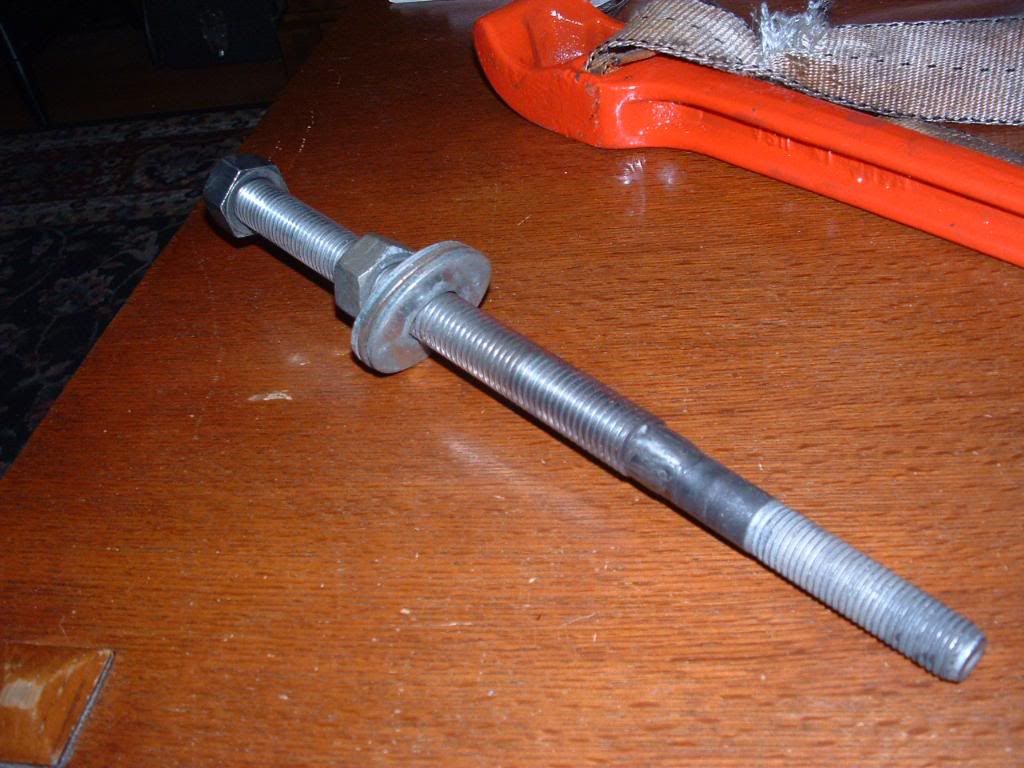
I made my own installation tool out of an old bolt and some all thread. Here is the strap wrench I used:

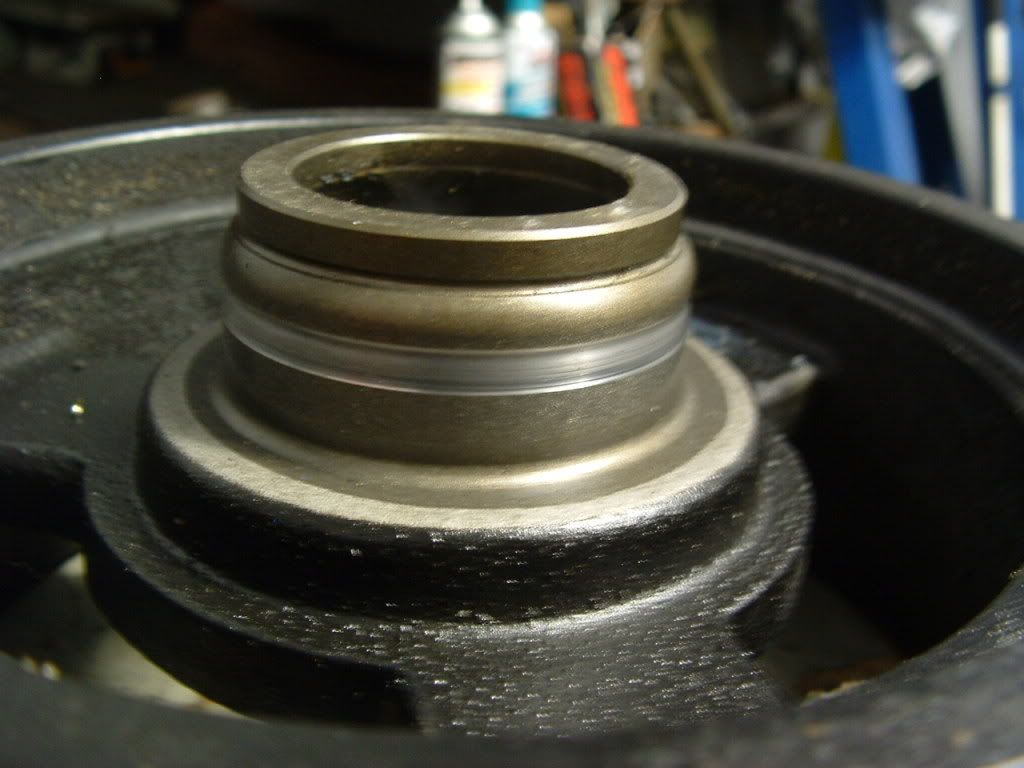
My OLD OEM Dampener was good and didn't wobble but, the oil seal cut the sealing surface and I developed a massive oil leak:
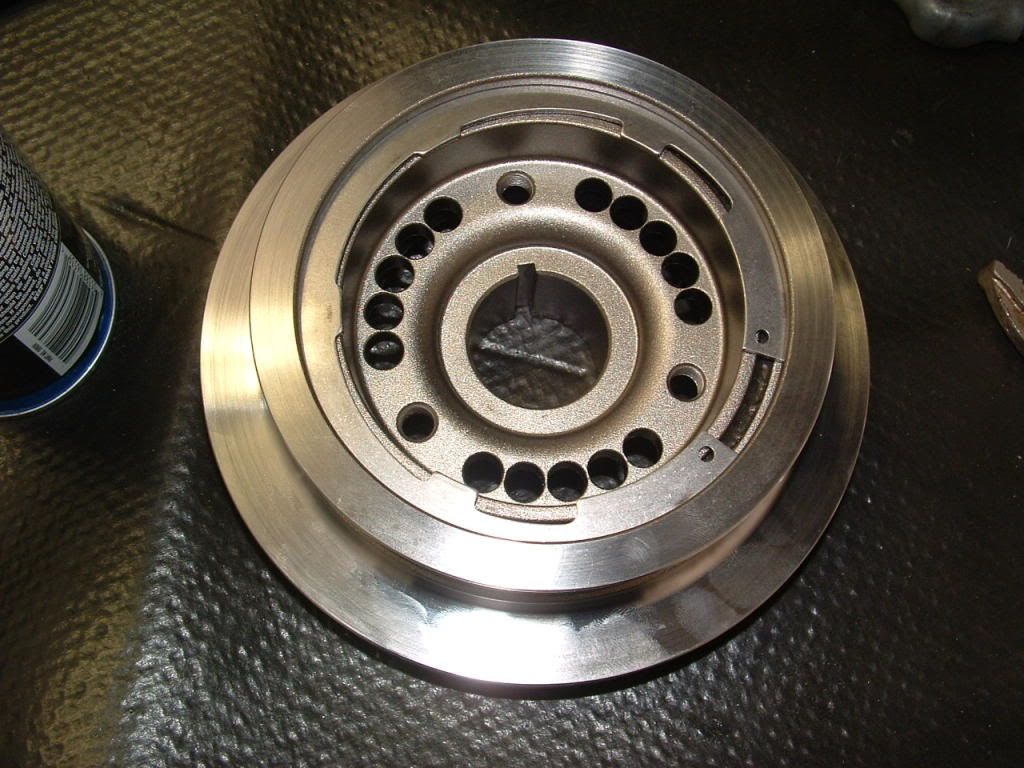
I used the Power Bond dampener as a replacement:
http://smg.photobucket.com/user/bill...l?sort=3&o=334
OLD OEM Timing Chain vs LS2 timing chain. You can see the SPLIT roller on the old chain.
If you remove the timing chain, make sure that you use HIGH STRENGTH locking compound on the fasteners that secure the gear to the cam when you reinstall it.

If you have a late model block, your block MAY be machined to accept a timing chain dampener. If it is, I would recommend purchasing one and installing it:
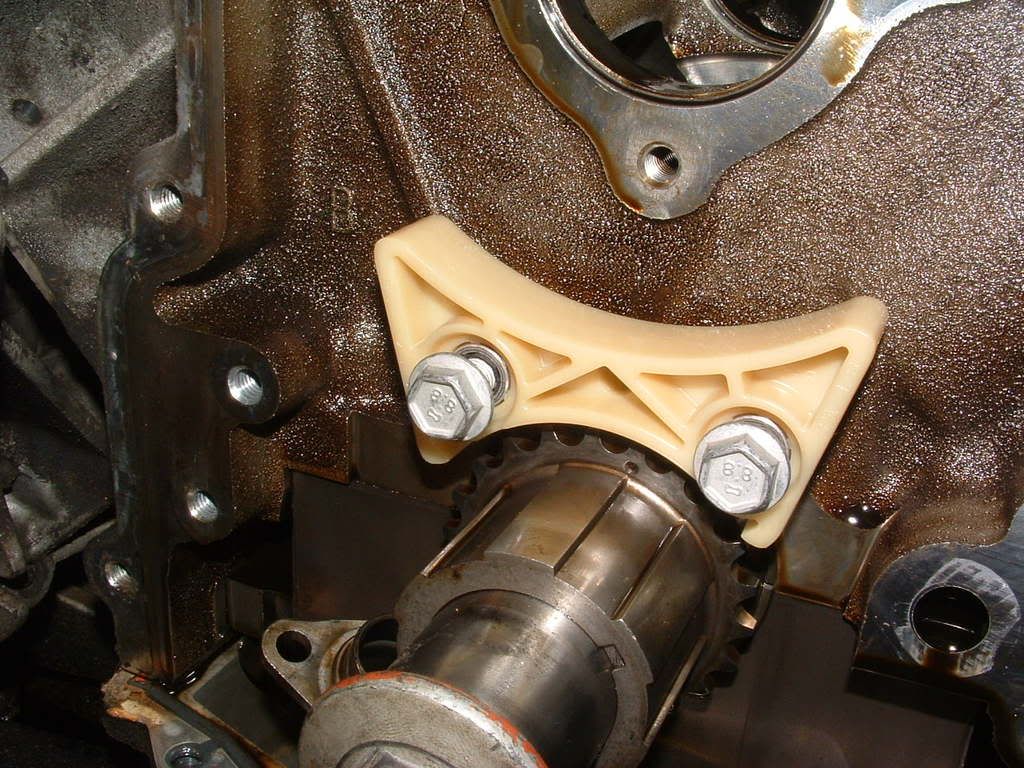
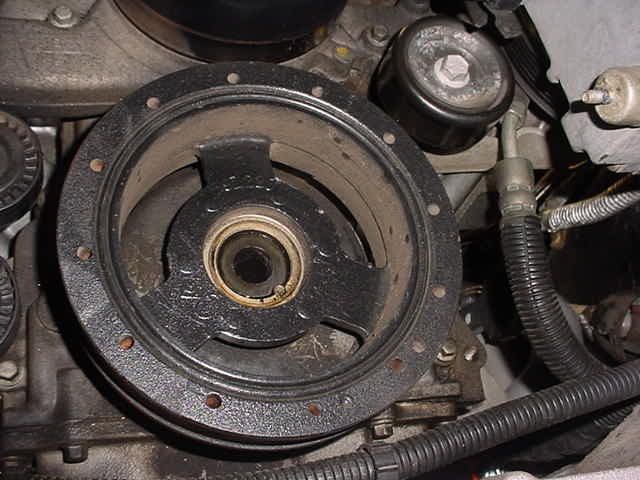
2000 C5, does NOT have the machined holes for the dampener. Good picture to see the difference between the LEFT and RIGHT side of the cover seating surface. One side has a PORT for the oil pump. "DRIVERS SIDE"


Bill
- ARP BOLT!
- I used the Power Bond Dampener and I also pinned it to the crank
- I have removed the rack and I have also removed the radiator and just pushed the passengers side of the rack forward and up to have access to the dampener bolt and to be able to install and use the puller.
- HEAT the dampener "HUB" with a Wagner heat gun or a propane torch to about 200 degs. Doesn't need to be schorching hot to make a big difference in force to remove or reinstall it. You will be amazed at how much easier it is to pull OFF and press back ON using heat!
- DO NOT use the old bolt to press the dampener on to the crank!!! NOTE, You DO use the old bolt to properly SEAT the dampener fully on to the crank once it is properly pressed on using the OTC Tool.
I used a BIG Strap Wrench to hold the dampener and prevent the engine from turning when I did my finial torque on the ARP BOLT.
MAKE SURE that you secure the steering wheel STRAIGHT and the wheels are pointing straight and do not rotate the steering wheel while the rack and steering shaft are disconnected. When you reinstall the rack, make sure that the wheels are pointed STRAIGHT.- I removed the radiator / fan shroud mainly because I was also doing a cam but that gives you the most working room.
- Replace the front cover seal and MAKE SURE that you put oil on the rubber seal and on the damper sealing surface before reassembly.
- If you are this far and have the dampener off, it would be a GREAT time to replace the oil pump & the timing chain. If you have never replaced the timing chain, it is strongly recommended as the LS1/LS6 chain is weak. The rollers are NOT solid and can split in half.
- The LS2/2/7 chain is a fantastic OEM replacement and works well and is not expensive.
- If you do remove the front cover, NOTE that the cover gasket will fit two ways. ONLY ONE WAY is the correct way. If you put it on backwards you will have a massive oil leak!
- Get a good set of flair nut wrenches to remove the hydraulic line flare nuts from the PS Rack. I sware that they use Gorillas to torque those flare nuts to the rack!! A normal wrench most of the time rounds off the flare nuts. I used Sears Craftsmen flare nut wrenches and they worked very well.
Good time to COMPLETELY flush and drain the radiator and the block and refill it with good stuff. I used a wet and dry vac to get ALL the old antifreeze out of the block. Clean the radiator and condenser while its apart. Use DISTILLED water and the correct dilution of DEXCOOL to refill.
MAKE SURE that you properly reattach the and seat the fan shroud on the radiator or it will come loose down the road when it 100 degrees out in the middle of no where! ASK ME HOW I KNOW!!!
YES the engine will start running a lot hotter than it normally does if it pops loose and separates from the radiator . - IF,,, You use an OEM Dampener bolt, it is a TORQUE TO YEILD bolt and there is a very specific procedure that you MUST use to reinstall it and torque it in place. If you don't follow the torque procedure, you will most likely be doing this job again in the near future as the bolt can and will come loose. You MUST purchase and install a NEW OEM DAMPENER BOLT each time you remove it.
Well,,, I THINK,,,, I covered just about everything...
Some pictures for you:
I made my own installation tool out of an old bolt and some all thread. Here is the strap wrench I used:
My OLD OEM Dampener was good and didn't wobble but, the oil seal cut the sealing surface and I developed a massive oil leak:
I used the Power Bond dampener as a replacement:
http://smg.photobucket.com/user/bill...l?sort=3&o=334
OLD OEM Timing Chain vs LS2 timing chain. You can see the SPLIT roller on the old chain.
If you remove the timing chain, make sure that you use HIGH STRENGTH locking compound on the fasteners that secure the gear to the cam when you reinstall it.
If you have a late model block, your block MAY be machined to accept a timing chain dampener. If it is, I would recommend purchasing one and installing it:
2000 C5, does NOT have the machined holes for the dampener. Good picture to see the difference between the LEFT and RIGHT side of the cover seating surface. One side has a PORT for the oil pump. "DRIVERS SIDE"
Bill
Last edited by Bill Curlee; May 7, 2015 at 04:35 PM.
Thread Starter
Le Mans Master
Joined: Feb 2012
Posts: 6,644
Likes: 479
From: OK
WOW Bill thank you sooooooo much others will be able to copy this to their C5 files and have an concise, knowledgeable, way to deal with this issue...
I did have a few questions:
I did have a few questions:
Ive done this too many times to count. Here are some tips and info:
- ARP BOLT!
- I used the Power Bond Dampener and I also pinned it to the crank
Plans to or have a supercharger or just added insurance?
- I have removed the rack and I have also removed the radiator and just pushed the passengers side of the rack forward and up to have access to the dampener bolt and to be able to install and use the puller.
I'm assuming just pushing the passenger side of the rack forward and up is faster and simpler, if I'm not going to change the timing gear?
- HEAT the dampener "HUB" with a Wagner heat gun or a propane torch to about 200 degs. Doesn't need to be schorching hot to make a big difference in force to remove or reinstall it. You will be amazed at how much easier it is to pull OFF and press back ON using heat!
- DO NOT use the old bolt to press the dampener on to the crank!!! NOTE, You DO use the old bolt to properly SEAT the dampener fully on to the crank once it is properly pressed on using the OTC Tool.
I used a BIG Strap Wrench to hold the dampener and prevent the engine from turning when I did my finial torque on the ARP BOLT.
Do you use loctite on the ARP Bolt?
I've seen a few places that if you have a 6 spd you can put it in 4th gear, set the e-brake, and chock the back wheels...to keep the engine from turning during torque.... what are your thoughts on that?
MAKE SURE that you secure the steering wheel STRAIGHT and the wheels are pointing straight and do not rotate the steering wheel while the rack and steering shaft are disconnected. When you reinstall the rack, make sure that the wheels are pointed STRAIGHT.
- I removed the radiator / fan shroud mainly because I was also doing a cam but that gives you the most working room.
- Replace the front cover seal and MAKE SURE that you put oil on the rubber seal and on the damper sealing surface before reassembly.
- If you are this far and have the dampener off, it would be a GREAT time to replace the oil pump & the timing chain. If you have never replaced the timing chain, it is strongly recommended as the LS1/LS6 chain is weak. The rollers are NOT solid and can split in half.
- The LS2/2/7 chain is a fantastic OEM replacement and works well and is not expensive.
- If you do remove the front cover, NOTE that the cover gasket will fit two ways. ONLY ONE WAY is the correct way. If you put it on backwards you will have a massive oil leak!
Is it fairly easy to tell which way is the correct way if, your paying attention?
- Get a good set of flair nut wrenches to remove the hydraulic line flare nuts from the PS Rack. I sware that they use Gorillas to torque those flare nuts to the rack!! A normal wrench most of the time rounds off the flare nuts. I used Sears Craftsmen flare nut wrenches and they worked very well.
Good time to COMPLETELY flush and drain the radiator and the block and refill it with good stuff. I used a wet and dry vac to get ALL the old antifreeze out of the block. Clean the radiator and condenser while its apart. Use DISTILLED water and the correct dilution of DEXCOOL to refill.
MAKE SURE that you properly reattach the and seat the fan shroud on the radiator or it will come loose down the road when it 100 degrees out in the middle of no where! ASK ME HOW I KNOW!!! YES the engine will start running a lot hotter than it normally does if it pops loose and separates from the radiator .
How do you know?... fubar
- IF,,, You use an OEM Dampener bolt, it is a TORQUE TO YEILD bolt and there is a very specific procedure that you MUST use to reinstall it and torque it in place. If you don't follow it 1005, you will most likely be doing this job again in the near future. You MUST purchase and install a NEW OEM BOLT each time you remove it.
I do not have an FSM... can you share the specific procedure for reinstall and torque?
Did you mark the orientation of your old balancer and then have the NEW one balanced also?
Well,,, I THINK,,,, I covered just about everything...
Some pictures for you:
I made my own installation tool out of an old bolt and some all thread. Here is the strap wrench I used:
My OLD OEM Dampener was good and didn't wobble but, the oil seal cut the sealing surface and I developed a massive oil leak:
I used the Power Bond dampener as a replacement:
http://smg.photobucket.com/user/bill...l?sort=3&o=334
OLD OEM Timing Chain vs LS2 timing chain. You can see the SPLIT roller on the old chain.
If you remove the timing chain, make sure that you use HIGH STRENGTH locking compound on the fasteners that secure the gear to the cam when you reinstall it.
If you have a late model block, your block MAY be machined to accept a timing chain dampener. If it is, I would recommend purchasing one and installing it:
2000 C5, does NOT have the machined holes for the dampener. Good picture to see the difference between the LEFT and RIGHT side of the cover seating surface. One side has a PORT for the oil pump. "DRIVERS SIDE"
Bill
- ARP BOLT!
- I used the Power Bond Dampener and I also pinned it to the crank
Plans to or have a supercharger or just added insurance?
- I have removed the rack and I have also removed the radiator and just pushed the passengers side of the rack forward and up to have access to the dampener bolt and to be able to install and use the puller.
I'm assuming just pushing the passenger side of the rack forward and up is faster and simpler, if I'm not going to change the timing gear?
- HEAT the dampener "HUB" with a Wagner heat gun or a propane torch to about 200 degs. Doesn't need to be schorching hot to make a big difference in force to remove or reinstall it. You will be amazed at how much easier it is to pull OFF and press back ON using heat!
- DO NOT use the old bolt to press the dampener on to the crank!!! NOTE, You DO use the old bolt to properly SEAT the dampener fully on to the crank once it is properly pressed on using the OTC Tool.
I used a BIG Strap Wrench to hold the dampener and prevent the engine from turning when I did my finial torque on the ARP BOLT.
Do you use loctite on the ARP Bolt?
I've seen a few places that if you have a 6 spd you can put it in 4th gear, set the e-brake, and chock the back wheels...to keep the engine from turning during torque.... what are your thoughts on that?
MAKE SURE that you secure the steering wheel STRAIGHT and the wheels are pointing straight and do not rotate the steering wheel while the rack and steering shaft are disconnected. When you reinstall the rack, make sure that the wheels are pointed STRAIGHT.- I removed the radiator / fan shroud mainly because I was also doing a cam but that gives you the most working room.
- Replace the front cover seal and MAKE SURE that you put oil on the rubber seal and on the damper sealing surface before reassembly.
- If you are this far and have the dampener off, it would be a GREAT time to replace the oil pump & the timing chain. If you have never replaced the timing chain, it is strongly recommended as the LS1/LS6 chain is weak. The rollers are NOT solid and can split in half.
- The LS2/2/7 chain is a fantastic OEM replacement and works well and is not expensive.
- If you do remove the front cover, NOTE that the cover gasket will fit two ways. ONLY ONE WAY is the correct way. If you put it on backwards you will have a massive oil leak!
Is it fairly easy to tell which way is the correct way if, your paying attention?
- Get a good set of flair nut wrenches to remove the hydraulic line flare nuts from the PS Rack. I sware that they use Gorillas to torque those flare nuts to the rack!! A normal wrench most of the time rounds off the flare nuts. I used Sears Craftsmen flare nut wrenches and they worked very well.
Good time to COMPLETELY flush and drain the radiator and the block and refill it with good stuff. I used a wet and dry vac to get ALL the old antifreeze out of the block. Clean the radiator and condenser while its apart. Use DISTILLED water and the correct dilution of DEXCOOL to refill.
MAKE SURE that you properly reattach the and seat the fan shroud on the radiator or it will come loose down the road when it 100 degrees out in the middle of no where! ASK ME HOW I KNOW!!!
YES the engine will start running a lot hotter than it normally does if it pops loose and separates from the radiator . How do you know?... fubar
- IF,,, You use an OEM Dampener bolt, it is a TORQUE TO YEILD bolt and there is a very specific procedure that you MUST use to reinstall it and torque it in place. If you don't follow it 1005, you will most likely be doing this job again in the near future. You MUST purchase and install a NEW OEM BOLT each time you remove it.
I do not have an FSM... can you share the specific procedure for reinstall and torque?
Did you mark the orientation of your old balancer and then have the NEW one balanced also?
Well,,, I THINK,,,, I covered just about everything...
Some pictures for you:
I made my own installation tool out of an old bolt and some all thread. Here is the strap wrench I used:
My OLD OEM Dampener was good and didn't wobble but, the oil seal cut the sealing surface and I developed a massive oil leak:
I used the Power Bond dampener as a replacement:
http://smg.photobucket.com/user/bill...l?sort=3&o=334
OLD OEM Timing Chain vs LS2 timing chain. You can see the SPLIT roller on the old chain.
If you remove the timing chain, make sure that you use HIGH STRENGTH locking compound on the fasteners that secure the gear to the cam when you reinstall it.
If you have a late model block, your block MAY be machined to accept a timing chain dampener. If it is, I would recommend purchasing one and installing it:
2000 C5, does NOT have the machined holes for the dampener. Good picture to see the difference between the LEFT and RIGHT side of the cover seating surface. One side has a PORT for the oil pump. "DRIVERS SIDE"
Bill
Last edited by 73Corvette; May 7, 2015 at 05:22 PM.
Thread Starter
Le Mans Master
Joined: Feb 2012
Posts: 6,644
Likes: 479
From: OK
Bill Curlee... I think I read on one of your past post where you suggested to someone to mark the dampner with white paint so you could see if the outer ring is moving...
I marked mind as well as measured the distance to the outer edge so I can see if it is creeping on the shaft as well....
If the wobble isn't getting any worse and the outer ring is not moving and the dampner is stay put on the shaft... is is safe to just keep an eye on it?
Thank you sir
I marked mind as well as measured the distance to the outer edge so I can see if it is creeping on the shaft as well....
If the wobble isn't getting any worse and the outer ring is not moving and the dampner is stay put on the shaft... is is safe to just keep an eye on it?
Thank you sir
Corvette Stories
The Best of Corvette for Corvette Enthusiasts

Top 10 Most Expensive Corvettes Ever Sold on Bring A Trailer
Brett Foote
10 Things Every Corvette Owner Needs (2026 Edition)
Michael S. Palmer
8 Most "Only Corvette Owners Understand" Quirks and Problems
Pouria Savadkouei
10 Reasons the C6 Z06 is Still A Performance Benchmark After 20 Years
Joe Kucinski
How Much Horsepower Every Corvette Engine "LOST" in 1972
Joe Kucinski
Top 10 DOs and DON'Ts for Protecting Your Convertible Top!
Michael S. Palmer
Top 10 Most Explosive Corvettes Ever Made: Power-to-Weight Ratio Ranked!
Joe Kucinski
150 hp to 1,250 hp: Every Corvette Generation Compared by the Specs That Matter
Joe Kucinski
8 Coolest Corvette Pace Cars (and Replicas) of All Time
Verdad Gallardo
Tech Contributor
Joined: Dec 1999
Posts: 32,910
Likes: 2,402
From: Anthony TX
CI 6,7,8,9,11 Vet
St. Jude Donor '08
YES it is. The pick up tube connection is on the bottom passengers side of the pump. I will answer your questions in order as you asked them:
- Pinned for added insurance for the most part. Who knows what the future holds. LOL!
- Yes,,, Its a LOT simpler and easier. getting the rack out can be a royal pain in the ****.
- You can use locktite. I didnt. Its torqued to (if I remember correctly) 190 ft/lbs and sofar so good.
I have never tried the in gear method. So,, give it a shot. Many do and have success.
LOL!! That is why I mentioned it. Too many have taken it for granted that what ever way that they install it, is good. It will go on BOTH ways. Only ONE way is correct and yes,, its easy to figure it out,, if you actually know it can go on backwards.
On the highway, I ususlly rum around 185-190 on a hot day. It was a HOT day in August and I was traveling to Callisle PA. for the Corvette Swap Meet.
On the way there I was seeing 210 highway and 220 in the stop and go traffic. I knew something was wrong. Didnt take long to see that the bottom of the shroud was not attached to the radiator. After it cooled down, I popped it back in the CORRECT way.
I did NOT balance the new Power Bond Balancer BUT,,,,, I did match balance the new SPEC Dual Disk fly wheel. Unless you are going to install a new OEM dampner and transfer any weights, its going to be tough to balance an aftermarket one short of taking it to a machine shop and having the new one balanced to the old one. I would STILL match mark the old one to the crank!
I will attach some more engine tear down pictures for you..
BC
Thread Starter
Le Mans Master
Joined: Feb 2012
Posts: 6,644
Likes: 479
From: OK
YES it is. The pick up tube connection is on the bottom passengers side of the pump. I will answer your questions in order as you asked them:
- Pinned for added insurance for the most part. Who knows what the future holds. LOL!
- Yes,,, Its a LOT simpler and easier. getting the rack out can be a royal pain in the ****.
- You can use locktite. I didnt. Its torqued to (if I remember correctly) 190 ft/lbs and sofar so good.
I have never tried the in gear method. So,, give it a shot. Many do and have success.
LOL!! That is why I mentioned it. Too many have taken it for granted that what ever way that they install it, is good. It will go on BOTH ways. Only ONE way is correct and yes,, its easy to figure it out,, if you actually know it can go on backwards.
On the highway, I ususlly rum around 185-190 on a hot day. It was a HOT day in August and I was traveling to Callisle PA. for the Corvette Swap Meet.
On the way there I was seeing 210 highway and 220 in the stop and go traffic. I knew something was wrong. Didnt take long to see that the bottom of the shroud was not attached to the radiator. After it cooled down, I popped it back in the CORRECT way.
I did NOT balance the new Power Bond Balancer BUT,,,,, I did match balance the new SPEC Dual Disk fly wheel. Unless you are going to install a new OEM dampner and transfer any weights, its going to be tough to balance an aftermarket one short of taking it to a machine shop and having the new one balanced to the old one. I would STILL match mark the old one to the crank!
I will attach some more engine tear down pictures for you..
BC
- Pinned for added insurance for the most part. Who knows what the future holds. LOL!
- Yes,,, Its a LOT simpler and easier. getting the rack out can be a royal pain in the ****.
- You can use locktite. I didnt. Its torqued to (if I remember correctly) 190 ft/lbs and sofar so good.
I have never tried the in gear method. So,, give it a shot. Many do and have success.
LOL!! That is why I mentioned it. Too many have taken it for granted that what ever way that they install it, is good. It will go on BOTH ways. Only ONE way is correct and yes,, its easy to figure it out,, if you actually know it can go on backwards.
On the highway, I ususlly rum around 185-190 on a hot day. It was a HOT day in August and I was traveling to Callisle PA. for the Corvette Swap Meet.
On the way there I was seeing 210 highway and 220 in the stop and go traffic. I knew something was wrong. Didnt take long to see that the bottom of the shroud was not attached to the radiator. After it cooled down, I popped it back in the CORRECT way.
I did NOT balance the new Power Bond Balancer BUT,,,,, I did match balance the new SPEC Dual Disk fly wheel. Unless you are going to install a new OEM dampner and transfer any weights, its going to be tough to balance an aftermarket one short of taking it to a machine shop and having the new one balanced to the old one. I would STILL match mark the old one to the crank!
I will attach some more engine tear down pictures for you..
BC
Tech Contributor
Joined: Dec 1999
Posts: 32,910
Likes: 2,402
From: Anthony TX
CI 6,7,8,9,11 Vet
St. Jude Donor '08
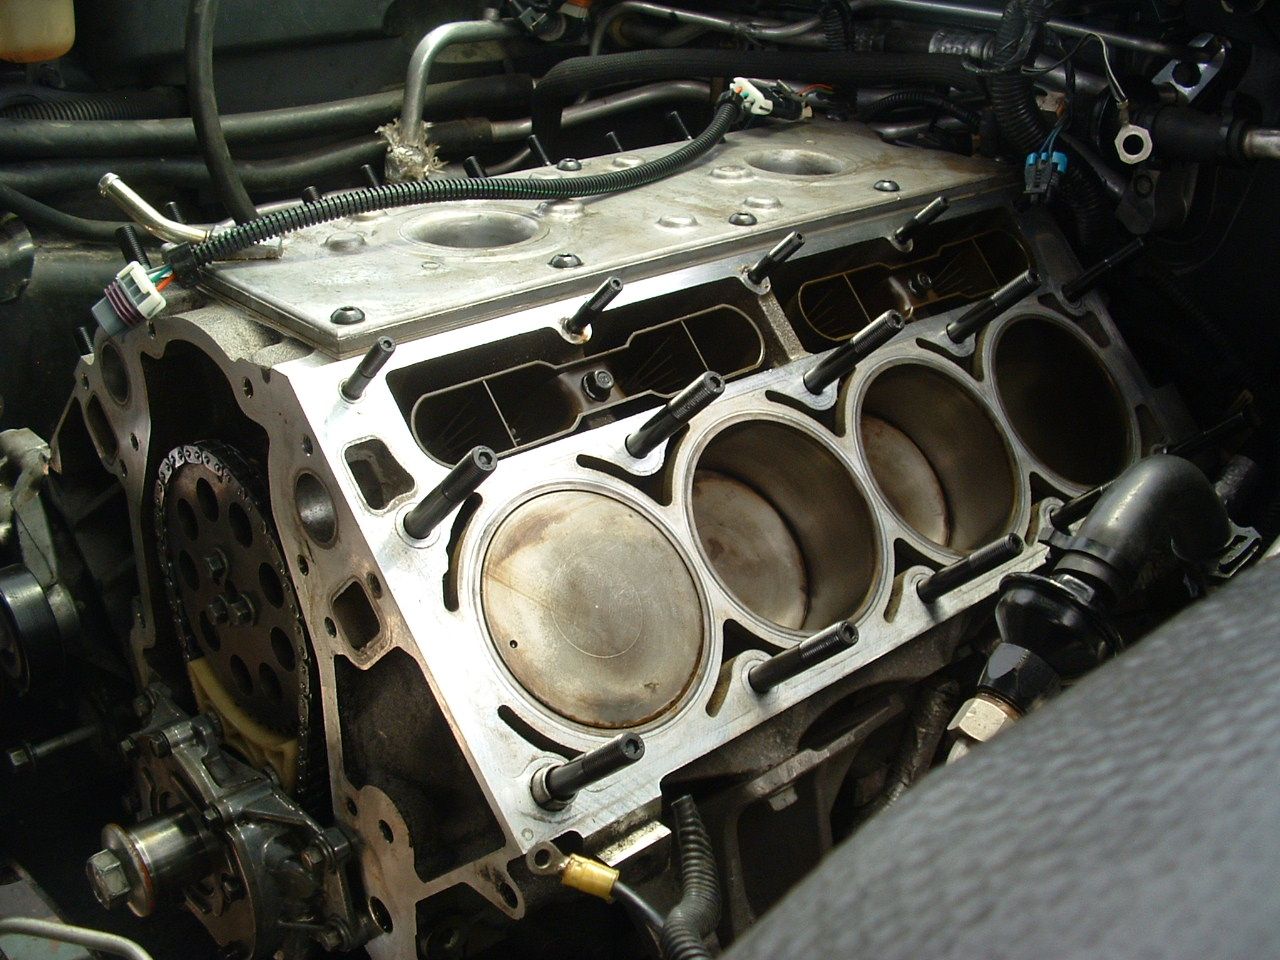
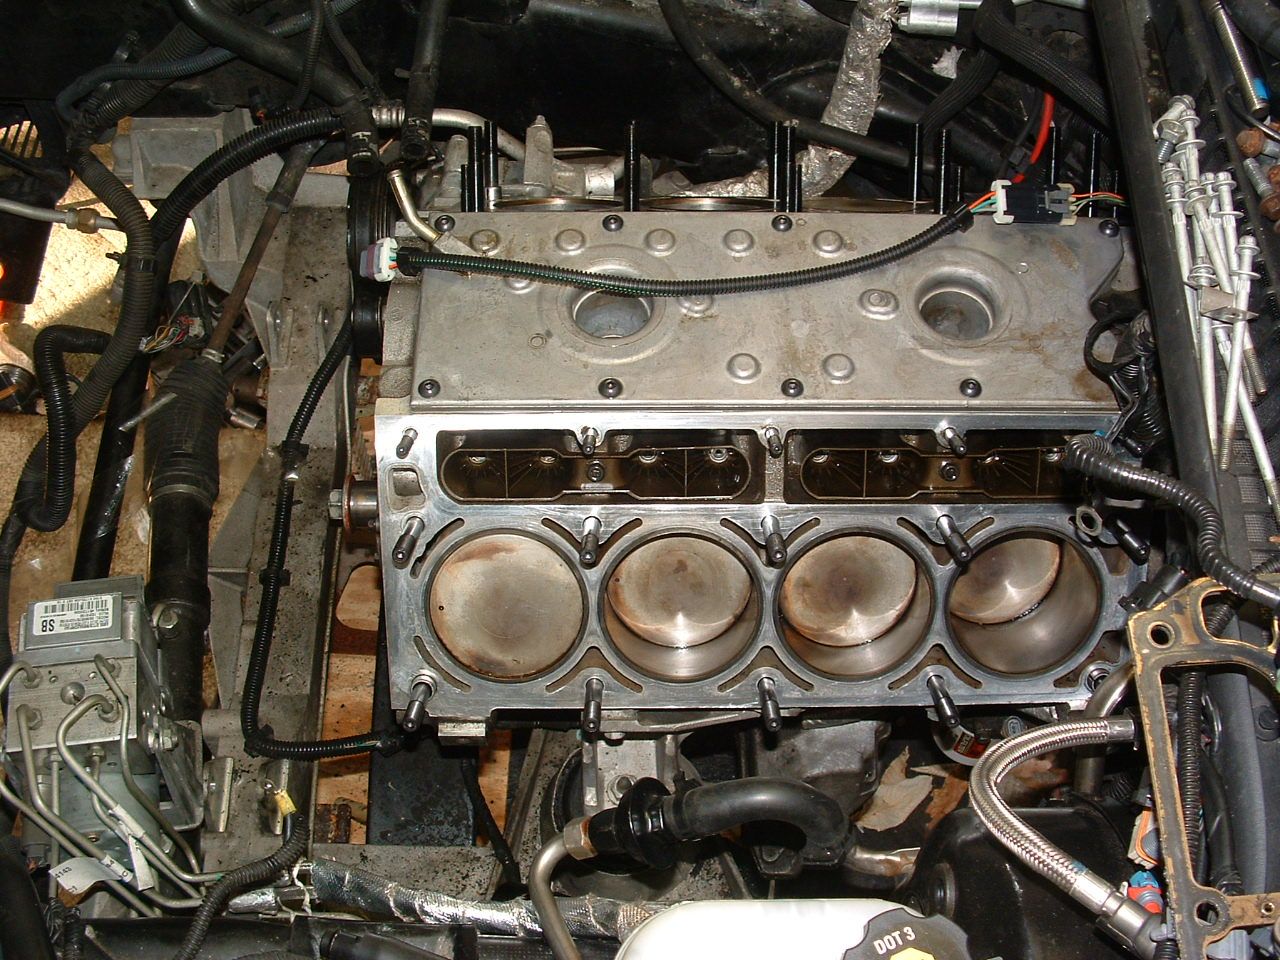
I installed some go fast parts and here are the build pictures:
I can never get a break. Too many GA Highway patrol cars to run!!


Heads removed and head studs installed in block:
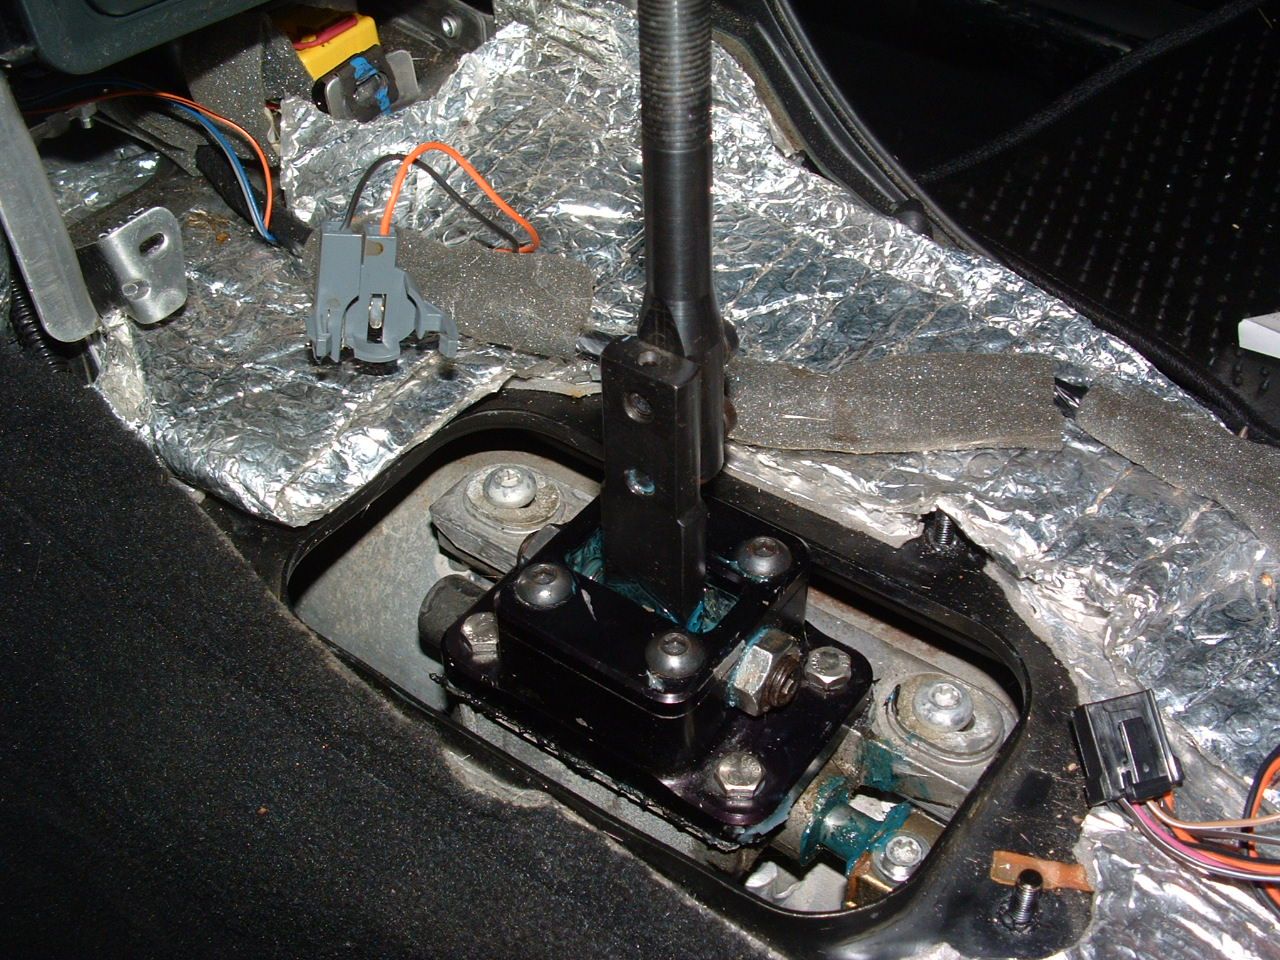
KIRBAN Shifter:
New MN12 / T60/60 Tranzilla Trans:

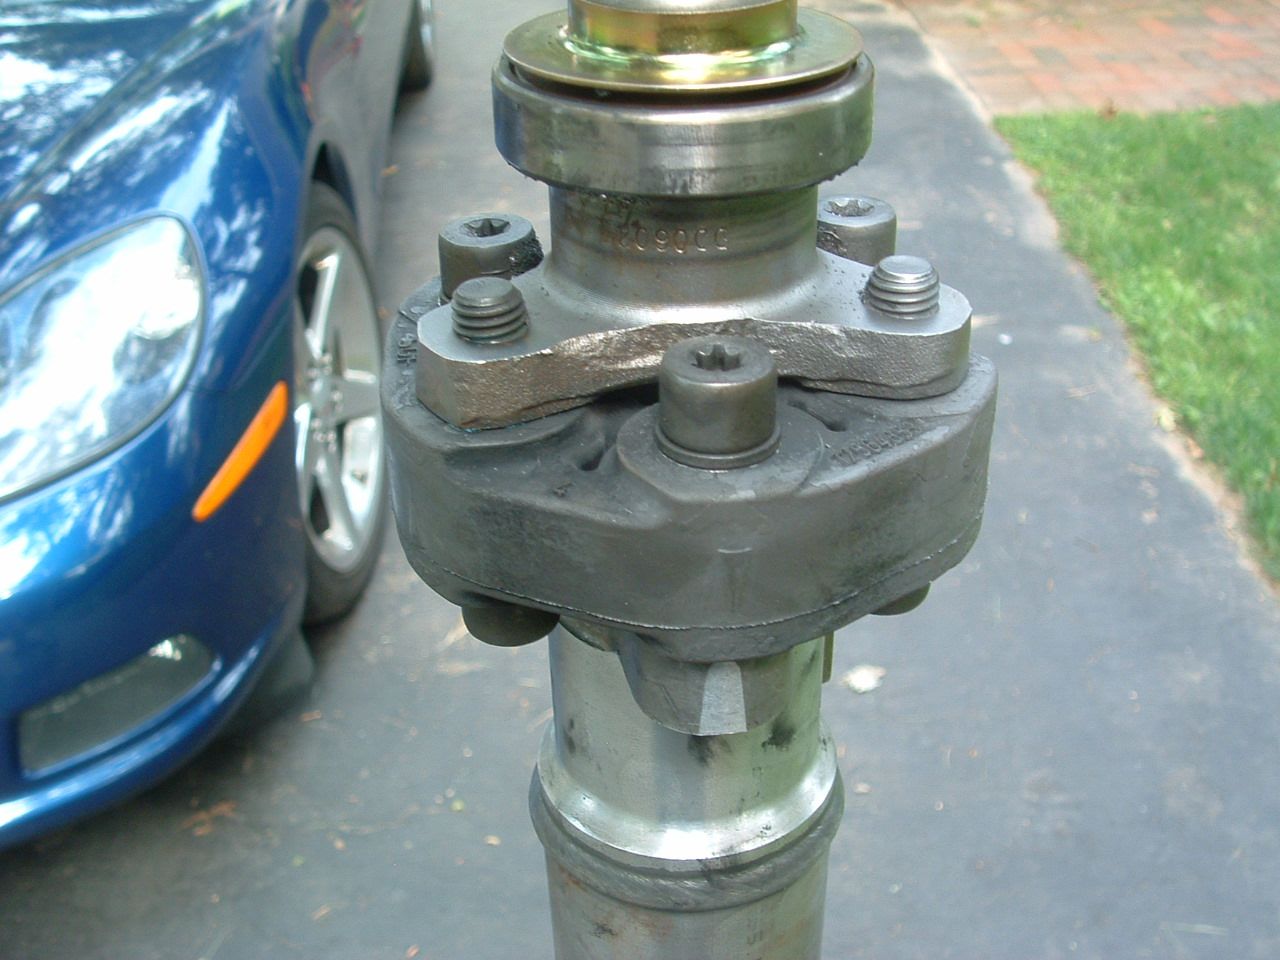
Torque Tube coupling check,,, 45K miles and good as new:
Cut away oil pump so you can see how the tube to pump O ring seals:
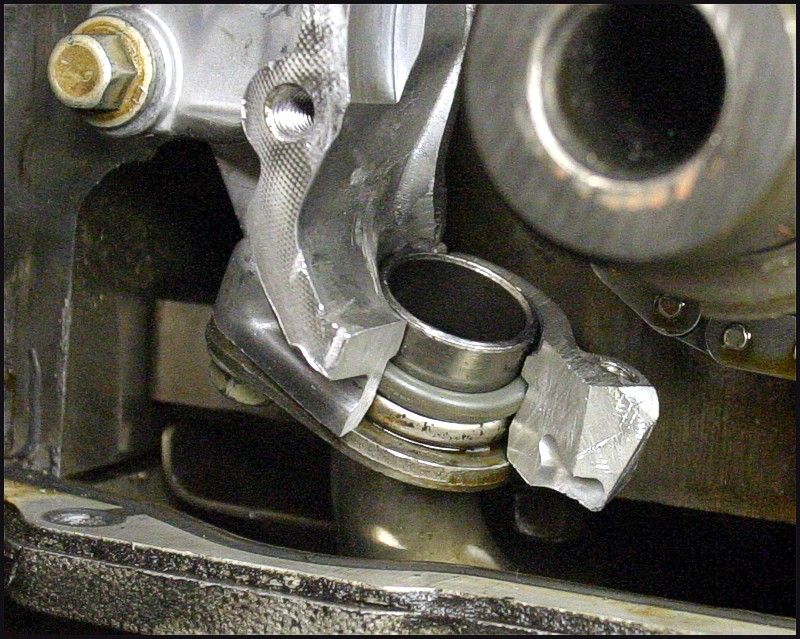
This is a FRONT crank Pin. You use a drill guide that bolts on to the crank and drill between the damper and the crank and then hammer in the pin. I have the ATI Kit that uses the key way in the Power Bond dampner and it pins on the SIDE of the crank. The pin in the key way keeps the damper from spinning on the crank::
Crank Pin Drill Fixture Kits for HEMI & LS1 Engines
The ATI Crank Pin Drill Fixture Kit allows you to install 1 or 2 dowel pins to the LS1 or HEMI crank, eliminating the damper twist on the shaft. This is a must for circle track or forced induction engines.
http://www.atiracing.com/products/dampers/damperparts/
Application
Crank Pin Drill Fixture Kit for LS1
LS1 Crank Pin Drill Fixture Kit
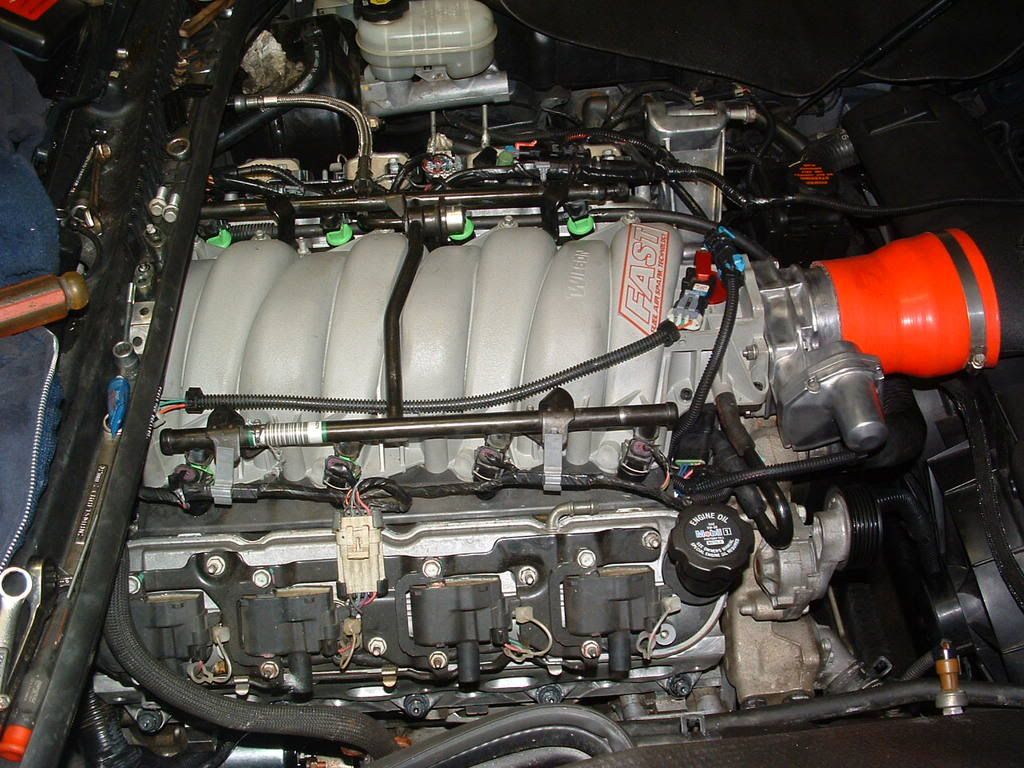
I installed Patriot Performance Stage 2 Heads and I ported and installed my own FAST 90 Manifold and 90mm TB:


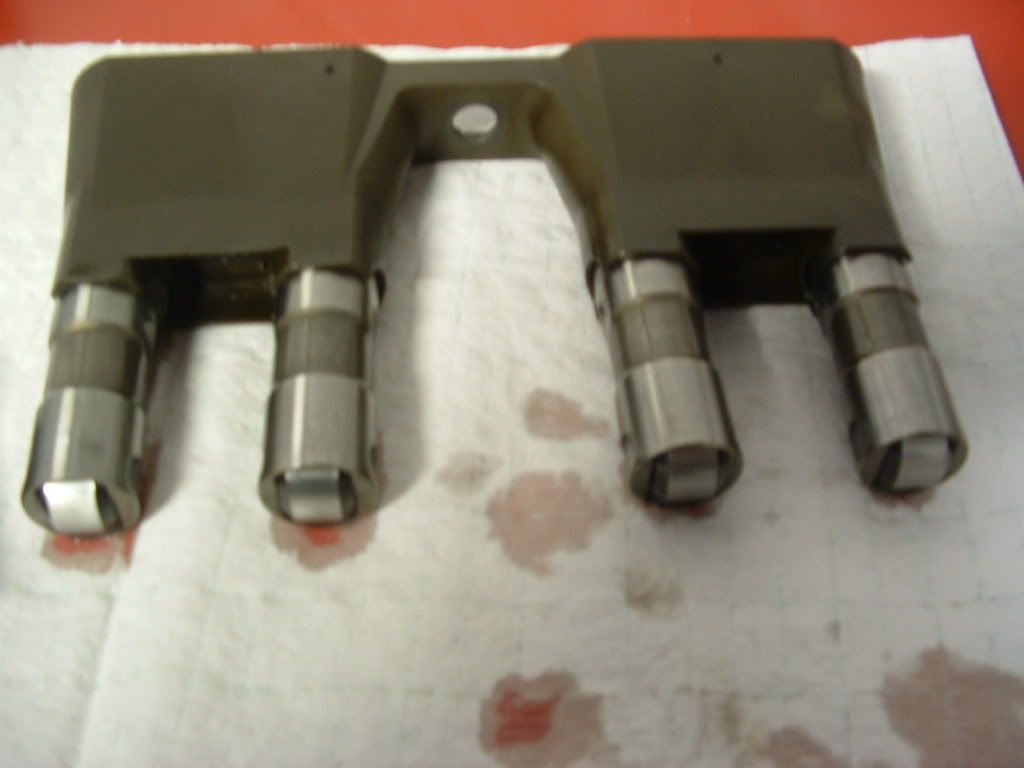
NEW CADDY Racing Lifters in new GM Lifter buckets:
BEFORE MODS! 385 RWHP

AFTER MODS! 450 RWHP
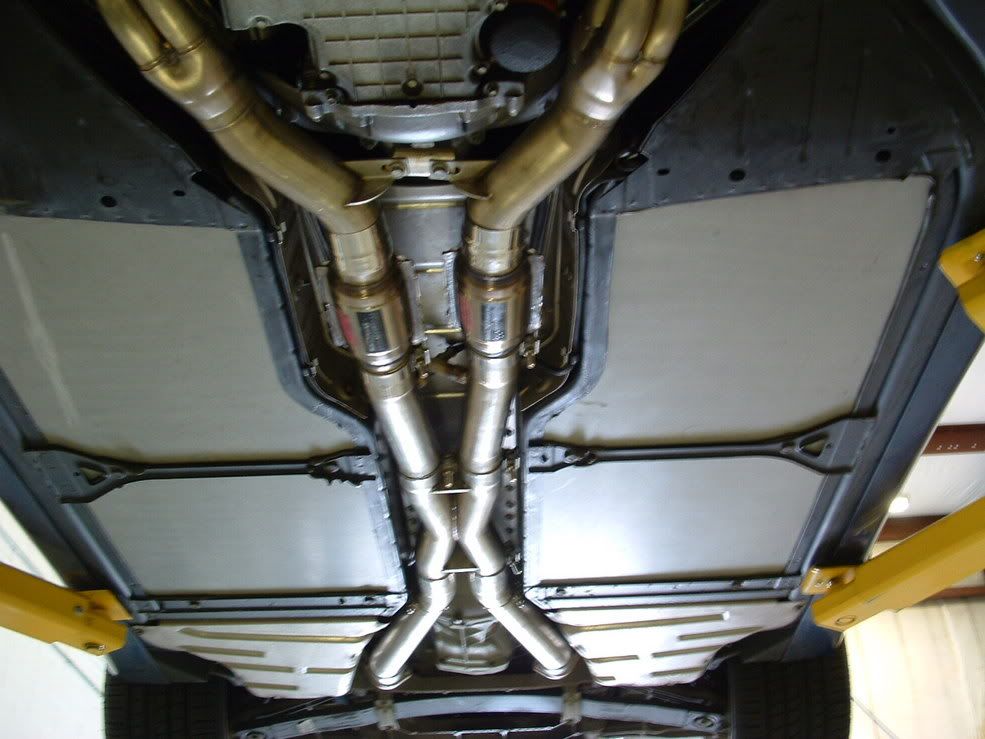
Complete Stainless worka header system with 3" exhaust system and X pipe form the collectors to the muffler tips:

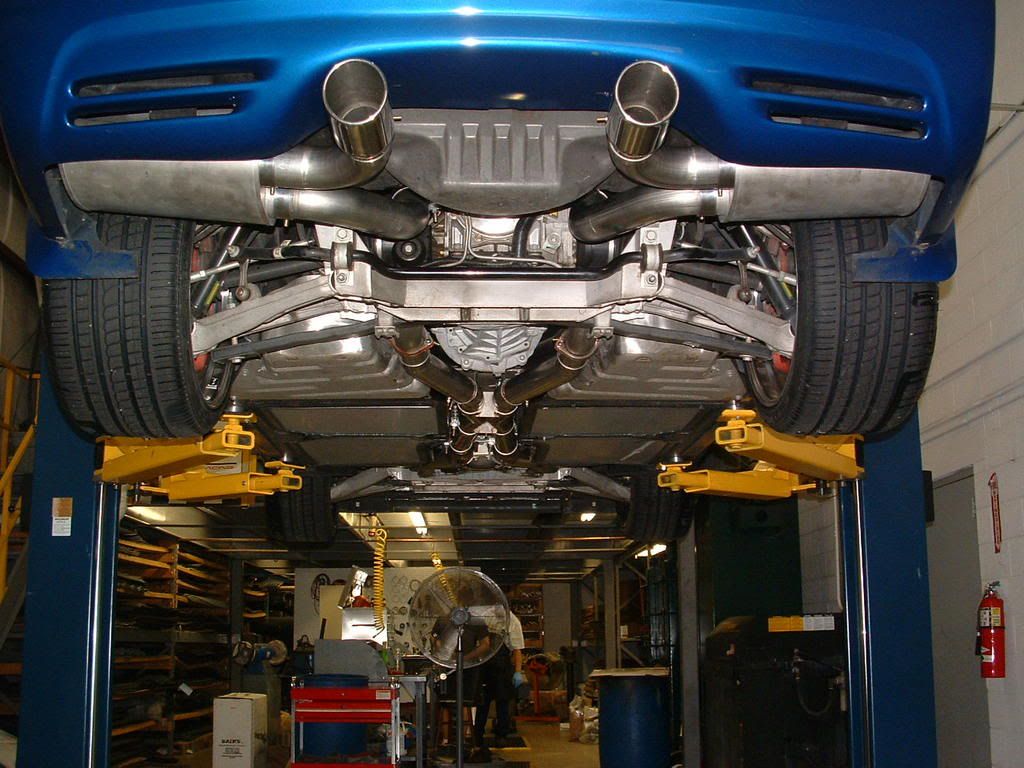
On the DYNO at Bowling Green KY Cruise In Meet May 04: CLICK to play vid.. It was 90 deg and 85% humidity!

Bill
I can never get a break. Too many GA Highway patrol cars to run!!
Heads removed and head studs installed in block:
KIRBAN Shifter:
New MN12 / T60/60 Tranzilla Trans:
Torque Tube coupling check,,, 45K miles and good as new:
Cut away oil pump so you can see how the tube to pump O ring seals:
This is a FRONT crank Pin. You use a drill guide that bolts on to the crank and drill between the damper and the crank and then hammer in the pin. I have the ATI Kit that uses the key way in the Power Bond dampner and it pins on the SIDE of the crank. The pin in the key way keeps the damper from spinning on the crank::
Crank Pin Drill Fixture Kits for HEMI & LS1 Engines
The ATI Crank Pin Drill Fixture Kit allows you to install 1 or 2 dowel pins to the LS1 or HEMI crank, eliminating the damper twist on the shaft. This is a must for circle track or forced induction engines.
http://www.atiracing.com/products/dampers/damperparts/
Application
Crank Pin Drill Fixture Kit for LS1
LS1 Crank Pin Drill Fixture Kit
I installed Patriot Performance Stage 2 Heads and I ported and installed my own FAST 90 Manifold and 90mm TB:
NEW CADDY Racing Lifters in new GM Lifter buckets:
BEFORE MODS! 385 RWHP
AFTER MODS! 450 RWHP
Complete Stainless worka header system with 3" exhaust system and X pipe form the collectors to the muffler tips:
On the DYNO at Bowling Green KY Cruise In Meet May 04: CLICK to play vid.. It was 90 deg and 85% humidity!
Bill
Last edited by Bill Curlee; May 7, 2015 at 09:37 PM.
Team Owner

Joined: Jul 2012
Posts: 34,479
Likes: 532
From: Central PA. - - My AR15 identifies as a muzzleloader
I believe in the Beer Fairy
You absolutely need a flywheel lock. A puller is a must, and you will need a tool for re-installing the new balancer. A BIG pipe for your breaker bar, my 1/2" drive IR impact wrench and 3/4" IR impact wrench would not remove my factory bolt even after I'd loosened it 1/2 a turn. It's ON there mister.
I think that's it for specialty tools. You'll need a 27mm 12 point socket if you buy the new ARP bolt to replace the stock one.
I think that's it for specialty tools. You'll need a 27mm 12 point socket if you buy the new ARP bolt to replace the stock one.
Thread Starter
Le Mans Master
Joined: Feb 2012
Posts: 6,644
Likes: 479
From: OK
You absolutely need a flywheel lock. A puller is a must, and you will need a tool for re-installing the new balancer. A BIG pipe for your breaker bar, my 1/2" drive IR impact wrench and 3/4" IR impact wrench would not remove my factory bolt even after I'd loosened it 1/2 a turn. It's ON there mister.
I think that's it for specialty tools. You'll need a 27mm 12 point socket if you buy the new ARP bolt to replace the stock one.
I think that's it for specialty tools. You'll need a 27mm 12 point socket if you buy the new ARP bolt to replace the stock one.
Team Owner
Joined: Jul 2012
Posts: 34,479
Likes: 532
From: Central PA. - - My AR15 identifies as a muzzleloader
I believe in the Beer Fairy
No, no need. I did have to grind a while on the arms of the puller to get it to fit into the hub of the pulley. But the part itself came off relatively easily once I got the puller on it. I didn't use heat to put it back on either.
I have a lathe so I made centers for the puller and made sure it was pressing the part straight on. That's a big piece of the pie when installing press fit parts is to make sure the part isn't cocked on the shaft as it's being pushed on.
I have a lathe so I made centers for the puller and made sure it was pressing the part straight on. That's a big piece of the pie when installing press fit parts is to make sure the part isn't cocked on the shaft as it's being pushed on.