


Progress with sinking clutch pedal
Thread Starter
Instructor

Joined: Aug 2018
Posts: 153
Likes: 16
Hey guys. I've been dealing with the same sinking clutch pedal at high RPMs as most of the other 10,000 sinking clutch pedal threads that get posted on here every day. I bought my 2004 in September last year with 52k miles. Everything seemed normal or maybe I just wasn't pushing it too hard, I don't know. I did start hearing about the issue from others, but thought, "boy am I glad that isn't me". Then it started happening lol. So I started researching how to fix it, mostly everyone parroting, "do the Ranger method", with mixed results. So I did the Ranger method. Initially my reservoir was filthy, then I emptied it, wiped it clean, filled it back up with fresh fluid and pumped it 30 times, which just barely introduced some dirty fluid back into the reservoir from the master. I repeated the ridiculous 6 sets of 30 reps with a drain and fill after each subsequent set, with pretty much no change in fluid clarity/color.
I daily drove the car for a couple weeks, with no change in behavior, clutch pedal still sinking and even sticking to the floor. I checked the fluid again and after a couple weeks of daily driving, it was almost as dirty as before. So I began to do another Ranger method, I got to the 2nd or 3rd set of 30 reps and realized just how ridiculous this was. There was literally no change in fluid content after the 2nd set and all I was doing was adding unnecessary wear and tear to an already compromised 15 year old clutch/hydraulic system. At that point I decided that I would just do a basic drain and fill every couple weeks, as needed and let the natural pumping action of daily driving take care of the fluid exchange for me.
I did this over the course of a few months and while the fluid seemed to be taking a bit longer to get dirty in between changes and overall cleaner, the clutch sinking and sticking to the floor did not change, in fact, it seemed to be getting worse over time. So through more research, it seemed like removing the assist spring (though very controversial) was the next logical step. I removed the spring and although the pedal was no longer getting stuck to the floor and requiring me to get my toes underneath to lift it up, it was still sinking most of the way down during prolonged high rpms. So slight help, but again, not a fix to the root cause. I continued doing drain and fills for the next few months, while researching more.
The next cheap and easy supposed fix pointed me to removing the bell housing inspection covers, though little explanation was given beyond "it allowing the clutch dust to escape and not get introduced to the hydraulics, via the slave cylinder". So I decided to remove the covers during my next oil change. I changed my motor oil/filter, did another clutch fluid drain/fill and removed my inspection covers. To my surprise, this is the one that did it. There was a noticeable improvement almost right away. I have been dailying it for 7 months now and for the first time in a while or maybe even ever, I can finally run a gear to red line, push in the clutch, make a gear change and repeat.
I am not really sure on the mechanics here, but the engineer in me would really like to know, how of all things, was this the thing that fixed my sinking clutch pedal? Some of the possible theories that I can think of are:
1. Better ventilation promoting a cooler and cleaner clutch and hydraulic system.
2. Increased airflow may have blown off some debris on the slave or pressure plate that was causing issues.
3. The pressure plate springs were getting hot, reducing tension and are now cooler, increasing tension.
4. The fluid is cooler now so less vapor/air causing sinking.
5. The fluid is just cleaner now, promoting better hydraulic operation.
Anyways I would love to hear some opinions/theories/advice.
I am going to try to pull the intake manifold and do a full bleed sometime in the future. I am also going to rig up a puller spring (something like the Linginfelter kit) on the clutch pedal at some point, to try to keep the pedal at the top stop, to allow better natural bleeding of air bubbles like GM intended, but I am not putting the assist spring back on.
Last edited by VFR RC46; May 3, 2019 at 09:53 AM.

Burning Brakes

Joined: Jul 2018
Posts: 1,113
Likes: 144
From: Miami
Very interesting post. Very surprising results too. As an engineer myself, I like to get to the bottom of things. Ranger method for me only patches the problem. Yes it's better, but I still get a sunken clutch with sustained hard pulls and high RPM shifts.
Melting Slicks


Joined: Nov 2008
Posts: 2,938
Likes: 65
From: Rochester Hills MI
I would say it is due to less heat being introduced to the slave cylinder. They tend to stick when they get hot if they are starting to fail or need to be bled. This may be a temporary fix for now, but I don't see it lasting long. The plastic inspection covers are there for a reason. I'd rather have clutch dust than rocks, sand, and water. IMO, the ranger method doesn't do crap. If you really want to bleed it, you will need to access the bleed screw.
Safety Car


Joined: Mar 2005
Posts: 3,757
Likes: 1,215
From: Wisconsin
I never had much faith in the clutch fluid explanation. Back in the 'old' days the diaphragm style clutches had a tendency to go over center when worn. That was the cause of the pedal going to the floor. Centrifugal force would keep the fingers depressed.
Thread Starter
Instructor
Joined: Aug 2018
Posts: 153
Likes: 16
I would say it is due to less heat being introduced to the slave cylinder. They tend to stick when they get hot if they are starting to fail or need to be bled. This may be a temporary fix for now, but I don't see it lasting long. The plastic inspection covers are there for a reason. I'd rather have clutch dust than rocks, sand, and water. IMO, the ranger method doesn't do crap. If you really want to bleed it, you will need to access the bleed screw.
Also from what I have read, every subsequent model up from the C5, got bigger and better bell housing venting.
From what I have read, the vent openings on the C6z are fairly large and people port them out further with good success.
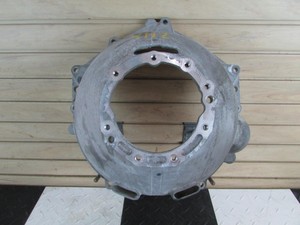
Pic showing the oem C6z bellhousing vents:

Last edited by VFR RC46; May 3, 2019 at 11:28 AM.
Melting Slicks
Joined: Nov 2008
Posts: 2,938
Likes: 65
From: Rochester Hills MI
With the location of the inspection covers, I really cant see anything getting in there, unless I took the car off roading.
Also from what I have read, every subsequent model up from the C5, got bigger and better bell housing venting. From what I have read, the vent openings on the C6z are fairly large and people port them out further with good success.
Also from what I have read, every subsequent model up from the C5, got bigger and better bell housing venting. From what I have read, the vent openings on the C6z are fairly large and people port them out further with good success.
Agreed, but there is also a reason why they are facing rearward.
Corvette Stories
The Best of Corvette for Corvette Enthusiasts

Top 10 Most Expensive Corvettes Ever Sold on Bring A Trailer
Brett Foote
10 Things Every Corvette Owner Needs (2026 Edition)
Michael S. Palmer
8 Most "Only Corvette Owners Understand" Quirks and Problems
Pouria Savadkouei
10 Reasons the C6 Z06 is Still A Performance Benchmark After 20 Years
Joe Kucinski
How Much Horsepower Every Corvette Engine "LOST" in 1972
Joe Kucinski
Top 10 DOs and DON'Ts for Protecting Your Convertible Top!
Michael S. Palmer
Top 10 Most Explosive Corvettes Ever Made: Power-to-Weight Ratio Ranked!
Joe Kucinski
150 hp to 1,250 hp: Every Corvette Generation Compared by the Specs That Matter
Joe Kucinski
8 Coolest Corvette Pace Cars (and Replicas) of All Time
Verdad GallardoRace Director


Joined: Jun 2013
Posts: 12,414
Likes: 1,750
From: DFW TX
There is an old thread somewhere maybe on LStech? about aggressively venting the bellhousing. Solved/prevented all kinds of issues.
Makes sense that the entire system will last/work better when kept cool and clean.
Makes sense that the entire system will last/work better when kept cool and clean.

Burning Brakes

Joined: Jul 2005
Posts: 788
Likes: 33
From: Cedar Rapids IA
For additional venting see post #30 of following thread:
https://www.corvetteforum.com/forums...e-floor-2.html
https://www.corvetteforum.com/forums...e-floor-2.html
Melting Slicks
Joined: Nov 2008
Posts: 2,938
Likes: 65
From: Rochester Hills MI

Thread Starter
Instructor
Joined: Aug 2018
Posts: 153
Likes: 16
I just did this a few days ago. From what I remember, the openings are definitely not facing forward. Can you show me pictures to point to what I am missing here?
Thread Starter
Instructor
Joined: Aug 2018
Posts: 153
Likes: 16
Okay I see it.

"-Open front of the bell housing by removing the plastic panels
There are 2 black plastic panels that cover the front side of the bell housing. The driver side has a small 3” panel held in place by 1-10mm bolt. The passenger side panel surrounds where the starter engages the flywheel. Disconnect battery, remove the 2- 15mm bolts and push the starter forward enough to pull out plastic panel. Before you reinstall the starter you can benefit from this wide open space. Check out the next step, Compressed air.
Total time will be between 10min and 1hr depending on stock exhaust manifold or headers and adjoining piping and space restraints and if on a lift or on the ground.
I would imagine that the panels were put in there to keep things from getting into the bell housing but the irony could be what was meant to protect the clutch hurt the longevity of it. The Driver side is shielded by the oil filter and the starter on the passenger side. It is quite amazing the amount of air moved by the clutch at idle from the “exhaust” ports of the bell housing, imagine what it would be in CFM@155mph 7k rpm. Ever heard of Smokey Yunicks flywheel supercharger?
Opening the front side of the bell housing is a crucial part of keeping things cleaner and cooler within the clutch. By allowing the front side of the bell housing to ingest airflow we now have a cross flow of air coming in and out of the bell housing and the faster we go the more volume of air through, like a radiator. With greater volume of high velocity air the clutch debris is expelled much more quickly rather than staying in the bell housing longer like the stock stagnant closed-front-entry (or it doesn’t exit but through a tiny hole like earlier Fbodies and GTOs). On our C6Z we even “ported” the “exhaust” side of the bell housing to even more aid in getting the airflow out. Futhermore, after about 7K miles we again cleaned it there was very little debris in the clutch and bell housing area and the fluid was in great shape too.
We feel that this is conclusive that it does keep the clutch much cleaner and cooler. What happens to a radiator when you block its airflow?
One more thing to mention about the GTOs and Fbodies: It has been our experience that the Heat and the clutch debris can very quickly ruin your fun. A few years back we had an ‘05 80K mile GTO with about 390RWHP and boltons, stock clutch. The vehicle was at a road course event and as the vehicle heated up it would lose hydraulics and not even be able to execute a gear shift by the end of a lap. We would have to draw out the DIRTY fluid and replace it every lap. (It is unknown how large a role the heat played it is difficult to test independently. When both sides of the bell housing are open it seems that it is no longer an issue.) Now looking back upon those experiences I know we could have resolved or at least greatly extended the proper functioning of the clutch. Since GTOs and earlier Fbodies do not have “exhausts” on their bell housings I would like to machine a few passages in there and see what happens......Now we have done the aforementioned methods to said vehicles and it has helped rather significantly but they NEED is the “exhaust” side opened up. When you take a look at the bigger picture you can see that it needs both clean high speed air in and high speed air out, just like an engine. Having only one side of it is merely half the battle. "