When you click on links to various merchants on this site and make a purchase, this can result in this site earning a commission. Affiliate programs and affiliations include, but are not limited to, the eBay Partner Network.
Just saying it would be a much better investment to go ahead and find a set of pistons and rods while its apart. I planned to do porting on my OE heads too until I talked to TSP, but then after finding out they would just barely out do a set of 243/799 heads I said forget it and purchased their 225 as cast head that I had them do 60cc chambers for 11:1cr. I also did the LS2 dorman and a silver blade ls2 TB. The only “reason” I purchased the short block was because I had just do all the work before and if doing it again I wasnt gonna waste the opportunity this time to upgrade it all at once. Scat makes decent rods, first line ARP rod bolts are fine for NA, and you can find sales or something on a set of pistons with rings. I think it would be better in the long run for you and you will be much better satisfied in the end. I took my engine all the way down to a short block the first time and I wish I had just done rods and pistons then but didnt. Fortunately I was in the position to be able to order a TSP short block so in the end it was ok that there was some failure. I will be comfortable knowing I have a bottom end that will be bullet proof for most uses. They use a 5.3 aluminum block and bore it for the pistons and have no reported issues so Im comfortable with them telling me the engine will hold up fine. With the correct piston, rod, and crank set up the piston skirt coming out of the sleeves is marginal and they hold up fine
All good points dskinsler83. I'll take a look at what i can find for the lower end components anyway. Heads and intake are easy enough to upgrade down the road. Thanks for the words of wisdom.
No problem! Just trying to save you some frustration down the road. I really feel that (like I did also btw) while you have it that far apart, you would regret not doing the internals now instead of later. When you have a forged bottom end or at least eliminate the two biggest weak links, i.e. pistons and rod bolts, then you know anything you add later will be better suited. The issue I have heard of with trying to reuse the OE rods is the press fit wrist pins? Not saying that you cant reuse them though, just more work involved I reckon. Maybe I read it wrong, can not remember, BUT with getting new bearings it will be the perfect time to upgrade the rod bolts for sure. As long as your crank is good to go it will hold great power. The building LS1/6 engines book and another book is good for reference and ideas, also Summit Racing web pages On All Cylinders is good for ideas and knowledge.
The "while you're in there" bug has bitten. Keep us posted on progress.
I'm not sure if "while you're in there" is a bug, more of a chronic illness thats extremely contagious. Pretty sure it was your case of "while you're in there" that "forced" me to tear my torque tube out to weld new u-joints into my shift linkage last year to eliminate a sloppy shifter. Naturally mine then took over at that point and now i have a new clutch, rebuilt torque tube, rebuilt rear diff and an MGW shifter as well. Things tend to get out of hand quickly once your infected.
The last step to completing the engine tear down was removing the camshaft bearings. Yes the easy thing to do would be to buy the tool for $100 or so, but because i have more time on my hands than money in my wallet at the moment i made my own. I used a 3 foot X 0.75 inch steel bar and a 2.5 inch diameter X 2 inch piece of brass to make to tool. I also 3D printed a cone shape to help keep the install tool square. I'll post the drawing of the brass piece i made below. I've never used a purchased tool but i can tell you that this one works like a charm and saved me 100$ or so for my hour of labor.
With the block finally torn completely down i could get it cleaned up and begin the refurbishing and rebuilding process. the first step was to get it clean. I had pretty good success running hot water through a pressure washer and gunk engine degreaser. I tested their original vs the new foamy version and the foam version was a clear winner. This was especially true on vertical surfaces as the foam clings to the walls allowing the degreaser to remain in contact with the grease longer. The first two pictures below will be before and after pictures of the first round of cleaning. I used the same process to preliminarily clean many as many engine components as possible.
Prior to pressure wash After pressure wash A few other components after pressure washing
Prior to a final clean and paint I decided to address the head mating surfaces. The proper way to preform this is with a CBN insert on a fly cutter, but as I don't have a great way to hold the block at the proper angle for machining i decided to use a technique that I've used countless times to rework components at work. Essentially, i used a sanding block to resurface the head mating surfaces. the key here is utilizing a large and extremely flat block. I'm using whats known as aluminum jig plate, its used in the machining world as base plates for fixtures and is certified as flat and parallel within 0.003 inches per foot. The piece you see here that i selected i found to be flat within about 0.0007 inches. I started with 220 grit and sanded while constantly changing patterns and direction until the surface completely cleaned. I then used 400 grit to achieve the desired surface finish. I'm pretty satisfied with the results, from what i can check its flat within 0.0018 which is well within the 0.003 factory spec. I'm in no way saying that this is better, or even equivalent, to the results an automotive machine shop could produce. But as this option was free in my case i figured i would give it a shot.
Jig plate used as sanding block Head mating surface after the 220 grit sanding.
After the parts were dry, i used brake cleaner a wire brush and rags to prep surfaces to paint. Any part that need to sit in the clean state need to be preserved with something like WD40 or oil to prevent corrosion. I however was able to mask the components for paint immediately after the cleaning processes were complete. I used VHT engine primer (2 coats) and paint (3 coats) to coat the exterior of the engine components. Unfortunately, I forgot to take pictures durring the painting process, but the finished process can be seen below.
Block after paint
The last step in refurbishing the block is to hone the bores. This is really just to establish a crosshatch to aid in oil retention durring the break-in process of the new rings. I used a 4 inch 400 grit ball hone to quickly establish the desired finish. Make sure you use a lubricant while performing this process, it will help the hone from gathering debris and potentially scoring the cylinder walls. If you look closely at the pictures below you'll see the cross hatch in the cylinder walls. Yes, i will be inspecting the block dimensionally before reassembly to ensure bore sizes and flatnesses are within spec, but other than that the block is now ready for assembly.
Pretty quick rework. It would have been tempting to take it to a machine shop but with nothing really "wrong" in those areas it was prudent to DIY the cleanup of mating surfaces. I may have missed it, do you work in aerospace?
Pretty quick rework. It would have been tempting to take it to a machine shop but with nothing really "wrong" in those areas it was prudent to DIY the cleanup of mating surfaces. I may have missed it, do you work in aerospace?
Believe me, taking the block to the machine shop was my first instinct as well. But like you said there really isn't anything "wrong" so I figured that id see if i could get it within factory spec without the time or money required to have the machine work done. We'll see, once i get get the block on a surface plate and can really check the bores for size and roundness with a dial bore i wont know it my efforts were sufficient, but i figured it was worth a shot.
Yes, I do work in aerospace. I work at a 2nd tier manufacturer as a continuous improvement lead, but have spent time in the tool room, as a process engineer and running a cell where i would fill in on burr benches, running machines, or applying coatings as necessary. It helps to work in manufacturing for a living to realize that any car is just a combinations of parts, if you understand their function and factory specifications it removes all of the guess work. Theres really no secrets or magic that lets any engine run, just provide proper quality parts with the right specifications in terms of fit and finish. I'm attempting to use this philosophy to understand were its possible to make concessions (like on refurbishing the block) and where its not (like the work being done to the crank that i'll discuss in a bit once i have all the info from the machine shop).
While i continue to clean and paint various components which is pretty monotonous and boring to continue to post about let's discuss a few issues that i have with my crankshaft. As you all saw, there was some embedded metal in the main bearings, obviously that would correspond to scoring of the crank. Fortunately the bearing material was soft enough to allow the material to be pressed into the bearings limiting the amount of scoring. Regardless, i took the crank to a machine shop as i did not have the knowledge or expertise to refurbish it myself. With the minimal scoring the engine builder was fairly certain that the journals could just be polished back to factory spec and size. (final some good news) However there was still work to be done. I'm not sure how many of you know this but the crank shaft in corvette LS1s were not internally balance, rather weights on the balancer and the flywheel balanced the crank. Be aware of this as you put aftermarket parts on your car. As my balancer and flywheel would now be internally balanced i chose to have the crank balanced as well. This requires all of the rotating components to be weighed to ensure that the proper balance could be found. On top of that there was some significant galling on the snout of the crank where the old balancer was mounted. clearly the balancer was spinning on the crank. LS1s rely on a press fit alone rather than a key to stop the balancer from spinning. luckily the runout of the snout was still within 0.0015 so it "should" be fine after keying the new balancer. So long short short, 300$ at the machine shop and a few hours on a bridgeport to cut a keyway for the balancer key and i'd would be good to go.
In order to have the machine shop balance the crank like discussed in my previous post I needed to get all of the rotating components to the machine shop to be weighed. these components include rod bearing, rods, wrist pins, rod bolts, pistons and piston rings. The first step then was to separate the piston from the rod. In the LS1 the wrists pins were pressed into the rods, there were no retaining clips. therefore you need a press to separate the rod from the piston. I'll post a picture of the press set up i used to press the pin out. Its a pretty tight press fit, just make sure you watch to insure theres no deflection of the aluminum piston. I used an indicator to watch deflection on the first piston i separated. last thing you want to crack a piston while your attempting to do this.
After separating the pistons from the rods the pistons needed some serious clean up . The carbon deposits were pretty substantial, as I expected based on the amount of oil in the intake. I started by addressing the carbon build up with some break clean and a wire brush. It took quite a bit of elbow grease to get the tops of the pistons cleaned. After that i used dish soap and hot water to clean the pistons, rods and wrist pins. everything made it over to the machine shop from evaluation and inspection before the holiday. Assuming there are no crack and everything's straight i'm going to stick with the stock pistons and rods. For my plans with the engine Im confident that they'll be up to the job. If anythings out of spec then i replace that component.
I'm not sure how many of you know this but the crank shaft in corvette LS1s were not internally balance, rather weights on the balancer and the flywheel balanced the crank. Be aware of this as you put aftermarket parts on your car. As my balancer and flywheel would now be internally balanced i chose to have the crank balanced as well. This requires all of the rotating components to be weighed to ensure that the proper balance could be found.
Hi,
The LS engines are not externally balanced.
Much of this confusion is caused by:
1.Chevy zero balances the flywheel and pressure plates as a unit so the flywheel alone may not be zero balanced
2.Chevy refines the balance of Vette engines after they are assembled by pressing small weights into pre-drilled holes in the flywheel & damper as determined by spinning the engine as an assembly
3.Chevy did not refine the balance of Camaros so they will not have the small weights
4.New replacement dampers are zero balanced
5.Used dampers from a Vette may not be zero balanced if they still have the weights installed
6.Aftermarket flywheels are zero balanced
7.Aftermarket pressure plates are zero balanced
So here are a few chooses when modifying your engine
1.To change only the flywheel or only the pressure plate, match balance to the old value
2.To change the flywheel & pressure plate together:
�match balance an aftermarket flywheel/pressure plate as a unit
�when using a new Chevy flywheel/pressure plate, you can transfer the small weights or match balance
Other options include going back to a zero balance damper & flywheel/clutch by removing all of the weight or zero balancing everything, which is as good as a Camaro balance
As i continue to clean and paint engine components I came across a bit of an issue with the lower oil pan. There was a pretty substantial casting void on the gasket mating surface. How this made it through QC at chevy or how it managed not to leak a ton of oil is beyond me, but needless to say it work be getting repaired. I contemplated welding the components but then i would risk warping the sealing surface and realistically i would need to machine the mating surface flat. Instead i decided to use epoxy to fill the void. This allowed me to easily file the surface flat. I then finished the surface with the same sanding block method i used on the block decks. I forgot to take pictures of the void before filling with epoxy, but below are two pictures of the epoxy filled void. (One before and one after the surface was refinished)
Hey guys, hoping to show some progress on the car soon, a ton of hours have gone into cleaning, painting and now porting heads. While I've been tediously working i've been planning the reassembly of the car. My question is has anyone ever build the rolling cassis and lifted the body in a way that is could just be lowered onto the chasis? I've seen this done ing the C3 world when working on my last vette, but never with a C5. It would not be difficult to remove the toque tube, rear subframe and transaxle at this point. then could all use some cleaning and paint anyway and then i could assemble the hole driveline outside of the car. I'm just not sure how tough itd be to lower the body back on. Any info on what it might weigh or a process that you've used would be helpful.
Hey guys, hoping to show some progress on the car soon, a ton of hours have gone into cleaning, painting and now porting heads. While I've been tediously working i've been planning the reassembly of the car. My question is has anyone ever build the rolling cassis and lifted the body in a way that is could just be lowered onto the chasis? I've seen this done ing the C3 world when working on my last vette, but never with a C5. It would not be difficult to remove the toque tube, rear subframe and transaxle at this point. then could all use some cleaning and paint anyway and then i could assemble the hole driveline outside of the car. I'm just not sure how tough itd be to lower the body back on. Any info on what it might weigh or a process that you've used would be helpful.
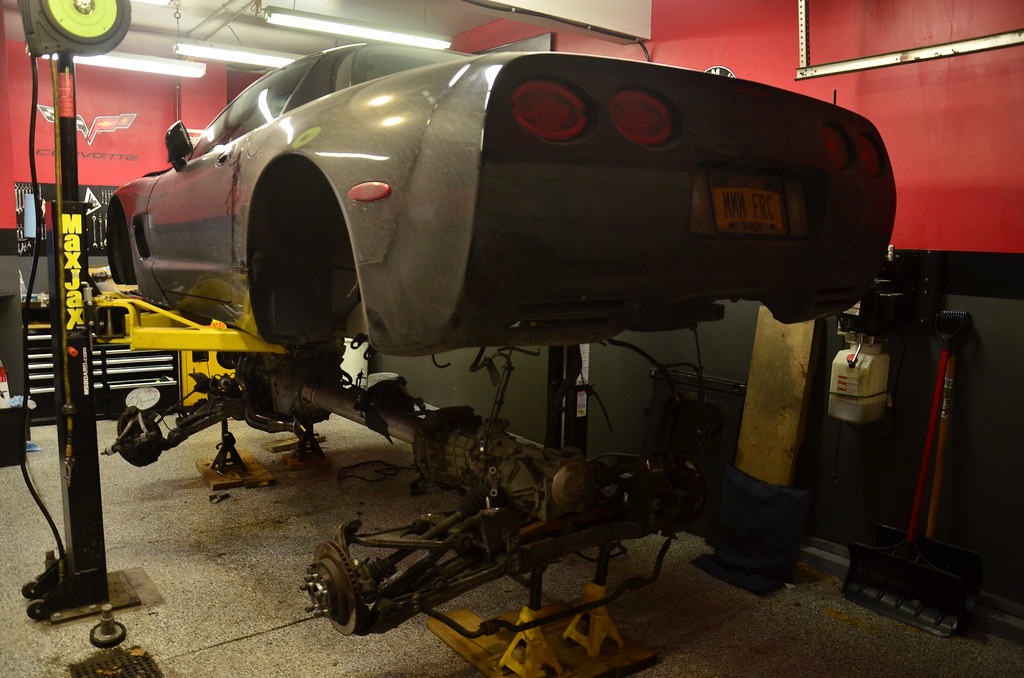
Although the C5 isn't a unibody vehicle, it isn't really a true body on frame design either. Think of the C5 construction as 3 major pieces:
Frame
Body panels
Drivetrain
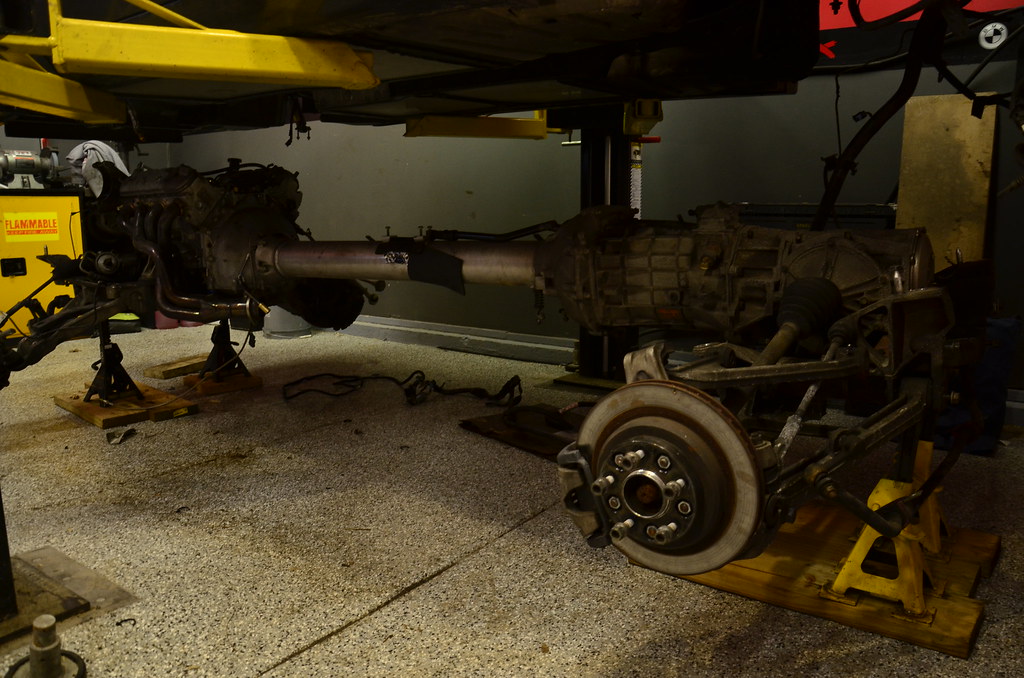
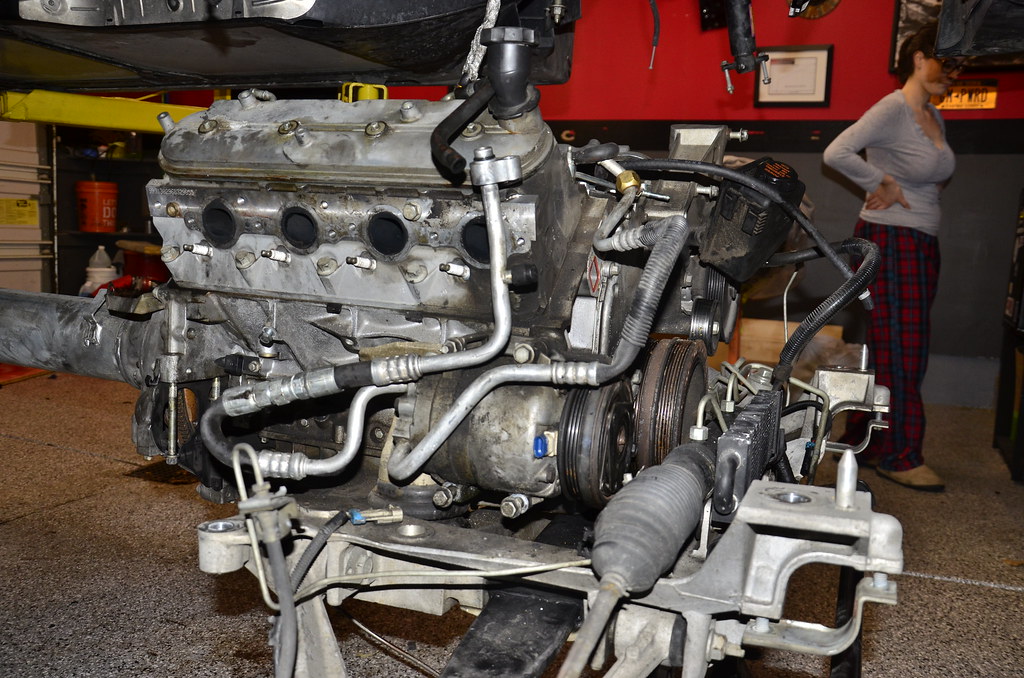
The body panels all can be unbolted from the frame, which is how you get that "Vette-Kart" look. All of those can be removed independently of each other, including dropping the entire drivetrain in 1 piece. I did this when I did the LS3 swap a couple years ago. IMO it's honestly easier than pulling just the motor due to space, but then again I am using the lift in my garage. You basically support the front and rear subframes, unbolt everything, then pick the frame/body up off the ground.
Originally Posted by nsogiba
The car went up on the lift and I started to tear it down. From a running, driving car to drivetrain out, it took me about 20 hours going slowly and labeling connections, taking notes about every disconnected wire, bolt, etc.
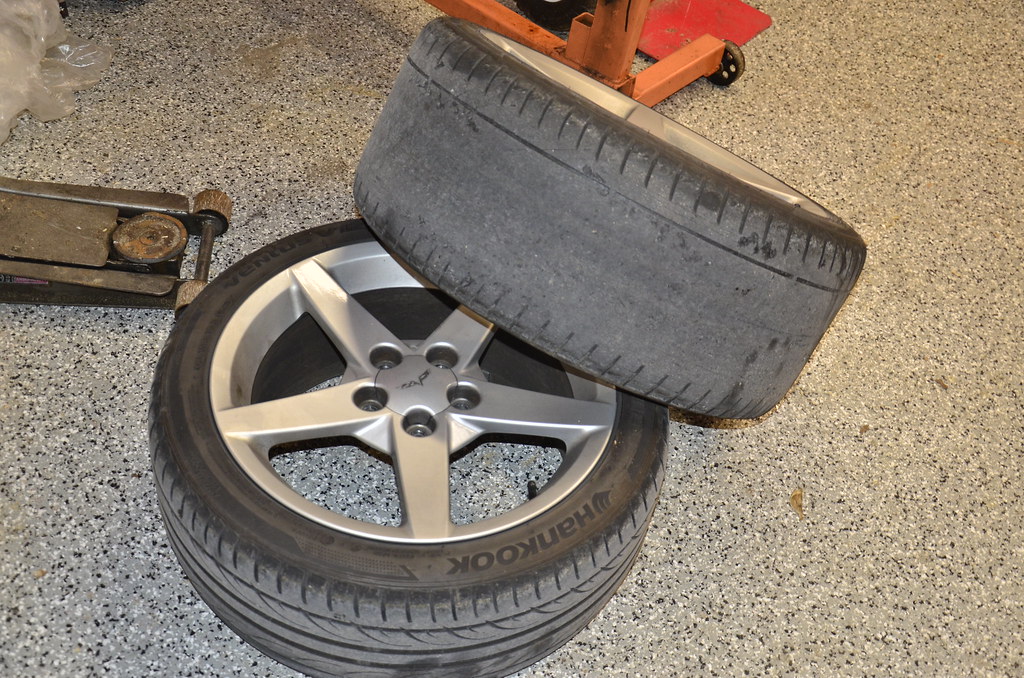
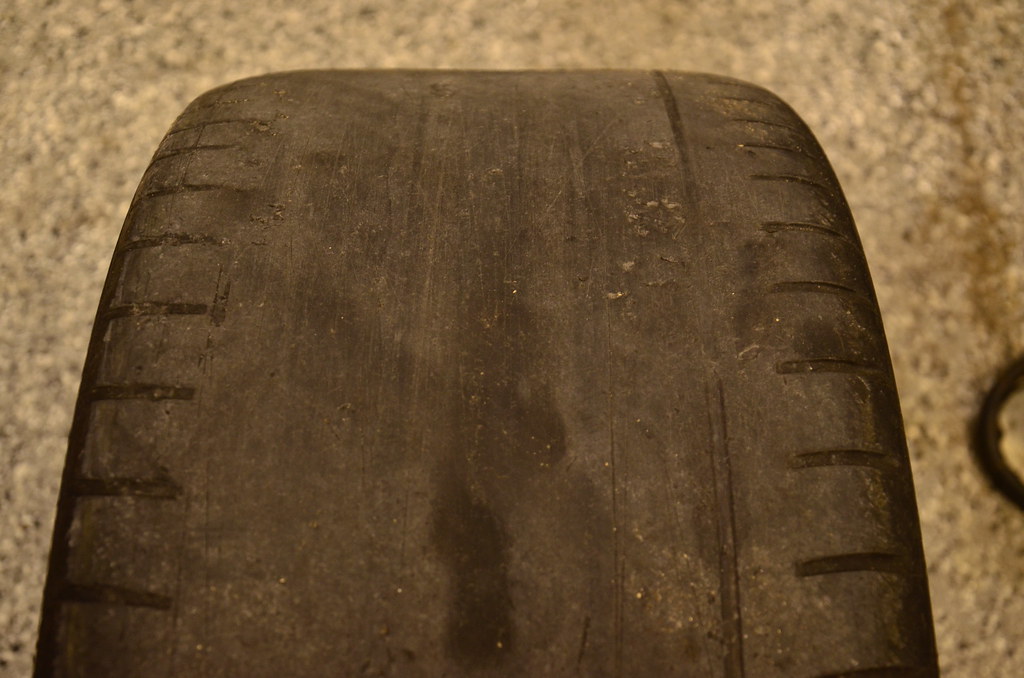
Rear tires are ready for a couple more months of use. These are Hankook Ventus V12s in a 285/35/19 and make for a great street tire. I even ran a few track days on them.
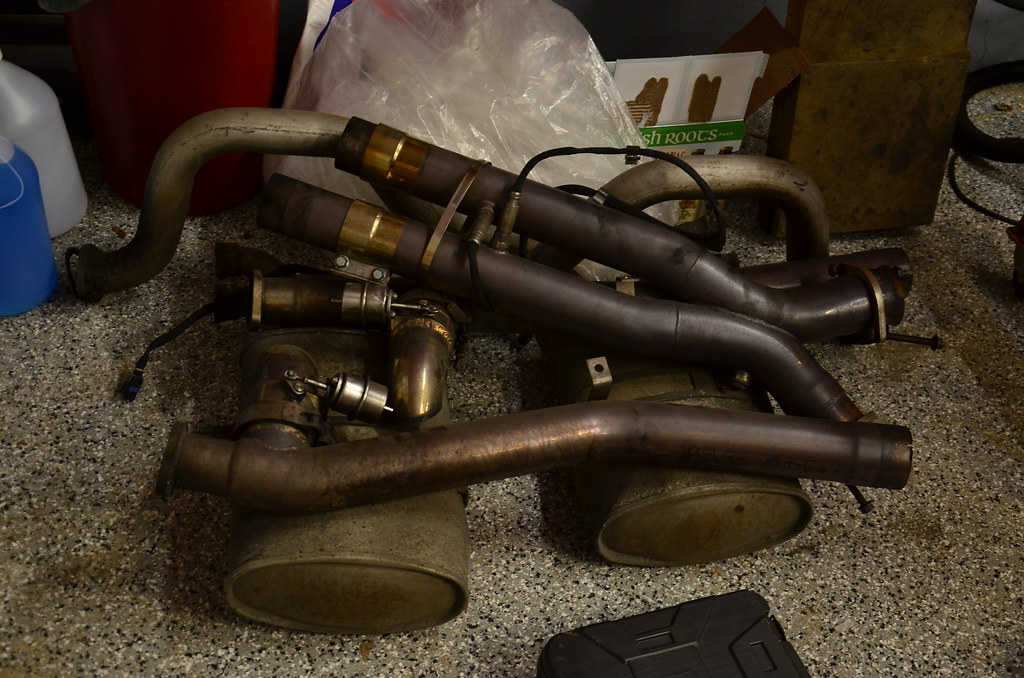
Exhaust components removed. Once I have the car up and running I'll be relocating the cutouts to the rear mufflers to do a "bypass mod on demand".
Finally:
Just some notes about dropping the drivetrain:
-It's easier to disconnect the rear diff, trans, and torque tube harness underneath the battery box and let them drop with the drivetrain than it is to leave them with the car.
-I left the EBCM/ABS module attached to the body (tied up with a string) but disconnected the brake line leading to the RF wheel so that I didn't have to remove the steering rack.
-If I was only doing the engine swap I would have probably pulled the engine alone, out the top. However, since I need to replace my whining 4.10s, I thought it would be easier to drop the whole assembly.
I defiantly like the idea of doing it this way now comes the exciting part of figuring out how to get my car up that high without a lift... and how lower it back down in a precise and controlled manner. Time to put that fancy engineering degree to use for once. haha.
nsogiba, with the drive train laid flat on dollies like you have shown in the last post you made, about how high are the top of the heads? Just trying to get a rough idea how high i need to get the car?