When you click on links to various merchants on this site and make a purchase, this can result in this site earning a commission. Affiliate programs and affiliations include, but are not limited to, the eBay Partner Network.
Gentleman don't be scared you don't need a fuse box. you will need to removed the box in the car put it on a bench. The problem is that GM bent a .030 copper wire almost 90 degrees in order to get it to where it needed to be You will have to un- swedge the 4 bolts that run through the fuse box and remove all the fuses and relays. just take a picture or make a chart and even if you don't no biggie the relays will only go in one way and the fuse amperage and location are inside of the cover or in your owners manual. The un-swedging of the captive part of the bolts is the hardest part. I'm all about things being perfect but unless t you can get your hands on 4 more of these bolts this part won't be perfect. I took a pair if vise grips and caught the edge with the first groove in the Jaws and adjusted them so it stopp before destrying everything. just work your way around and when your close they will slip through with a little force. them tips that you are unable to get up against the threads wont hurt anything. Just do it. Once you have it apart its a piece of cake. there is a copper wire .030 in diameter running from the terminal that grounds the relay for the low beams to the terminal in the corner of the C3 purple cover plug. You will see it it is the pink with a white tracer Look carefully at the .030 copper wire running between the two. it has a couple bends in that follow a groove in the plastic. just about half way between there is a bend thats almost 90 degrees. the wire is broken right there. go rip about 10 inches of wire from the garage door opener button on the wall in your garage Most of them use .030 solid copper wire or check the reversing lights they use it to. Or go to home depot and buy the right size . IT MUST BE .030-.031 Remove Carefully loosen the crimp at each of the broken wire in your fuse box so the broken wire can be removed. strip the insulation off the wire you just rip of the wall AFTER YOU ACCURATELY MEASURED IT AND FOUND IT TO BE IDENTICAL TO THE ONE GM PUT IN. and install it in place of the broken one carefully getting it seated in the groove use a small pair of needle nose to recrimp at each end and you are done except for putting it back together. Note I noticed that on the other side I could run another copper wire to the same two terminals so as to give the gound signal two paths to take, just in case it breaks I did this and I suggest you do to. To the guys who bought a new fuse box it will happen again unless they changed the design. When you get the broken wire out you can take a scribe or anything small and pointed to pluck one of the guide corners off on the plastic so the bend is not so severe. that will make it a lifetime repair. when swedging the bolts again just use a small screwdriver to get it way from the bolt. then what I did was I happened to have a cheap set of hole punches for gaskets that had a center hole that fit the bolts real close and the outer tip was tapered so I put a sockey on the head of the bolt so when you hit it with a hammer you don't break any plastic then grab a 3/16 1/4 drive deep socket slide that on the bolt and hit it again "carefully " and that for me it worked out fine and looked pretty good too. This is the final word on the mystery low beam issue. Its only about a six pack worth of work and the parts are free. Im slow as hell and once I accidentaly found the problem after 2 days of looking I was done in two hours but my garage door doesn't work anymore and my girlfriend is pissed.. If you need pictures call or email me. Tom (916) 474-5769
One more thing. I thought I would have to split the inner part of the fuse box because it appeared that the copper wire turned down into the inside of it. It doesn't do that. There is a hole for the tip of the wire to sit into but thats as far as either side of the wire goes. It's a piece of cake Its starting to get dark here in california and Im going to go melt my new nitto NTO5's If you do not have a set of these on your C6 ZO6 you are a fool. they eliminated any wheel hop and you can actually stand on the gas in first and second. It's a night and day difference from the Goodyears as long as you don't mind calling a tow truck if you get a flat
Thanks for the Great info. I'm new to forum, and found your info helpful. If you still have pictures, I would love to see them. If you could email me them would be great. My email address is coreyb57@gmail.com. Thanks
I had a dealership sell me a recall kit for 11.50 and I had the lights working in an hour. They often insist to do the recall themselves but...I prefer to keep my car in my personal shop.
I was surprised to find my '05 had no low beams when driving home from Ruby's Redondo Cruise-In in the dark but the lights would work in the dark of the garage. So I noticed a pattern: car cold - lights on, car warmed - lights off. I figured the problem could be due to thermal expansion of something or a problem with one of the computer modules.
Then I searched the CF and, lo and behold, found this thread with the answer and the awesome fix thanks to the pictorial essay of SenseofTouch and the description of racerxr. Sure enough I found my problem exactly as shown where SenseofTouch showed it would be. My ohmmeter showed the proof in ambient and heated conditions. The rest of the fix was easy and straightforward with the result of low beam headlights now.
I've gone through this thread, took everything apart, tested with a multimeter and can't find a bad break in anything. I replaced the relay and fuses, too.
Any ideas what might be causing my low beams to go out?
NM: Pulled the wire and replaced it. Issue seems to be fixed.
Last edited by DjCritterus; 06-05-2018 at 11:05 AM.
I wish I would have found this thread earlier. My fuel pump relay is not engaging at startup. It happened as I was on a 12 hour trip, I tightened the front two bolts and was able to get the car started. As it would happen again after the car would warm up (also high beams worked when engine was cold, but not after the car warmed up) My car already had the low beam recall repair done with previous owner.
My issue is: after repeated tightening of the front two bolts, they will not disengage from the lower wire looms/harness.
Any suggestions?
I have had a low beam problem on my car since I bought it. Dealer tried to fix it before shipping it to me (by replacing a relay) and that did of course not work. After much back and forth arguing who's paying for what I decided to fix it myself.
First, a huuuuuge thank you to racerxr (Tom) here on the forum. Thanks for locating the problem and figuring out how to fix it as well as providing excellent descriptions and pictures via email! The wire was broken in EXACTLY the spot that you pointed out!
Yesterday me and my awesome girlfriend set out to fix the fuse box! We ended up following Tom's instructions for the most part with a few modifications. I have written a short step-by-step guide for how we fixed the problem. This is to further clarify how this CAN be done (this is by NO means the perfect solution) to those who are still wondering to fix it yourself or not. It was a pretty straight forward job, and absolutely well worth 1000 $
Take the fuse box out of the car. Very simple:
1. Disconnect the battery and the power cable that connects to the fuse box
2. Press the plastic clips that attaches the main part of the fuse box and pop it out
3. Unscrew the four metal bolts and knock on them so that each of the four blocks fall out
4. You're DONE
Disassemble the fuse box
1. Pull out all fuses and relays
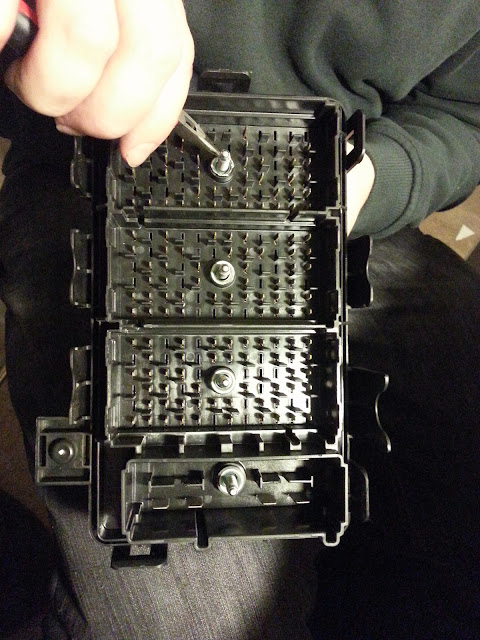
2. Use a needle nose plier and un-swedge the metal sleeves that hold the two layers together.
3. When un-swedged enoug, knock the bolts through the box so that it can be disassembled. I messed up the bolts so badly (bad needle nose pliers) during the un-swedging that I decided to cut the metal sleeves surrounding the bolts (see picture) so that they don't interfere. The sleeves are not needed as their only purpose is to keep you from opening the fusebox. When the box is in the car, it is held in place by the four bolts and the four block modules.
Replacing the broken wire
1. Get some 20 gauge copper wire. I bought some at Homedepot for 7 $
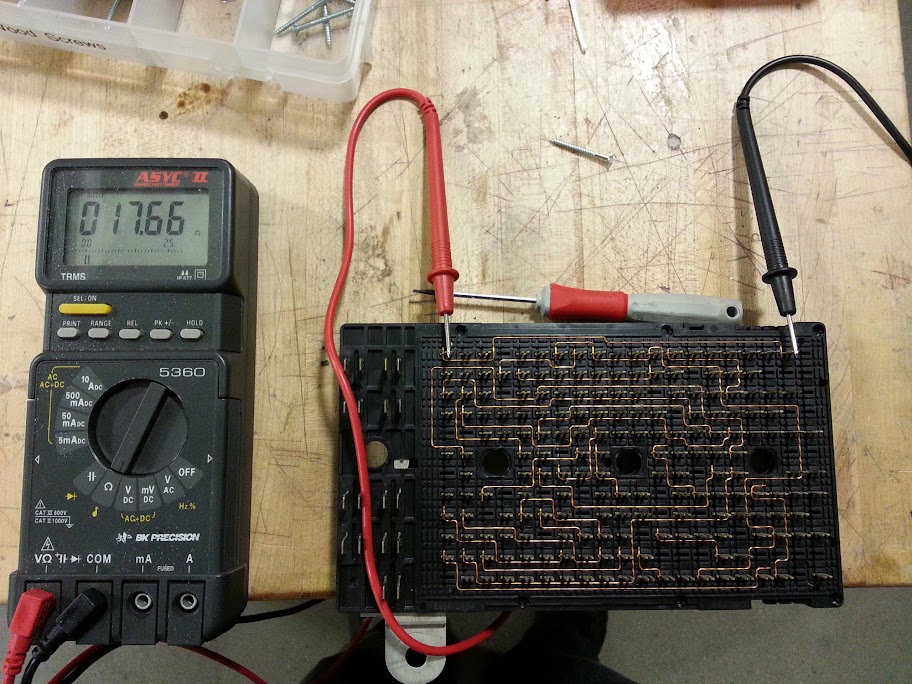
2. Find the broken broken wire and remove it. When you manage to open the fusebox, the broken wire is on the other side.
Very bad conductivity.
3. Replace the wire. As Tom suggested, I added a backup wire on the other side as well. So in case the wire breaks again there is a backup on the other side. I also removed some of the plastic guiding with a razor so that the copper wire can have nicer bends.
Backup wire on the back side
Put everything back together and drive after dark!
When putting the fusebox back together, simply align the four block modules and place the box on top of them (without the bolts in place). Then see through the bolt holes so that you make sure that they are sentered. Enter the bolts and screw in place each of the modules till each bolt is tightened. Check visually afterwards if all the blocks are in place.
Thanks to this write up, I didn't panic when I lost my lights this evening.
A buddy of mine happened to have some 20ga solid in his bins and we knocked it out in about an hour. Deswaging the sleeves is, by far, the hardest part.
Mine had been doing the bump-flicker for a while but I was just ignoring it.
Another indicator might be a slight greenish cast to the lights. Mine are noticeably whiter post-repair.
The recall was supposedly done on my 06 some years ago, but I am experiencing the now "classic" symptoms for this. Morning beams works, hot engine later.. nope. Relay replaced in vain. So I'll get in there, see if they really did do the recall I guess, look for the issue, but it's not working anymore if they did do it.
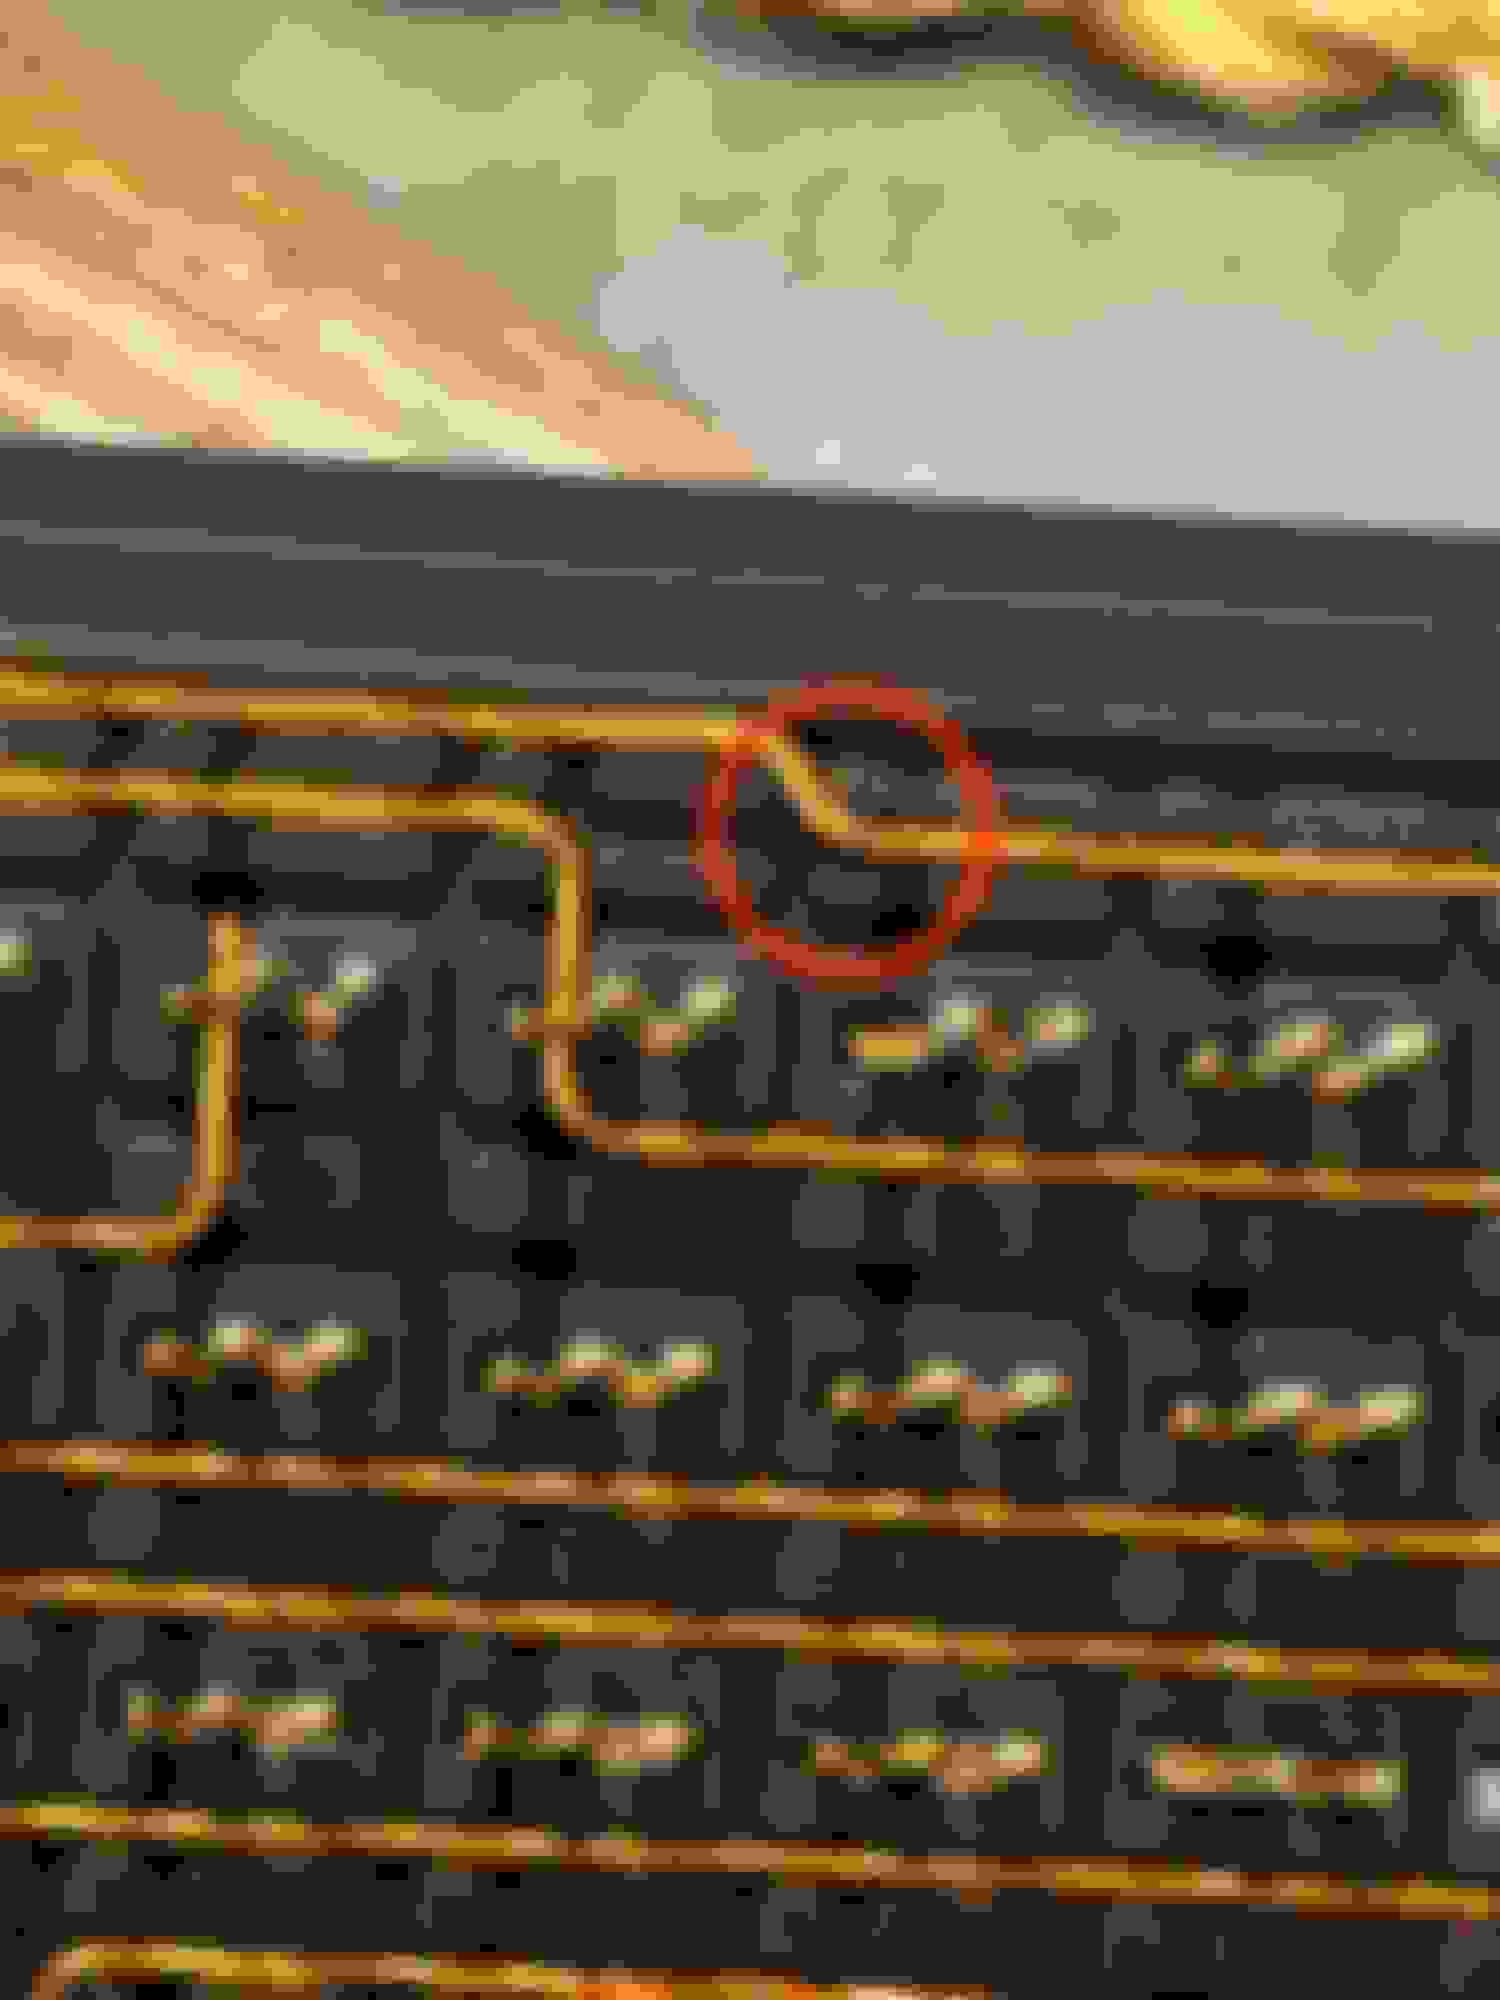
This is the bottom of the top level of the fuse box........had the same problem in my C6 (low beams would not work after engine compartment heated up.....they were fine in the AM........once you get the fuse box apart (it is a pain), replace the burnt wire with a a copper door bell wire.........take your time and it will fix the problem...... After opening" the fuse box (it's a pain), (C6) I found a broken wire (see pointer), and used a door bell wire to repalce this wire This solved the problem........
Well the recall was done for sure on mine, I could see that extra wire they added,(orange) and it actually was visible outside the fusebox coming out and going back in again, but obviously it didn't stop this problem from happening. So just because you had the recall you still may not be in the clear.
So either it didn't hold up over time or they didn't do it right. I didn't mess with it and left it.
Anyways replaced the copper wire (which WAS broken in the expected spot) and added the back up. So far so good. Those swedge things suck! I had two that were fairly easy but two that were pretty tight to the plastic. I found that a Milwaukee long reach 48-22-6101 needle nose had the bite needed at the tip to get at them better than vice grips.
this is the answer i was looking for. My vette loses fog lights and left turn signal when the engine warms up... Based on this information, I would like to replace the wire and see how it goes.
I too had the loss of the low beams after a car show ended at 8:00 PM one night (March 2021) and had to drive home on the high beams. I got on this forum and found the answer was to open up the fuse box and do the wire replacement. I wasn't about to pay someone to do the job for $300+ when I could do it myself. It actually cost me nothing but my time as I went to Home Depot to get the door bell wire, and the guy in the electrical department gave me 2' for free! While I had the fuse box open, I decided to do the jumper wire on the opposite side too. Fixed the problem! This spring I went with the Morimoto LS7 style head lights. Was curious and looked up the history on the car and it had the "outer" jumper wire service bulletin "fix" in 2014. Obviously it wasn't a forever fix ! I am of the opinion that you should get into the fuse box and do the jumper wire replacement.
hello, unfortunately for me it was difficult to see where is the wire damaged, when testing it by tester I think it is already cold. Can you tell me how ca be the the problem solved in this case?
I want to thank racerxr for this contribution. Based on his post, I went out to my parts bin and re-examined my old fusebox.
When mine failed a year ago, I took the thing apart like he did, un-swaged the four metal sleeves that hold the thing together, and noted that inside was a multi-layer punchdown block with copper wires routed around a plastic grid.
Unfortunately, the wire to the low-beam relay was not on the bottom layer, and it appeared that a lot of disassembly would be required to reach the upper layer(s), so I called it a day.
I shouldn't have. As racerxr points out - once the four sleeves are out, the backplane is held against the top half of the fusebox case by the fuses and relays themselves.
I just now unplugged everything, and sure enough, the entire backplane fell out the bottom, revealing the top layer and the broken wire of circuit 1970 (low-beam relay).
With the top layer visible, it became apparent why circuit 1970 fails all the time but the other circuits don't. It has the longest straight section of any wire in the box, with a jog in the middle probably intended for strain relief. It appears what happens is that as the fusebox heats up, the plastic grid expands faster than the copper wires do. This puts the long wire in tension, stretching the jog section tightly around the plastic guides, where eventually it fractures.
This looks to be a fairly straightforward repair. I agree that matching the wire gauge is essential, and that removing material from the guide corners would help prevent it happening again.
Thanks to SenseofTouch for posting the step-by-step.
Quick note.....I also had a break in the wire at the same place, but you could not see it until you removed the wire from the track. Even the resistance checked OK. After I pulled up on one end of the wire, it came right out showing the break.
On a related note...I checked with the dealer and they said that the recall service was complete in Feb 2018. After looking in the fuse bay under the wiring busses, it was clear that the real was never performed. Now they're tap dancing!
Thanks again to SenseofTouch and Tom for sharing this with the group.


 03-03-2015, 12:54 PM


 So just because you had the recall you still may not be in the clear.