


Started my e-force install - question???

Safety Car


Joined: Sep 2007
Posts: 3,502
Likes: 82
Last edited by Motorhead-47; Nov 6, 2012 at 06:29 PM.
Thread Starter
Drifting


Joined: May 2005
Posts: 1,563
Likes: 334
From: Indianapolis Indiana
Word has it that in pre-2008 cars the firewall is different..just enough different so that the Edelbrock can contact the firewall. Those parts slightly lower the engine to add clearance. This keeps the supercharger from contacting the firewall. If the supercharger contacts the firewall your interior becomes one big echo chamber for the mechanical noises of the supercharger....not good.
I was a bit worried about getting the crank bolt loose but it turned out not to be a problem at all. I'll pin it tomorrow.
So far so good!
Thanks
Thread Starter
Drifting
Joined: May 2005
Posts: 1,563
Likes: 334
From: Indianapolis Indiana
This is how I held my crank. Simple and worked great.
http://i145.photobucket.com/albums/r...charger003.jpg
http://i145.photobucket.com/albums/r...charger001.jpg
http://i145.photobucket.com/albums/r...charger003.jpg
http://i145.photobucket.com/albums/r...charger001.jpg
Thread Starter
Drifting
Joined: May 2005
Posts: 1,563
Likes: 334
From: Indianapolis Indiana
Thread Starter
Drifting
Joined: May 2005
Posts: 1,563
Likes: 334
From: Indianapolis Indiana
Word has it that in pre-2008 cars the firewall is different..just enough different so that the Edelbrock can contact the firewall. Those parts slightly lower the engine to add clearance. This keeps the supercharger from contacting the firewall. If the supercharger contacts the firewall your interior becomes one big echo chamber for the mechanical noises of the supercharger....not good.
Pinning the crank went well but I had to trim off about 2" of length on both the drill bit and the reamer. Glad that is done!
Removing the bracket on the power stearing pump was down right tough. That hose had no intentions of coming off at all.
I was very careful and lined up the template to cut the radiator shroud. I figured it would be perfect - it wasn't. I may have to trim it.
Reading ahead Step #174 has you removing a vacuum cap. Does anything go back on it? I may have missed something. Also do you have any pics of how the wiring harness is laid out?
Thanks
Safety Car
Joined: Sep 2007
Posts: 3,502
Likes: 82
Thanks for the super picture. I made it to step 123 installing the water pump and couldn't quite figure out how it mounted until I looked at your picture.
Pinning the crank went well but I had to trim off about 2" of length on both the drill bit and the reamer. Glad that is done!
Removing the bracket on the power stearing pump was down right tough. That hose had no intentions of coming off at all.
I was very careful and lined up the template to cut the radiator shroud. I figured it would be perfect - it wasn't. I may have to trim it.
Reading ahead Step #174 has you removing a vacuum cap. Does anything go back on it? I may have missed something. Also do you have any pics of how the wiring harness is laid out?
Thanks
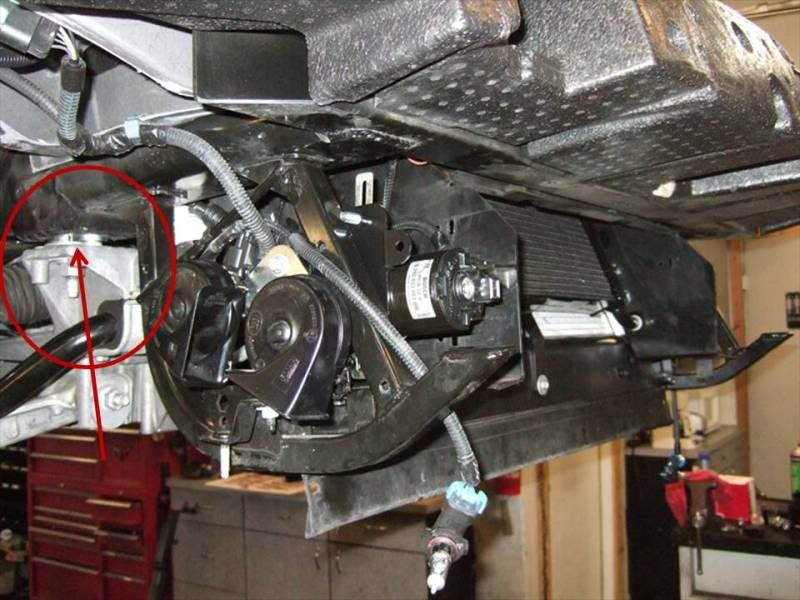
Not sure what pics you need of the wiring harness. I may not have what you are looking for. Here are the two that I have that might help.


Dang...you are nearly done!
Corvette Stories
The Best of Corvette for Corvette Enthusiasts

Top 10 Most Expensive Corvettes Ever Sold on Bring A Trailer
Brett Foote
10 Things Every Corvette Owner Needs (2026 Edition)
Michael S. Palmer
8 Most "Only Corvette Owners Understand" Quirks and Problems
Pouria Savadkouei
10 Reasons the C6 Z06 is Still A Performance Benchmark After 20 Years
Joe Kucinski
How Much Horsepower Every Corvette Engine "LOST" in 1972
Joe Kucinski
Top 10 DOs and DON'Ts for Protecting Your Convertible Top!
Michael S. Palmer
Top 10 Most Explosive Corvettes Ever Made: Power-to-Weight Ratio Ranked!
Joe Kucinski
150 hp to 1,250 hp: Every Corvette Generation Compared by the Specs That Matter
Joe Kucinski
8 Coolest Corvette Pace Cars (and Replicas) of All Time
Verdad Gallardo
Thread Starter
Drifting
Joined: May 2005
Posts: 1,563
Likes: 334
From: Indianapolis Indiana
Far from done...
I'm hoping the wiring harness will become obvious as I proceed. I see it now on step 183.
What about that piece you have to grind off on step #155. Is there anything I need to know there?
Safety Car
Joined: Sep 2007
Posts: 3,502
Likes: 82

My buddy "rdodson" in FAIRBANKS ALASKA first tipped me off to the interference issue. He found it before it made the Edelbrock instructions and alerted me.
http://forums.corvetteforum.com/c6-f...-for-me-3.html
Thread Starter
Drifting
Joined: May 2005
Posts: 1,563
Likes: 334
From: Indianapolis Indiana
About post #53 in the following link talks to it. Just pull it off, and put your grinder to it. If you don't do this you get a real big vacuum leak!
My buddy "rdodson" in FAIRBANKS ALASKA first tipped me off to the interference issue. He found it before it made the Edelbrock instructions and alerted me.
http://forums.corvetteforum.com/c6-f...-for-me-3.html
My buddy "rdodson" in FAIRBANKS ALASKA first tipped me off to the interference issue. He found it before it made the Edelbrock instructions and alerted me.
http://forums.corvetteforum.com/c6-f...-for-me-3.html
Had a minor surprise when I started looking around under the car. Not sure when this happened. As far as I know i never hit anything.
http://i145.photobucket.com/albums/r...charger006.jpg
Safety Car
Joined: Sep 2007
Posts: 3,502
Likes: 82


Safety Car
Joined: Sep 2007
Posts: 3,502
Likes: 82
Check the welds....worst case it is about $225.00 and bolts on
http://store.gmpartshouse.com/parts/...agramCallOut=2
http://store.gmpartshouse.com/parts/...agramCallOut=2
Thread Starter
Drifting
Joined: May 2005
Posts: 1,563
Likes: 334
From: Indianapolis Indiana
Actually it's bent straight back and bent perfectly dead center. It looks natural to an untrained eye. It might have been this way when I bought the car. I've had it on a lift a few times but never noticed it but I've always thought the spoiler was wavy. I don't think I'm going to worry about it this go around. I might fiddle with it a little bit before I put the fascia back on; maybe try an pull it back out. The bolt for the heat exchanger still lines up ok.

Thread Starter
Drifting
Joined: May 2005
Posts: 1,563
Likes: 334
From: Indianapolis Indiana
I got to work on it six hours today and made it to Step 159. Yes, I set that heavy SC all by myself... with the help of a hoist which is the only way to go IMO.
The last bolt in the sequence #8 was tough to get a socket on. I used needle nose plyers to get it in far enough to get a socket on it.
The book said to torque the bolts to 7ft lbs. I didn't have anything that went down that low. I used an analog torque wrench and kind of guessed at where the 7 ft lbs. graticle would be. I'm going to re-torque again in the morning just to be safe.
Putting the short hose between the pump and the heat exchanger took some patients. I ended up taking the heat exchange back out to get the hose on it.
Edelbrock did not cap an unused vacuum inlet at the front of the SC. I'm glad I spotted it before it was too late.
The end is in sight!
Thread Starter
Drifting
Joined: May 2005
Posts: 1,563
Likes: 334
From: Indianapolis Indiana
Check the welds....worst case it is about $225.00 and bolts on
http://store.gmpartshouse.com/parts/...agramCallOut=2
http://store.gmpartshouse.com/parts/...agramCallOut=2
Safety Car
Joined: Sep 2007
Posts: 3,502
Likes: 82
Thread Starter
Drifting
Joined: May 2005
Posts: 1,563
Likes: 334
From: Indianapolis Indiana

