


 Feb 19, 2015, 07:25 PM
Last edit by: IB Advertising
See related guides and technical advice from our community experts:
Browse all: Exterior How-Tos
- How to Remove Front Bumper
Step by step instructions for do-it-yourselfers.
Browse all: Exterior How-Tos

Removing front bumper
Thread Starter
Pro


Joined: Jan 2010
Posts: 629
Likes: 65
From: Freedom PA
I'm hung up trying to remove the front bumper on my 2006 convert.
I have removed all of the fasteners specified in the factory service manual, but I can't get the clip to release, that holds the fender to the front bumper.
I have even tried using a panel clip, pry tool, to lever the bumper upward away from the fender, but it won't release.
If I could just see what the clip looks like I might have an idea how to release it.
Does any one have a sugestion.
See photo below.
Ed
Thanks to all who helped; I got her off today.
 The Bumper!!!
Get your mind out of the gutter.
Ed

I have removed all of the fasteners specified in the factory service manual, but I can't get the clip to release, that holds the fender to the front bumper.
I have even tried using a panel clip, pry tool, to lever the bumper upward away from the fender, but it won't release.
If I could just see what the clip looks like I might have an idea how to release it.
Does any one have a sugestion.
See photo below.
Ed
Thanks to all who helped; I got her off today.
The Bumper!!!Get your mind out of the gutter.
Ed
Last edited by Old Yellow; Feb 3, 2010 at 07:06 PM.
Burning Brakes


Joined: Oct 2005
Posts: 1,020
Likes: 18
From: Anderson SC
You should be able to pull straight up on the bumper cover to unclip it. The worst you can do is break the clips which are cheap to replace but I've never broke one and removed bumper covers plenty of times. Hope this helps. 

Instructor


Joined: Jan 2006
Posts: 246
Likes: 4
From: Denton County Texas

I dont see a clip there, this is directly from the GM service manual
Service Information
2006 Chevrolet Corvette | Corvette (VIN Y) Service Manual | Document ID: 1506204
--------------------------------------------------------------------------------
Fascia, Valence, Fascia Close Out Panel Replacement - Front Bumper
Callout
Component Name
Notice: Refer to Fastener Notice in the Preface section.
Fastener Tightening Specifications: Refer to Fastener Tightening Specifications .
Fascia Replacement
1
Retainer, Front Wheelhouse (Qty: 5)
2
Bolt, Fascia (Qty: 5)
Tighten
7 N�m (62 lb in)
3
Bolt, Fascia Upper Bracket (Qty: 3)
Tighten
7 N�m (62 lb in)
4
Nut, Fascia (Qty: 4)
Tighten
5 N�m (44 lb in)
5
Fascia, Front Bumper Fascia
6
Bolt, Fascia Upper Bracket (Qty: 4)
Tighten
7 N�m (62 lb in)
7
Bracket, Fascia Support Bracket
Front Bumper Valance Replacement
8
Bolt, Valance (Qty: 3)
Tighten
7 N�m (62 lb in)
9
Valance, Front Bumper Valance
Fascia Close Out Panel Replacement
8
Bolt, Valance (Qty: 3)
Tighten
7 N�m (62 lb in)
9
Valance, Front Bumper Valance
10
Panel, Fascia Close Panel
� 2010 General Motors. All rights reserved.

Former Vendor
Joined: Dec 2009
Posts: 3,353
Likes: 166
From: 19804
The bumper hangs over the top there where it clips. You should be able to pull forward on the bottom of the bumper and up to free the top. Then to put it back on you have to hang the top over the lip and then push the bottom toward the rear of the car. I will pm you a picture of a c6 i have the bumper off off so you can see under it.
Thread Starter
Pro
Joined: Jan 2010
Posts: 629
Likes: 65
From: Freedom PA
The bumper hangs over the top there where it clips. You should be able to pull forward on the bottom of the bumper and up to free the top. Then to put it back on you have to hang the top over the lip and then push the bottom toward the rear of the car. I will pm you a picture of a c6 i have the bumper off off so you can see under it.
Thanks all for the help.
I'll get back on it in the morning.
Last edited by Old Yellow; Feb 2, 2010 at 11:47 PM.
Thread Starter
Pro
Joined: Jan 2010
Posts: 629
Likes: 65
From: Freedom PA
Their instructions, in general, seem to be helpful only as a reminder, if you have done the job before.
Believe me there is a clip in there.
Ed
Race Director


Joined: Dec 2005
Posts: 11,888
Likes: 107
From: God's Country, ID

Corvette Stories
The Best of Corvette for Corvette Enthusiasts

Top 10 Most Expensive Corvettes Ever Sold on Bring A Trailer
Brett Foote
10 Things Every Corvette Owner Needs (2026 Edition)
Michael S. Palmer
8 Most "Only Corvette Owners Understand" Quirks and Problems
Pouria Savadkouei
10 Reasons the C6 Z06 is Still A Performance Benchmark After 20 Years
Joe Kucinski
How Much Horsepower Every Corvette Engine "LOST" in 1972
Joe Kucinski
Top 10 DOs and DON'Ts for Protecting Your Convertible Top!
Michael S. Palmer
Top 10 Most Explosive Corvettes Ever Made: Power-to-Weight Ratio Ranked!
Joe Kucinski
150 hp to 1,250 hp: Every Corvette Generation Compared by the Specs That Matter
Joe Kucinski
8 Coolest Corvette Pace Cars (and Replicas) of All Time
Verdad GallardoPro

Joined: Sep 2007
Posts: 747
Likes: 0
From: S. Jersey .............. Low 11sec club
St. Jude Donor '11

Thread Starter
Pro
Joined: Jan 2010
Posts: 629
Likes: 65
From: Freedom PA
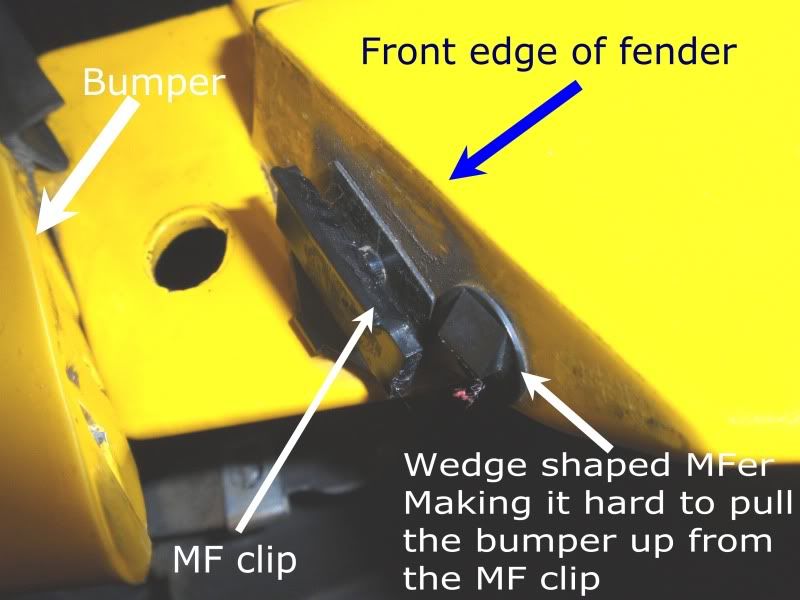
Since this thread has been revived I'll add some better pictures that I took after I got the bumper seperated.
These are from my 06 that I started this link for. Last year I did my new GS, and having done it before made this time a snap.
I used a couple of those plastic door panel tools to wedge the bumper forward and another to pry up on the fender. Popped right apart.
In the photos the reference to the MF clip is just short hand for, "Mighty Fine Clip."
Ed
Pro
Joined: Feb 2009
Posts: 719
Likes: 9
From: Heliopolis, Between Cleopatra's Needles
Since this thread has been revived I'll add some better pictures that I took after I got the bumper seperated.
These are from my 06 that I started this link for. Last year I did my new GS, and having done it before made this time a snap.
I used a couple of those plastic door panel tools to wedge the bumper forward and another to pry up on the fender. Popped right apart.
In the photos the reference to the MF clip is just short hand for, "Mighty Fine Clip."
Ed
Personally have inquired and referenced other sources that suggest an opposite to the pictured position, though still uncertain which is correct and/or proper by design and intent from incurring said problem. There must be a proper intended orientation, or why else the difference.
Thread Starter
Pro
Joined: Jan 2010
Posts: 629
Likes: 65
From: Freedom PA
Ed
Pro
Joined: Feb 2009
Posts: 719
Likes: 9
From: Heliopolis, Between Cleopatra's Needles
:: fascia_removal.pdf – see last page (4 of 4)
:: bumper-wings-wont-stay-down – see Post 5
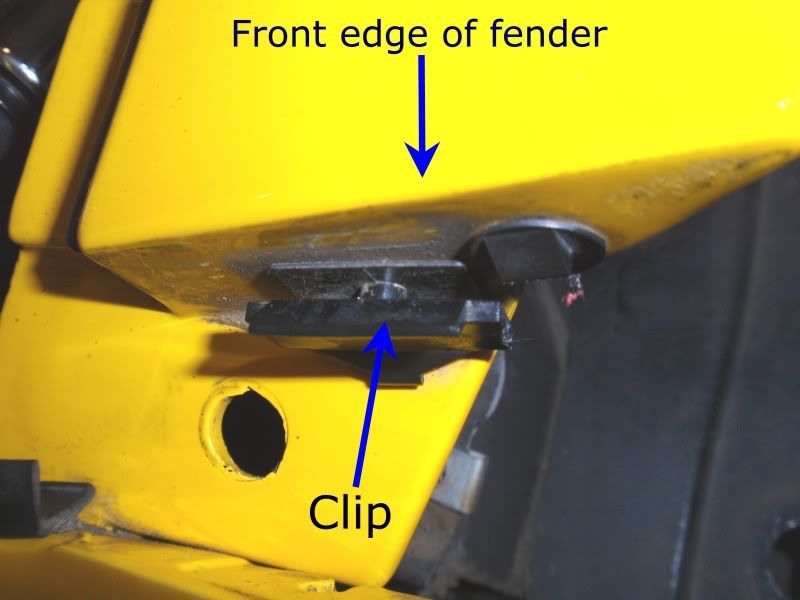
The second and third pictures of Motorhead-47's posting seem to suggest by the angularity and tapered tip of the clip that that orientation would better serve as a guide for the fascia’s edge to slide into place, again, not certain for nothing definitive has been available to date.
PS: Clip in question is the larger "MF clip" of the two, as per your reference in 2nd picture.
Last edited by QwikC; Feb 4, 2012 at 06:18 PM. Reason: added PS
Pro
Joined: Feb 2009
Posts: 719
Likes: 9
From: Heliopolis, Between Cleopatra's Needles
^^^^ That was precisely the point, chose two (2) like but separate examples that illustrate the clip comparatively opposite in position to that displayed in Old Yellow’s posting.
Thread Starter
Pro
Joined: Jan 2010
Posts: 629
Likes: 65
From: Freedom PA
You can beat this to death, but the pictures I showed in my post #11 is the correct orientation of the clip as it is attached to the fender.
Since doing my own two cars I have since helped four other people take their bumpers loose from the fender. In each case the clips were installed as shown in my photos.
If you reverse either the MF clip or the ramp clip you will only increase the difficulty in either taking the bumper off or putting it back on.
All of the pictures posted on this subject show them oriented in the same way. It is only the lighting or orientations of the camera that make them appear different.
The biggest obstacle to getting the bumper to pop off the clips is the temperature. When the bumper is warm they will pop apart more easily than when it is cold. When I did my first one the garage temperature was around 50 degrees. With the ambient temperature in the 70 to 80s the urethane bumper is more pliable, and came apart much easier.
Ed
Last edited by Old Yellow; Feb 5, 2012 at 11:57 AM.
Pro
Joined: Feb 2009
Posts: 719
Likes: 9
From: Heliopolis, Between Cleopatra's Needles
^^^^ It’s unfortunate that you fail to recognize the simple intent here to find a “definitive” answer from anybody willing to share knowledge of the fact – a proper position of the clip. Also, IF you look acutely enough at the examples provided you’ll see NOT all pictures illustrate the same position, but that’s you prerogative if you’re content with such an inaccurate observation and not so a matter of lighting.
Indeed, personally finished with this matter, shall pursue discovery elsewhere that's absent innuendos suggestive of beating a matter to death. Hadn’t anticipated though ought to have realized such remarks are often the product of minds dull to detail and content to live with inaccuracies while diminishing the worth of others in their efforts for greater accuracies, which in this matter may prove the difference in keeping the fascia from detaching in later times as some have experienced…. if it didn’t matter then the sides would’ve been the same, plain and simple. Good day all.
A PM previously received showin' a conflicting viewpoint and cause for the inquiry...
======================================== ======================================
From : Motorhead-47
To : QwikC
Date : 2011-07-03 18:34
Title : Re: Clip Orientation_up, down?
--------------------------------------------------------------------------------
Glad to help
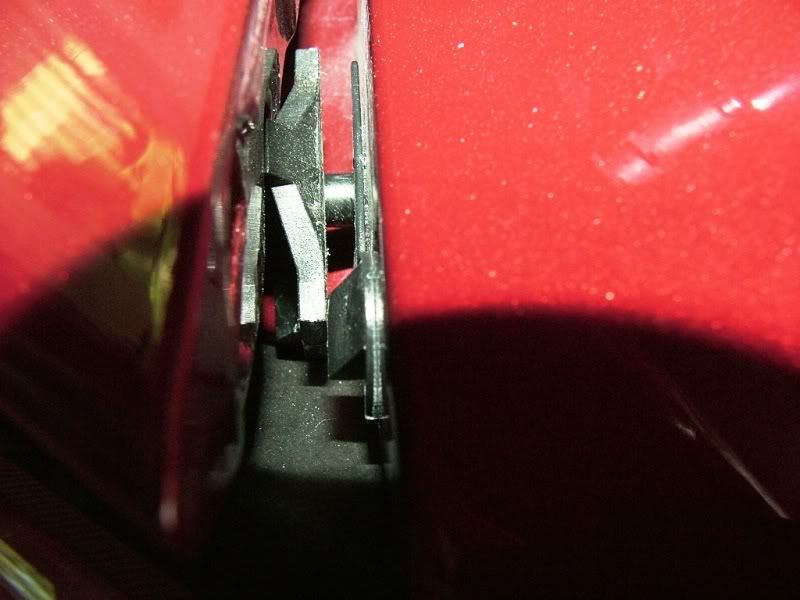
The following photo was taken of my car and those clips have not been touched from the factory. You'll see that the top of the clip leans forward. I'm assuming this is to help guide the front fascia down into the slot.
Hope that helped
PS: IF anybody should be further genuinely interested to know of the proper orientation of clip for the cited reason; avoid noted and possible/future separation, PM and information will be made when fact is ascertained.
Indeed, personally finished with this matter, shall pursue discovery elsewhere that's absent innuendos suggestive of beating a matter to death. Hadn’t anticipated though ought to have realized such remarks are often the product of minds dull to detail and content to live with inaccuracies while diminishing the worth of others in their efforts for greater accuracies, which in this matter may prove the difference in keeping the fascia from detaching in later times as some have experienced…. if it didn’t matter then the sides would’ve been the same, plain and simple. Good day all.
A PM previously received showin' a conflicting viewpoint and cause for the inquiry...
======================================== ======================================
From : Motorhead-47
To : QwikC
Date : 2011-07-03 18:34
Title : Re: Clip Orientation_up, down?
--------------------------------------------------------------------------------
Glad to help
The following photo was taken of my car and those clips have not been touched from the factory. You'll see that the top of the clip leans forward. I'm assuming this is to help guide the front fascia down into the slot.
Hope that helped
PS: IF anybody should be further genuinely interested to know of the proper orientation of clip for the cited reason; avoid noted and possible/future separation, PM and information will be made when fact is ascertained.
Last edited by QwikC; Feb 6, 2012 at 08:32 AM. Reason: posted PS
Thread Starter
Pro
Joined: Jan 2010
Posts: 629
Likes: 65
From: Freedom PA
I've taken 6 cars apart, and the results were as posted previously.
Get out your wrenches, pull the bumper off, and you will find a three dimensional visual of my posted pictures.
What do you want to hear? That someone else agrees with you!
Ed
Pro
Joined: Feb 2009
Posts: 719
Likes: 9
From: Heliopolis, Between Cleopatra's Needles
^^^^ You’re ignorant as equally rude in reply (dah) by your continuing failure to see that your three-dimensional illustration on a comparative basis is neither “definitive” nor “resolute” to the issue. Maybe others here can help you see the point of the matter.
Finished here… UNSUBSCRIBING from any furtherance, so have at it, personally haven’t a predisposition to favor playing in the mud….
Finished here… UNSUBSCRIBING from any furtherance, so have at it, personally haven’t a predisposition to favor playing in the mud….