


DIY alignment thoughts
Thread Starter
Track Junky


Joined: Jun 2007
Posts: 4,074
Likes: 36
From: Orlando Area
Tech Contributor
Bob (BEZ06),
You made mention that while adjusting toe, 3 flats made a 1/16" change... Is that in total toe?
Also, after you removed the washers up front, you adjusted toe in 9 flats on each side... that means, removing the washers changed your toe from zero total toe to approximately 7/16" toe out? That is a pretty significany change, I wouldn't have guessed that much.
Just trying to visualize how this whole thing works in my head before making any adjustments.
Sean
Last edited by taken19; Dec 14, 2011 at 02:08 PM.
Melting Slicks


Joined: Sep 2009
Posts: 2,028
Likes: 357
Bob (BEZ06),
You made mention that while adjusting toe, 3 flats made a 1/16" change... Is that in total toe?
Also, after you removed the washers up front, you adjusted toe in 9 turns on each side... that means, removing the washers changed your toe from zero total toe to approximately 7/16" toe out? That is a pretty significany change, I wouldn't have guessed that much.
Just trying to visualize how this whole thing works in my head before making any adjustments.
Sean
"After adjusting camber, I found turning a tie-rod adjuster 3 flats (half a turn) would change toe by about 1/16".
After adjusting to my track camber settings, I found I had to tighten (shorten) both the front and rear tie-rods/toe adjusters to get my track toe settings. I had to tighten the fronts 9 flats on each side, and in the rear I tightened them 4 flats on each side."
That is 1 1/2 turns front and 2/3 turn rear. 3/16" front and just over 1/16" rear.
And he did it on each side, so that would have been 3/8" toe change in front and about 5/32" in rear.
Thread Starter
Track Junky
Joined: Jun 2007
Posts: 4,074
Likes: 36
From: Orlando Area
Tech Contributor
You're right, I meant flats!
Hadn't had my coffee yet at 5:23 this morning. Sorry about that...
And yes, I understand he adjusted toe on the front 3/8". The point I was making was that simply removing the washers from the upper control arms made significant change in total toe - way more than I would have guessed off the top of my head.
I edited that post so nobody else gets confused by my pre-coffee jibberish.
Last edited by taken19; Dec 14, 2011 at 02:10 PM.

Burning Brakes

Joined: Aug 2011
Posts: 967
Likes: 1
thought this might be helpful to some:
http://www.raceramps.com/slip-plate-stands.aspx
i plan on buying my own alignment machine soon and saw these
there was a company that includes these with turn tables and a laser alignment kit
forgot offhand who it was and how much, wasn't cheap, but wasn't super expensive
i used to love doing alignments at the shop
be surprised what air pressure can do, or should say lack of
i plan to get a Sun/Snap-on/John bean setup, if i can find it within my budget
Tech Contributor


Joined: Oct 1999
Posts: 41,037
Likes: 9,798
From: Charlotte, NC (formerly Endicott, NY)
Bob referenced flats not turns:
"After adjusting camber, I found turning a tie-rod adjuster 3 flats (half a turn) would change toe by about 1/16".
After adjusting to my track camber settings, I found I had to tighten (shorten) both the front and rear tie-rods/toe adjusters to get my track toe settings. I had to tighten the fronts 9 flats on each side, and in the rear I tightened them 4 flats on each side."
That is 1 1/2 turns front and 2/3 turn rear. 3/16" front and just over 1/16" rear.
And he did it on each side, so that would have been 3/8" toe change in front and about 5/32" in rear.
Bill
Tech Contributor
Joined: Oct 1999
Posts: 41,037
Likes: 9,798
From: Charlotte, NC (formerly Endicott, NY)
thought this might be helpful to some:
http://www.raceramps.com/slip-plate-stands.aspx
i plan on buying my own alignment machine soon and saw these
there was a company that includes these with turn tables and a laser alignment kit
forgot offhand who it was and how much, wasn't cheap, but wasn't super expensive
i used to love doing alignments at the shop
be surprised what air pressure can do, or should say lack of
i plan to get a Sun/Snap-on/John bean setup, if i can find it within my budget
http://www.raceramps.com/slip-plate-stands.aspx
i plan on buying my own alignment machine soon and saw these
there was a company that includes these with turn tables and a laser alignment kit
forgot offhand who it was and how much, wasn't cheap, but wasn't super expensive
i used to love doing alignments at the shop
be surprised what air pressure can do, or should say lack of
i plan to get a Sun/Snap-on/John bean setup, if i can find it within my budget
http://www.bbxracing.com/product_inf...products_id=69

Bill
Last edited by Bill Dearborn; Dec 14, 2011 at 03:36 PM.
Thread Starter
Track Junky
Joined: Jun 2007
Posts: 4,074
Likes: 36
From: Orlando Area
Tech Contributor
Bill, good point about the reference to toe and actual measurement location. So let's clarify...
If the measurement is taken when the tire needs the rim in the vertical plane, every 1/16" of total toe (1/32" per wheel) is about 0.35 total degrees of toe(0.0.3673). This assumes rim outer diameter at 19.5" (what I measured last night for the front wheels).
Same concept for the rear wheels - 20.5" outer rim diameter will give 0.3494 total degrees of toe.
Thanks for bringing that up.
Do you know what the ideal toe is for the track, measured in degrees? Both front and back if you have the numbers please.
Sean
Tech Contributor
Joined: Oct 1999
Posts: 41,037
Likes: 9,798
From: Charlotte, NC (formerly Endicott, NY)
I don't have any specific settings that are any better than others I have seen mentioned. I know that to maximize performance the settings probably vary from track to track.
I do use this chart to convert from inches to degrees:
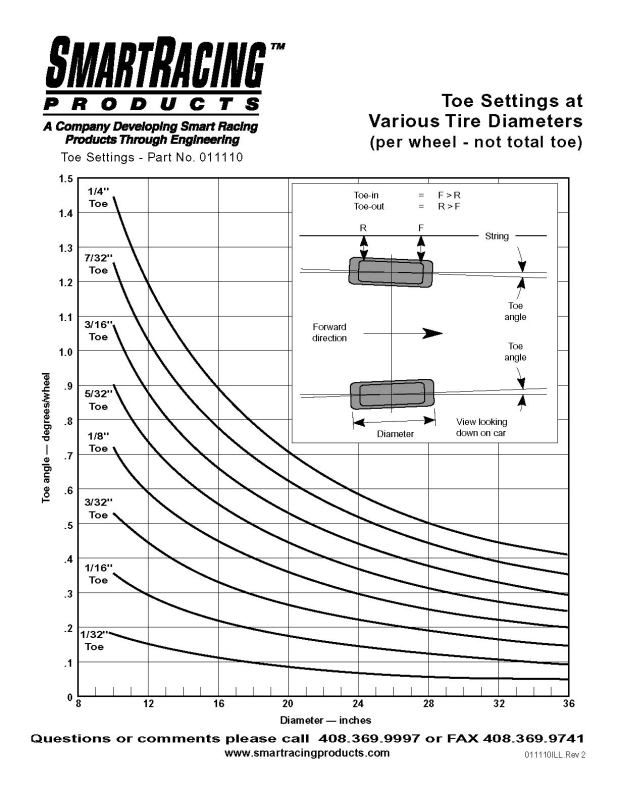
This is on a per wheel basis.
A couple of things I learned from LG about making quick changes at the track is to have a 1 inch rectangular tube with two vertical bars welded to it a little further apart than the rear wheels are spaced can be used to measure toe from the tire. A two ft Sears Laser level can be used to set thrust angle from the rear tire. The bar is used to measure the distance from one wheel to the bar by placing the bar in front of or in rear of the tires with one side against the tire and measuring from the other tire to the other end of the bar. Two people can make a toe measurement in less than a minute.
For setting thrust angle one person locates a spot on the front frame and puts a tape measure through the front wheel onto the spot. The other person locates the level across the rear tire/rim on the same side and rotates the level until the beam hits the tape measure. Comparing measurements from one side of the car to the other you should try to get them near equal by adjusting the rear toe. The two types of measurements are interrelated so you have to repeat them a couple of times but Lou and one of his crew adjusted the rear toe and thrust angle on my car in the garage at the Glen in less time than it took me to eat a 6 inch subway sandwich.
Bill
I do use this chart to convert from inches to degrees:
This is on a per wheel basis.
A couple of things I learned from LG about making quick changes at the track is to have a 1 inch rectangular tube with two vertical bars welded to it a little further apart than the rear wheels are spaced can be used to measure toe from the tire. A two ft Sears Laser level can be used to set thrust angle from the rear tire. The bar is used to measure the distance from one wheel to the bar by placing the bar in front of or in rear of the tires with one side against the tire and measuring from the other tire to the other end of the bar. Two people can make a toe measurement in less than a minute.
For setting thrust angle one person locates a spot on the front frame and puts a tape measure through the front wheel onto the spot. The other person locates the level across the rear tire/rim on the same side and rotates the level until the beam hits the tape measure. Comparing measurements from one side of the car to the other you should try to get them near equal by adjusting the rear toe. The two types of measurements are interrelated so you have to repeat them a couple of times but Lou and one of his crew adjusted the rear toe and thrust angle on my car in the garage at the Glen in less time than it took me to eat a 6 inch subway sandwich.
Bill
Corvette Stories
The Best of Corvette for Corvette Enthusiasts

150 hp to 1,250 hp: Every Corvette Generation Compared by the Specs That Matter
Joe Kucinski
8 Coolest Corvette Pace Cars (and Replicas) of All Time
Verdad Gallardo
Top 10 Corvette Engines RANKED by Peak Torque (70+ Years of Muscle!)
Joe Kucinski
Corvette ZR1X Will Be Pacing the Indy 500, And Could Probably Race, Too!
Verdad Gallardo
Top 10 Corvettes Coming to Mecum Indy 2026!
Brett Foote
Top 10 C9 Corvette MUST-HAVES to Fix These C8 Generation Flaws!
Michael S. Palmer
10 Revolutionary 'Corvette Firsts' Most People Don't Know
Joe Kucinski
5 Reasons to Upgrade to an LS6-Powered Corvette; 5 Reasons to Stay LT2
Michael S. Palmer
2027 Corvette vs The World: Every C8 vs Its Closest Competitor
Joe Kucinski
Former Vendor
Joined: Aug 2005
Posts: 16,897
Likes: 412
From: Lewisville TX
St. Jude Donor '03-'04-'05-'06-'07-'08-'09-'10-'11-'12-'13
I don't have any specific settings that are any better than others I have seen mentioned. I know that to maximize performance the settings probably vary from track to track.
I do use this chart to convert from inches to degrees:
This is on a per wheel basis.
A couple of things I learned from LG about making quick changes at the track is to have a 1 inch rectangular tube with two vertical bars welded to it a little further apart than the rear wheels are spaced can be used to measure toe from the tire. A two ft Sears Laser level can be used to set thrust angle from the rear tire. The bar is used to measure the distance from one wheel to the bar by placing the bar in front of or in rear of the tires with one side against the tire and measuring from the other tire to the other end of the bar. Two people can make a toe measurement in less than a minute.
For setting thrust angle one person locates a spot on the front frame and puts a tape measure through the front wheel onto the spot. The other person locates the level across the rear tire/rim on the same side and rotates the level until the beam hits the tape measure. Comparing measurements from one side of the car to the other you should try to get them near equal by adjusting the rear toe. The two types of measurements are interrelated so you have to repeat them a couple of times but Lou and one of his crew adjusted the rear toe and thrust angle on my car in the garage at the Glen in less time than it took me to eat a 6 inch subway sandwich.
Bill
Darn skippy we did.

Doing the alignment at home is easy enough for most weekend racers given you have a little bit of help and a few basic tools and understanding of what is going on.
The Corvette's are easy enough to make changes to, and the front and rear are darn near the same so if you understand one end of the car, the other end is just as simple. I would say the hardest part is jacking the car up and settling the suspension between changes.
Thread Starter
Track Junky
Joined: Jun 2007
Posts: 4,074
Likes: 36
From: Orlando Area
Tech Contributor
Im gonna focus on the frond axle for now. It appears that thrust angle is slightly more difficult to perfect, so I'll take baby steps for now.
Thanks for the graph and suggestions. You guys probably saved me a ton of hassle and several hours of iterations.
Thanks for the graph and suggestions. You guys probably saved me a ton of hassle and several hours of iterations.
Thread Starter
Track Junky
Joined: Jun 2007
Posts: 4,074
Likes: 36
From: Orlando Area
Tech Contributor
Bill, good point about the reference to toe and actual measurement location. So let's clarify...
If the measurement is taken when the tire needs the rim in the vertical plane, every 1/16" of total toe (1/32" per wheel) is about 0.18 total degrees of toe(0.1836). This assumes rim outer diameter at 19.5" (what I measured last night for the front wheels).
Same concept for the rear wheels - 20.5" outer rim diameter will give 0.1747 total degrees of toe.
Thanks for bringing that up.
Do you know what the ideal toe is for the track, measured in degrees? Both front and back if you have the numbers please.
Sean
Numbers corrected in the original quote.
Thread Starter
Track Junky
Joined: Jun 2007
Posts: 4,074
Likes: 36
From: Orlando Area
Tech Contributor
I took a look at fromt and rear setups today whils bleeding brakes, swapping pads and going back to street tires.
Initial camber at all four corners was -0.8, rear toe was -1/16" measured at edge of rim and front was zero toe.
I adjusted rear control arms outward 2 hash marks, no toe adjustment yet. Fromt upper control arms only had one washer installed except for DR front mount (which had 2). Took one washer out all around with no toe adjustment.
I'm gonna drive around the neighborhood in the morning and measure again to try to gather data on how much of XX adjustment changes things. One thing at a time so I can understand the dynamics of each adjustment.
One question though... Is there a special tool for tie rod adjustment? Some form of wider wrench to grab more metal? A 13 mm wrench fit but was loose, and a 1/2 inch was too small. The rear tie rods didn't want to move at all, maybe I need PB blaster.
Tech Contributor
Joined: Oct 1999
Posts: 41,037
Likes: 9,798
From: Charlotte, NC (formerly Endicott, NY)
I took a look at fromt and rear setups today whils bleeding brakes, swapping pads and going back to street tires.
Initial camber at all four corners was -0.8, rear toe was -1/16" measured at edge of rim and front was zero toe.
I adjusted rear control arms outward 2 hash marks, no toe adjustment yet. Fromt upper control arms only had one washer installed except for DR front mount (which had 2). Took one washer out all around with no toe adjustment.
I'm gonna drive around the neighborhood in the morning and measure again to try to gather data on how much of XX adjustment changes things. One thing at a time so I can understand the dynamics of each adjustment.
One question though... Is there a special tool for tie rod adjustment? Some form of wider wrench to grab more metal? A 13 mm wrench fit but was loose, and a 1/2 inch was too small. The rear tie rods didn't want to move at all, maybe I need PB blaster.
Initial camber at all four corners was -0.8, rear toe was -1/16" measured at edge of rim and front was zero toe.
I adjusted rear control arms outward 2 hash marks, no toe adjustment yet. Fromt upper control arms only had one washer installed except for DR front mount (which had 2). Took one washer out all around with no toe adjustment.
I'm gonna drive around the neighborhood in the morning and measure again to try to gather data on how much of XX adjustment changes things. One thing at a time so I can understand the dynamics of each adjustment.
One question though... Is there a special tool for tie rod adjustment? Some form of wider wrench to grab more metal? A 13 mm wrench fit but was loose, and a 1/2 inch was too small. The rear tie rods didn't want to move at all, maybe I need PB blaster.
Bill
Thread Starter
Track Junky
Joined: Jun 2007
Posts: 4,074
Likes: 36
From: Orlando Area
Tech Contributor
Spent about 4 hrs adjusting today. After 5 separate adjustments (only ont thing at a time - camber or toe), I ended up with the following:
Front camber -1.9 right, -2.0 left
Front toe 1/16" out, measured at rim edge
Rear camber -1.0 both sides
Rear toe 1/16" in
All in all, simple process. Lifting the car and driving around to settle suspension took more time than anything.
Thanks for all the pointers. I think I will leave it this way for a bit since I put more track miles on the car than street miles.


Thread Starter
Track Junky
Joined: Jun 2007
Posts: 4,074
Likes: 36
From: Orlando Area
Tech Contributor
This was my first attempt. I went slow on purpose an documented everything so I could understand what each adjustment did for the car. If I had to do it again, I could go back to street alignment in 45-60 min since I marked everything prior to moving it.
Plus, I only trust one shop down here and he is $140. The actual work is super easy, you can probably do it during your morning coffey.
Sean
Plus, I only trust one shop down here and he is $140. The actual work is super easy, you can probably do it during your morning coffey.
Sean


