


DIY alignment thoughts
Thread Starter
Track Junky


Joined: Jun 2007
Posts: 4,074
Likes: 36
From: Orlando Area
Tech Contributor
Now that I'm figuring this road race thing, I'm learning about suspension and alignment fundamentals. Still running factory Z51 suspension (loweredon stock bolts with rear bushings cut) and street alignment. I have taken 6-7 seconds off my lap times at Homestead between the last two events by improving skill and understanding the car (from 1:58 to 1:51).
I have been reading the DIY articles for track alignment setups and it doesn't look difficult at all with a few basic tools. A couple questions though...
1. How high do you get the car up to access the tie rods and A-arm bolts? I was thinking 3-4 inches by driving up on 2x10" planks stacked.
2. By adjusting camber first, how much difference will than have on toe? Minor or significant?
3. I was gonna ompare the iPhone level with a carpenters level for accuracy. If it is close, I may use the iPhone since it will read tents of a degree. Am I out to left field here? Do you think there will be any issues with repeatibility?
4. After my first attempt, I'm gonna drive around and re-measure. What's the likelihood of an alignment shift? I would guess a small chance as long as the car remains on the ground the entire time (suspension does not become I sprung at any time).
I appreciate any suggestions.
Sean

Advanced

Joined: Sep 2011
Posts: 69
Likes: 1
From: Fullerton Ca.
What might work is the Pfadt shim kit. Use a alignment rack and use the kit to get two alignments. Note the location of the shims for both alignments (track / street). Then it would be easier to switch from your street to track to street alignments.
Race Director


Joined: Jan 2005
Posts: 10,924
Likes: 854
From: Daytona Beach FL
I do my own alignments, and it's not hard at all.
I used strings to set up my initial toe settings, and a digital level to check camber. After I had a good street setup, it was just a mechanical process to go from street to track.
I used to be cranking in a bunch of camber when I put on my Hoosiers for the track (they need -2.5 to -3 degrees of camber), then going back to street alignment after the event.
I drive my car to track events, and I got tired of adjusting alignment in the motel parking lot when I got to an event, so now I just set up an aggressive street alignment and run street tires at track events. If I were trailering the car, I'd just set it up for the track and leave it alone - well, check it every once in a while, but I never found if changing.
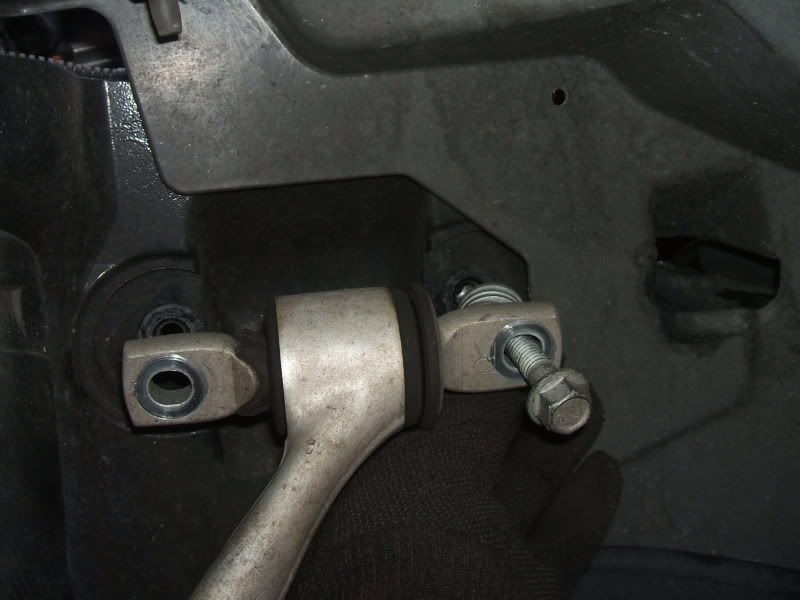
I used to adjust camber by simply removing 2 or 3 of the washers behind the dogbones that mount the upper A-arm to the frame. Hardbar makes some studs you can install so you won't create a real problem if you strip out one of those threads in the frame.
Here's a picture of what I'm talking about:
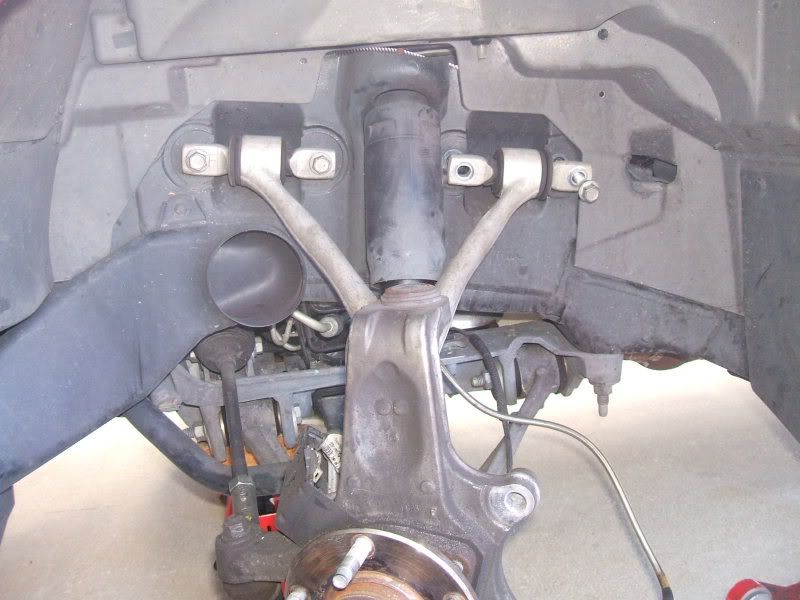
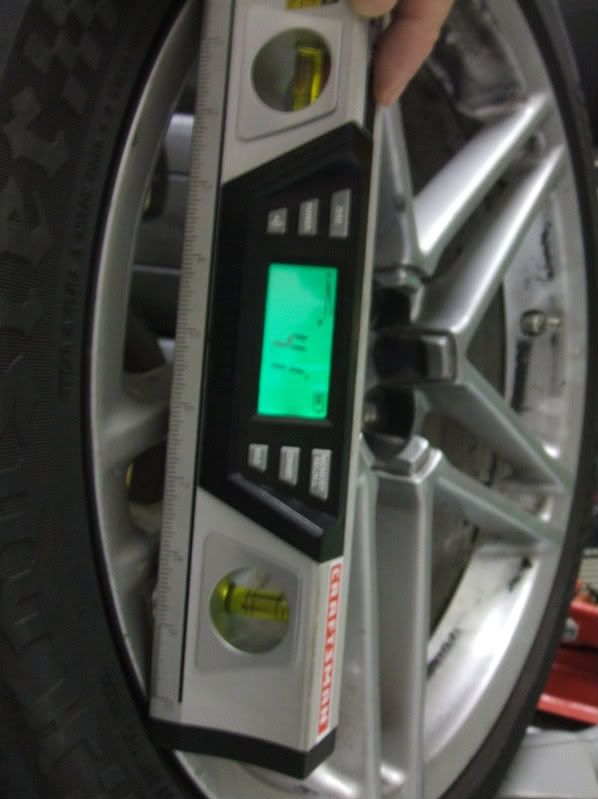
I have a nice digital level I got at Sears for about $30, but I think an iPhone would work fine. Just make sure it's calibrated properly, and use a long straight edge to give you a longer surface you're measuring over to a better reading of the actual angle.
On the Z06 the front and rear upper A-arms are exactly the same, but on a base C6 the rear is different (bolts go longitudinally instead of going directly into the frame). So, you'll need to mess with the eccentric bolts to change camber in the rear.
From the factor my Z06 had 4 washers up front and 2 in the rear, so I removed 3 washers up front and 2 washers in the rear to crank in negative camber.
My street alignment is about -1.2* of camber and 0 toe up front, and in the rear I've got about -1* camber and 1/16" toe in (I think that's about 2*).
Each washer is not quite 1/2* of camber, so when I removed 3 up front it went to about -2.6*, and in the rear removing 2 washers gave me about -1.7*.
Changing camber changes toe pretty significantly, and I ran different toe on the street and track anyway - so I had to adjust toe every time I changed camber.
For the street I run 0 toe up front, and a total of 1/16" toe-in for the rear.
For the track I adjust it to a total toe of about 1/16" toe-out up front, and 1/8" toe-in for the rear.
After adjusting camber, I found turning a tie-rod adjuster 3 flats (half a turn) would change toe by about 1/16".
After adjusting to my track camber settings, I found I had to tighten (shorten) both the front and rear tie-rods/toe adjusters to get my track toe settings. I had to tighten the fronts 9 flats on each side, and in the rear I tightened them 4 flats on each side.
When going back to street alignment I put the washers back in and turned the toe adjusters the same amount in the opposite directions.
So...after I initially got the adjustments figured out, it was a pretty quick process - just a mechanical adjustment and I didn't even bother checking after I did it a bunch of times and found it always came out right where I wanted it - i.e., it never slipped or shifted.
I always had the wheels off to change camber the way I did it, so I usually just jacked up one side and adjusted things, then jacked the other and adjusted - but I knew how many washers or turns of the tie-rods I wanted so it was very easy.
Good luck, and let us know how it works out!!
Bob
I used strings to set up my initial toe settings, and a digital level to check camber. After I had a good street setup, it was just a mechanical process to go from street to track.
I used to be cranking in a bunch of camber when I put on my Hoosiers for the track (they need -2.5 to -3 degrees of camber), then going back to street alignment after the event.
I drive my car to track events, and I got tired of adjusting alignment in the motel parking lot when I got to an event, so now I just set up an aggressive street alignment and run street tires at track events. If I were trailering the car, I'd just set it up for the track and leave it alone - well, check it every once in a while, but I never found if changing.
I used to adjust camber by simply removing 2 or 3 of the washers behind the dogbones that mount the upper A-arm to the frame. Hardbar makes some studs you can install so you won't create a real problem if you strip out one of those threads in the frame.
Here's a picture of what I'm talking about:
I have a nice digital level I got at Sears for about $30, but I think an iPhone would work fine. Just make sure it's calibrated properly, and use a long straight edge to give you a longer surface you're measuring over to a better reading of the actual angle.
On the Z06 the front and rear upper A-arms are exactly the same, but on a base C6 the rear is different (bolts go longitudinally instead of going directly into the frame). So, you'll need to mess with the eccentric bolts to change camber in the rear.
From the factor my Z06 had 4 washers up front and 2 in the rear, so I removed 3 washers up front and 2 washers in the rear to crank in negative camber.
My street alignment is about -1.2* of camber and 0 toe up front, and in the rear I've got about -1* camber and 1/16" toe in (I think that's about 2*).
Each washer is not quite 1/2* of camber, so when I removed 3 up front it went to about -2.6*, and in the rear removing 2 washers gave me about -1.7*.
Changing camber changes toe pretty significantly, and I ran different toe on the street and track anyway - so I had to adjust toe every time I changed camber.
For the street I run 0 toe up front, and a total of 1/16" toe-in for the rear.
For the track I adjust it to a total toe of about 1/16" toe-out up front, and 1/8" toe-in for the rear.
After adjusting camber, I found turning a tie-rod adjuster 3 flats (half a turn) would change toe by about 1/16".
After adjusting to my track camber settings, I found I had to tighten (shorten) both the front and rear tie-rods/toe adjusters to get my track toe settings. I had to tighten the fronts 9 flats on each side, and in the rear I tightened them 4 flats on each side.
When going back to street alignment I put the washers back in and turned the toe adjusters the same amount in the opposite directions.
So...after I initially got the adjustments figured out, it was a pretty quick process - just a mechanical adjustment and I didn't even bother checking after I did it a bunch of times and found it always came out right where I wanted it - i.e., it never slipped or shifted.
I always had the wheels off to change camber the way I did it, so I usually just jacked up one side and adjusted things, then jacked the other and adjusted - but I knew how many washers or turns of the tie-rods I wanted so it was very easy.
Good luck, and let us know how it works out!!
Bob
Thread Starter
Track Junky
Joined: Jun 2007
Posts: 4,074
Likes: 36
From: Orlando Area
Tech Contributor
But adjusting camber also affects toe, correct?
It would be nice if it was as easy as a shim kit, but I'm not sure that it is. I will do more research on that.
Thanks for the idea.
It would be nice if it was as easy as a shim kit, but I'm not sure that it is. I will do more research on that.
Thanks for the idea.
Thread Starter
Track Junky
Joined: Jun 2007
Posts: 4,074
Likes: 36
From: Orlando Area
Tech Contributor
Thanks Bob, great insight. I was under the assumption I would have to adjust the lower control bolts to set camber. I hadn't paid enough attention to the upper control arm setup to see the washers up front.
When you were figuring things out, did you do trial and error by lifting the car and removing a wheel each time or did you drive the car on ramps (or similar) and had homemade rotating plates (tiles with grease between them)? Trial and error would be very time consuming by driving around to settle the alignment after each attempt.
I'm not looking for the easy way out, but I don't wanna spend 2 days zeroing in on a good track setup. The wife and kids wouldn't allow that. Max I could get away with is a day.
Thanks again,
Sean
I do my own alignments, and it's not hard at all.
I used strings to set up my initial toe settings, and a digital level to check camber. After I had a good street setup, it was just a mechanical process to go from street to track.
I used to be cranking in a bunch of camber when I put on my Hoosiers for the track (they need -2.5 to -3 degrees of camber), then going back to street alignment after the event.
I drive my car to track events, and I got tired of adjusting alignment in the motel parking lot when I got to an event, so now I just set up an aggressive street alignment and run street tires at track events. If I were trailering the car, I'd just set it up for the track and leave it alone - well, check it every once in a while, but I never found if changing.
I used to adjust camber by simply removing 2 or 3 of the washers behind the dogbones that mount the upper A-arm to the frame. Hardbar makes some studs you can install so you won't create a real problem if you strip out one of those threads in the frame.
Here's a picture of what I'm talking about:
I have a nice digital level I got at Sears for about $30, but I think an iPhone would work fine. Just make sure it's calibrated properly, and use a long straight edge to give you a longer surface you're measuring over to a better reading of the actual angle.
On the Z06 the front and rear upper A-arms are exactly the same, but on a base C6 the rear is different (bolts go longitudinally instead of going directly into the frame). So, you'll need to mess with the eccentric bolts to change camber in the rear.
From the factor my Z06 had 4 washers up front and 2 in the rear, so I removed 3 washers up front and 2 washers in the rear to crank in negative camber.
My street alignment is about -1.2* of camber and 0 toe up front, and in the rear I've got about -1* camber and 1/16" toe in (I think that's about 2*).
Each washer is not quite 1/2* of camber, so when I removed 3 up front it went to about -2.6*, and in the rear removing 2 washers gave me about -1.7*.
Changing camber changes toe pretty significantly, and I ran different toe on the street and track anyway - so I had to adjust toe every time I changed camber.
For the street I run 0 toe up front, and a total of 1/16" toe-in for the rear.
For the track I adjust it to a total toe of about 1/16" toe-out up front, and 1/8" toe-in for the rear.
After adjusting camber, I found turning a tie-rod adjuster 3 flats (half a turn) would change toe by about 1/16".
After adjusting to my track camber settings, I found I had to tighten (shorten) both the front and rear tie-rods/toe adjusters to get my track toe settings. I had to tighten the fronts 9 flats on each side, and in the rear I tightened them 4 flats on each side.
When going back to street alignment I put the washers back in and turned the toe adjusters the same amount in the opposite directions.
So...after I initially got the adjustments figured out, it was a pretty quick process - just a mechanical adjustment and I didn't even bother checking after I did it a bunch of times and found it always came out right where I wanted it - i.e., it never slipped or shifted.
I always had the wheels off to change camber the way I did it, so I usually just jacked up one side and adjusted things, then jacked the other and adjusted - but I knew how many washers or turns of the tie-rods I wanted so it was very easy.
Good luck, and let us know how it works out!!
Bob
Burning Brakes

Joined: Nov 2008
Posts: 998
Likes: 0
if you are going to use a shim kit (for upper a-arms) you MUST swap out the stock eccentric bolts for a NON-adjustable bolt aka camber kit.
The NON-adjustable bolts push the bottom of the wheel out as far as it will go.
With all that negative camber, you must shim the top a-arms to push the top of the wheel out to give you the alignment.
The NON-adjustable bolts push the bottom of the wheel out as far as it will go.
With all that negative camber, you must shim the top a-arms to push the top of the wheel out to give you the alignment.
Race Director
Joined: Jan 2005
Posts: 10,924
Likes: 854
From: Daytona Beach FL
I just run the stock eccentric bolts - and I've never touched them!!
My factory camber was good for street driving. The factory toe was lousy.
Because my camber was fine for street driving, and the factory had 4 washers under each bolt on the front dogbones and 2 under the rears, I had plenty to remove to crank in negative camber. I only removed 3 up front in order to get about -2.6*, but if removed the 4th one I would probably get just slightly more than -3*.
Again, the C6 Z06, ZR1, and I think the GS have the same rear upper A-arm mounting system as in the front - so it's very easy to adjust camber removing/adding washers.
Bob
Race Director
Joined: Jan 2005
Posts: 10,924
Likes: 854
From: Daytona Beach FL
When you were figuring things out, did you do trial and error by lifting the car and removing a wheel each time or did you drive the car on ramps (or similar) and had homemade rotating plates (tiles with grease between them)? .....
I'm sure you've seen forum member David Farmer's great website - it has good info on alignments:
http://davidfarmerstuff.com
Click on "Alignment Guide" and "Why Toe OUT".
Reading a bunch of other forum member's input helped my to cut down on the trial and error time.
I've never used any toe-plates with grease between them. I just do my adjustments by counting flats, go out and drive around the block, then stop and do a quick toe measurement to see if it's what I wanted.
I've got a Hardbar alignment tool. Their instructions have you using it with the lower A-arms on jackstands so the suspension is deflected like it will be with the weight on the wheels. However, I use it with the car sitting weight on wheels and put the tool against the tires and stretch my tapes underneath the car to measure the distance difference between the front of the wheels and the rear of the wheels.
When adjusting toe, I just turn however many flats I think I need, then go and drive the car. When I come back into my garage I stop straight ahead and can quickly measure again to see how it worked.
Bob
Corvette Stories
The Best of Corvette for Corvette Enthusiasts

Top 10 Most Expensive Corvettes Ever Sold on Bring A Trailer
Brett Foote
10 Things Every Corvette Owner Needs (2026 Edition)
Michael S. Palmer
8 Most "Only Corvette Owners Understand" Quirks and Problems
Pouria Savadkouei
10 Reasons the C6 Z06 is Still A Performance Benchmark After 20 Years
Joe Kucinski
How Much Horsepower Every Corvette Engine "LOST" in 1972
Joe Kucinski
Top 10 DOs and DON'Ts for Protecting Your Convertible Top!
Michael S. Palmer
Top 10 Most Explosive Corvettes Ever Made: Power-to-Weight Ratio Ranked!
Joe Kucinski
150 hp to 1,250 hp: Every Corvette Generation Compared by the Specs That Matter
Joe Kucinski
8 Coolest Corvette Pace Cars (and Replicas) of All Time
Verdad Gallardo
Thread Starter
Track Junky
Joined: Jun 2007
Posts: 4,074
Likes: 36
From: Orlando Area
Tech Contributor
Thanks for all the replies. I'm gonna start the adjustments in the next week or so.
Bob, the data you gave with estimated camber change per washer and toe change per flat will be invaluable!
Sean
Bob, the data you gave with estimated camber change per washer and toe change per flat will be invaluable!
Sean
Drifting


Joined: Sep 2000
Posts: 1,888
Likes: 230
From: Livingston County, Michigan
You may want to consider fender shims (u-shaped) instead of washers for the upper control arm adjustment. This way you don't need to take out the bolt, but merely loosen them to remove/insert the shims.
Melting Slicks


Joined: Sep 2009
Posts: 2,028
Likes: 357
Thanks BEZO6, I was looking for this information as well. Have a PFADT poly busing and camber kits as well as a set of upper & lower control arms in the garage waiting for my next track event. I'm a DIYer and will be referencing this thread. Guess I need to order the toe plates and get a digital level. 
Noticed you are using the Craftsman 10 in. Digital LaserTrac� Level
link: http://www.sears.com/shc/s/p_10153_1...2&blockType=G2
Do you think the 24" would ne too long? top be too high when against rim and the fender be in the way?
Never mind, just checked...a 24" level is too long - would be on tire sidewalls, not the rim. Seems an 18" would be perfect, but nobody makes one. Think I'll get the 10" and fab up a 18" plate to mount it on.
Last edited by CGZO6; Dec 11, 2011 at 04:55 PM.
Thread Starter
Track Junky
Joined: Jun 2007
Posts: 4,074
Likes: 36
From: Orlando Area
Tech Contributor
Great idea. I would be a bit worried about them staying in place during hard cornering though. May not be worth the chance long term. I would ve hatin life if one fell out in the track. An unstable suspension can be an ugly thing during threshold cornering! If I get the Hardbar studs, removing washers will become much easier.
Drifting
Joined: Sep 2000
Posts: 1,888
Likes: 230
From: Livingston County, Michigan
Great idea. I would be a bit worried about them staying in place during hard cornering though. May not be worth the chance long term. I would ve hatin life if one fell out in the track. An unstable suspension can be an ugly thing during threshold cornering! If I get the Hardbar studs, removing washers will become much easier.
BTW, OEM C4 front shims were u-shaped.
Thread Starter
Track Junky
Joined: Jun 2007
Posts: 4,074
Likes: 36
From: Orlando Area
Tech Contributor
Thanks. Yeah, I have David Farmer's torque specs printed on tough paper and taped to the lid of my tool box. His website has great info.
Thread Starter
Track Junky
Joined: Jun 2007
Posts: 4,074
Likes: 36
From: Orlando Area
Tech Contributor
Didn't know that. I would say that they will most likely work fine while saving a lot or work. Thanks for the heads up!
Race Director
Joined: Aug 2005
Posts: 13,592
Likes: 187
From: Hudson WI
NCM Sinkhole Donor
Why not just get the Pfadt alignment kit and use studs instead of bolts on the uppers? Much easier to do and you can have two shim backs, one for street and one for the track.
Thread Starter
Track Junky
Joined: Jun 2007
Posts: 4,074
Likes: 36
From: Orlando Area
Tech Contributor
I'm thinking buy SS bolts, cut the heads off, install with red loctite and you're about the same as the Hardbar setup. Am I way off?
Last edited by taken19; Dec 11, 2011 at 07:18 PM.
Race Director
Joined: Aug 2005
Posts: 13,592
Likes: 187
From: Hudson WI
NCM Sinkhole Donor
I'm tending to agree now. Didn't know that kit existed until today. The Hardbar studs are $90! I can make stainless studs from the local hardware store for under $15 I bet. Gonna have to look into that idea...
I'm thinking buy SS bolts, cut the heads off, install with red loctite and you're about the same as the Hardbar setup. Am I way off?
I'm thinking buy SS bolts, cut the heads off, install with red loctite and you're about the same as the Hardbar setup. Am I way off?