


Failed Lifter
Thread Starter
Instructor

Joined: Aug 2010
Posts: 155
Likes: 0
From: Fort Worth Tx
Sooo I'm going to throw this out there because you mentioned the ticking only starts after it warms up. I had this same symptom a while back after a cam swap and I thought the same thing, lifters. turns out I pinched the o-ring on the oil pump pickup. So it was sucking in air and oil and frothing the oil up. My tick seemed like it was coming from #7. It couldn't stay pumped up because of the airated oil.
I know it means dropping the cradle and pulling your balancer off again but I would strongly suggest you check the o-ring on the oil pump pickup as our symptoms seem exactly the same.
I know it means dropping the cradle and pulling your balancer off again but I would strongly suggest you check the o-ring on the oil pump pickup as our symptoms seem exactly the same.
Man, I hope thats not the issue. Tons of work to do over again if thats the issue. Thanks for the help however. Hope to have it fired up by Sunday so I will report my findings.
Le Mans Master


Joined: Aug 2002
Posts: 8,472
Likes: 38
From: Houston TX
St. Jude Donor '11
Here's the thread for reference. Check it out. 
http://forums.corvetteforum.com/c6-t...-cam-swap.html
http://forums.corvetteforum.com/c6-t...-cam-swap.html
Thread Starter
Instructor
Joined: Aug 2010
Posts: 155
Likes: 0
From: Fort Worth Tx
Hey 5, I looked at your thread and now Im scratching my head. Sure hope that not the prob even though we have similar problems. I did however make sure I took the o-ring out of the pump and reinstall it over the pickup tube. It was covered in oil too, so I certain it didnt bind. But like you say, if lifters dont solve it, thats my next thing to troubleshoot.
Burning Brakes

Joined: Sep 2011
Posts: 932
Likes: 4
Here is how to check pushrod length with adjustable pushrod:
1) Install pushrod and rocker arm (loose).
2) Snug up rocker arm bolt to trunnion, making sure that pushrod remains loose (adjust it shorter if need be).
3) Once rocker arm bolt is snug to trunnion (torque if you like, not really needed), use your fingers to unscrew the adjustable pushrod until it is snug between the rocker arm and the lifter. You may have to fiddle a bit, loosening it until there is just a little up-and-down play and then screwing it out a bit until you just take out all the up-and-down slack between the lifter and the rocker arm.
This is your zero-preload pushrod length.
If you can figure out how many turns the pushrod has gone thru to figure out the length of it, more power to ya. I'd just remove the pushrod (without disturbing it) and measure the length with an 8" dial caliper, then subtract about .020" (this is a 'fudge factor') to get the actual gauge length that pushrod manufacturers use to indcate pushrod length (but has nothing to do with the real length of the pushrod... i.e., a GM 7.800" pushrod is actually about 7.821" long if you measure it with a dial caliper).
Don't ask me why they do it this way. Ask them
You can confirm this by measuring a stock pushrod with an 8" dial caliper. You should measure about .020 longer than advertised.
So, back to the adjustable pushrod -- if it measures 7.396" (with a dial caliper) after being set for zero lash, then subtract that .021 fudge factor for 7.375" 'gauge length' pushrod for zero lash. If you want .075 preload, then add that to the zero lash figure and order a set of 7.450" pushrods (7.375 + .075).
Then double check them when you reassemble the engine... in this case, run the rocker bolt down by hand until you feel the pushrod get snug (= zero lash), then count the turns of the rocker arm bolt from there until the rocker trunnion seats firmly down into the stand. This may not work well with new or already-leaked-down lifters since the lifter cup will only have the internal spring pressure supporting the pushrod (i.e., may be difficult to find 'zero' without inadvertently pressing the lifter cup down into the lifter body).
You should probably check at least one intake and one exhaust since the two different types of valves may be a little different in length. Ideally you should check them all.
http://www.compcams.com/Technical/In...20Geometry.pdf
OP:
Since you have an abundance of lifters and an old head gasket, you're in luck!!
Take an old LS7 lifter, remove the retainer clip and fill it with epoxy or gorilla glue (whatever), put it back together and set it on its side and let it dry. Its now a "solid" lifter. Install it in the block, put down your old head gaskets and torque down the head.
Now when you check for the length, you don't have to worry about plunger depression. Simply turn it till you find one that fits your needs and add an addition .050" or .060" or whatever length you want for preload.
If you are going to use another lifter besides an LS7/Caddie Racing lifter, then this won't exactly work unless you can veryify the difference in cup height between the two lifters unless they are the same.
If you dont have tools to measure, you might be able to call the manufacturer and they should tell you the cup height. Its just simple math from there to determine the difference.
Also, are you using a light rate valve spring when you're doing all this? I highly reccomend it.
Keep us posted
Last edited by briancb1; Jun 8, 2014 at 04:38 PM.

Melting Slicks

Joined: Dec 2004
Posts: 3,120
Likes: 119
St. Jude Donor '10
If math could get you there then all you need to measure is the base circle difference. And if you mill the heads or use a thinner head gasket or deck the block etc etc. Not all that math adds up in the real world. I know as I have tried it.
Corvette Stories
The Best of Corvette for Corvette Enthusiasts

Top 10 Most Explosive Corvettes Ever Made: Power-to-Weight Ratio Ranked!
Joe Kucinski
150 hp to 1,250 hp: Every Corvette Generation Compared by the Specs That Matter
Joe Kucinski
8 Coolest Corvette Pace Cars (and Replicas) of All Time
Verdad Gallardo
Top 10 Corvette Engines RANKED by Peak Torque (70+ Years of Muscle!)
Joe Kucinski
Corvette ZR1X Will Be Pacing the Indy 500, And Could Probably Race, Too!
Verdad Gallardo
Top 10 Corvettes Coming to Mecum Indy 2026!
Brett Foote
Top 10 C9 Corvette MUST-HAVES to Fix These C8 Generation Flaws!
Michael S. Palmer
10 Revolutionary 'Corvette Firsts' Most People Don't Know
Joe Kucinski
5 Reasons to Upgrade to an LS6-Powered Corvette; 5 Reasons to Stay LT2
Michael S. Palmer
Safety Car

Joined: Aug 2012
Posts: 4,706
Likes: 5
From: KY
1. You can measure actual length,
2. use a similar known pushrod to come up wth the difference between actual length and gauge length, and use that to
3. come up with a fudge factor to specify the desired gauge length of what you measured in #1.
Melting Slicks
Joined: Dec 2004
Posts: 3,120
Likes: 119
St. Jude Donor '10
using an adjustable pushrod.
the 7702-1 comp pushrod is easiest. It has markings for every .050". It ranges from 6.800-7.800. For the LS7 you need the longer checker of course.
Then use it in increments. Normally you will screw it out to a known good or normal length like 7.400. Then find zero lash. From there on a metric 8 x 1.25 thread one turn is .047". I usually recommend .060 preload which would calculate out to 1 1/8 turns. Some people prefer more, which will get you into the 1 1/4 turn respectively. Screw the checker out or in until you get in that window or whichever measurement you choose.
The alternate way is to have multiple pushrods of multiple lengths and put them in and check them.
Safety Car
Joined: Aug 2012
Posts: 4,706
Likes: 5
From: KY
If you want to use a calibrated adjustable pushrod, and know how to use it, to find zero lash then fine (some seem to have trouble, and then some claim that not all adjustable pushrods work the same). Then just add your desired preload to that figure and I suppose you have gauge length.
But when you start playing with counting rocker arm bolt threads you are heading down the rabbit hole. At best you could set up a dial indicator on both the pushrod end of the rocker arm and the valve stem end of the rocker arm, simultaneously, and perhaps figure out what is going on (odds are that if the lifter is still full of oil then as you tighten the rocker arm you will also be pushing down on the valve stem -- problem #2).
Thread Starter
Instructor
Joined: Aug 2010
Posts: 155
Likes: 0
From: Fort Worth Tx
Lifters installed and running again.
I ended up with Morels installed with 7.425 pushrods. The valve train noise is well within exceptable limits. I did end up counting threads as I tightened down the rockers. But I had the cam on the base circle each time. With 7.40 I would get over two turns before reaching 22lbs torque. With slightly longer I got 3/4 turn before reaching the torque valve. I tell ya, each time I see a method for determining pushrod lenght, there is a contrary reponse. Im not saying somebody is wrong, but it seems there should be a proper method we could follow without problems.
Also, i am back to 5w30 oil, maintained oil pressure, and no ticking. Glad to have this behind me, hopefully, I only took a short drive with it.
There has been a lot of help here on the board, and within this thread. Thanks all that helped. Also Colorado Speed and Texas Speed both, help me tons. Dont hesitate to work with either company.
Melting Slicks
Joined: Dec 2004
Posts: 3,120
Likes: 119
St. Jude Donor '10
The pythagorean theorem begs to differ.
No one is couting rocker arm bolt threads as they are EXACT MEASUREMENTS. You count the turns on the pushrod. That makes me think you have never done this method. The machined threads in the head are the only NON VARIABLE.
There is no perhaps in my method. There is no fudge factor.
I have literally done this hundreds of times, have recommended it more, and this method is widely accepted and used by many professionals including the person/shop who first introduced this method to tech, Thunder Racing. They are not a business anymore, but their business practices have nothing to do with their attention to detail with an engine and their methodology for installs.
There is no rabbit hole here only the one you appear to be chasing.
Trying to use a dial indicator that accurately for that length can be an issue as well. How good can you measure an angled surface with one? You cant.
Last edited by COSPEED; Jun 8, 2014 at 08:31 PM.
Safety Car
Joined: Aug 2012
Posts: 4,706
Likes: 5
From: KY
If you can explain how it would apply in this situation then I would be impressed (surprised, also, since I can't see how it does).
Yes, you were counting turns of the rocker arm bolt. That is the same as counting threads. It won't work, as I'll show in a bit.
Yes, to obtain a zero lash measurement. Then, from your earlier post, it seem that you then started counting rocker bolt turns (or threads) to calculate preload.
And if you know the zero lash pushrod gauge length then there is no need to be counting anything anyway, you just add the desired preload to that length.
No, there is another variable (thinking about the method rather than the experience of others would be more productive):
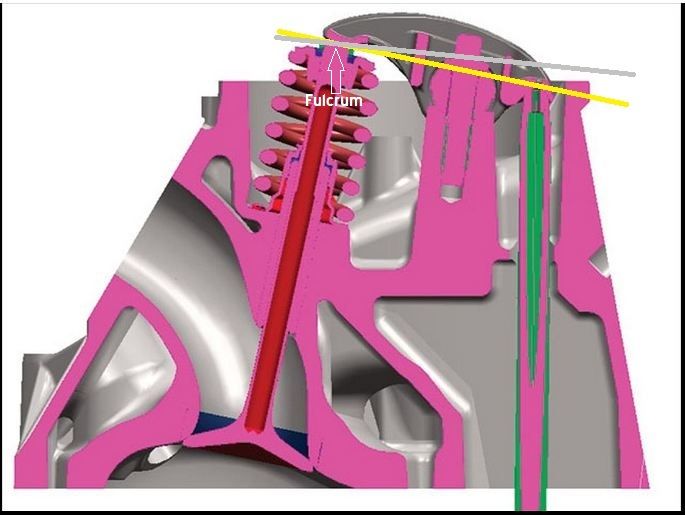
 Now, if you assume the picture depicts the rocker sitting at zero lash, then you tighten down the rocker bolt until the rocker has become snug against the pedestal, has the pushrod (preload) moved:
a) less than the rocker bolt
b) the same as the rocker bolt
c) more than the rocker bolt.
I'm sorry that you've been doing it wrong all these years; now, with that diagram, you should be able to see the light  . . . were one determined to count bolt turns and calculate bolt travel (pitch) to determine preload, then you'd want to multiply that result by 2.7 then divide by 1.7 (using the LS3 rocker ratio for example) to come up with an approximately correct number (this adjusts for the angular multiplication). Assuming the spring did not depress on you while you were tightening the bolt, which I don't think would be a particularly safe assumption (again, a dial indicator in that area would tell the tale).
In a nutshell, after you do all that math one turn of the bolt works out to be about .075 preload when you correct for the angles involved.
And you should not count the last ~1/8-1/4 turn if you are torquing to spec as the rocker trunnion has already seated in the pedestal and is not moving any further (that last bit of a turn is simply torque loading the assembly).
That should be a pretty exhaustive explanation. Apologies for the thread jack
Yes, to obtain a zero lash measurement. Then, from your earlier post, it seem that you then started counting rocker bolt turns (or threads) to calculate preload.
And if you know the zero lash pushrod gauge length then there is no need to be counting anything anyway, you just add the desired preload to that length.
a) less than the rocker bolt
b) the same as the rocker bolt
c) more than the rocker bolt.
There is no perhaps in my method. There is no fudge factor.
I have literally done this hundreds of times, have recommended it more, and this method is widely accepted and used by many professionals including the person/shop who first introduced this method to tech, Thunder Racing. They are not a business anymore, but their business practices have nothing to do with their attention to detail with an engine and their methodology for installs.
There is no rabbit hole here only the one you appear to be chasing.
. . . were one determined to count bolt turns and calculate bolt travel (pitch) to determine preload, then you'd want to multiply that result by 2.7 then divide by 1.7 (using the LS3 rocker ratio for example) to come up with an approximately correct number (this adjusts for the angular multiplication). Assuming the spring did not depress on you while you were tightening the bolt, which I don't think would be a particularly safe assumption (again, a dial indicator in that area would tell the tale).In a nutshell, after you do all that math one turn of the bolt works out to be about .075 preload when you correct for the angles involved.
And you should not count the last ~1/8-1/4 turn if you are torquing to spec as the rocker trunnion has already seated in the pedestal and is not moving any further (that last bit of a turn is simply torque loading the assembly).
That should be a pretty exhaustive explanation. Apologies for the thread jack
Melting Slicks
Joined: Dec 2004
Posts: 3,120
Likes: 119
St. Jude Donor '10
Maybe if you have the fulcrum of the rocker at the right height you would see more? I can draw inaccurate diagrams also. Maybe you forget about angularity between the rocker pushrod cup and the lifter pushrod cup? It isnt a straight line.
Go ahead and draw what I just said. Ill wait.
But you sure did draw most of Pythagoras' theorem. Too bad they are not on a straight line like that at all.
The spring should never depress when you are using the method i mentioned. If it does either you dont have the cam on the base circle, your lifter has completely collapsed, or your pushrod is entirely too long.
Last edited by COSPEED; Jun 8, 2014 at 11:04 PM.
Safety Car
Joined: Aug 2012
Posts: 4,706
Likes: 5
From: KY
Maybe. maybe not. It's going to depend on how 'pumped up' the lifter is and how easily it can relieve itself of that fluid. Since I would consider it possible I would consider it an item that should be monitored when using your approach, at least until no movement had been detected over the course of many such procedures.
Melting Slicks
Joined: Dec 2004
Posts: 3,120
Likes: 119
St. Jude Donor '10
A fudge factor that you speak of would be how much more inaccurate?
I have had fresh lifters right off of running the engine and they have never....never...even hinted at moving the valve.
How many times have you actually done this?
I have had fresh lifters right off of running the engine and they have never....never...even hinted at moving the valve.
How many times have you actually done this?
Burning Brakes
Joined: Sep 2011
Posts: 932
Likes: 4
Theres multiple ways you can go about measuring for pushrod length.
Its your engine, do whatever you want. But...
Making a solid lifter out of an old lifter that is dimesionally the same, a used head gasket of the same type you will use upon final assumbly and the Comp Cam .050" turn-style adjustable pushrod will give you a pretty darn accurate gauge length with ZERO preload. If you physically measure the adjustable pushrod, it will be longer length than the instructed "counting the turns" length from fully closed.
Mathmatically adding the desired preload to the "solid lifter setup" works and well at that. There is zero movement, no guessing if the piston is depressed. I'm not going to act like I created the process but I use it because it works very well and is repeatable.
I'll let you and Mark hash it out for 1st and 2nd place, but this way works every time.
Last edited by briancb1; Jun 10, 2014 at 09:43 AM.

Intermediate
Joined: Jun 2013
Posts: 46
Likes: 0
Mark2009, most of what you are saying is correct. When using the trunnion bolt method one turn of the bolt is not .047 preload. During loading of the lifter the rocker arm is pivoting on the valve stem and the trunnion bolt is not at the end of the arc radius, the pushrod however is. The ratio of the rocker at the beginning of the valve's travel is not 1.7:1, the ratio increases as lift increases. You can verify this by looking at the wear pattern on your rockers.
According to my calcs, and they are not exact, multiplier should be about 1.58. So if you get to zero lash, then turn the trunnion bolt one full turn to 22 ft lb, the amount of preload would be .074. .047x1.58=.074. And I only used .047 because I have seen it in so many threads, actually one turn of a 1.25 pitch metric thread is closer to .049".
I shoot for between 1 and 1 1/4 turns to get you reasonably close to the suggested preload of most lifters @ .082"
And yes you can check preload with a dial indicator on a good heavy base. I have done it many times and it is very accurate.
Last edited by nbm6spd; Jun 10, 2014 at 10:22 AM.