When you click on links to various merchants on this site and make a purchase, this can result in this site earning a commission. Affiliate programs and affiliations include, but are not limited to, the eBay Partner Network.
My shocks are shot and need to be replaced on my 2008. Before buying replacements I'm wondering if the leaf springs need attention as well.
I'm the second owner and I'm pretty sure the leaf springs are 16 year old originals. The car only has about 72k but I'm worried they may have aged out. I've heard that steel springs can fatigue over time but I believe these are composite or something.
How would I know if they're reaching end of life? Other than the worn out shocks the car seems to drive fine.
Trans springs should be fine, but would replace the ride height adjuster bolts on the springs/reset the corner balance,since the rubber ends of the ride height adjusters do tend to wear out.
As for changing the adjusters, as you are replacing each shock, allow the lower arm to come down farther to take the pressure off it, so you can thread them out and new ones in. If car has not been lowered, then take a measurement of the top of adjuster threads out of the trans spring sleeve each location, and just install the new ones to same thread above top heights.
If you need more room, then can use a bottle jack on the bottom of the trans spring to push it up more, to give your more room/take the load off the adjuster.
And with age of of ride height bolts being in play, hit them with some PB blaster and let them soak for a while, before you go to spin them out.
Contrary to other posts the a-arms, sway bar, etc. do not need to be disconnected.
Remove the tire/ rim and then undo the lower shock mounting bolts.
Spary some Liquid Wrench chemicals (or like product) on the adjustor threads and let soak.
Measure the adjustor threads above the leaf spring.
Apply a bottle jack to the spring to release pressure on the adjustor and gain adjustor removal space.
Unscrew out the old adjustor to remove and screw in the new adjustor.
No wheel alignment is needed, but a small fine-tuning of ride height may be.
Kenny, I am hoping you get some solid answers to your post. Maybe my question will help you also. I want to know if using the bottle jack to jack up the end of the spring, can the spring be raised enough to get the new stock bolt under it enough to screw it in? If not, do you have to drop the A-arm? I am planning on just the front ones for now. I just want to retain stock height. Thanks for letting me hi-jack your post. dmad1
Contrary to other posts the a-arms, sway bar, etc. do not need to be disconnected.
Remove the tire/ rim and then undo the lower shock mounting bolts.
Spary some Liquid Wrench chemicals (or like product) on the adjustor threads and let soak.
Measure the adjustor threads above the leaf spring.
Apply a bottle jack to the spring to release pressure on the adjustor and gain adjustor removal space.
Unscrew out the old adjustor to remove and screw in the new adjustor.
No wheel alignment is needed, but a small fine-tuning of ride height may be.
Do I understand?
Car on lift stands, tires off, bottle jack on bottom of trans spring or bottom arm that side that you are removing the shock, unbolt and lower down trans spring or bottom of arm so you can get shock out, change ride height bolt, then bring Arm back up so you can get top of shock bolted back in place, and them onto next corner.
Hence shock maxed out is what is holding lower arm up, and if you don't support the bottom of arm or take the pressure off the trans shock when removing the shock, bottom arm is going to spring load down hard as soon as you remove top nut of shock. So really wanting to support the lower arm as you take the shock off, and if you need more room to change ride height bolt with lower arm all the way down before you install the new shock, then let arm hang all the way down, and use bottom jack on trans spring to lift it up higher.
I don't use a bottle jack to press up against the spring. I fear it concentrates too much pressure on a small area.
I prefer a floor jack, with a small block of wood, or in my case a floor jack with one of the rubber blocks from my quick jack to more gently distribute the load over a larger area without risk of damaging the composite leaf. Perhaps I'm ****...
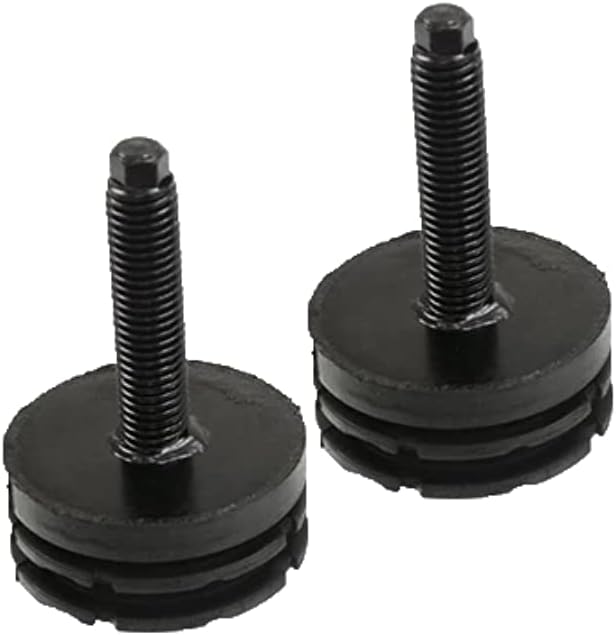
not sure if replacing the ride height adjusters are a good idea. From what I understand, you can only get the original adjusters with new springs from GM. All the aftermarket adjusters are junk and the rubber separates from the metal part of the adjuster fairly quickly. There have been tons of post with people looking for quality adjusters and none of them are near as good as OEM.
not sure if replacing the ride height adjusters are a good idea. From what I understand, you can only get the original adjusters with new springs from GM. All the aftermarket adjusters are junk and the rubber separates from the metal part of the adjuster fairly quickly. There have been tons of post with people looking for quality adjusters and none of them are near as good as OEM.
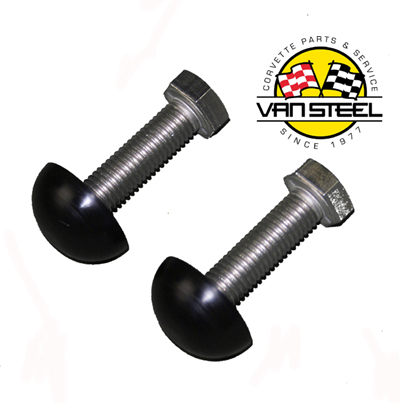
These are junk and fall apart in less than a year,
These are copies of the Oem and will last as long as the OEM's,
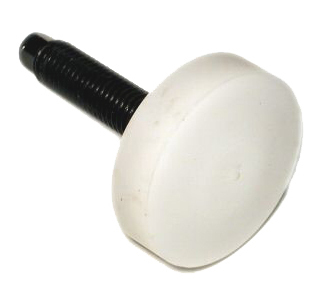
here's another variety that I've never seen before. Appear to be Delrin, but a more robust design, I suspect (don't know) that this what was used with the T1 setup. Of course, those guys don't live on street and probably refresh and re-align often...
Has anyone tried this type?
I checked my bolts. They look original and the bottom material is completely flattened. They're basically lowering bolts now. No wonder the front was scraping so much. I gave them a couple turns and the height is much better now.
When I do the shocks I'll try and get back to stock ride height. Other than the flattened plastic/rubber on the bottom they seem fine. Any reason to replace them?
i think once they're 'splayed' out a lot, they may also have softened over time, and wear will be accelerated.
But, no reason I can think of not to keep readjusting them to restore ride height...just beware that at some point the rubber will have worn out and there will be steel contacting the softer aluminum control arm.
Also, I think its advisable to turn only full rotations to keep the direction of splay the same.
As an aside, my car was on the alignment rack just yesterday, with new height adjuster bolts in front (after settling in for about 200 miles), and took a baseline height measurement to fender. We noticed that even about 1/8" height movement has a very negligible (if any) effect on toe.
So, its easy to maintain height and alignment by having a baseline, then adjusting for wear...within reason of course,
only problem I see, if that the bottom surface for the pucks to A rams does no stay tram, so if bottom of say delrin pucks are not rounded, then same problem with the shorty ride high adjusters, and just going to cause separation problems
So this tries to solve the changing surface problem at the A arm to bottom of adjuster, but since you have so much pressure to delrin to threads, it just ends up with bottom delrin section splitting in half.
And yes, since you have rubber bushing in play for rotation points for the A arms, A arm is flexing around (even worse in the back end), so not a just a fixed point on the of arm for the ride height adjusters a well. Hence the reason that GM went to the thick rubber adjuster pads in the first place.