When you click on links to various merchants on this site and make a purchase, this can result in this site earning a commission. Affiliate programs and affiliations include, but are not limited to, the eBay Partner Network.
I agree. I want to get the rear quarter vents as well as these fins, but the price?????? I am Canada so I have another 30% exchange plus shipping, yikes!!
Hi Tyho, we actually just revised pricing on the RQ ports. We have automated some of the work :-) About 100$ cheaper @ 349$, in CFZ color.
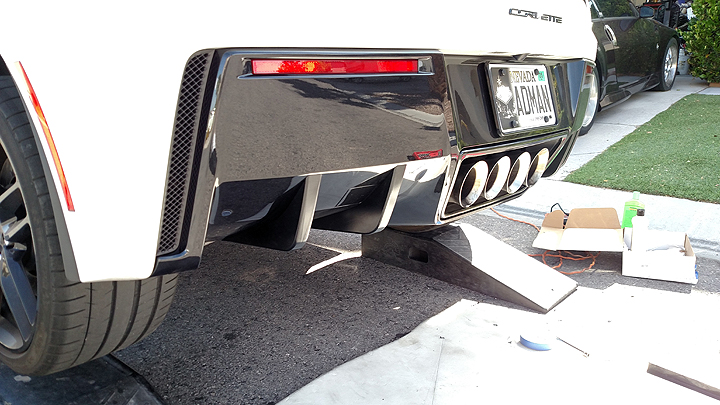
I just received my order of the dual fin per side package, and here's my experience with installation as well as a product review. Everything arrived well packaged, including the fins, plastic bag of mounting hardware, instructions and tape-on pattern for drilling holes in precise locations.
The instructions are short and easy to follow. I ordered mine unpainted to save $100 bucks, and if you go that route here's what you need to know. The fins are primed but they have manufacturing marks in the surfaces that you may want to sand out. I didn't bother with that because you just can't see that kind of detail on that area of the car unless you crawl underneath and inspect it at very close range. I also used gloss black paint because again, you just can't tell black from carbon flash unless you get down there close up, it all looks black.
Next, when you cut out the pattern, which will be taped to the valance to mark the holes for drilling, I recommend you use a magic marker to add notes that will make it easier to orient it. You'll notice that the original printing ends up inverted when the pattern is placed against the valance. I also found it useful to use the two screws at the bottom to hold it in place for taping, then remove them again after drilling the holes.
NOTE: You'll see in these pictures that I have the car up on jack stands all around with the wheels removed. I was doing track prep on my brakes, but all you will need to do is jack up the rear end, and if you remove the lower valance as I show in the next few pictures, you won't even need to do that.
I found it very helpful to also remove the three screws on the outside bottom of the valance (in addition to the two on each side the instructions call for) to make it easier to get your arm behind it to tighten the mounting screws. After installing the two driver's side fins I decided to do the passenger side by removing the entire lower valance beforehand, to make it easier to install the interior mounting hardware. This is NOT NECESSARY, I just wanted to see how much difference there would be. Without removing the valance, it is a very tight fit to work on the middle and upper attaching screws and washers. You'll need a 7mm ratcheting box wrench, and its tedious and relatively slow going. I've removed the lower valance before (NOT the entire rear end) so I already knew how easy that is, and working standing up with everything open and right in front of you really simplifies things. If you go this route, just be careful when detaching the crosshatched louvers at each side, they must be pushed out from the back side after removing all other attaching points, in order to avoid breaking them.
All four fins fit perfectly, tightening down snuggly and looking like they are part of the valance. Removing the valance, installing the fins and re-installing the valance takes all of 30 minutes. I'm very happy with the finished product and the look.
I second everything that JET VET said. My thanks again to ACS. Great products.
Great packaging. Professional instructions. Legit eComm. Lightning fast shipping.
As you can see, I did NOT remove the bumper - just the two bottom screws for the template and the three in the corners by the rear vents.
The outside fin on the drivers side was the only one that was more difficult than the others. There isn't much room to tighten the top bolt
with the eBrake unit in the way. But, it's nothing that should stop you from being able to finish in a few extra minutes.
I especially like the fact in knowing these are not going to fall off in the desert heat or extreme conditions on the track.
Thank you for sharing your install, rear end look killer !
Originally Posted by ///ADMAN
I second everything that JET VET said. My thanks again to ACS. Great products.
Great packaging. Professional instructions. Legit eComm. Lightning fast shipping.
As you can see, I did NOT remove the bumper - just the two bottom screws for the template and the three in the corners by the rear vents.
The outside fin on the drivers side was the only one that was more difficult than the others. There isn't much room to tighten the top bolt
with the eBrake unit in the way. But, it's nothing that should stop you from being able to finish in a few extra minutes.
I especially like the fact in knowing these are not going to fall off in the desert heat or extreme conditions on the track.
Here are mine, on another thread. Makes the car look lower as well which is always nice. Agree, as you'll see in my write up, that driver-side far bolt is a real pain. It can be done, probably even without a lift if you are flexible.
I second everything that JET VET said. My thanks again to ACS. Great products.
Great packaging. Professional instructions. Legit eComm. Lightning fast shipping.
As you can see, I did NOT remove the bumper - just the two bottom screws for the template and the three in the corners by the rear vents.
The outside fin on the drivers side was the only one that was more difficult than the others. There isn't much room to tighten the top bolt
with the eBrake unit in the way. But, it's nothing that should stop you from being able to finish in a few extra minutes.
I especially like the fact in knowing these are not going to fall off in the desert heat or extreme conditions on the track.
Wait a minute adman, how did you get the car's rear wheels up on the rhino ramps? that would mean the rhino ramps fit underneath the side rocker panels before the rear tires can go up them? Is that true?
ACS, question on your wicker extensions for the factory Z51 spoiler. So if these two wickers go under the factory spoiler it would seem that the rest of the spoiler would not be flush with the deck lid. Can you confirm that the spoiler is flush all the way across. Some close up pics would be appreciated. Also interested in your diffuser fins. Tks Doug.
Last edited by dovervold; May 16, 2016 at 04:05 PM.
Awesome!!! I think a few of us from another thread will be ordering some - if another vendor isn't feeling well soon.
He needs to stop posting pictures of his shop and post photos of our orders being completed instead.
These will match my ACS Composite skirts nicely. I knew I should have waited...
I have a set from that other vendor and I wish I didn't. 4 Fins and none are the same size, They do not fit the curve properly, and one is even thicker than the other. If you can get out from under them do so and order from here. If you want more info send me a PM
Wait a minute adman, how did you get the car's rear wheels up on the rhino ramps?
Sorry, it's an optical delusion.
^^^ See, I have pucks and a super low profile speed jack. I always jack the car up and put it on Rhino ramps.
More trusting than jackstands in my opinion. And, they don't get in the way sliding around under the vehicle.
Plus, it was time to change my oil anyway.
I think this belongs in this thread too
Originally Posted by halt00
Update: Added the ACS composite dual fins on 4/24. The picture doesn't do them justice. They fit flush and tight and make the car look a lot lower from the back now. (Forgive the car sitting high, it was on the lift just before the pic). One bolt on the outer drivers side fin was @#$ difficult as there is almost no space to get your hands in there. That one bolt took me as long as the other 11 combined!
Last edited by Steve Garrett; Jan 19, 2017 at 09:38 PM.
Reason: Merged Posts-please use the Multi-Quote button (middle icon) in the lower right hand corner of each post to make your response look like this.
You are correct, the base of the wicker goes between the Z51 spoiler and Fascia, once re-assembled, the gap is zero. See attached.
We also have a bolt on version available, this is bolted by the rear, so no spoiler removal required.
Originally Posted by dovervold
ACS, question on your wicker extensions for the factory Z51 spoiler. So if these two wickers go under the factory spoiler it would seem that the rest of the spoiler would not be flush with the deck lid. Can you confirm that the spoiler is flush all the way across. Some close up pics would be appreciated. Also interested in your diffuser fins. Tks Doug.
You are correct, the base of the wicker goes between the Z51 spoiler and Fascia, once re-assembled, the gap is zero. See attached.
We also have a bolt on version available, this is bolted by the rear, so no spoiler removal required.
Tks ACS. More information on the bolt on version please. What does the hardware look like. And will this hold at high speeds. I actually like the look of the exposed bolts, much like the Z06.
Several customers have installed these using two way tape.
They were very happy with it, personally, I am just not a fan of 2 way tape.
If you ever want to return to stock, for which ever reson, you can purchase a complete diffuser new panel from GM for a few hundred dollars. They come pre-painted in CFZ paint, and you can sell the ACS modded panel.
Originally Posted by solarstingray
has any one installed these using 3m double tape only ?
also can you just use bolt on the under part and 3m tape the outer part,
just trying to mimize holes incase you want to return the car to stock,
Tks ACS. More information on the bolt on version please. What does the hardware look like. And will this hold at high speeds. I actually like the look of the exposed bolts, much like the Z06.
Several customers have installed these using two way tape.
They were very happy with it, personally, I am just not a fan of 2 way tape.
You know how long that stuff (doesn't) last out here? Take a guess...
I am always surprised by the amount of people who say they don't want to do something to their vehicle
because they are worried about not being able to return it back to stock. How many people actually do this?
I think I'll put another thread together with a poll asking just that.
Designer Imagines A Corvette That Looks More Like a Corvette Than the Corvette
Slideshow: A Jaguar designer's personal project imagines what a modern front-engined Corvette might look like if Chevrolet revisited the golden age of the Stingray.