


LMR Breather Can Unboxing / Install Notes Thread
Thread Starter
Tech Contributor
Joined: Jan 2006
Posts: 4,761
Likes: 240
From: Saint Louis MO
St. Jude Donor '14-'15
So, after several requests for doing the same as I did with my ECS kit in the other thread, I gave in to peer pressure. 
I ordered and received my LMR breather can last week, and have been in the middle of prepping everything to get that installed correctly.
First, since it's already late, let me post the pictures of the unboxing, etc. I will go into more detail tomorrow about what is included, what is involved in modifying the rocker covers, etc.
Fresh out of the box - the breather, two filters, and two -10AN bungs:
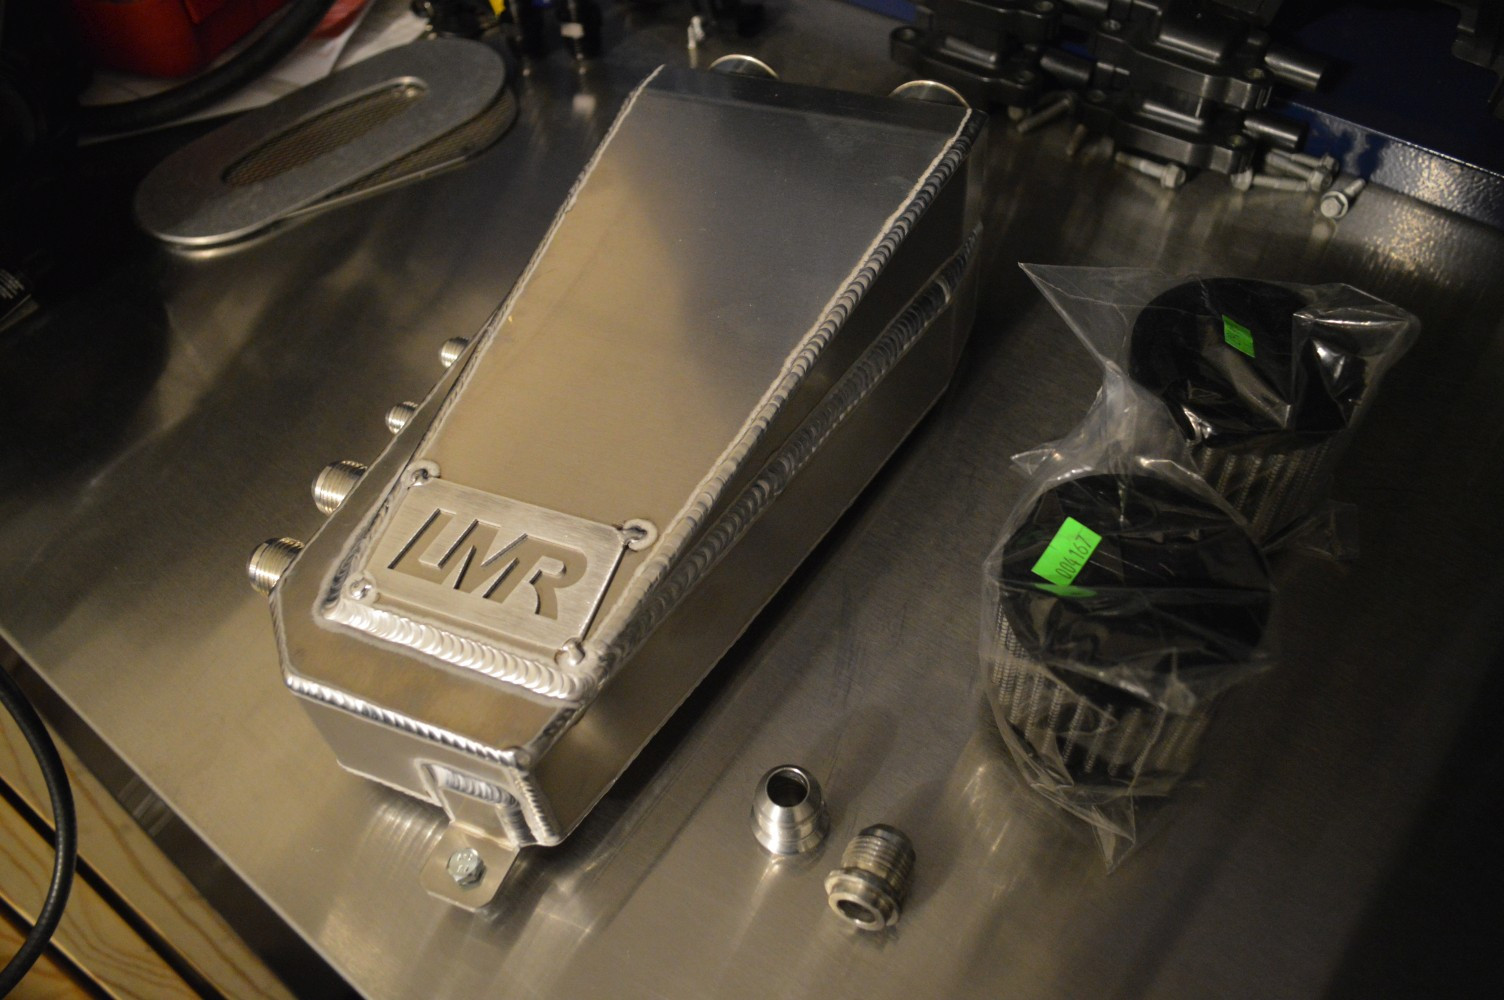
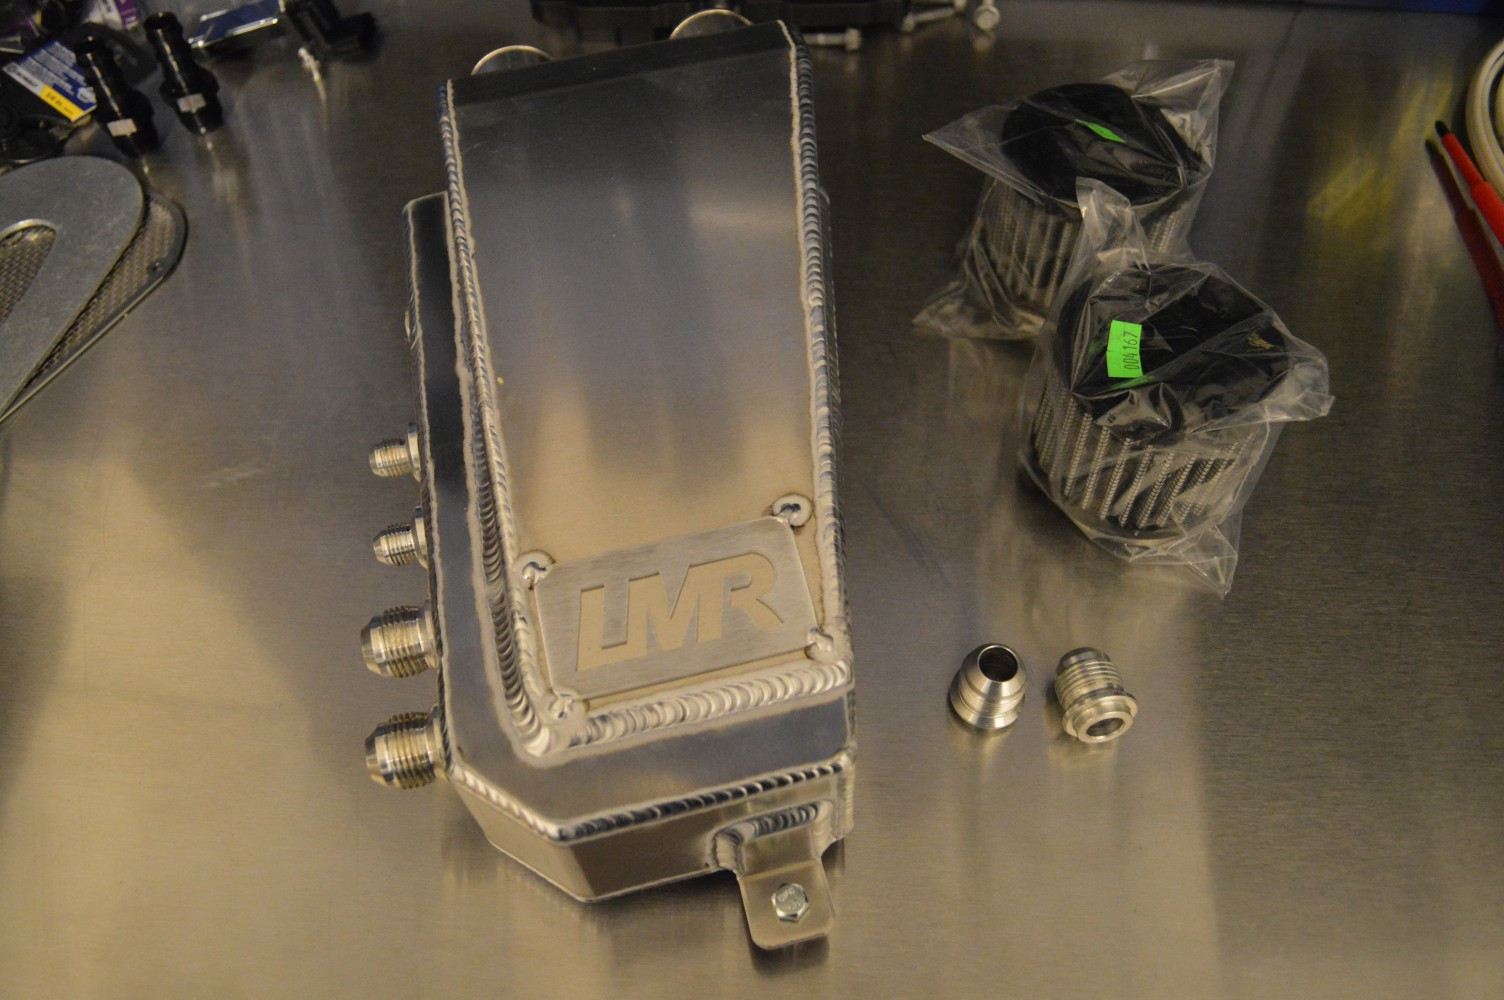
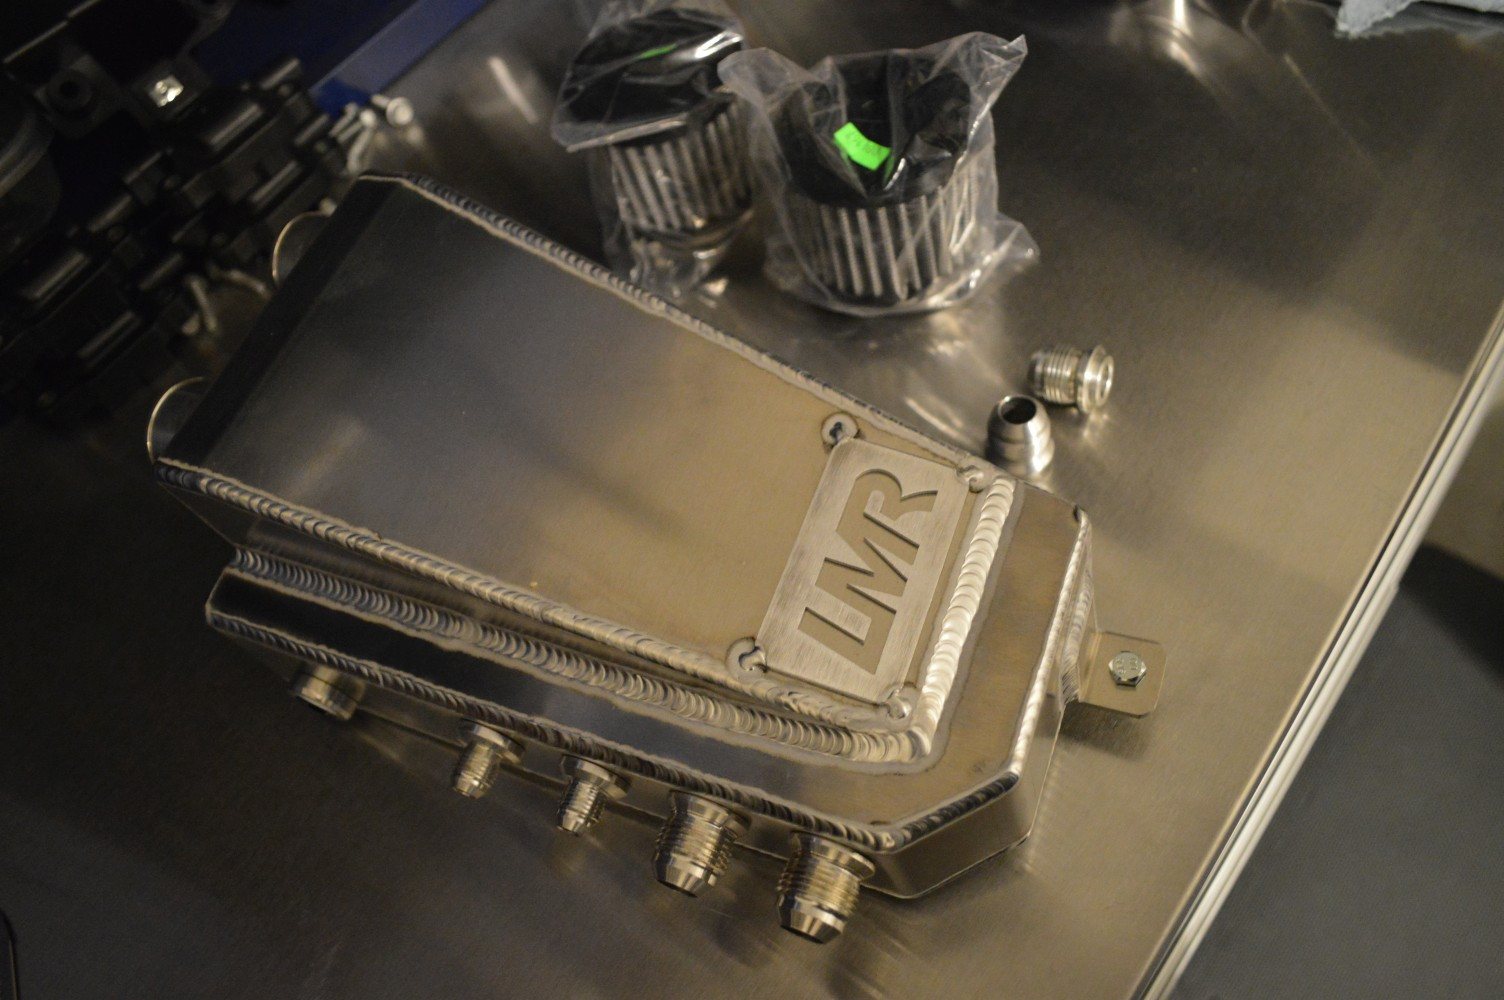
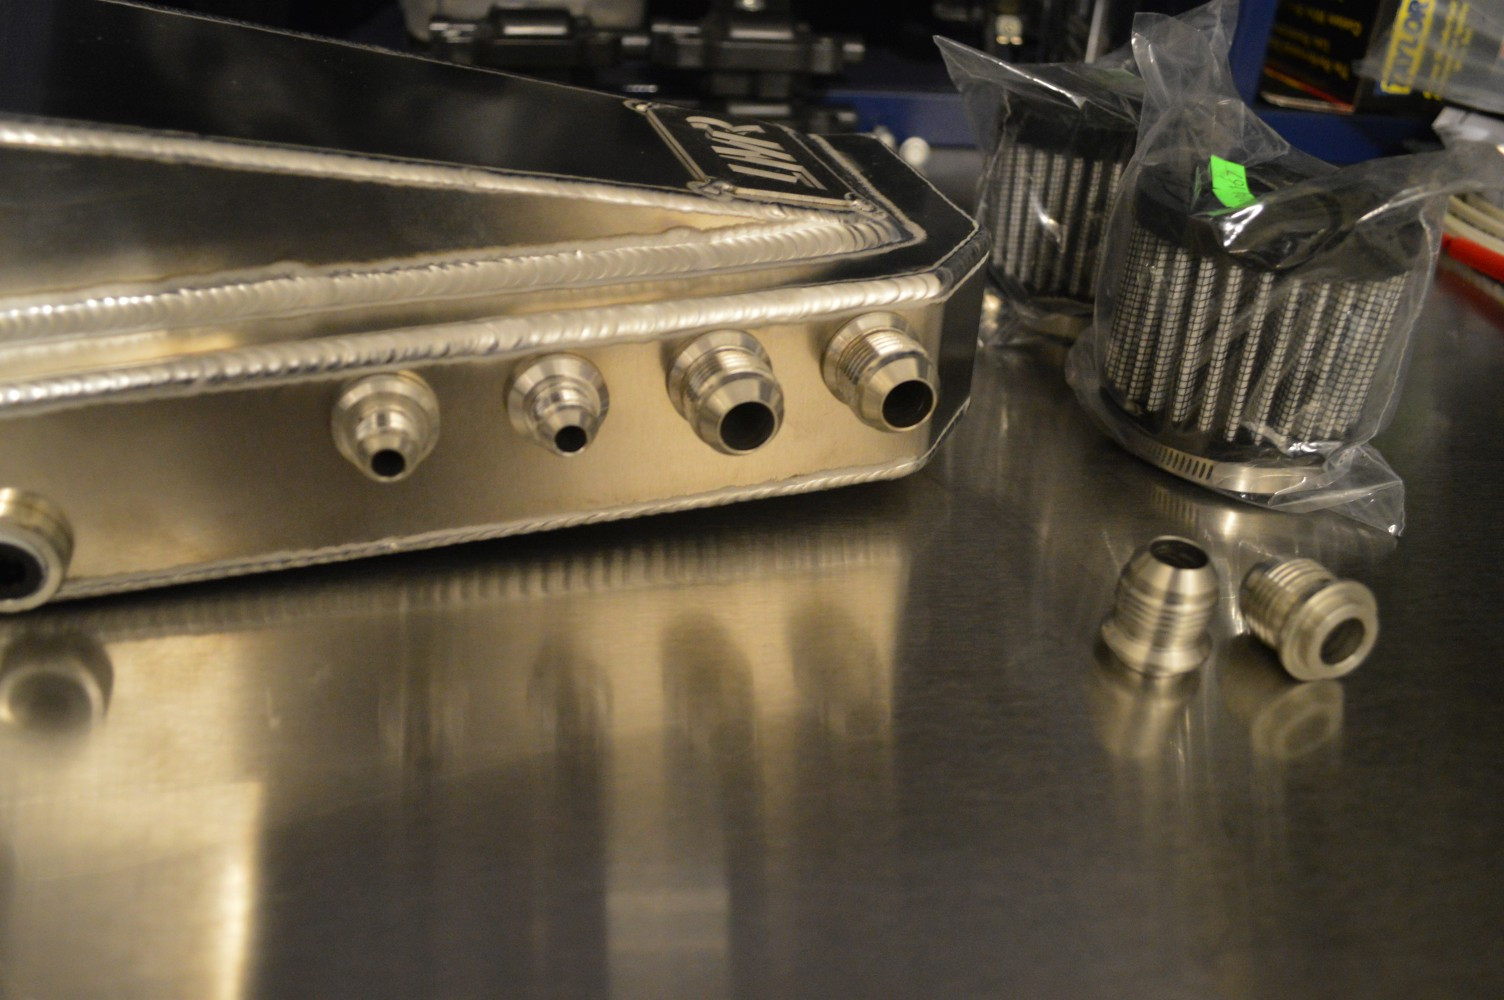
Rear of the breather (yes, it is baffled):
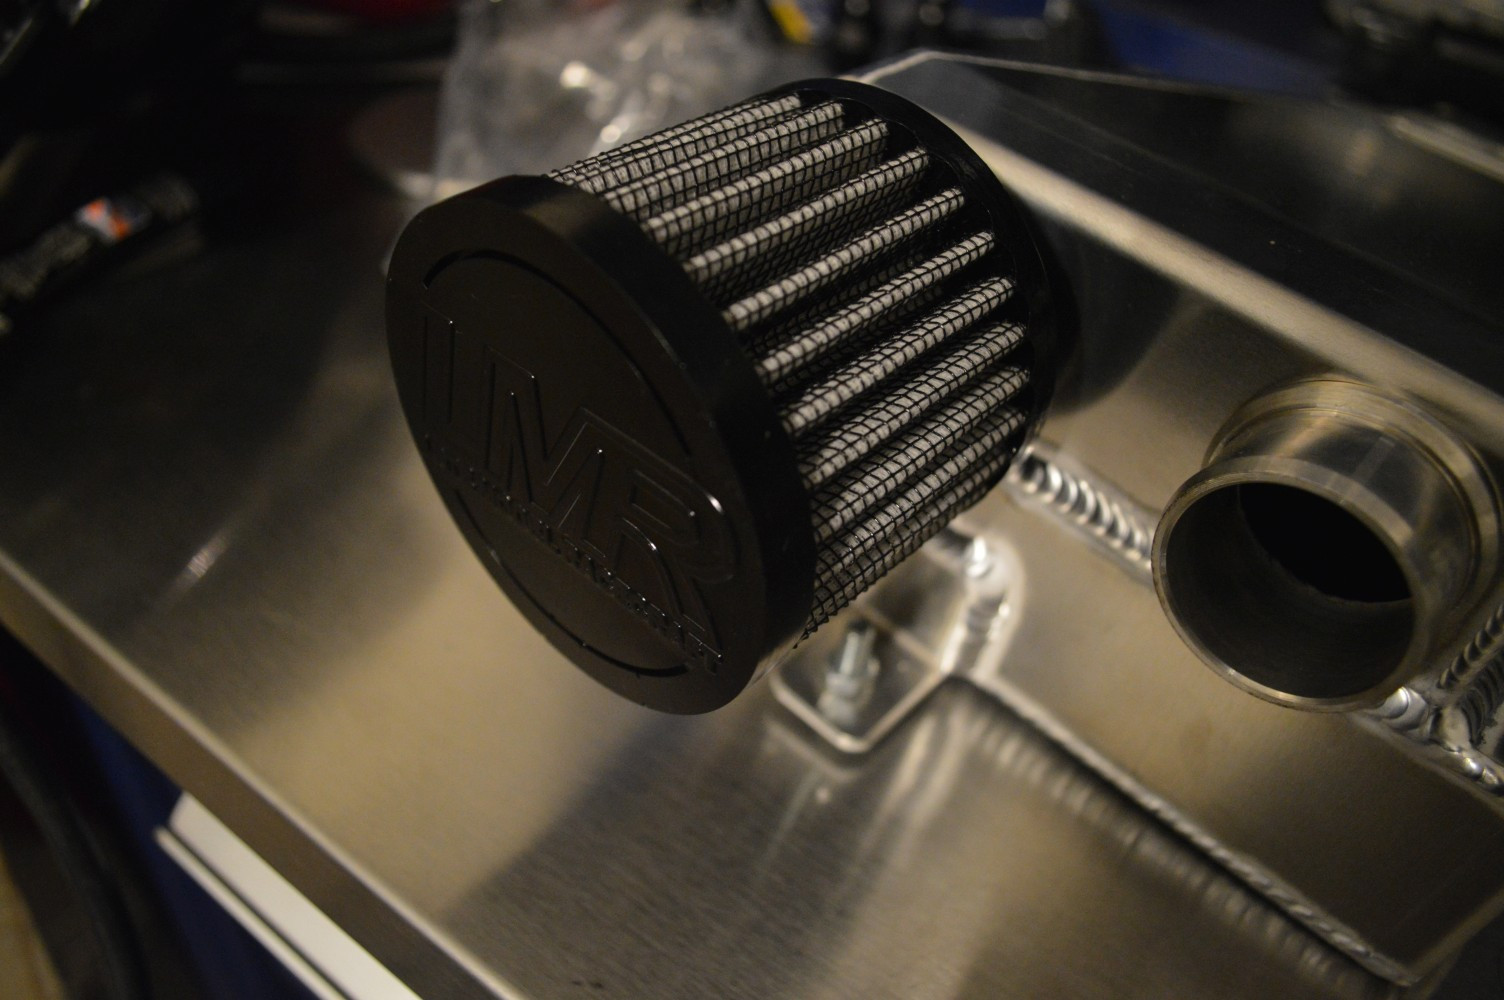
Opening and installing one of the filters:
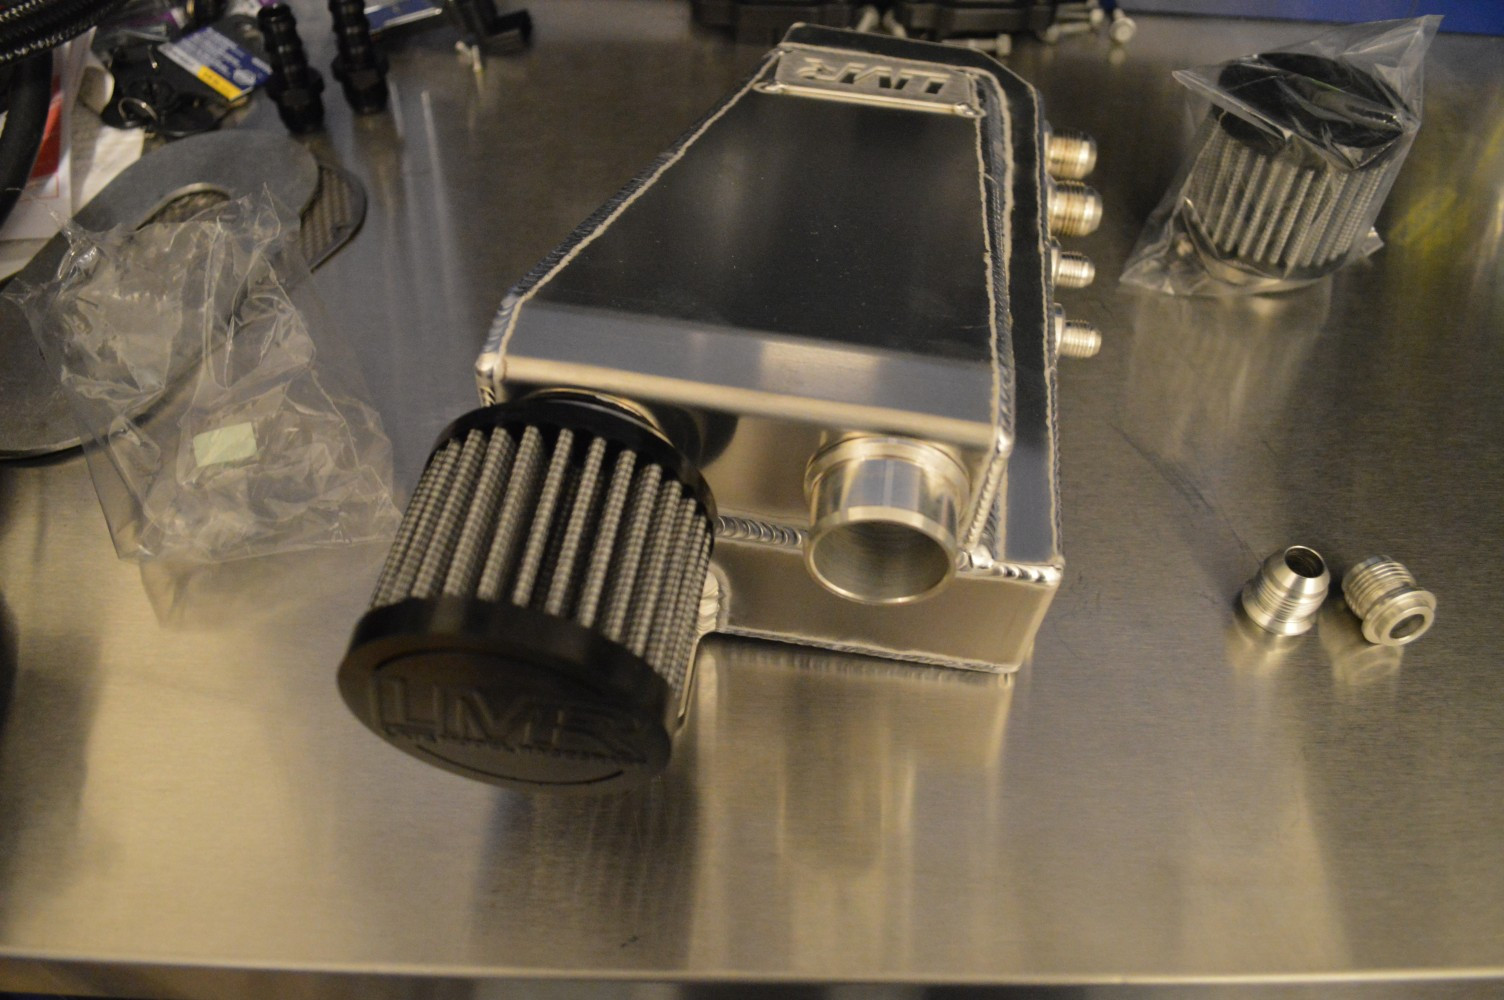
Close-up on filter w/ logo:
Included hardware:
5' -10AN Earl's Pro-350 Braided Hose
3' -6AN Push-Loc Hose w/ 90-degree -6AN Push-Loc Connector
18" -6AN Push-Loc Hose w/ 45-degree -6AN Push-Loc Connector
2 x 90-degree -10AN Push-Loc Connectors w/ Hose Finishers
2 x Straight -10AN Push-Loc Connectors w/ Hose Finishers
More info to come tomorrow! (It's already 3am here)
....
I ordered and received my LMR breather can last week, and have been in the middle of prepping everything to get that installed correctly.
First, since it's already late, let me post the pictures of the unboxing, etc. I will go into more detail tomorrow about what is included, what is involved in modifying the rocker covers, etc.
Fresh out of the box - the breather, two filters, and two -10AN bungs:
Rear of the breather (yes, it is baffled):
Opening and installing one of the filters:
Close-up on filter w/ logo:
Included hardware:
5' -10AN Earl's Pro-350 Braided Hose
3' -6AN Push-Loc Hose w/ 90-degree -6AN Push-Loc Connector
18" -6AN Push-Loc Hose w/ 45-degree -6AN Push-Loc Connector
2 x 90-degree -10AN Push-Loc Connectors w/ Hose Finishers
2 x Straight -10AN Push-Loc Connectors w/ Hose Finishers
More info to come tomorrow! (It's already 3am here)
....
Last edited by Theta; Apr 3, 2014 at 03:32 PM.
Supporting Vendor


Joined: Nov 2010
Posts: 3,893
Likes: 652
From: Houston, TX
Glad you got it! Let us know what you think, and how you like it. We will be looking for feedback. Thanks for sharing! 
__________________
Worlds Quickest C8 Corvette 8.83@160MPH
FIRST C7 Corvette in the 7's & 9's
FIRST C7 Corvette in the 7's & 9's
2019 ZR1 LT5 8.874 @ 155
Current C7 World Record Holder 7.55 @ 184 MPH
Quickest and Fastest GEN5 LT Powered Vehicle
LMR1200HP Supercharged C7 8.84 @ 160
LMR1200HP Twin Turbo C7 9.35@155mph-2014
2 TIME OUTLAW DRAG RADIAL LSX CHAMPION 2008/2010
9.47 ZR1 Corvette-2009
LATE MODEL RACECRAFT
713-466-9900
LateModelRacecraft.com
Too many PMs, please call or email instead, thanks!

Instructor

Joined: Nov 2013
Posts: 138
Likes: 0
From: Milton ON
Thread Starter
Tech Contributor
Joined: Jan 2006
Posts: 4,761
Likes: 240
From: Saint Louis MO
St. Jude Donor '14-'15
I'm dropping the valve covers off to the welder today, so we'll see how that turns out (hopefully by tomorrow). I'll get his notes on how hard it would be for the average welder, what's involved on the inside ring removal, etc.
The factory didn't do us any favors by having the back side of those sealed up with epoxy - no way to cut out the ring from the bottom.
Thread Starter
Tech Contributor
Joined: Jan 2006
Posts: 4,761
Likes: 240
From: Saint Louis MO
St. Jude Donor '14-'15
Thanks - I'm trying to keep it inside me, but my dumb *** forgets to put on gloves and then bam...
My understanding is that since this bypasses the entire stock PCV system, no oil can collect in the factory intake, etc. (which is a very real concern on these cars) since it's being shoved into this can instead.
My main motivation to buy and install this was having forced induction, which only tends to amplify problems like N/A drivers are seeing.
It's also pretty. (kidding, although it's well-built)
My main motivation to buy and install this was having forced induction, which only tends to amplify problems like N/A drivers are seeing.
It's also pretty. (kidding, although it's well-built)
Drifting


Joined: Nov 2006
Posts: 1,713
Likes: 217
From: NY
Love the can! I have enjoyed this Forum project a lot! I look forward to your progression with your input...pics ...and responses. Ultimately the finished product!!! I hope it has been as easy as you had thought it would have..
Corvette Stories
The Best of Corvette for Corvette Enthusiasts

Top 10 Most Expensive Corvettes Ever Sold on Bring A Trailer
Brett Foote
10 Things Every Corvette Owner Needs (2026 Edition)
Michael S. Palmer
8 Most "Only Corvette Owners Understand" Quirks and Problems
Pouria Savadkouei
10 Reasons the C6 Z06 is Still A Performance Benchmark After 20 Years
Joe Kucinski
How Much Horsepower Every Corvette Engine "LOST" in 1972
Joe Kucinski
Top 10 DOs and DON'Ts for Protecting Your Convertible Top!
Michael S. Palmer
Top 10 Most Explosive Corvettes Ever Made: Power-to-Weight Ratio Ranked!
Joe Kucinski
150 hp to 1,250 hp: Every Corvette Generation Compared by the Specs That Matter
Joe Kucinski
8 Coolest Corvette Pace Cars (and Replicas) of All Time
Verdad Gallardo
Thread Starter
Tech Contributor
Joined: Jan 2006
Posts: 4,761
Likes: 240
From: Saint Louis MO
St. Jude Donor '14-'15
Thanks!
Really, the only difficult part about any of this is the time constraints. So many other things going on, but I want to make sure that progress is being made every day.
Really, the only difficult part about any of this is the time constraints. So many other things going on, but I want to make sure that progress is being made every day.
Racer
Joined: Sep 2013
Posts: 302
Likes: 3
From: Sarasota Florida
St Jude Donor '14
So, after several requests for doing the same as I did with my ECS kit in the other thread, I gave in to peer pressure.
I ordered and received my LMR breather can last week, and have been in the middle of prepping everything to get that installed correctly.
First, since it's already late, let me post the pictures of the unboxing, etc. I will go into more detail tomorrow about what is included, what is involved in modifying the rocker covers, etc.
Fresh out of the box - the breather, two filters, and two -10AN bungs:


Rear of the breather (yes, it is baffled):

Opening and installing one of the filters:

Close-up on filter w/ logo:

Included hardware:
5' -10AN Earl's Pro-350 Braided Hose
3' -6AN Push-Loc Hose w/ 90-degree -6AN Push-Loc Connector
18" -6AN Push-Loc Hose w/ 45-degree -6AN Push-Loc Connector
2 x 90-degree -10AN Push-Loc Connectors w/ Hose Finishers
2 x Straight -10AN Push-Loc Connectors w/ Hose Finishers

More info to come tomorrow! (It's already 3am here)
....
I ordered and received my LMR breather can last week, and have been in the middle of prepping everything to get that installed correctly.
First, since it's already late, let me post the pictures of the unboxing, etc. I will go into more detail tomorrow about what is included, what is involved in modifying the rocker covers, etc.
Fresh out of the box - the breather, two filters, and two -10AN bungs:
Rear of the breather (yes, it is baffled):
Opening and installing one of the filters:
Close-up on filter w/ logo:
Included hardware:
5' -10AN Earl's Pro-350 Braided Hose
3' -6AN Push-Loc Hose w/ 90-degree -6AN Push-Loc Connector
18" -6AN Push-Loc Hose w/ 45-degree -6AN Push-Loc Connector
2 x 90-degree -10AN Push-Loc Connectors w/ Hose Finishers
2 x Straight -10AN Push-Loc Connectors w/ Hose Finishers
More info to come tomorrow! (It's already 3am here)
....
Thread Starter
Tech Contributor
Joined: Jan 2006
Posts: 4,761
Likes: 240
From: Saint Louis MO
St. Jude Donor '14-'15
Quick update on this - my welder was at two funerals today for a few riders out here that were killed by a bus a few days back, so he wasn't able to get the welding job done for me.
Can't fault him for that - just reminds us all to be careful, since you never know when your number's up.
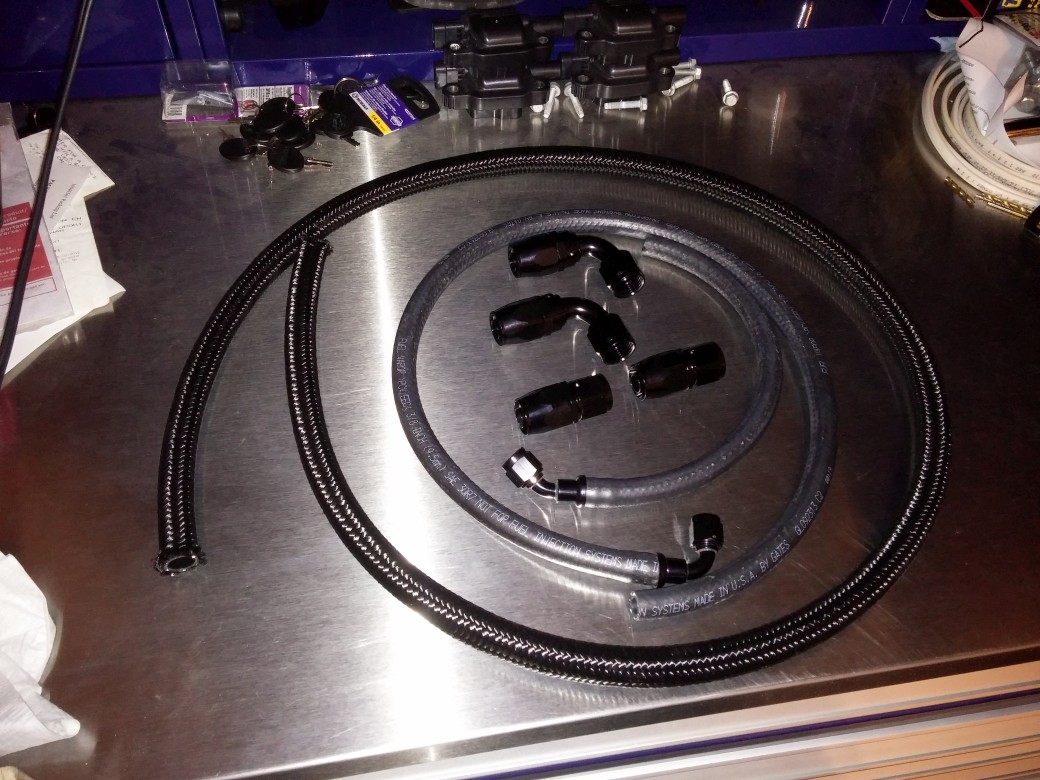
I did, however, receive my box of goodies from Jegs today, and got most of the adapters installed. Once I have those at the proper length, I'll post up pictures and add part numbers on what you'll need from Jegs (mostly things like an EWarl's -6AN T, 3 -6AN barb adapters, etc.).
Will have instructions on mounting this tomorrow for certain. Made a lot of progress on the SC install tonight, so i'll focus on this in the morning/afternoon.
Can't fault him for that - just reminds us all to be careful, since you never know when your number's up.
I did, however, receive my box of goodies from Jegs today, and got most of the adapters installed. Once I have those at the proper length, I'll post up pictures and add part numbers on what you'll need from Jegs (mostly things like an EWarl's -6AN T, 3 -6AN barb adapters, etc.).
Will have instructions on mounting this tomorrow for certain. Made a lot of progress on the SC install tonight, so i'll focus on this in the morning/afternoon.
Racer
Joined: Sep 2013
Posts: 302
Likes: 3
From: Sarasota Florida
St Jude Donor '14
Quick update on this - my welder was at two funerals today for a few riders out here that were killed by a bus a few days back, so he wasn't able to get the welding job done for me.
Can't fault him for that - just reminds us all to be careful, since you never know when your number's up.
I did, however, receive my box of goodies from Jegs today, and got most of the adapters installed. Once I have those at the proper length, I'll post up pictures and add part numbers on what you'll need from Jegs (mostly things like an EWarl's -6AN T, 3 -6AN barb adapters, etc.).
Will have instructions on mounting this tomorrow for certain. Made a lot of progress on the SC install tonight, so i'll focus on this in the morning/afternoon.
Thread Starter
Tech Contributor
Joined: Jan 2006
Posts: 4,761
Likes: 240
From: Saint Louis MO
St. Jude Donor '14-'15
Will do! I have a working list right now using clamps, but I need to tweak the sizing to see if I can get proper-fitting hose ends for a truly pro look.
I will take pictures of the route with the T splitter today, but I think I'll order a few other 'test' items from Jegs to see if I can make it prettier than just black hose clamps over AN barbs.
I will take pictures of the route with the T splitter today, but I think I'll order a few other 'test' items from Jegs to see if I can make it prettier than just black hose clamps over AN barbs.
Tech Contributor

Joined: Aug 1999
Posts: 16,376
Likes: 404
From: Should this thoughtful, valuable contribution meet with no acknowledgement or 'thanks' this post----

Supporting Vendor
Joined: Nov 2010
Posts: 3,893
Likes: 652
From: Houston, TX
Of course, customers that get builds from us get apparel as well. Theta just needs to email us his size. Hit me up at shop tomorrow if you have any further questions, looking forward to seeing your results of your build. Should be a monster.
Thread Starter
Tech Contributor
Joined: Jan 2006
Posts: 4,761
Likes: 240
From: Saint Louis MO
St. Jude Donor '14-'15
Right on - somebody just got me a free t-shirt. Woo hoo!
Going outside to continue the work. I was planning on getting this done with the parts list today, but I realized:
1) My hood is down because of the struts being removed, and
2) I need to order some prettier hardware/hose.
But let's see if I can get more work done tonight!
Going outside to continue the work. I was planning on getting this done with the parts list today, but I realized:
1) My hood is down because of the struts being removed, and
2) I need to order some prettier hardware/hose.
But let's see if I can get more work done tonight!
Thread Starter
Tech Contributor
Joined: Jan 2006
Posts: 4,761
Likes: 240
From: Saint Louis MO
St. Jude Donor '14-'15
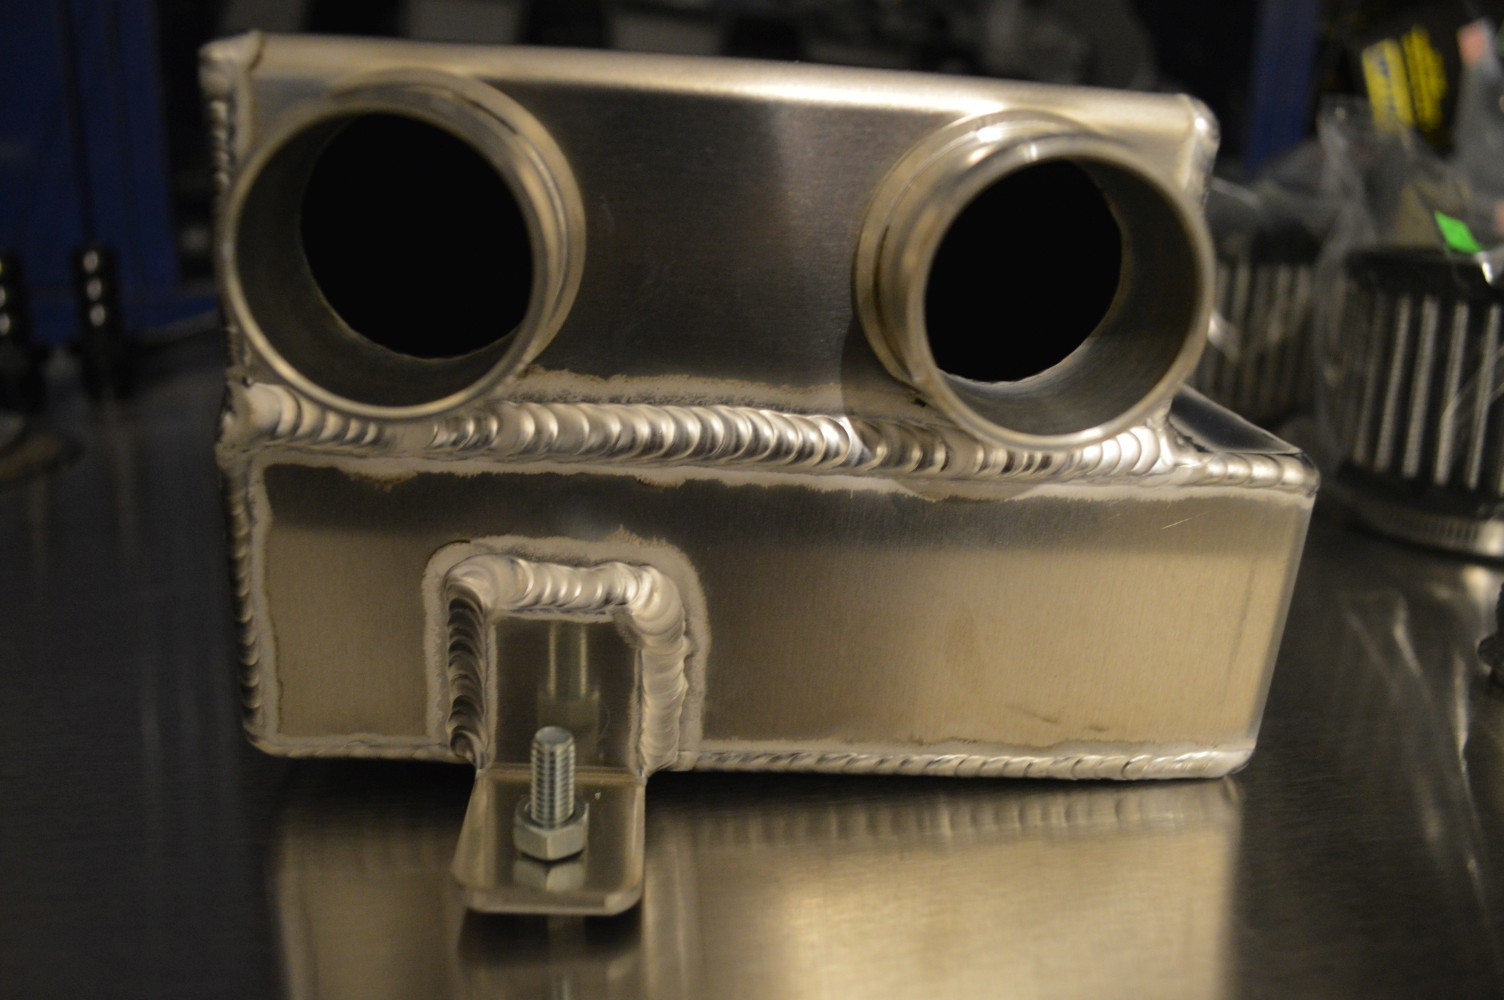
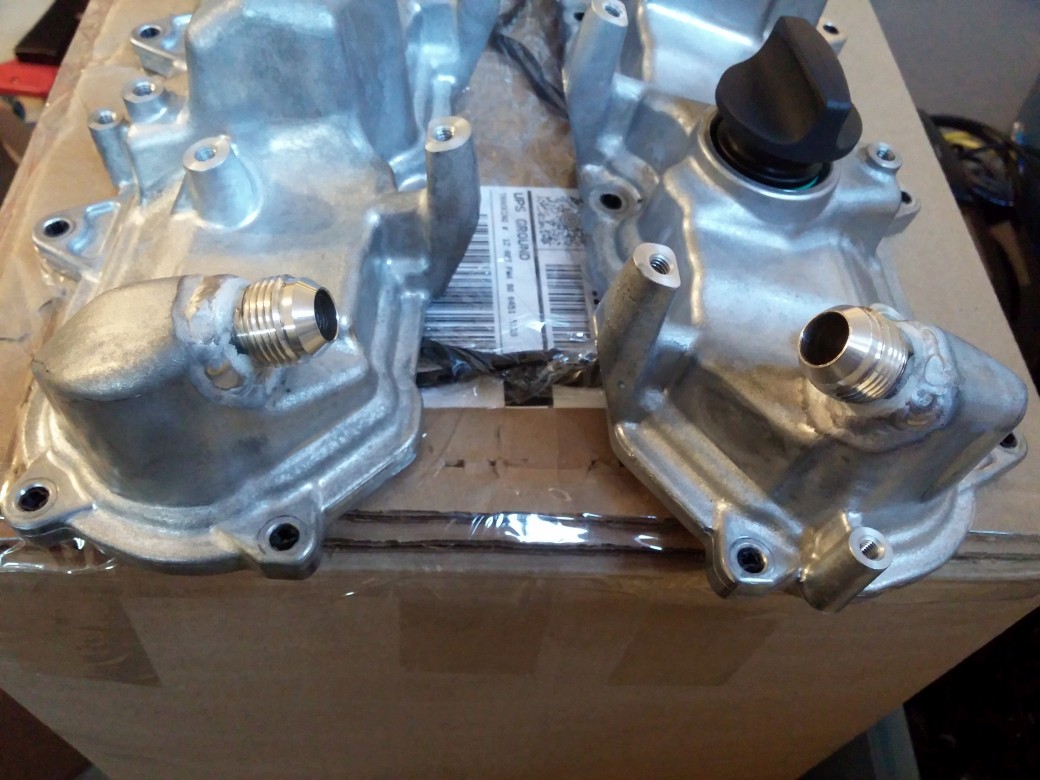
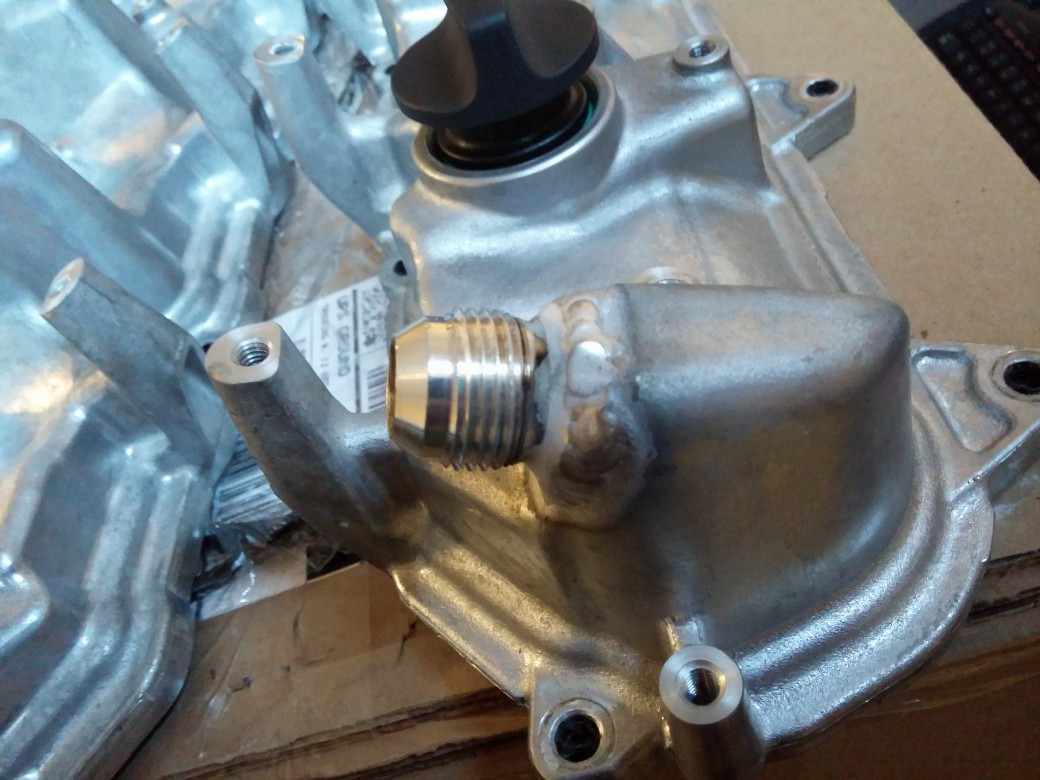
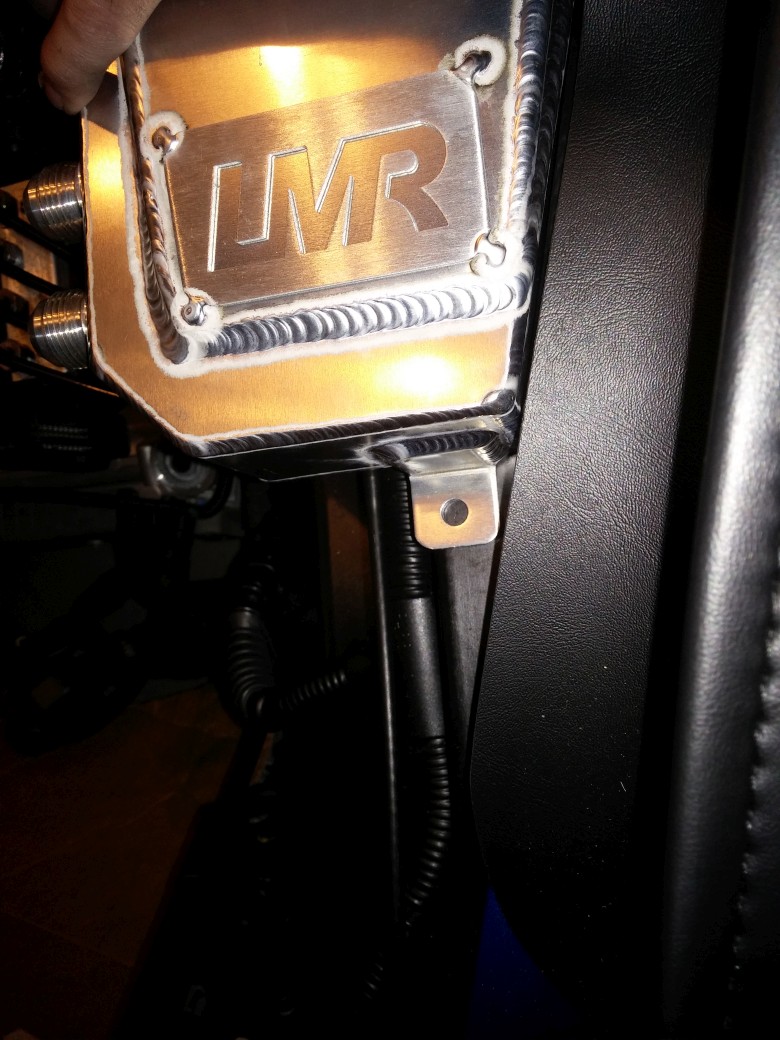
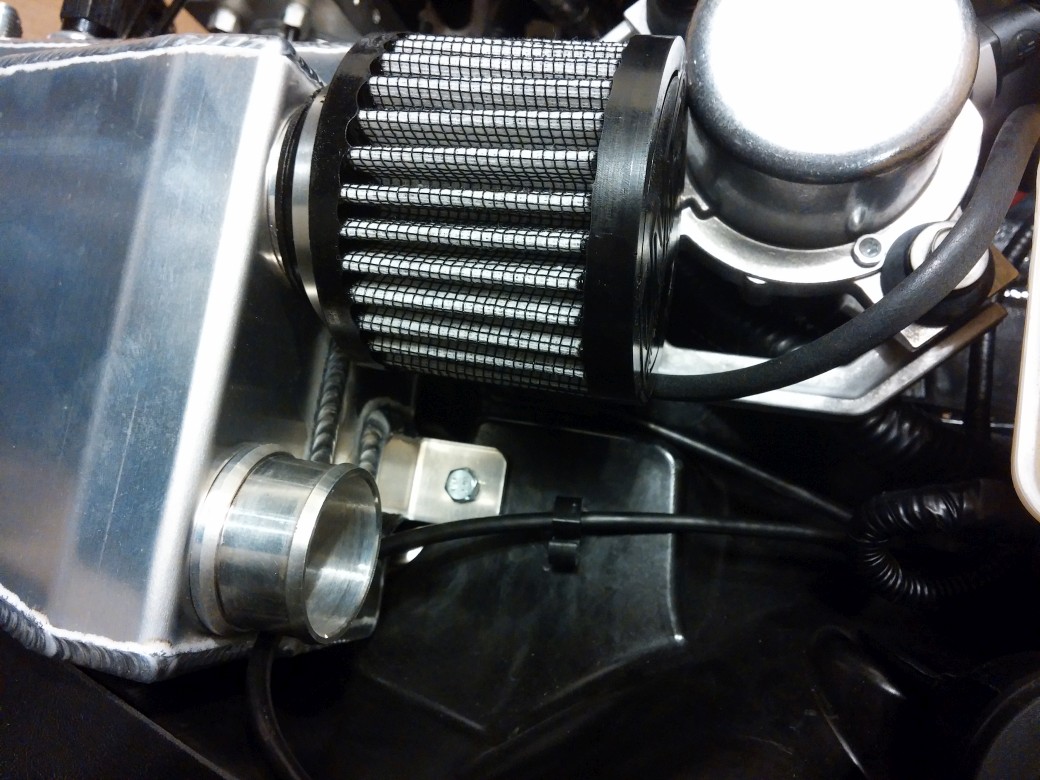
Very good news - I picked up my valve covers this morning from the welder!
He did a great job, but noted that you need a good welder to do it because of the alloy, limiting heat in the area, etc. Anyway, I trust him, and he did one hell of a job. Told me the same that LMR did - those barbs are pushed in from the back, and there's no way to get them out without cutting out the section.
Cost me $50 out the door for his 3 hours of top-notch work. I'm decent with stainless welding, but I don't do Al stuff.
Pics to show your welder when getting these installed:
Thread Starter
Tech Contributor
Joined: Jan 2006
Posts: 4,761
Likes: 240
From: Saint Louis MO
St. Jude Donor '14-'15
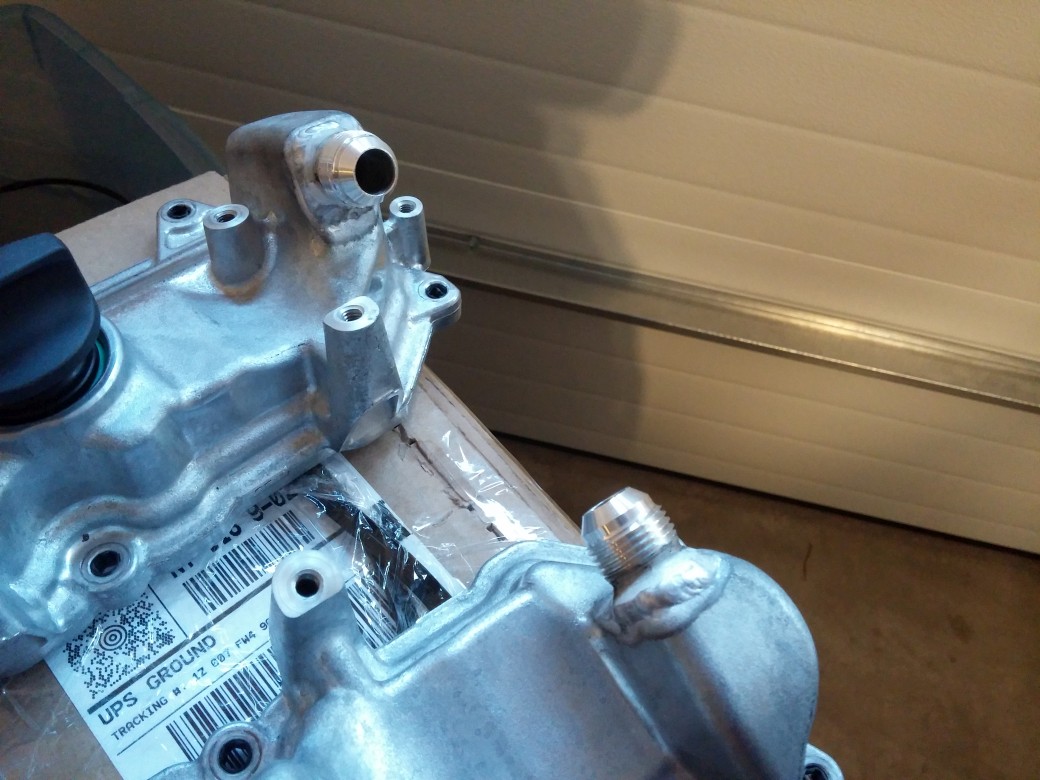
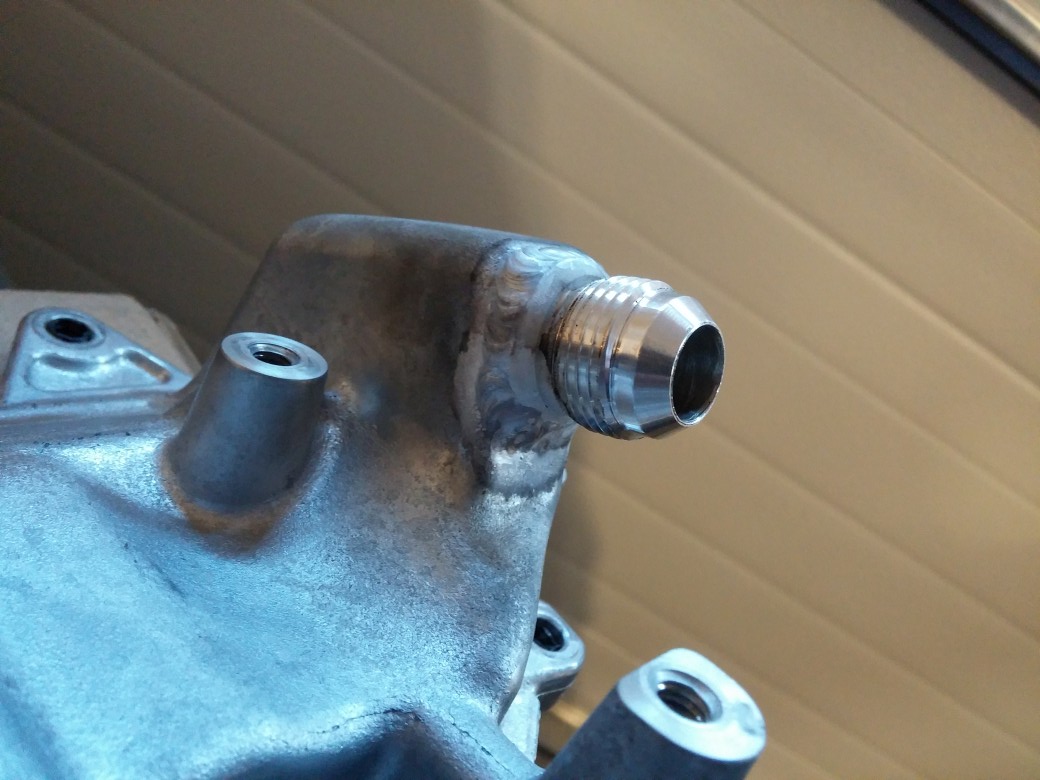
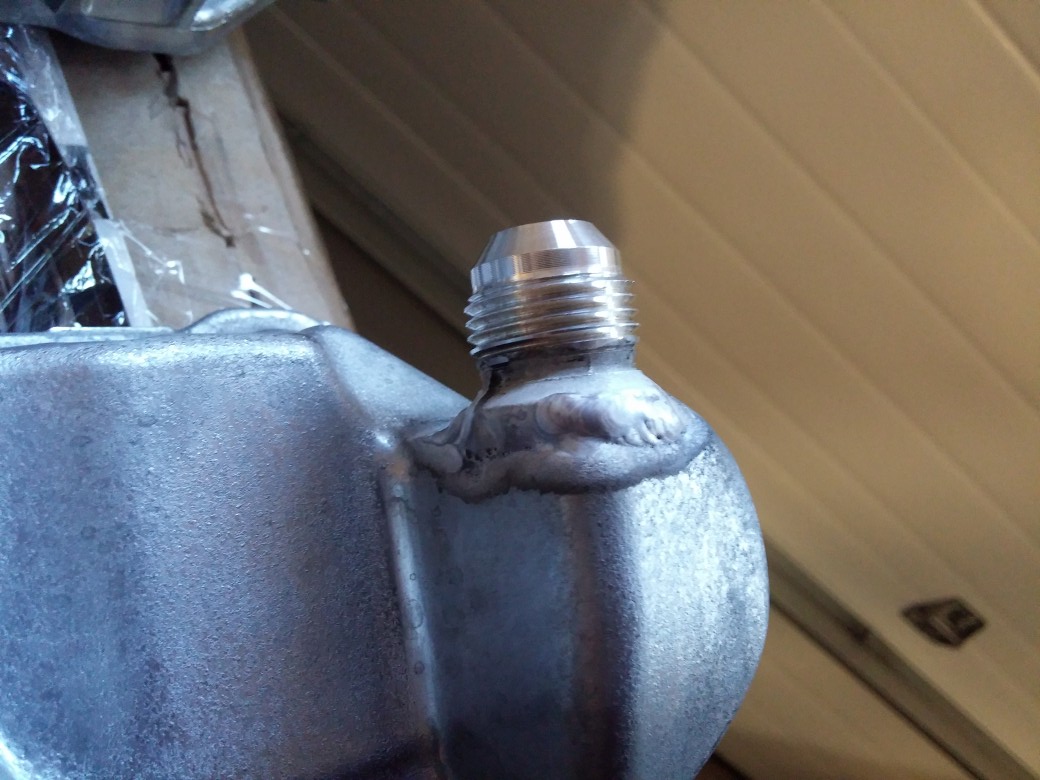
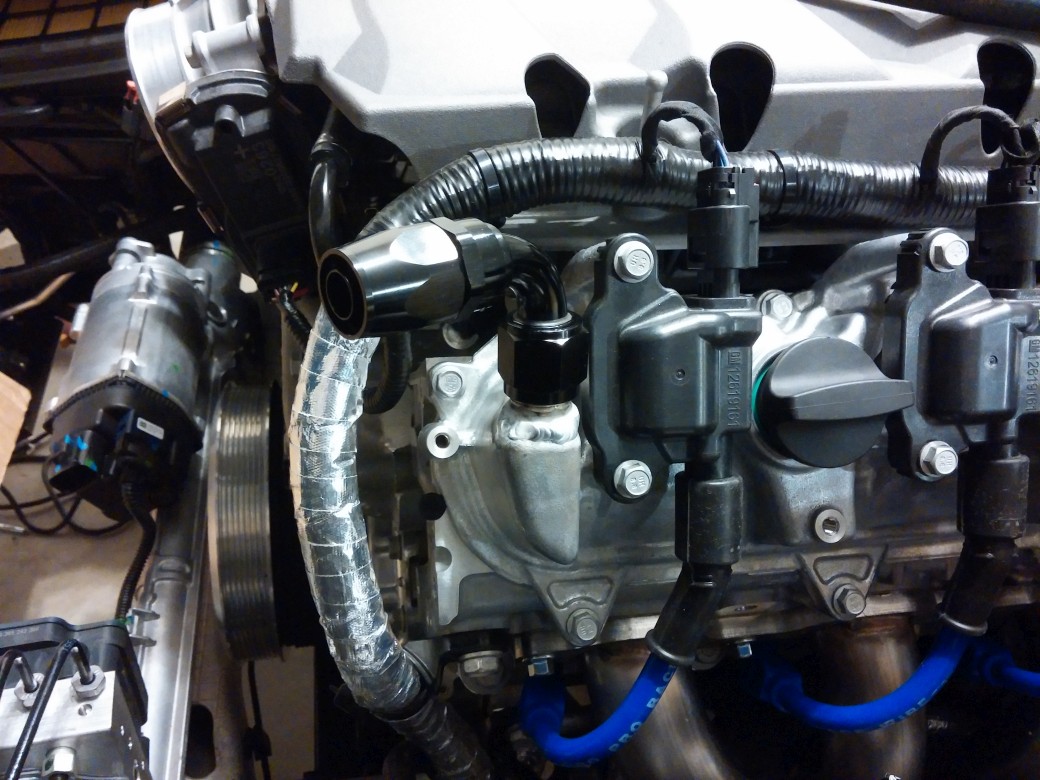
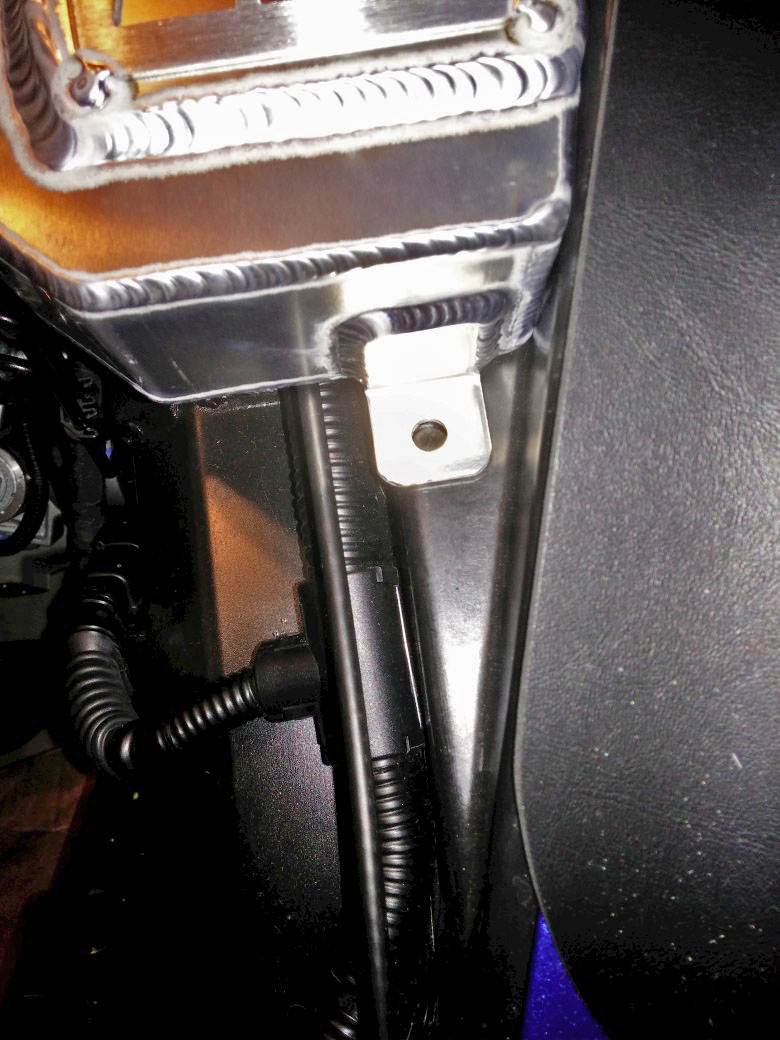
Back as promised, here is more of the 'install' portion that should help out (and allow you see more of what needs to be done. There's certainly some effort required here, but I hope this serves to show you all a start-to-finish on what to do and what's needed.
Part list and hose pictures will follow today (box from Jegs is arriving shortly).
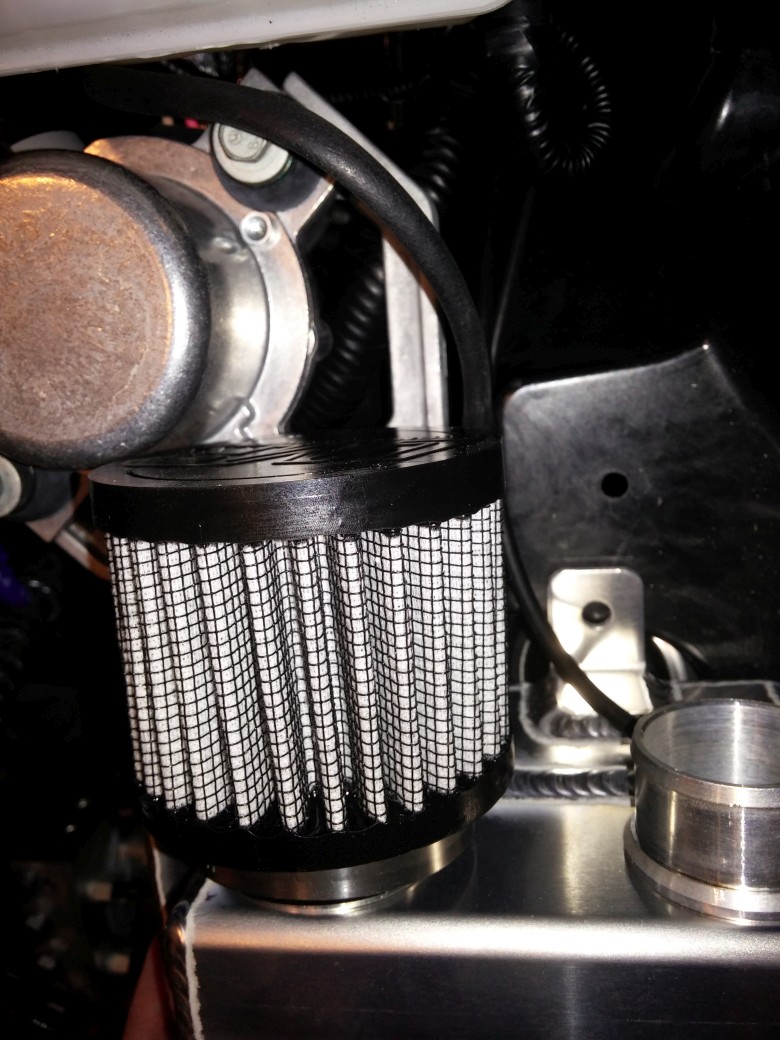
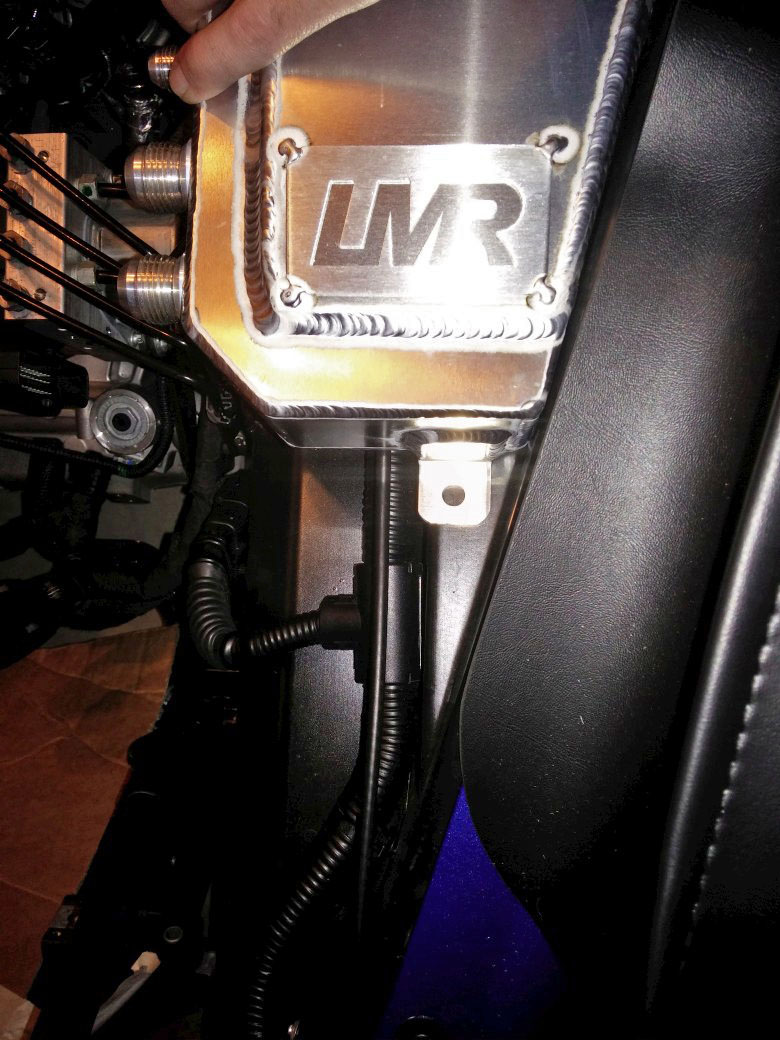
Here's the finished and installed product with the welded AN fittings:

Part list and hose pictures will follow today (box from Jegs is arriving shortly).
Here's the finished and installed product with the welded AN fittings:
Thread Starter
Tech Contributor
Joined: Jan 2006
Posts: 4,761
Likes: 240
From: Saint Louis MO
St. Jude Donor '14-'15
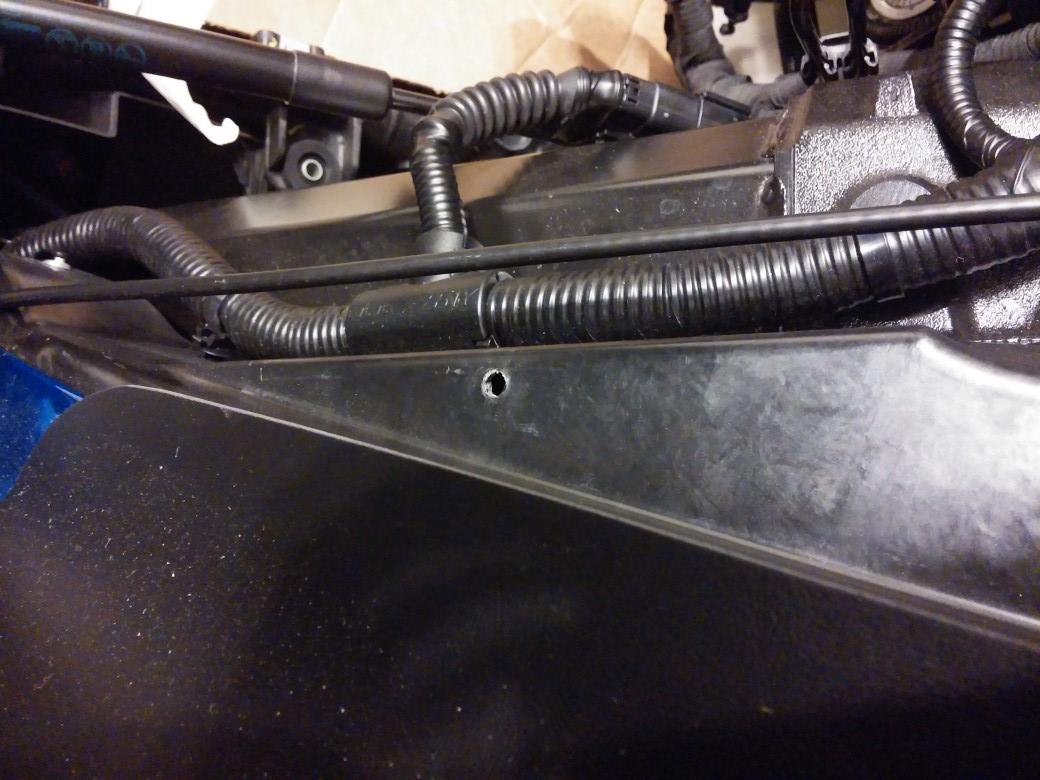
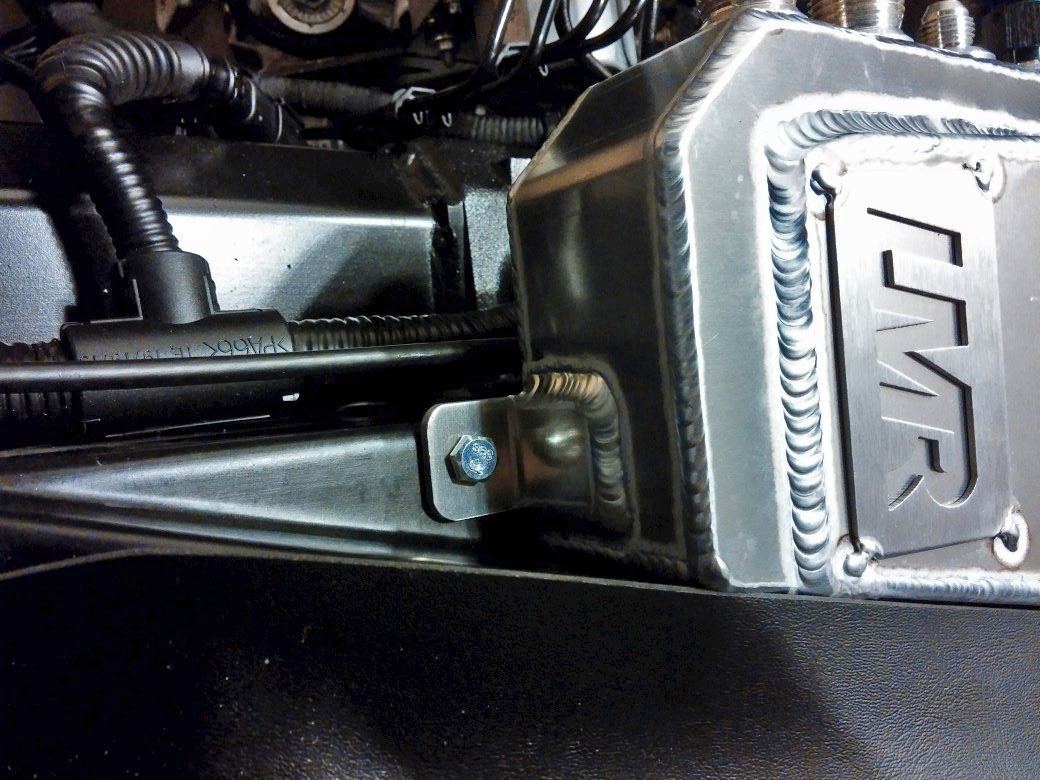
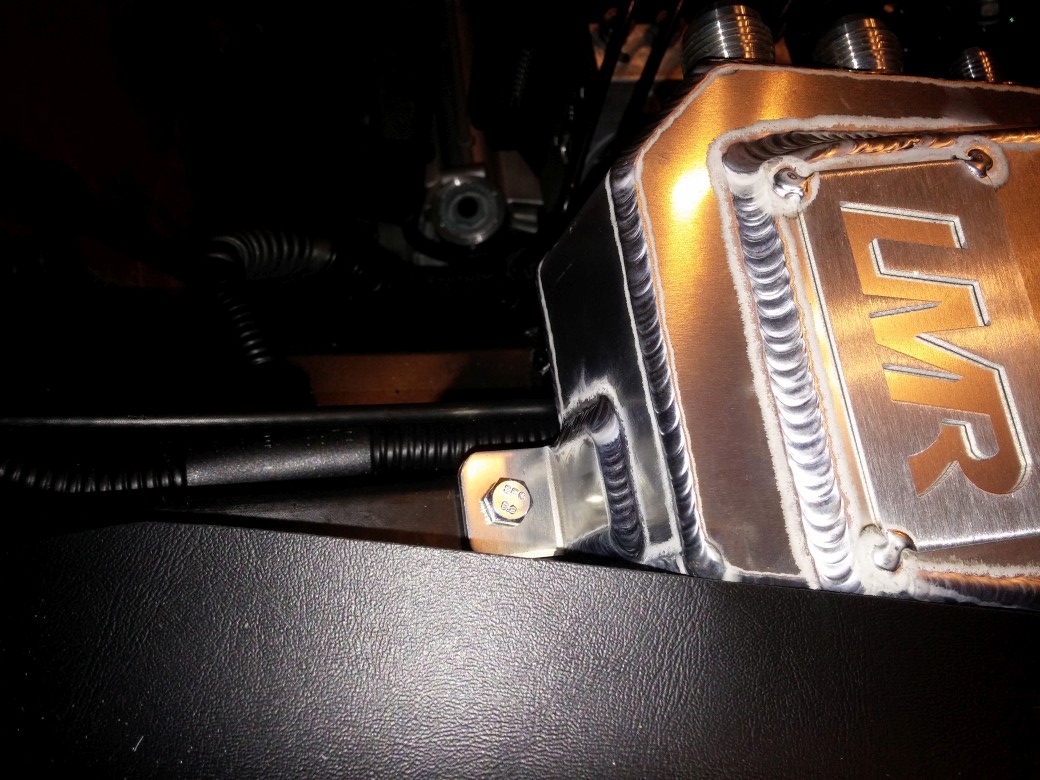
Next up... According to the design, the first bolt hole re-uses the factory bracket hole. So, already, this is going to be a problem. The filter won't clear the pump.
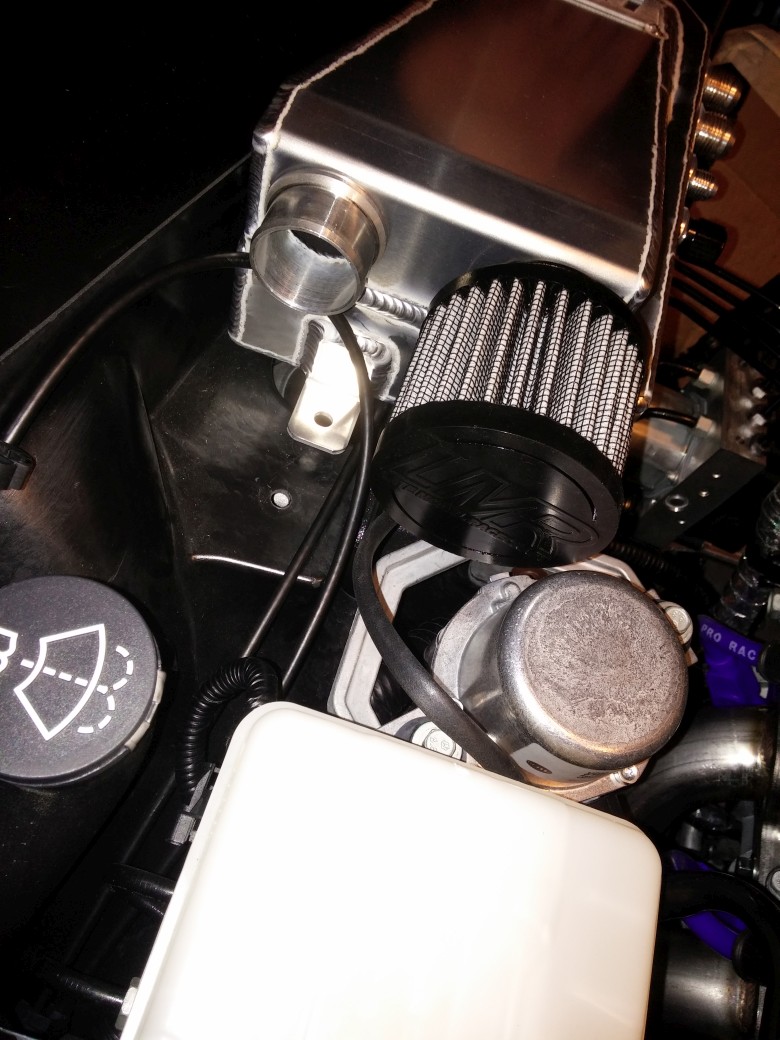
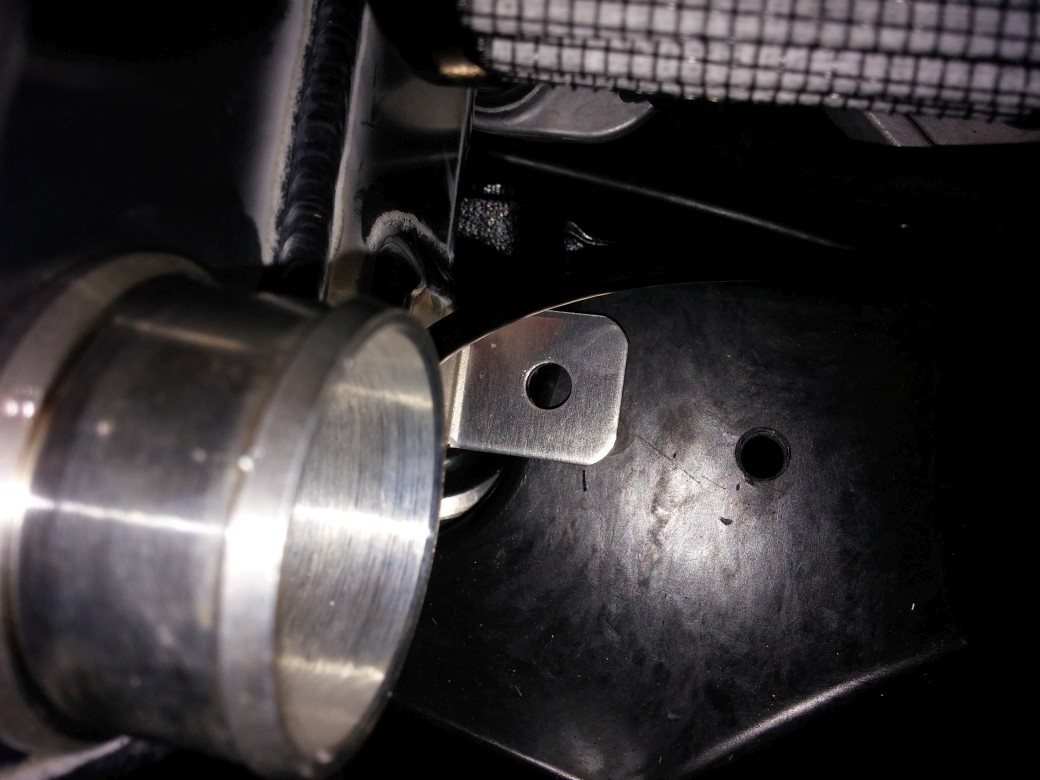
Now, the front we knew we'd need to drill, so that's no surprise:
Now, the front we knew we'd need to drill, so that's no surprise:
Thread Starter
Tech Contributor
Joined: Jan 2006
Posts: 4,761
Likes: 240
From: Saint Louis MO
St. Jude Donor '14-'15
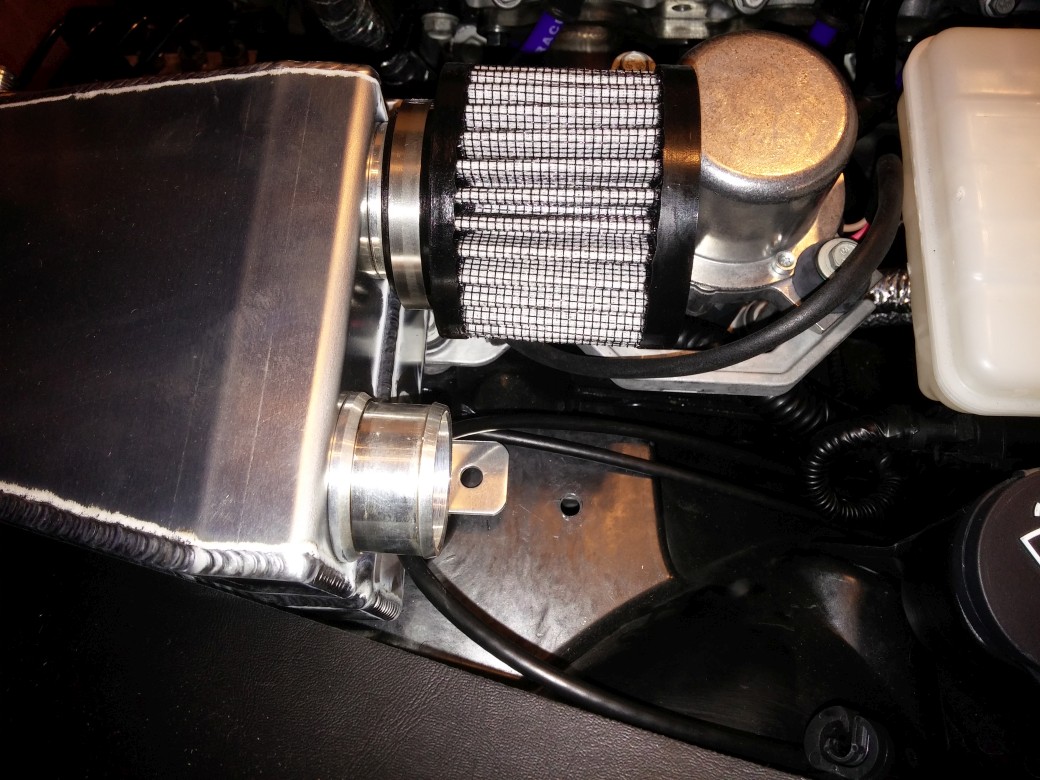
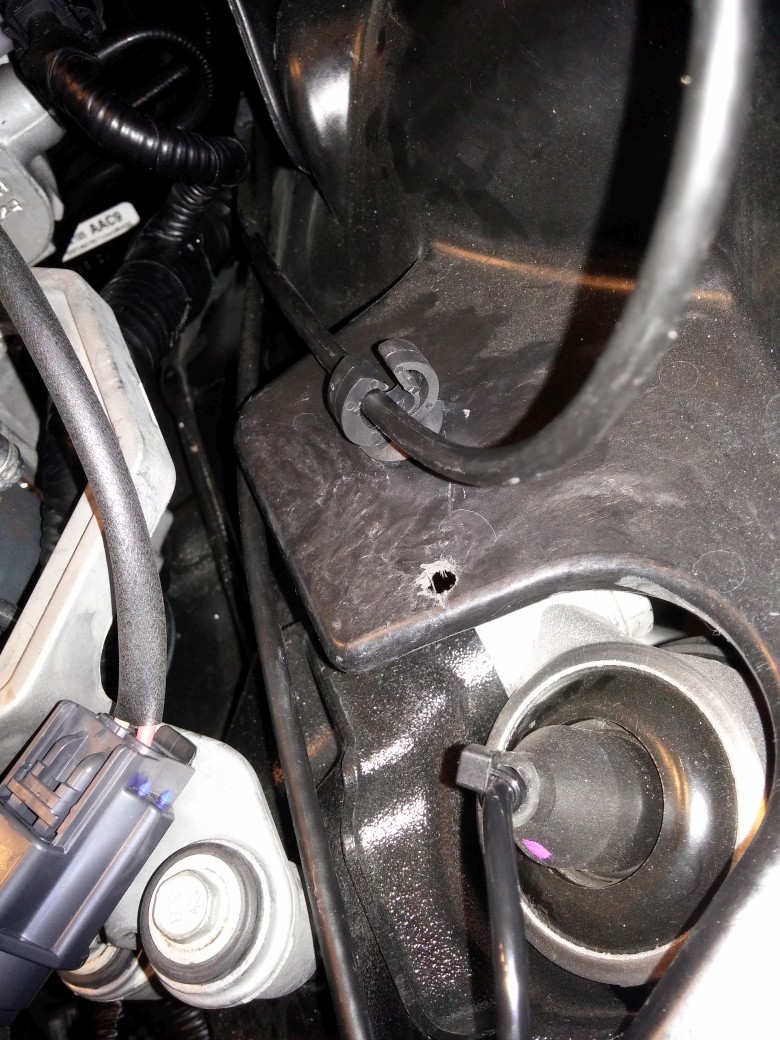
So we need to drill two holes with a 15/32" bit (I used a Dewalt pilot-tip Ti bit), and keep in mind that this is not plastic - it's some kind of composite material (similar to CF) and cracks easily. The duct is also reminiscent of micro tubules. Just be sure to go slowly and clean it up thoroughly.
If it wasn't clear by this point, you need to remove the fender liner. Let me know if anyone has a problem with that. There are a lot of fasteners and screws.
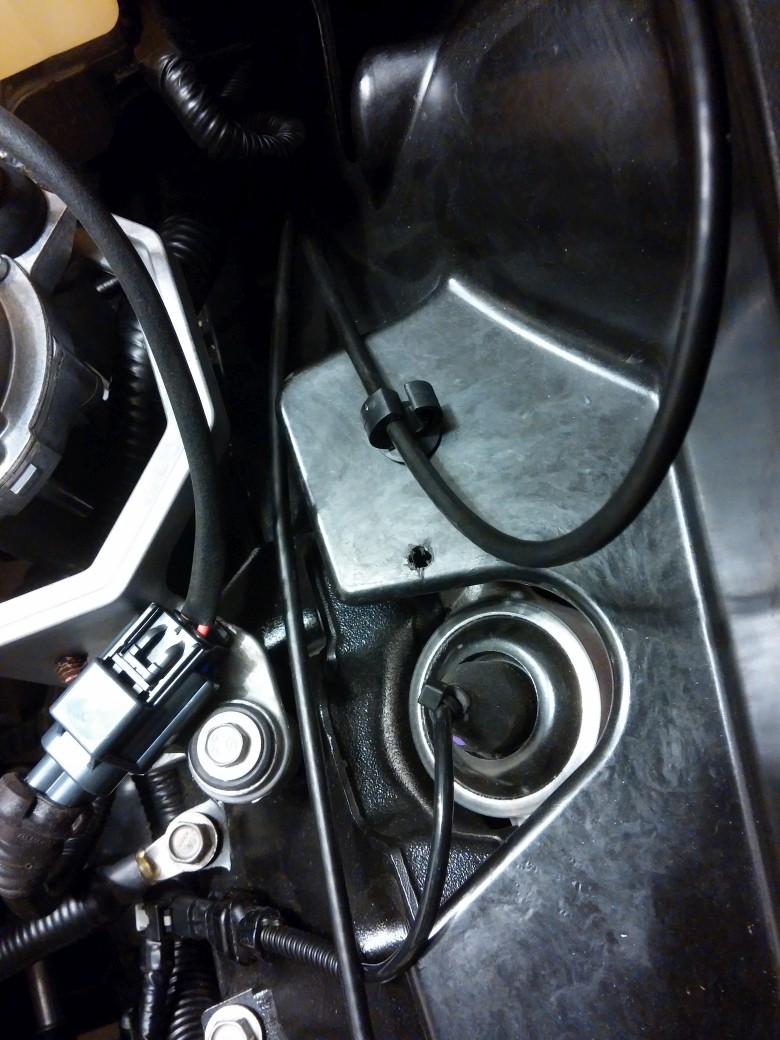
Attachment 48373407
Success!
Next, on to the parts list. Edit: See post #37.
If it wasn't clear by this point, you need to remove the fender liner. Let me know if anyone has a problem with that. There are a lot of fasteners and screws.
Attachment 48373407
Success!
Next, on to the parts list. Edit: See post #37.
Last edited by Theta; Mar 26, 2014 at 09:39 PM.