
cam for a Vortech blown LT1

Thread Starter
Team Owner


Joined: Mar 2001
Posts: 30,856
Likes: 293
From: Boston, Dallas, Detroit, SoCal, back to Boston MA
cam selection article for a 765hp blown 355
reposted for here for those who dont' venture into the FI section
Engine Master's article posted on AFR's site
http://airflowresearch.com/articles/article122/A-P1.htm

following the link for the rest of the pages.
also an 810hp 383 with smaller 195 heads
http://airflowresearch.com/articles/article119/A-P1.htm
Pretty close to my combo
Thread in the C4 FI section
http://forums.corvetteforum.com/show....php?t=2076118
tequilaboy made some real plots
plots
reposted for here for those who dont' venture into the FI section
Engine Master's article posted on AFR's site
http://airflowresearch.com/articles/article122/A-P1.htm
following the link for the rest of the pages.
also an 810hp 383 with smaller 195 heads
http://airflowresearch.com/articles/article119/A-P1.htm
Pretty close to my combo
Thread in the C4 FI section
http://forums.corvetteforum.com/show....php?t=2076118
tequilaboy made some real
plots
Thread Starter
Team Owner
Joined: Mar 2001
Posts: 30,856
Likes: 293
From: Boston, Dallas, Detroit, SoCal, back to Boston MA
In case your wondering how I'm going to get all this power to the groud.
I just got back from Tom's (astock165 ) place, picked up my rear suspension links with spherical rod ends
Nice
All top quality stuff. It's nice when an engineer works on this stuff.
the for sale thread:
http://forums.corvetteforum.com/show...post1566463543
Here's a review from 'another forum':
OK then
http://www.corvette-guru.com/modules...mode=0&start=0
I just got back from Tom's (astock165 ) place, picked up my rear suspension links with spherical rod ends
Nice
All top quality stuff. It's nice when an engineer works on this stuff.
the for sale thread:
http://forums.corvetteforum.com/show...post1566463543
I have these same kits on my 93 coupe and have been very happy with the results. The rear end stays planted much better than when I had the stock aluminum links and poly bushings. I have had great results at both autocross and at the track.
I developed this kit with Gary from Hardbar and although there are other kits on the market we both feel this kit is superior in many ways. The bodies are knurled for easy grip and adjustment, even when on the car. The ends of the links are slotted like a collet and use Omega style clamps to lock the rod ends in place and eliminates the jam nuts, which can come loose. All you need to fully tighten the rod ends in place is a 1/4" 12 point socket. No need for 2 large wrenches to go in tight spaces like with jam nuts.
I have sold five kits so far and have gotten some great feedback from the buyers. I have more parts on order and will be able to ship in about a week.
The kits are as follows:
Red anodized aluminum turnbuckle links with steel bodied, Teflon lined spherical rod ends. All components are American made.
Nuts & bolts are all Grade 8 hardware.
All necessary spacers and washers are provided.
Trailing Arm Kit: $350 + $20 S&H

Camber Rod Kit: $225 + $10 S&H

If you have any questions, please don�t hesitate to ask. You can PM me through the forum or use my email below.
The easiest method of payment right now is PayPal, but I will discuss other methods if you prefer.
I developed this kit with Gary from Hardbar and although there are other kits on the market we both feel this kit is superior in many ways. The bodies are knurled for easy grip and adjustment, even when on the car. The ends of the links are slotted like a collet and use Omega style clamps to lock the rod ends in place and eliminates the jam nuts, which can come loose. All you need to fully tighten the rod ends in place is a 1/4" 12 point socket. No need for 2 large wrenches to go in tight spaces like with jam nuts.
I have sold five kits so far and have gotten some great feedback from the buyers. I have more parts on order and will be able to ship in about a week.
The kits are as follows:
Red anodized aluminum turnbuckle links with steel bodied, Teflon lined spherical rod ends. All components are American made.
Nuts & bolts are all Grade 8 hardware.
All necessary spacers and washers are provided.
Trailing Arm Kit: $350 + $20 S&H
Camber Rod Kit: $225 + $10 S&H
If you have any questions, please don�t hesitate to ask. You can PM me through the forum or use my email below.
The easiest method of payment right now is PayPal, but I will discuss other methods if you prefer.
OK then
http://www.corvette-guru.com/modules...mode=0&start=0
CentralCoaster wrote:
Finally got everyone off my back and got some time to install these.


Car feels great. It really freed up the rear suspension. The car actually dropped a bit due to less binding, yet I did not adjust the ride height at all. I scraped my exhaust for the first time after backing out of my steep driveway. (Car is lowered.) I can articulate the rear knuckle easily by hand when the car is on jackstands.
Going over speed bumps, I hear the front end squeak and bounch with the poly bushings. Rear end is quiet as a mouse and transmits less to the chassis.
Took it in the twisties, but improvements there are going to be impossible to quantify without lap times.
I don't know when my next track day is, but I'll have to repeat a track that I've been to recently and compare. May not be until a few months from now when it cools off.
.....
Everyone (without these installed) seems to think they'll ride very rough.
If anything, I found the opposite to be true. Now my car has never rode very smooth, but with the new Bilsteins and these installed, it's as good as ever. I had poly bushings on prior to this, and petrified stock rubber bushings on before that.
I'm not convinced how spherical rod ends can hurt ride quality, when you can easily articulate the suspension by hand, that means the suspension can react quickly to an uneven road surface. The stock pieces in their bound up state are very stiff and hard to move, and so they would transfer more energy directly to the frame, not allowing the suspension to soak it up.
I'll get pics this evening.
Posted on: 7/18 14:06
Finally got everyone off my back and got some time to install these.
Car feels great. It really freed up the rear suspension. The car actually dropped a bit due to less binding, yet I did not adjust the ride height at all. I scraped my exhaust for the first time after backing out of my steep driveway. (Car is lowered.) I can articulate the rear knuckle easily by hand when the car is on jackstands.
Going over speed bumps, I hear the front end squeak and bounch with the poly bushings. Rear end is quiet as a mouse and transmits less to the chassis.
Took it in the twisties, but improvements there are going to be impossible to quantify without lap times.
I don't know when my next track day is, but I'll have to repeat a track that I've been to recently and compare. May not be until a few months from now when it cools off.
.....
Everyone (without these installed) seems to think they'll ride very rough.
If anything, I found the opposite to be true. Now my car has never rode very smooth, but with the new Bilsteins and these installed, it's as good as ever. I had poly bushings on prior to this, and petrified stock rubber bushings on before that.
I'm not convinced how spherical rod ends can hurt ride quality, when you can easily articulate the suspension by hand, that means the suspension can react quickly to an uneven road surface. The stock pieces in their bound up state are very stiff and hard to move, and so they would transfer more energy directly to the frame, not allowing the suspension to soak it up.
I'll get pics this evening.
Posted on: 7/18 14:06
BrianCunningham wrote:
Yes, but with the stock C4's it's even worse since it's not a ball joint, but just a rubber bushed cylindrical hole, that really should just be used for 2d movements.
Here's a recent pic of my stock suspension, you can see the old stock rubber bushings binding up so much that they are being forced out.

Next time you have your wheels off, or it's up on a lift, check it out.
Poly bushings would actually make it worse since they take away compliance in the the off axis direction.
Yes, but with the stock C4's it's even worse since it's not a ball joint, but just a rubber bushed cylindrical hole, that really should just be used for 2d movements.
Here's a recent pic of my stock suspension, you can see the old stock rubber bushings binding up so much that they are being forced out.
Next time you have your wheels off, or it's up on a lift, check it out.
Poly bushings would actually make it worse since they take away compliance in the the off axis direction.
Thread Starter
Team Owner
Joined: Mar 2001
Posts: 30,856
Likes: 293
From: Boston, Dallas, Detroit, SoCal, back to Boston MA
Well, it looks like I'll be starting this build a little sooner than anticipated. While I was on the road course at NHMS, one of my front seals cut loose  Since I have to tear it down anyways, I might as well put the blower on
Ron will be shipping my stuff out to me shortly.
I talked to my tuner, SloRvette, he's going to order me a custom cam, injectors and handle the tuning.
Also, when I bought my AFR's I did so for a 383 build, so they have large 65cc chambers. He said he's put a S-trim on iron LT1's with stock bottom ends and they've handled it no problem. So even though my S trim has been upgraded for more boost, with the compression lowered by the large chambered heads, I can go with the stock bottom end no problem.
Since I have to tear it down anyways, I might as well put the blower on Ron will be shipping my stuff out to me shortly.
I talked to my tuner, SloRvette, he's going to order me a custom cam, injectors and handle the tuning.
Also, when I bought my AFR's I did so for a 383 build, so they have large 65cc chambers. He said he's put a S-trim on iron LT1's with stock bottom ends and they've handled it no problem. So even though my S trim has been upgraded for more boost, with the compression lowered by the large chambered heads, I can go with the stock bottom end no problem.


Thread Starter
Team Owner
Joined: Mar 2001
Posts: 30,856
Likes: 293
From: Boston, Dallas, Detroit, SoCal, back to Boston MA
I talked to my tuner, it sounds like we're going to go custom, very close to a nitrous cam.
I was real happy to see the UPS guy today...
.... IT'S HERE!!


I forgot just how big 3in pipes really are


I was real happy to see the UPS guy today...
.... IT'S HERE!!
I forgot just how big 3in pipes really are


Pro

Joined: Apr 1999
Posts: 533
Likes: 6
From: Poinciana Florida
If your interested,I have available a Comp Cams
CC-305 220/230 w/510 lift on a 114 LSA
Power range 1500/5500 rpm
Strong midrange and decent top end. This cam produced 596rwhp. $85.00 including shipping.
Be advised, no matter what cam you put in the engine your building your going to have a difficult time putting power to the ground. When you finally hit traction in 3rd gear, hold on for the ride of your life!!!
Thread Starter
Team Owner
Joined: Mar 2001
Posts: 30,856
Likes: 293
From: Boston, Dallas, Detroit, SoCal, back to Boston MA
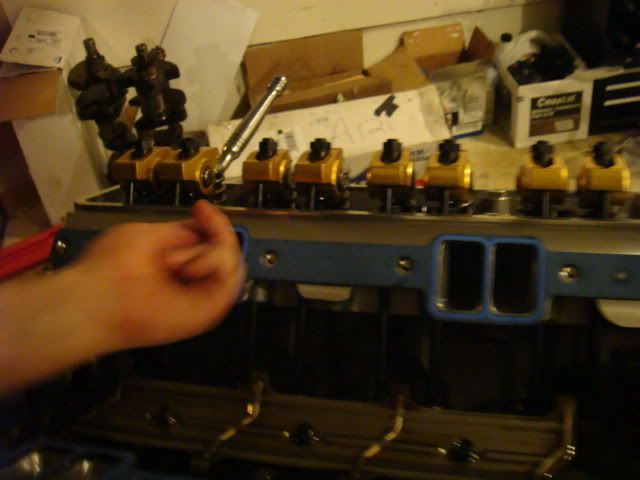
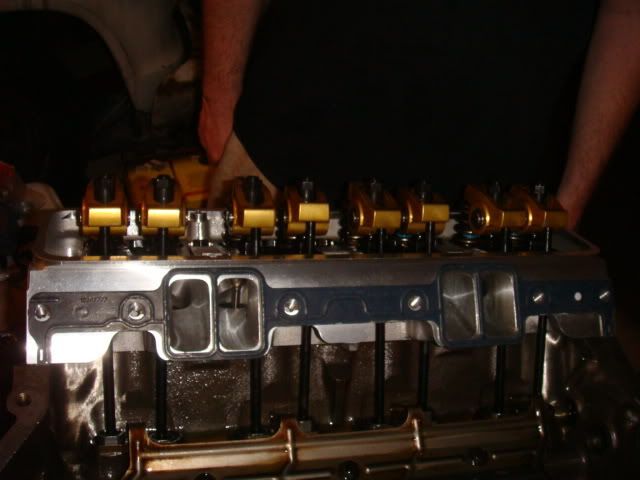
It turns out a stock LT1 intake will work with the new AFR's
So I'm just going to use the spare one I have
So I'm just going to use the spare one I have
Brian,
Here is the pic from Nolands engine thread.
This is a Fel Pro stock replacement LT1 gasket (PN1284) up to his AFR 195 Comp Ports . I actually used this Fel Pro LT1 gasket (added just <.060 to the roof) to port match his LT4 intake and when we put it on the motor the port alignment was perfect.
We then put the GM "LT4 Off Road" gasket (777) up to them to show the difference.
Now in the end since Noland had an LT4 intake which has more sealing surface above the intake port I just used the GM LT4 777 gasket for assy. It expidited assy (no gasket trimming) and Noland didn't seem to keen on me taking a pocket knife to his brand new gaskets if I didn't have to...
Another option is SCE, which has a few different LTX gaskets (that have different port heights) and you could get one that didn't require any trimming on the 195's. I had to go with SCE intake gaskets on my 210's.
Reguardless LT1 intake and gaskets on the 195 Comp Ports is easily done.
Will
Thread Starter
Team Owner
Joined: Mar 2001
Posts: 30,856
Likes: 293
From: Boston, Dallas, Detroit, SoCal, back to Boston MA
Well I just made by shortblock builder happy.
I got the final specs for my engine, so I just gave him my credit card #
Going with a 9:1 compression, which may seem a little low, but my tuner thinks I may max out the S-trim, so that will leave me room to send it back and have it rebuilt as a T-trim.
Going with a 5.7 rod, and not a 6, for the dwell time at the top.
I am going with an internal balance on this, so a zero balance flywheel.
With that in mind I'm getting the McLeod street twin clutch with the detachable weights.
It will be a custom Nitrous/Blower cam 220/236 duration.
Here's the shop I'm using, thanks to Cuisinartvette for finding it.
http://qmpracing.com/
Race Director


Joined: Aug 2006
Posts: 18,346
Likes: 1
From: D / FW
Doesn't seem to be too low to me ! Mine blew both head gaskets at 6800 on the Dyno with 8 lb's D 1SC and 9.8.1.
I decided I don't want to hack my interior on the low miles 95 Z0 7 optioned car by adding a roll cage because of the power adder.
I'll pull the cam and pistons and boost compression to 11.1 which will get me back up .
Here are my comp cams custom grind specs if you want to compare.
Like I said Fully forged lower end ,fresh block H beam rods and JE Blower Pistons total seal rings.
Using 1,000 CFM Holly throttle body LT 4 intake and Late ported LT4 heads w/ 2in intakes and 54 cc chambers .
Your 64 cc's much better for boost !
gross lift : 540 intake 545 exhaust
Duration @ .006 tappet lift 284 289
valve timing open closed
@ .050 int 5 BTDC 45 ABDC
exh 58 BBDC 2 ATDC
installed
@ 110.0 intake center line
intake exhaust
duration @ 230 240
lobe lift .3580 .3600
lobe separation 114.0
2 bar map
Thread Starter
Team Owner
Joined: Mar 2001
Posts: 30,856
Likes: 293
From: Boston, Dallas, Detroit, SoCal, back to Boston MA
I got some pics from my machinist of the block being worked on.


-----Original Message-----
From: brad <brad@qmpracing.com>
To: swiftwood@aol.com
Sent: Mon, 30 Mar 2009 3:46 pm
Subject: Re: LT1 383 shortblock for a blower
Hey brian
i am working on a new program for the main caps on your block
instead of using a stepped cap like everyone else
i want to use a flat cap that way you would get a better register in the block
its taking a little longer than i expected but the result will be far greater
Thanks
Brad


Thread Starter
Team Owner
Joined: Mar 2001
Posts: 30,856
Likes: 293
From: Boston, Dallas, Detroit, SoCal, back to Boston MA
More info
-----Original Message-----
From: Brad Lagman <brad@qmpracing.com>
To: swiftwood@aol.com
Sent: Mon, 20 Apr 2009 6:38 pm
Subject: RE: They want to know how long to build a motor
Hey Brian
I decided to machine another 3/16 key in the crank 180 deg from the orig
This way you have 2 keys holding that hub
That will be much stonger that way especially in a boost situation
Thanks
Brad
Thread Starter
Team Owner
Joined: Mar 2001
Posts: 30,856
Likes: 293
From: Boston, Dallas, Detroit, SoCal, back to Boston MA
Shortblock's done!
BTW normally you hit the water jackets when you do his he didn't
Drainbacks for the AFR's


EDIT:
BTW He couldn't make the S.C.A.T. crank balance with the 5.7 rods so he went ahead an upgraded me to a Lunati crank no charge.
You can see the heavy metal it took to balance it.
-----Original Message-----
From: Brad Lagman <brad@qmpracing.com>
To: swiftwood@aol.com
Sent: Sat, 25 Apr 2009 5:17 pm
Subject: Engine
Hey Brian
Thanks for your business!
This engine came out really good I think you will like it
I was explaining the whole main cap issue with you
When people normally convert a 2-bolt block to a 4-bolt they normally use a stepped cap to fit in the stock 2-bolt registers
The problem with that is you have to have a .002-.005 air gap under the ends where the extra bolts go through so you are definitely
Flexing the cap the way we do it is that we machine a whole new register in the block so you have the bottom of the main cap completely flat now you have full contact with the block not just the step.
This way is harder to do (if you do not have a cnc machine) that’s why most shops use the step cap they just bolt them on and drill it with a drill bushing and tap it. I am not knocking that way, hell I used to do the same thing. Now we have a better way of doing it so we pass that on to our customers. Our shop is outfitted with the latest in machinery. I pride myself in having the best equipment available. So we can build a better engine for you.
Thanks again
Brad
Drainbacks for the AFR's
EDIT:
BTW He couldn't make the S.C.A.T. crank balance with the 5.7 rods so he went ahead an upgraded me to a Lunati crank no charge.
You can see the heavy metal it took to balance it.
Last edited by BrianCunningham; Apr 26, 2009 at 11:04 PM.
Thread Starter
Team Owner
Joined: Mar 2001
Posts: 30,856
Likes: 293
From: Boston, Dallas, Detroit, SoCal, back to Boston MA
more toys for the car
I'm buying some Penske double adjustables off another forum member.
I know their good shocks as they used to be on Gary's (Hardbar) car.
http://forums.corvetteforum.com/auto...post1570239963
I'm buying some Penske double adjustables off another forum member.
I know their good shocks as they used to be on Gary's (Hardbar) car.
http://forums.corvetteforum.com/auto...post1570239963
For sale are a car set of HardbarUSA/LEMD Penske 8100 double adjustable shocks. I bought these shocks from Gary Hoffman @ HardbarUSA directly off his C6Z. They are suitable for all C5 and C6 applications. I am asking $2500 (plus shipping) for the entire set up.
They have recently been back to HardbarUSA/LEMD for a checkup on the dyno and to have a couple of seals replaced (preventive maintenance).
Pic of complete set up:

Pic of the rears, note the Mallett upper plate:

Pic of the fronts:

Pic of rear bump & rebound adjusters:

Pic of front rebound adjusters:

These are a steal at this price. 39% off what the new equivalent (Penske 8300s) would cost you! This package works great, street or track. If you've been on this forum any length of time you've seen numerous people rave about them!
They have recently been back to HardbarUSA/LEMD for a checkup on the dyno and to have a couple of seals replaced (preventive maintenance).
Pic of complete set up:
Pic of the rears, note the Mallett upper plate:
Pic of the fronts:
Pic of rear bump & rebound adjusters:
Pic of front rebound adjusters:
These are a steal at this price. 39% off what the new equivalent (Penske 8300s) would cost you! This package works great, street or track. If you've been on this forum any length of time you've seen numerous people rave about them!
Thread Starter
Team Owner
Joined: Mar 2001
Posts: 30,856
Likes: 293
From: Boston, Dallas, Detroit, SoCal, back to Boston MA
Now that I have a truck for a DD my buildup has started
He's going to port match the intake to the AFR's
BTW the stock LT1 intake gasket fit the AFR's
He's going to port match the intake to the AFR's
BTW the stock LT1 intake gasket fit the AFR's