



Need help with front turn signal bulb
Thread Starter
Advanced

Joined: Oct 2003
Posts: 50
Likes: 0
From: Philpot KY
 Need help with front turn signal bulb
My wife and I got the 2000 Sebring Silver convertible out for a little spin today. While driving I flipped the right turn signal and it flashed at about double speed. So, I got out, after stopping of course, and checked the bulbs on the driver's side with the signal on. The right front signal bulb was not flashing. I looked in the book and can't find any help on how to get at or change that bulb. On the way home it would work intermitenly. When I got home it quit again. I got under the front as best as I could but couldn't get to the bulb. Can anybody help? 
I just noticed in the book it says: "For any bulb changing procedure not listed in this section contact your Chevrolet dealer". Does this mean only the dealer can change the front turn signal bulb? And what would they charge for changing the bulb?
I just noticed in the book it says: "For any bulb changing procedure not listed in this section contact your Chevrolet dealer". Does this mean only the dealer can change the front turn signal bulb? And what would they charge for changing the bulb?
Last edited by DylanFan; Jun 22, 2008 at 03:44 PM. Reason: New information.
Tech Contributor


Joined: Dec 2003
Posts: 19,384
Likes: 87
From: Horncastle Lincolnshire, England
2023 C5 of the Year Finalist - Unmodified
You'll get three suggestions
Go in through the brake ducts - not easy with a Z06 or if you have screens
Go in through the bottom by taking out the bottom panel
The one that works for me is:
Turn on the headlights and back off one position to kill the lights.
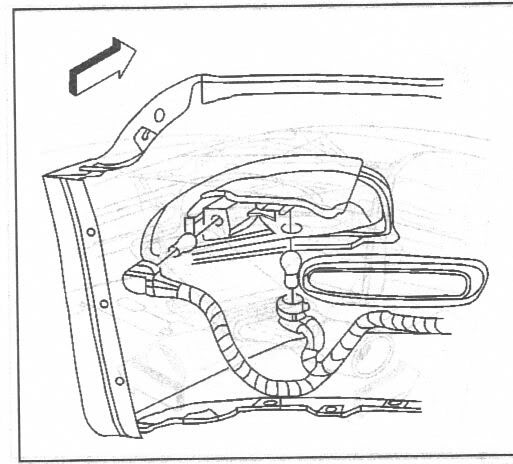
Unscrew the 3 small screws on the black plastic housing around the headlight. Gently pull the housing clear. Reach down around the headlight unit and release the bulb holder. It unscrews counter clockwise but it has a plastic clip which you need to squeeze to release it. Here’s how the bulb fits into the lamp unit. The DRL bulb is the lower of the two.
Here’s the light socket. This one’s after market but it gives you the idea. You can see the clip you need to squeeze.
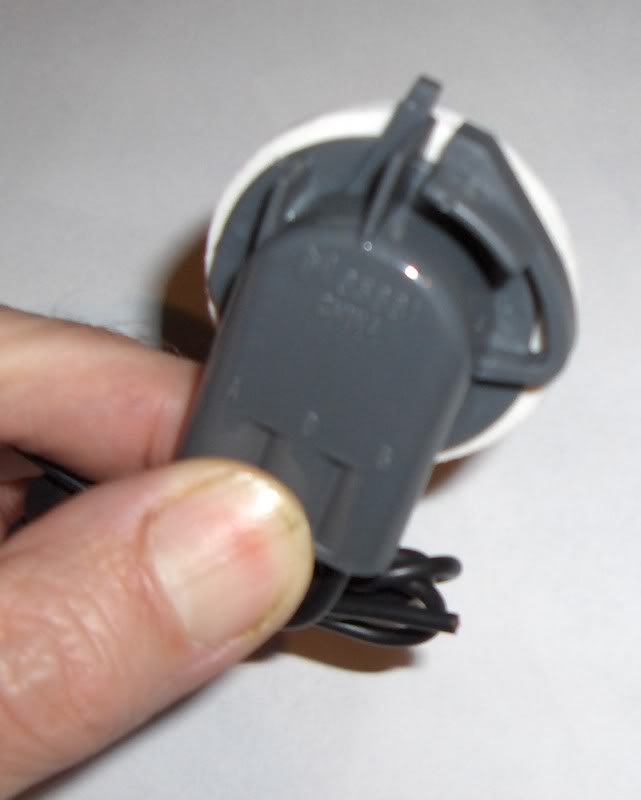
Change the bulb. Reseat the bulb holder and turn until it clicks back in place. Put the plastic housing back in place making sure to locate the small plastic tab in the bracket on the headlamp cover. Replace the 3 screws and close the lights.
10 minute job. Some guys have had the lights close if they’ve taken a while to do the fix. If you’re worried about that, disconnect the battery once the lights are up.
The bulb is a 4157NA
Some guys with big arms remove the hood adjusting screw for better access. Guys with even bigger arms have had to take off the headlight cover. Four torx screws (2 back, 1 each side). Take the back ones off first with the lamps down. Raise the lights and take the side ones out.
Go in through the brake ducts - not easy with a Z06 or if you have screens
Go in through the bottom by taking out the bottom panel
The one that works for me is:
Turn on the headlights and back off one position to kill the lights.
Unscrew the 3 small screws on the black plastic housing around the headlight. Gently pull the housing clear. Reach down around the headlight unit and release the bulb holder. It unscrews counter clockwise but it has a plastic clip which you need to squeeze to release it. Here’s how the bulb fits into the lamp unit. The DRL bulb is the lower of the two.
Here’s the light socket. This one’s after market but it gives you the idea. You can see the clip you need to squeeze.
Change the bulb. Reseat the bulb holder and turn until it clicks back in place. Put the plastic housing back in place making sure to locate the small plastic tab in the bracket on the headlamp cover. Replace the 3 screws and close the lights.
10 minute job. Some guys have had the lights close if they’ve taken a while to do the fix. If you’re worried about that, disconnect the battery once the lights are up.
The bulb is a 4157NA
Some guys with big arms remove the hood adjusting screw for better access. Guys with even bigger arms have had to take off the headlight cover. Four torx screws (2 back, 1 each side). Take the back ones off first with the lamps down. Raise the lights and take the side ones out.

Safety Car

Joined: Apr 2007
Posts: 3,586
Likes: 0
From: Lynn Haven, FL Sunshine State
St. Jude Donor '08
Do it the easy way! Pop down the brake duct cooling vent on the front fasica and stick your arm, not real comfortable, throught there feeling around for the light bulb. It might take a minute or two to find the first time, but it's not hard. When you find it turn it 1/4 turn and remove it. The wire is long enough to come out of the front opening so you can change the bulb and replace easily. Pop the brake duct back in place and you're done. 5 minutes max first time, I can do it in about 30 seconds now.

Drifting


Joined: Sep 2006
Posts: 1,387
Likes: 30
I did it with the headlight raise method. You pop the light up, take off the bezel around it (the black piece) and then you can get your arm in there and feel around. Remember it sticks upward to the sky, so it pulls down, not out. Its not too bad but i had trouble my first time, i could maybe do the brake duct method next time but not sure, its kinda far up there...I don't see how anyone can do it that way.

Racer

Joined: Nov 2005
Posts: 346
Likes: 0
By the way FYI!! the bulb is so close to the top of the housing,that the heat generated by the bulb causes the top of the housing to melt and crack, thereby letting water in to "blow" the bulb. I recommend that you put some clear silicone over the cracks in the housing to "reseal"it.

Administrator


Joined: Mar 2001
Posts: 368,053
Likes: 24,729
From: In a parallel universe. Currently own 2014 Stingray Coupe.
C7 of the Year - Modified Finalist 2021
MO Events Coordinator
St. Jude Co-Organizer
St. Jude Donor '03 thru '25
NCM Sinkhole Donor
CI 5, 8 & 11 Veteran
You can do it one of two ways -
- take off the bezel around the headlights and reach down and unplug the light socket. Does not work well with large arms.
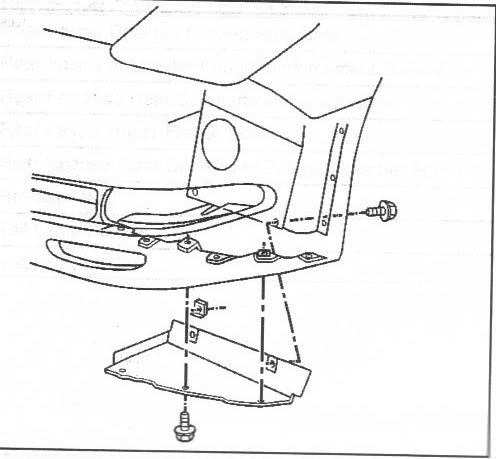
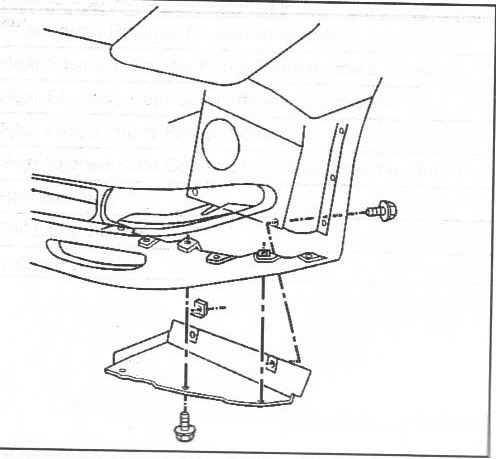
- there is an access panel under the front fasica that you can remove and have total access to the area where the lights are. Just have to get the car up off the ground a bit.
- take off the bezel around the headlights and reach down and unplug the light socket. Does not work well with large arms.
- there is an access panel under the front fasica that you can remove and have total access to the area where the lights are. Just have to get the car up off the ground a bit.
Corvette Stories
The Best of Corvette for Corvette Enthusiasts

Top 10 Most Explosive Corvettes Ever Made: Power-to-Weight Ratio Ranked!
Joe Kucinski
150 hp to 1,250 hp: Every Corvette Generation Compared by the Specs That Matter
Joe Kucinski
8 Coolest Corvette Pace Cars (and Replicas) of All Time
Verdad Gallardo
Top 10 Corvette Engines RANKED by Peak Torque (70+ Years of Muscle!)
Joe Kucinski
Corvette ZR1X Will Be Pacing the Indy 500, And Could Probably Race, Too!
Verdad Gallardo
Top 10 Corvettes Coming to Mecum Indy 2026!
Brett Foote
Top 10 C9 Corvette MUST-HAVES to Fix These C8 Generation Flaws!
Michael S. Palmer
10 Revolutionary 'Corvette Firsts' Most People Don't Know
Joe Kucinski
5 Reasons to Upgrade to an LS6-Powered Corvette; 5 Reasons to Stay LT2
Michael S. Palmer
Advanced
Joined: Sep 2007
Posts: 60
Likes: 0
From: Branson Missouri
Thanks Dee Gee
Hey Dee Gee,
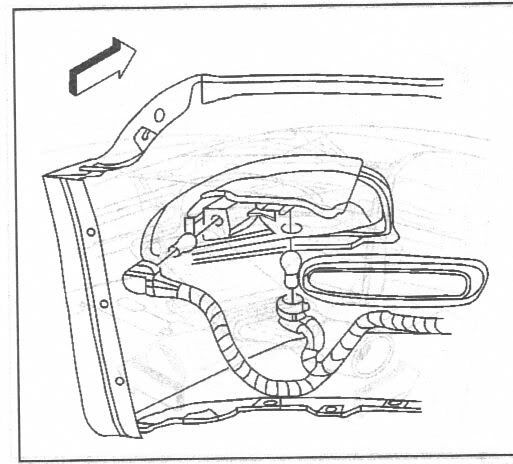
Thanks for the diagram for the blinker. I was actually able to fit my arm in the duct and reach up to find the blinker housing. I couldnt figure out how to get it out until I looked at your diagram and in five minutes I had a blinker again. Again thanks!!
Cindy
Thanks for the diagram for the blinker. I was actually able to fit my arm in the duct and reach up to find the blinker housing. I couldnt figure out how to get it out until I looked at your diagram and in five minutes I had a blinker again. Again thanks!!
Cindy


Pro

Joined: Mar 2006
Posts: 700
Likes: 2
From: Spring Hill Florida
Mine has been doing it for over 4 years and I have yet to replace the blub! It has never "blown". I just take out the bulb, sand off the contacts, clean out the socket and put the old bulb back in....good for another year! And there is no hole in the housing???

Melting Slicks


Joined: Feb 2001
Posts: 2,015
Likes: 52
From: Largo,Fl fl
What a b*tch, I was able to get to the bulb,but couldn't get the bulb out. I took the tailight out to get an idea of how to release the clip.I then put my other arm in was able to release the clip. I have a big bag of spare bulbs but no 4157.I had a 3157. I go to the store and find 4157 is the same as 3157. wtf The package had on it 4157,3157 and 5702.

Team Owner


Joined: Dec 1999
Posts: 174,312
Likes: 1,217
From: Here
Pilot of Beer Force 1
Tampa Regional Coordinator
CI 4-5-6-7-8 Veteran
Organizer St. Jude Fundraiser
I believe in the Beer Fairy
another common issue is the socket gets all $#@%ed up and you will need to replace it...the ones they sell at Advanced Auto or AutoZone..(I forget which) are only like $10....dealer wants like $30...

Tech Contributor
Joined: Dec 2003
Posts: 19,384
Likes: 87
From: Horncastle Lincolnshire, England
2023 C5 of the Year Finalist - Unmodified

Drifting

Joined: Sep 2009
Posts: 1,862
Likes: 594
From: Prescott, Arizona
I can do the left bulb through the brake cooling duct, but not the right. From the brake duct opening, something interferes with the socket tab that has to be pushed to turn the socket (only on the right side).
My hands/arms are average size.
Next time I have to change the right bulb, I will do it from the bottom. but see if I can remove whatever is in the way of pushing the tab with my battery powered Dremel tool-
My hands/arms are average size.
Next time I have to change the right bulb, I will do it from the bottom. but see if I can remove whatever is in the way of pushing the tab with my battery powered Dremel tool-

Cruising
Joined: Jul 2008
Posts: 10
Likes: 0
You'll get three suggestions
Go in through the brake ducts - not easy with a Z06 or if you have screens
Go in through the bottom by taking out the bottom panel
The one that works for me is:
Turn on the headlights and back off one position to kill the lights.
Unscrew the 3 small screws on the black plastic housing around the headlight. Gently pull the housing clear. Reach down around the headlight unit and release the bulb holder. It unscrews counter clockwise but it has a plastic clip which you need to squeeze to release it. Here’s how the bulb fits into the lamp unit. The DRL bulb is the lower of the two.
Here’s the light socket. This one’s after market but it gives you the idea. You can see the clip you need to squeeze.

Change the bulb. Reseat the bulb holder and turn until it clicks back in place. Put the plastic housing back in place making sure to locate the small plastic tab in the bracket on the headlamp cover. Replace the 3 screws and close the lights.
10 minute job. Some guys have had the lights close if they’ve taken a while to do the fix. If you’re worried about that, disconnect the battery once the lights are up.
The bulb is a 4157NA
Some guys with big arms remove the hood adjusting screw for better access. Guys with even bigger arms have had to take off the headlight cover. Four torx screws (2 back, 1 each side). Take the back ones off first with the lamps down. Raise the lights and take the side ones out.
Go in through the brake ducts - not easy with a Z06 or if you have screens
Go in through the bottom by taking out the bottom panel
The one that works for me is:
Turn on the headlights and back off one position to kill the lights.
Unscrew the 3 small screws on the black plastic housing around the headlight. Gently pull the housing clear. Reach down around the headlight unit and release the bulb holder. It unscrews counter clockwise but it has a plastic clip which you need to squeeze to release it. Here’s how the bulb fits into the lamp unit. The DRL bulb is the lower of the two.
Here’s the light socket. This one’s after market but it gives you the idea. You can see the clip you need to squeeze.
Change the bulb. Reseat the bulb holder and turn until it clicks back in place. Put the plastic housing back in place making sure to locate the small plastic tab in the bracket on the headlamp cover. Replace the 3 screws and close the lights.
10 minute job. Some guys have had the lights close if they’ve taken a while to do the fix. If you’re worried about that, disconnect the battery once the lights are up.
The bulb is a 4157NA
Some guys with big arms remove the hood adjusting screw for better access. Guys with even bigger arms have had to take off the headlight cover. Four torx screws (2 back, 1 each side). Take the back ones off first with the lamps down. Raise the lights and take the side ones out.
6/30/12
I just completed the taks from the bottom access panel, it really helped to know about the clip. It also helped that I am left handed because you need good dexterity for the process of putting bulb back in the socket. I am a large man and had no trouble with not having enough room.
Premium Supporting Vendor
Joined: Oct 2004
Posts: 36,838
Likes: 438
From: Manassas Park VA
St. Jude Donor '07-'08,-'13-'14, '16-'17
You'll get three suggestions
Go in through the brake ducts - not easy with a Z06 or if you have screens
Go in through the bottom by taking out the bottom panel
The one that works for me is:
Turn on the headlights and back off one position to kill the lights.
Unscrew the 3 small screws on the black plastic housing around the headlight. Gently pull the housing clear. Reach down around the headlight unit and release the bulb holder. It unscrews counter clockwise but it has a plastic clip which you need to squeeze to release it. Here’s how the bulb fits into the lamp unit. The DRL bulb is the lower of the two.
Here’s the light socket. This one’s after market but it gives you the idea. You can see the clip you need to squeeze.
Change the bulb. Reseat the bulb holder and turn until it clicks back in place. Put the plastic housing back in place making sure to locate the small plastic tab in the bracket on the headlamp cover. Replace the 3 screws and close the lights.
10 minute job. Some guys have had the lights close if they’ve taken a while to do the fix. If you’re worried about that, disconnect the battery once the lights are up.
The bulb is a 4157NA
Some guys with big arms remove the hood adjusting screw for better access. Guys with even bigger arms have had to take off the headlight cover. Four torx screws (2 back, 1 each side). Take the back ones off first with the lamps down. Raise the lights and take the side ones out.
Go in through the brake ducts - not easy with a Z06 or if you have screens
Go in through the bottom by taking out the bottom panel
The one that works for me is:
Turn on the headlights and back off one position to kill the lights.
Unscrew the 3 small screws on the black plastic housing around the headlight. Gently pull the housing clear. Reach down around the headlight unit and release the bulb holder. It unscrews counter clockwise but it has a plastic clip which you need to squeeze to release it. Here’s how the bulb fits into the lamp unit. The DRL bulb is the lower of the two.
Here’s the light socket. This one’s after market but it gives you the idea. You can see the clip you need to squeeze.
Change the bulb. Reseat the bulb holder and turn until it clicks back in place. Put the plastic housing back in place making sure to locate the small plastic tab in the bracket on the headlamp cover. Replace the 3 screws and close the lights.
10 minute job. Some guys have had the lights close if they’ve taken a while to do the fix. If you’re worried about that, disconnect the battery once the lights are up.
The bulb is a 4157NA
Some guys with big arms remove the hood adjusting screw for better access. Guys with even bigger arms have had to take off the headlight cover. Four torx screws (2 back, 1 each side). Take the back ones off first with the lamps down. Raise the lights and take the side ones out.

Peace
Chip
__________________
..................Click for



..................Click for