Corvette: How to Install Center Cap Emblems on Aftermarket Wheels
Adding a custom emblem on your aftermarket wheels gives it a unique look.
This article applies to the C5 Corvette (1997-2004), C6 Corvette (2005-2013), and C7 Corvette (2014-current).
DIY emblems offer a fun, fast, and affordable way to personalize aftermarket Corvette wheels. The required tools are relatively inexpensive and some of the material can also be applied to other parts of your vehicle—such as the hood, trunk, roof, dashboard and door handles— if you decide to continue your decorating efforts. Create center cap emblems that complement your Corvette's sleek, attractive body style, or add style and design that indulges your creative sensibility.

Materials Needed
- Razor or box knife
- Two part epoxy resin to "dome" the decals
- C5, C6 or C7 decals (stickers)
- Flat wooden stick
Step 1 – Cut the sheet of carbon fiber vinyl
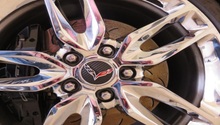
This soft, flexible material bends easily and can be applied to your car's wheels, metal parts and most non-porous surfaces. Cut the sheet of carbon fiber vinyl into a circle. The circle should be larger than your Corvette's center cap, which is the center portion of the wheel.

Figure 1. Cut the circle larger than your Corvette's center cap.
Step 2 – Add a flag decal
Embellish the carbon fiber vinyl with a C5, C6 or C7 flag decal (sticker), which you can find online for as little as $8 to $10. Specialty decal kits are also available online for approximately $25 or less. These kits offer convenience and provide all the tools you will need to create a center cap emblem at home. However, you do NOT need to purchase a decal kit to complete this DIY project.

Pro Tip
If you are not already working on a flat surface, you might want to do that now. You will need to position the carbon fiber vinyl on a flat, even surface. Also, it will help while you handle resin.
Step 3 – Prep the resin
Mix the epoxy resin per the manufacturer's instructions. Apply evenly over the carbon fiber vinyl by starting at the center, and then brushing the resin out toward the edges with a flat wooden stick. Watch as the decal assumes a dome shape all on its own.

Step 4 – Set aside to dry
Set the carbon fiber vinyl aside to dry. Cover it with a round lid and it let dry for 24 hours. An old plastic container will suffice. Add a caution label if children will be present in the area.

Step 5 – Conform the finished emblem
Apply the finished emblem to the center cap, pressing gently from left to right and top to bottom. Conform the sheet to the contours of the center cap and trim away excess vinyl with a razor or box knife.

Related Discussions
- Center Cap Emblem for Aftermarket Wheels - CorvetteForum.com
- What Glue Do You Use to Stick the Center Caps to the Wheels - CorvetteForum.com
- Adding Center Cap Emblem for Aftermarket Wheels - CorvetteForum.com