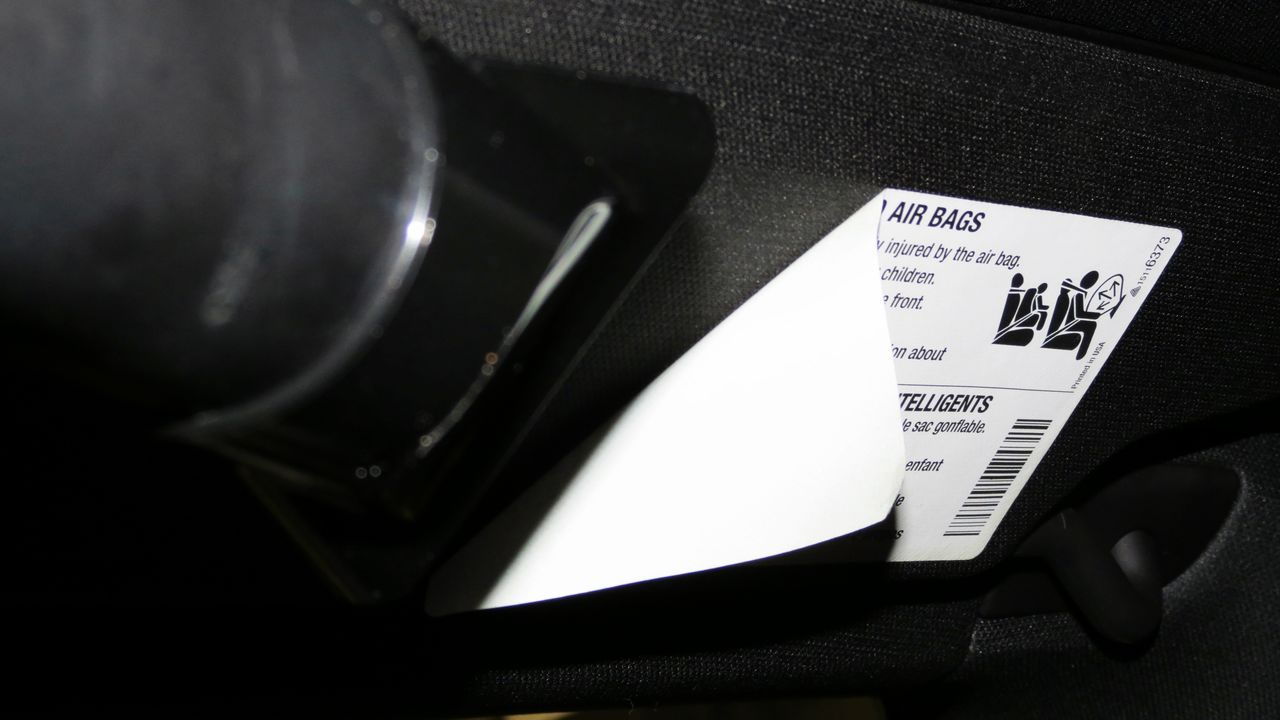
Corvette: How to Remove Visor Warning Label
Removing the safety labels from the visors are the first step to a totally clean Corvette interior.
This article applies to the C5, C6, and C7 Corvette (2005-2013).
Some drivers cover up those pesky visor warning labels, while others choose to remove them. Fortunately, it's quite simple and easy to remove the labels without compromising the visor's appearance.
This is a great project for a weekend afternoon. Only a few household tools are needed in addition to Goo Gone or a similar effective product. If there's more than one label to remove, simply repeat the process until all the labels are gone. Each label should take 10 minutes.

Materials Needed
- Hair dryer
- Small sharp knife (Swiss Army)
- Goo Gone
- Clean cotton towel
- Small stiff brush (such as plastic fingernail brush)
Step 1 – Heat label
Using the hair dryer, heat the label. The higher the heat, the faster and easier the glue will peel off. Position the hair dryer approximately one inch from the label. It should take between three and five minutes to adequately heat up the label.
Warning
Proceed with caution when heating up the label, as the plastic can burn or melt if the heat is too high.
Step 2 – Scrape the corners
Use the knife to carefully scrape any residue off the corners. Continue using the hair dryer on high heat to loosen the sticker's glue. Grab the corner edge with your fingers while slowly and steadily peeling the sticker off. Keep the dryer aimed at the label during this step. Continue until you have completely removed the label from the visor.
Step 3 – Clean up residue
After the label comes off, you will see a small indentation in the fabric and a thin glue outline where the sticker used to be. Dab a generous amount of Goo Gone onto the indentation. Use enough to cover the area, but avoid covering the label with too much goo or it could drip and cause a mess. Heat up the Goo Gone with the hair dryer set on a "warm" instead of "hot." When the product is heated up, scrub it off with a towel using back and forth, up and down movements. While one application is usually sufficient, you may need to repeat this step using a thin layer of Goo Gone to completely remove the residue.

Step 4 – Remove the indentation
Start by heating up the visor with the hair dryer. Then, brush the visor in a circular motion to lift up all the fibers that have been indented. When finished, open up the windows or doors to get rid of the Goo Gone smell.

Related Discussions
- Definitive Visor Warning Label Removal - CorvetteForum.com