When you click on links to various merchants on this site and make a purchase, this can result in this site earning a commission. Affiliate programs and affiliations include, but are not limited to, the eBay Partner Network.
Friends 2 year owned car: I helped a friend 2 years ago, he kept burning out bulbs. His tail-lights were siliconed in. Vibration and hot bulbs don't mix.
The PO had drilled huge 3/4 holes to mount the lights, the mounting assembly fell through the holes so he just used silicone.
I should have added only kidding - my bad.
The car wound up a horror show - the door panels and most of the interior trim (which was new) was silicone on.
Yeah ...that would have helped a lot knowing that you were joking.
I know Priya is serious about what she is doing( like many other forum members seeking advice)...and had to reply to what you wrote to just clarify that what she did was correct.
So, I thought I was done the work on the 70-73 ACI rear clip other than drilling the holes for the bumpers. I posted a discussion in the thread below on the proper position for the rear bumpers and in trying to line them up I discovered another problem that's going to require attention. https://www.corvetteforum.com/forums...post1594172533
It all goes back to a mistake I made in glassing in the exhaust filler panel to the rear tail light panel.
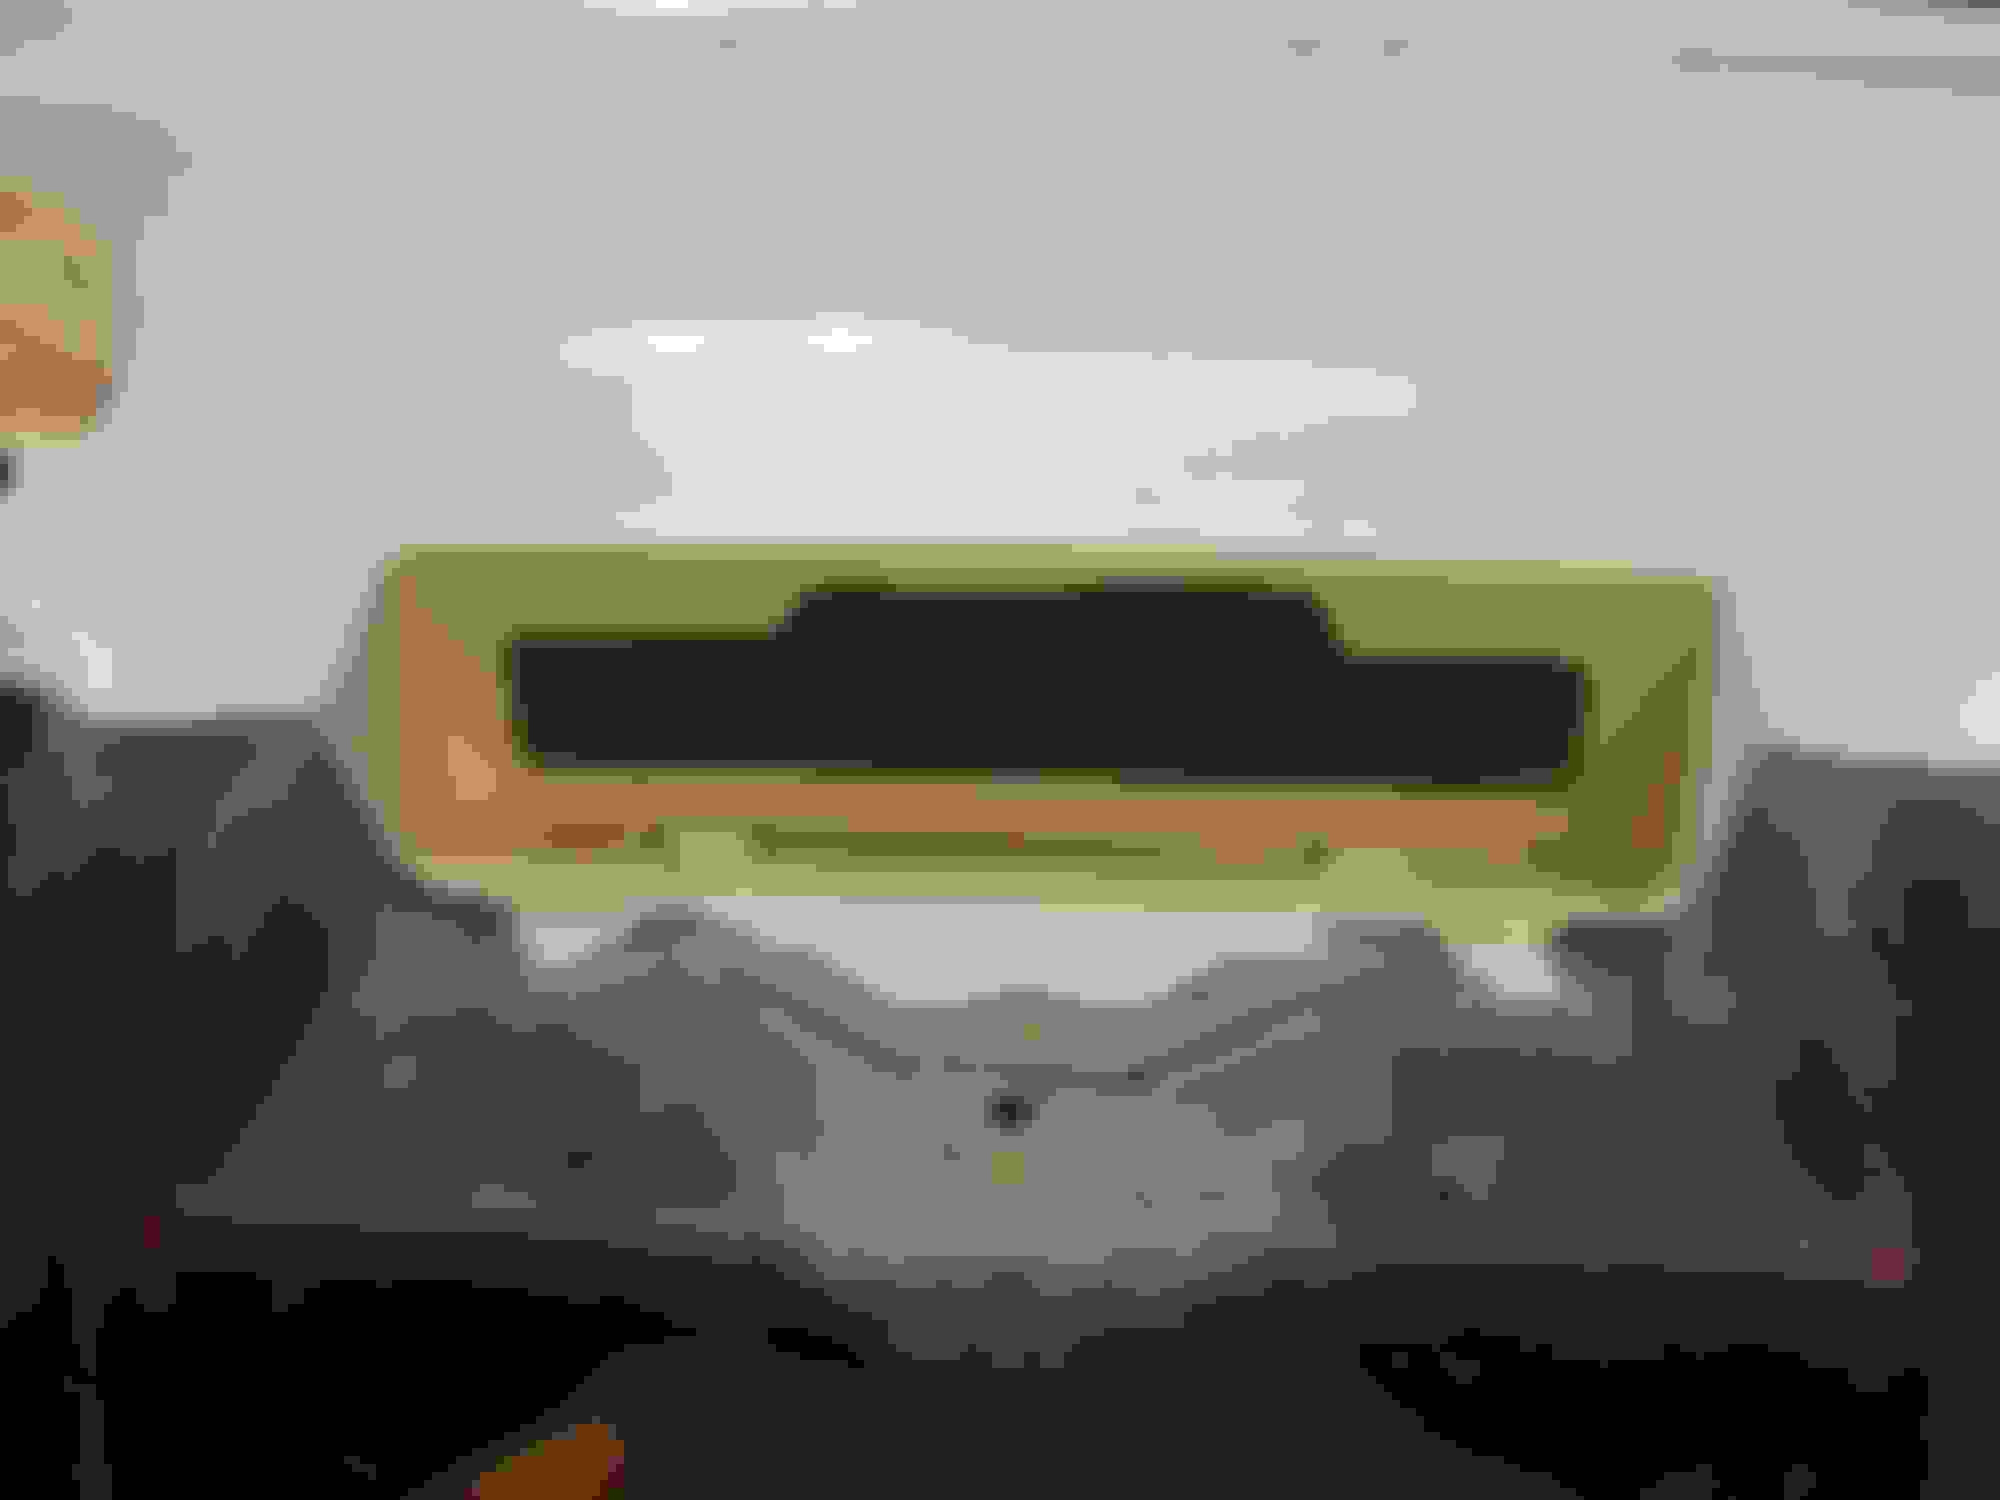
When I first clamped the tail light panel and the exhaust filler panel they weren't at the same level in the areas shown by "A" and "B" in the picture below. The panel in area "A" was quite a bit higher than the panel in area "B". When I initially glassed them in I clamped the panels together at "A" and "B" which resulted in pushing the entire bottom of the exhaust filler panel upwards (red arrows). This has created a cascade of problems. First was I had to shave the lower edge of the exhaust filler panel at the bottom of the license plate bezel area and add fill in the area outlined in blue to get the license plate bezel to fit flush.
Now because the exhaust filler panel is pulled out of proper alignment with the tail light panel the mounting areas for the bumper (outlined in black shown in picture below) don't sit flush with the fiberglass. When the bumper is properly positioned the lower area of the bumper mounts (yellow arrows) rests against the fiberglass but the upper area of the bumper mounts(red arrows) is 1/8 to 3/16 of an inch away from the fiberglass. My husband explained that if I bolt it together this way all the pressure will be on the flush lower edge of the bumper mounts (yellow arrows) and none on the top (red arrows) and this will cause the fiberglass to crack. So, what he recommended and what I'm going to do is build up a wedge shape with fiberglass at the top of the bumper mount areas (red arrows) that will raise the top edge 1/8 to 3/16 of an inch and taper down to flush with the bottom edge of the bumper mount area (yellow arrows).
The unfortunate result of this will be that as shown in the picture below, the gap between the bumper and exhaust filler panel at position "B" will be much narrower than the gap at position "A" but at least the bumpers will be reasonably well aligned every where else and shouldn't crack the fiberglass.
Hi P,
I don't want to step into Dub's area of expertise�.. so I'll be quiet� but I want to let you know I do empathize with your situation.
Sorry for this bump in the road!
Regards,
Alan
3rd photo:
A ...at the split between the taillight panel and valance/filler from the chrome bezel to the bumper surface�. 1-3/8".
B� at the point the chrome bezel begins it's turn toward the center of the car... 1-3/4".
The difference is because of the taper in the chrome bumper at that point. The chrome bezel of course is even vertically.
Thanks Alan. The frustrating part is that the exhaust filler panel fit perfectly on the 69 rear clip I started with. I threw that away and spent another $1000 on the ACI rear clip because I thought the 69 rear clip needed too many repairs. In hindsight I'd have had a lot less work if I had stuck with the 69 rear clip - the C O R V E T T E letters were already in the right place and I wouldn't have had all these fitment problems with the bumpers and license plate bezel.
First lets deal with the bumpers not sitting flush against the fiberglass. I will tell you I encounter this A LOT!
Many times it is due to how the mounts are welded in the bumper. If I am working on a Corvette and the rear bumpers are going to be sent out for plating. I cut the mount and allow it to bend so when I install the bumper...the mount is flush against the fiberglass...and that is also taking into account ALL brackets/braces that are on the backside to give the mount ares support. I make the cut in the mount at the 90 degree bend so it is a bit easier to grind and get to look good and then use a die grinder on the inside and contour the weld back into a 90 degree curve.
OR...if the customer wants another option....I apply tape on the backside of the bumper mount and also the body and coat it in wax and then mount the bumper. I then pack in some of my modeling clay and remove the bumper. This will make the wedge I want or need and then I fabricate one out of ABS plastic or thick very dense black rubber I have. it all depends on what the customer wants it to look like.
Seeing how this is a custom job and not worried about thing being factory correct. You can also mix up some VPA...apply tape on your bumper mount plate and apply the VPA on the body and then mount the bumper. Allow it to begin to set good and then remove the bumper and that will set your 'wedge' where you know it needs to go. Let the VPA cure and test fit your bumper again. If all is good. Do whatever filling in on the area you applied the VPA.
AS for the bottom of the bumper and how close it is to the exhaust filler panel that is now set in place. I would make sure the rod that attaches to the bumper and the rear crossmember is being used and see if a bit of 'tweaking can get that measurement a bit better.
****DISCLAIMER******
Keep in mind that when I am doing any of the repair options I mentioned above is when the panels are attached on the frame and body.
IF...repeat...IF this work is all being done when the clip has NOT been attached...do not be surprised if other problems come into play when you do get it molded in and find out a lot of what you did is now fighting you trying to get parts to align correctly. SO...I myself would not do anything else but concern myself with getting this rear clip installed and THEN address these issues....which can save you from having to cut things back apart entirely....and I am writing this ONLY because I have had to do just that. And THAT is why I do not like doing major custom work or modifications if the body is off and there is even a chance that due to it not being on the frame....can cause me to back track.
'Speaking' from experience. The smallest of things not taken into account can transfer out to problems that are quite huge.
Thanks Dub, some great advice there. I'm tempted to try working up a solution before I mount the clip on the body as with it now on the bench and the tail light panel parallel to the ground I can rest the bumper in place without any assistance and it will stay so I can gradually work it until I get it right. Then when I mount the clip on the body I can "fine tune" it to get it right at that time. If I put the clip on the body now I need someone to hold the bumper up while I try to get the wedges right.
I'm going to sleep on it and make a decision which way to go later.
So, I thought it over and talked with my husband and I'm going to take Dub's advice and attach the rear clip before I go any further. As my rear bumpers need re-chroming I'm going to also cut the mounts, bend and re-weld them to fit the clip rather than doing further fiberglass work on the clip.
So I'm ready to start putting the rear clip on!
Well, maybe not quite. Hubby has removed the hydraulic hoses from the lift to get some new ones made and I can't get the car back on the ground until that's done.
Good luck.
My experience with chrome shops is that they can take a long time to get your parts back to you..I'd advise getting them in as soon as you're done with your mock up phase.
So, I thought it over and talked with my husband and I'm going to take Dub's advice and attach the rear clip before I go any further. As my rear bumpers need re-chroming I'm going to also cut the mounts, bend and re-weld them to fit the clip rather than doing further fiberglass work on the clip.
So I'm ready to start putting the rear clip on!
Well, maybe not quite. Hubby has removed the hydraulic hoses from the lift to get some new ones made and I can't get the car back on the ground until that's done.
Thanks for the bumper measurement thread....I subscribed to it!
There really is something beautiful about those taillights in the gently curved taillight panel!
Especially when the bumpers are mounted and you see the reflection of the lenses in the chrome! (So you still have something terrific to look forward to.)
When i read that its common to reweld bumper brackets to get things to look right i kind of took a sigh as i always thought that an option but wouldnt have said it out loud,
But yeah, the more you do with clip in place on car the better it will all fit in the end,
It say this is gonna be stunning....
Thanks Bats. I think the hardest part is going to be sorting out the bumper brackets. I've been looking at the rear part of my frame today compared to the 68-73 and they're quite a bit different. This could be quite a challenge.
Thanks Bats. I think the hardest part is going to be sorting out the bumper brackets. I've been looking at the rear part of my frame today compared to the 68-73 and they're quite a bit different. This could be quite a challenge.
The super cool part to me is a cat like alan who has a perfect example of how it was factory then its just a case of how to get yours to that in a way pleasing to you, you really have come so far im impressed as all hell, the way you are doing it is so much harder than just returning chrome to a chrome car.


 02-16-2017, 11:04 AM